Messages in the Blazor Chat UI Component
18 Jun 202624 minutes to read
The Blazor Chat UI component manages and displays a collection of messages through its Messages property. This collection stores all messages sent and received in the conversation.
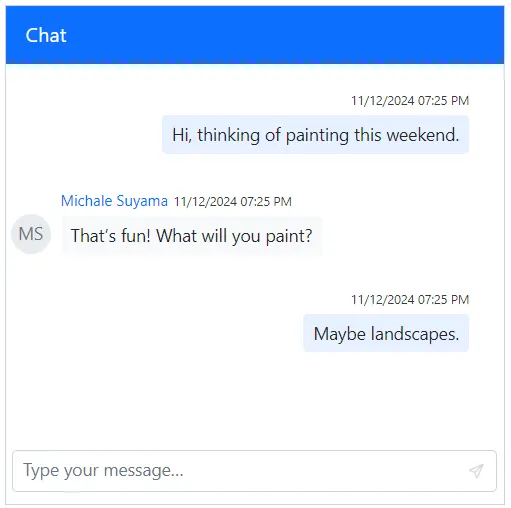
Configuring Messages
Use the Text property to add message content for the user. Each message can be configured with options such as id, text, author, timestamp, and more.
@using Syncfusion.Blazor.InteractiveChat

<div style="height: 400px; width: 400px;">
    <SfChatUI ID="chatUser" User="CurrentUserModel" Messages="ChatUserMessages"></SfChatUI>
</div>

@code {
    private static UserModel CurrentUserModel = new UserModel() { ID = "User1", User = "Albert" };
    private static UserModel MichaleUserModel = new UserModel() { ID = "User2", User = "Michale Suyama" };

    private List<ChatMessage> ChatUserMessages = new List<ChatMessage>()
    {
        new ChatMessage() { Text = "Hi, thinking of painting this weekend.", Author = CurrentUserModel },
        new ChatMessage() { Text = "That’s fun! What will you paint?", Author = MichaleUserModel },
        new ChatMessage() { Text = "Maybe landscapes.", Author = CurrentUserModel }
    };
}
Defining the Current User
The Author property identifies the sender of a message. Each user is represented by a UserModel object, which includes properties like ID, User, and AvatarUrl.
The User property specifies the user’s display name, while the ID property serves as a unique identifier to differentiate between users.
@using Syncfusion.Blazor.InteractiveChat

<div style="height: 400px; width: 400px;">
    <SfChatUI ID="chatUser" User="CurrentUserModel" Messages="ChatUserMessages"></SfChatUI>
</div>

@code {
    private static UserModel CurrentUserModel = new UserModel() { ID = "User1", User = "Albert" };
    private static UserModel MichaleUserModel = new UserModel() { ID = "User2", User = "Michale Suyama" };

    private List<ChatMessage> ChatUserMessages = new List<ChatMessage>()
    {
        new ChatMessage() { Text = "Hi, thinking of painting this weekend.", Author = CurrentUserModel },
        new ChatMessage() { Text = "That’s fun! What will you paint?", Author = MichaleUserModel },
        new ChatMessage() { Text = "Maybe landscapes.", Author = CurrentUserModel }
    };
}
Setting the Avatar URL
The AvatarUrl property defines the image URL for a user’s avatar. When a URL is not provided, the component displays fallback initials derived from the user’s name.
@using Syncfusion.Blazor.InteractiveChat

<div style="height: 400px; width: 400px;">
    <SfChatUI ID="chatUser" User="CurrentUserModel" Messages="ChatUserMessages"></SfChatUI>
</div>

@code {
    private static UserModel CurrentUserModel = new UserModel() { ID = "User1", User = "Albert" };
    private static UserModel MichaleUserModel = new UserModel() { ID = "User2", User = "Michale Suyama", AvatarUrl = "" };//Provide the URL for the image here.
    private List<ChatMessage> ChatUserMessages = new List<ChatMessage>()
    {
        new ChatMessage() { Text = "Hi, thinking of painting this weekend.", Author = CurrentUserModel },
        new ChatMessage() { Text = "That’s fun! What will you paint?", Author = MichaleUserModel },
        new ChatMessage() { Text = "Maybe landscapes.", Author = CurrentUserModel }
    };
}![]()
Customizing the Avatar Background Color
The AvatarBgColor property sets a specific background color for a user’s avatar using hexadecimal values. If a color is not specified, a default color from the current theme is applied.
@using Syncfusion.Blazor.InteractiveChat

<div style="height: 400px; width: 400px;">
    <SfChatUI ID="chatUser" User="CurrentUserModel" Messages="ChatUserMessages"></SfChatUI>
</div>

@code {
    private static UserModel CurrentUserModel = new UserModel() { ID = "User1", User = "Albert" };
    private static UserModel MichaleUserModel = new UserModel() { ID = "User2", User = "Michale Suyama", AvatarBgColor = "#ccc9f7" };
    private List<ChatMessage> ChatUserMessages = new List<ChatMessage>()
    {
        new ChatMessage() { Text = "Hi, thinking of painting this weekend.", Author = CurrentUserModel },
        new ChatMessage() { Text = "That’s fun! What will you paint?", Author = MichaleUserModel },
        new ChatMessage() { Text = "Maybe landscapes.", Author = CurrentUserModel }
    };
}![]()
Applying a Custom CSS Class
The CssClass property allows for custom styling of a user’s avatar and message bubble.
@using Syncfusion.Blazor.InteractiveChat

<div style="height: 400px; width: 400px;">
    <SfChatUI ID="chatUser" User="CurrentUserModel" Messages="ChatUserMessages"></SfChatUI>
</div>

@code {
    private static UserModel CurrentUserModel = new UserModel() { ID = "User1", User = "Albert" };
    private static UserModel MichaleUserModel = new UserModel() { ID = "User2", User = "Michale Suyama", CssClass = "custom-user" };

    private List<ChatMessage> ChatUserMessages = new List<ChatMessage>()
    {
        new ChatMessage() { Text = "Hi, thinking of painting this weekend.", Author = CurrentUserModel },
        new ChatMessage() { Text = "That’s fun! What will you paint?", Author = MichaleUserModel },
        new ChatMessage() { Text = "Maybe landscapes.", Author = CurrentUserModel }
    };
}

<style>
    .e-chat-ui .e-message-icon.custom-user {
        background-color: #416fbd;
        color: white;
        border-radius: 5px;
    }
</style>![]()
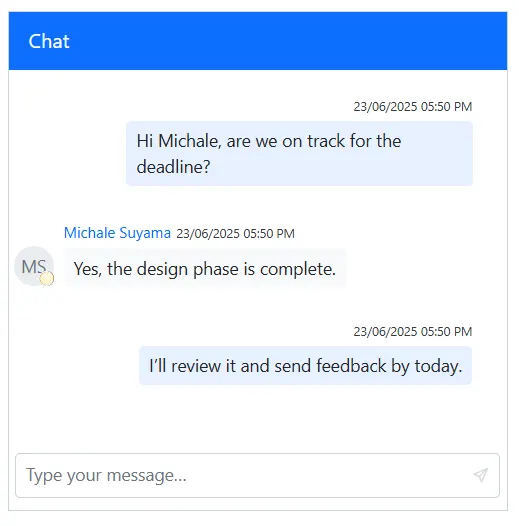
Setting status icon css
To indicate a user’s presence (e.g., online, offline, busy, or away), assign a predefined CSS class to the StatusIconCss property.
The following are the predefined status styles that can be defined using the StatusIconCss property.
| Status | Icon Class |
|---|---|
Available |
e-user-online |
Away |
e-user-away |
Busy |
e-user-busy |
Offline |
e-user-offline |
@using Syncfusion.Blazor.InteractiveChat

<div style="height: 400px; width: 400px;">
    <SfChatUI ID="chatUser" User="CurrentUserModel" Messages="ChatUserMessages"></SfChatUI>
</div>

@code {
    private static UserModel CurrentUserModel = new UserModel() { ID = "User1", User = "Albert", StatusIconCss = "e-icons e-user-online" };
    private static UserModel MichaleUserModel = new UserModel() { ID = "User2", User = "Michale Suyama", StatusIconCss = "e-icons e-user-away" };

    private List<ChatMessage> ChatUserMessages = new List<ChatMessage>()
    {
        new ChatMessage() { Text = "Hi Michale, are we on track for the deadline?", Author = CurrentUserModel },
        new ChatMessage() { Text = "Yes, the design phase is complete.", Author = MichaleUserModel },
        new ChatMessage() { Text = "I’ll review it and send feedback by today.", Author = CurrentUserModel }
    };
}
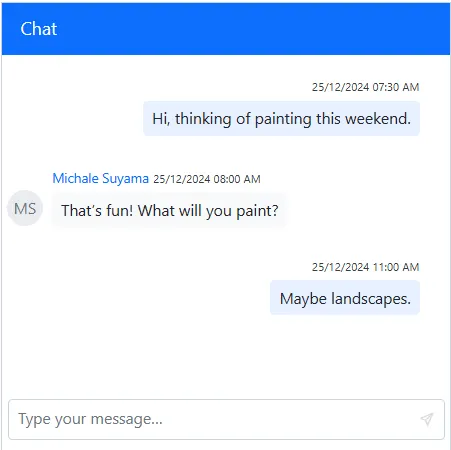
Configuring the Timestamp
The Timestamp property specifies the date and time a message was sent. If not set, it defaults to the current system time.
@using Syncfusion.Blazor.InteractiveChat

<div style="height: 400px; width: 400px;">
    <SfChatUI ID="chatUser" User="CurrentUserModel" ShowTimestamp="false" Messages="ChatUserMessages"></SfChatUI>
</div>

@code {
    private static UserModel CurrentUserModel = new UserModel() { ID = "User1", User = "Albert" };
    private static UserModel MichaleUserModel = new UserModel() { ID = "User2", User = "Michale Suyama" };

    private List<ChatMessage> ChatUserMessages = new List<ChatMessage>()
    {
        new ChatMessage() { Text = "Hi, thinking of painting this weekend.", Author = CurrentUserModel, Timestamp = new DateTime(2024,12,25,7,30,0) },
        new ChatMessage() { Text = "That’s fun! What will you paint?", Author = MichaleUserModel, Timestamp = new DateTime(2024,12,25,8,0,0) },
        new ChatMessage() { Text = "Maybe landscapes.", Author = CurrentUserModel, Timestamp = new DateTime(2024,12,25,11,0,0) }
    };
}
Setting the Timestamp Format
The TimestampFormat property customizes the display format for the timestamp. The default format is dd/MM/yyyy hh:mm tt.
@using Syncfusion.Blazor.InteractiveChat

<div style="height: 400px; width: 400px;">
    <SfChatUI ID="chatUser" User="CurrentUserModel" Messages="ChatUserMessages"></SfChatUI>
</div>

@code {
    private static UserModel CurrentUserModel = new UserModel() { ID = "User1", User = "Albert" };
    private static UserModel MichaleUserModel = new UserModel() { ID = "User2", User = "Michale Suyama" };

    private List<ChatMessage> ChatUserMessages = new List<ChatMessage>()
    {
        new ChatMessage() { Text = "Hi, thinking of painting this weekend.", Author = CurrentUserModel },
        new ChatMessage() { Text = "That’s fun! What will you paint?", Author = MichaleUserModel, TimestampFormat = "MMMM hh:mm tt" },
        new ChatMessage() { Text = "Maybe landscapes.", Author = CurrentUserModel }
    };
}
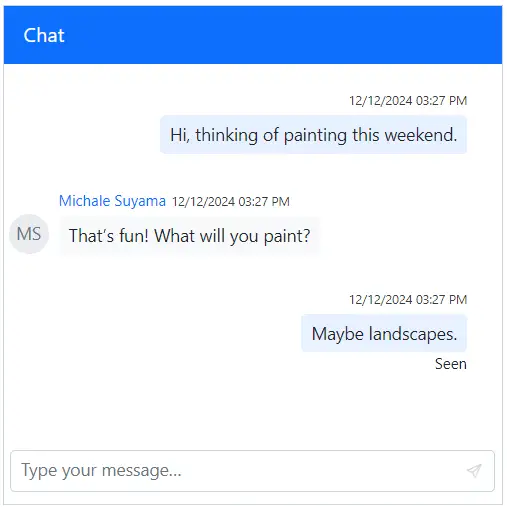
Defining Message Status
The Status property of a message helps manage delivery and read receipts. It can be configured with an icon, text, and tooltip to visually indicate the state of a message (e.g., Sent, Delivered, Read).
Setting the Status Icon CSS
The IconCss property applies a CSS class to the status indicator, allowing for visual differentiation between message statuses.
@using Syncfusion.Blazor.InteractiveChat

<div style="height: 400px; width: 400px;">
    <SfChatUI ID="chatUser" User="CurrentUserModel" Messages="ChatUserMessages"></SfChatUI>
</div>

@code {
    private static UserModel CurrentUserModel = new UserModel() { ID = "User1", User = "Albert" };
    private static UserModel MichaleUserModel = new UserModel() { ID = "User2", User = "Michale Suyama" };

    private List<ChatMessage> ChatUserMessages = new List<ChatMessage>()
    {
        new ChatMessage() { Text = "Hi, thinking of painting this weekend.", Author = CurrentUserModel },
        new ChatMessage() { Text = "That’s fun! What will you paint?", Author = MichaleUserModel },
        new ChatMessage() {
            Text = "Maybe landscapes.",
            Author = CurrentUserModel,
            Status= new MessageStatusModel() {
                IconCss = "e-icons e-chat-seen"
            }
        }
    };
}![]()
Setting the text
The Text property provides descriptive text next to the status icon, giving users clear context about the message status.
@using Syncfusion.Blazor.InteractiveChat

<div style="height: 400px; width: 400px;">
    <SfChatUI ID="chatUser" User="CurrentUserModel" Messages="ChatUserMessages"></SfChatUI>
</div>

@code {
    private static UserModel CurrentUserModel = new UserModel() { ID = "User1", User = "Albert" };
    private static UserModel MichaleUserModel = new UserModel() { ID = "User2", User = "Michale Suyama" };

    private List<ChatMessage> ChatUserMessages = new List<ChatMessage>()
    {
        new ChatMessage() { Text = "Hi, thinking of painting this weekend.", Author = CurrentUserModel },
        new ChatMessage() { Text = "That’s fun! What will you paint?", Author = MichaleUserModel },
        new ChatMessage() {
            Text = "Maybe landscapes.",
            Author = CurrentUserModel,
            Status= new MessageStatusModel() {
                Text = "Seen"
            }
        }
    };
}
Setting the tooltip
The Tooltip property displays additional information when a user hovers over the status icon.
@using Syncfusion.Blazor.InteractiveChat
<div style="height: 400px; width: 400px;">
<SfChatUI ID="chatUser" User="CurrentUserModel" Messages="ChatUserMessages"></SfChatUI>
</div>
@code {
private static UserModel CurrentUserModel = new UserModel() { ID = "User1", User = "Albert" };
private static UserModel MichaleUserModel = new UserModel() { ID = "User2", User = "Michale Suyama" };
private List<ChatMessage> ChatUserMessages = new List<ChatMessage>()
{
new ChatMessage() { Text = "Hi, thinking of painting this weekend.", Author = CurrentUserModel },
new ChatMessage() { Text = "That’s fun! What will you paint?", Author = MichaleUserModel },
new ChatMessage() {
Text = "Maybe landscapes.",
Author = CurrentUserModel,
Status= new MessageStatusModel() {
IconCss = "e-icons e-chat-seen",
Tooltip = "Seen"
}
}
};
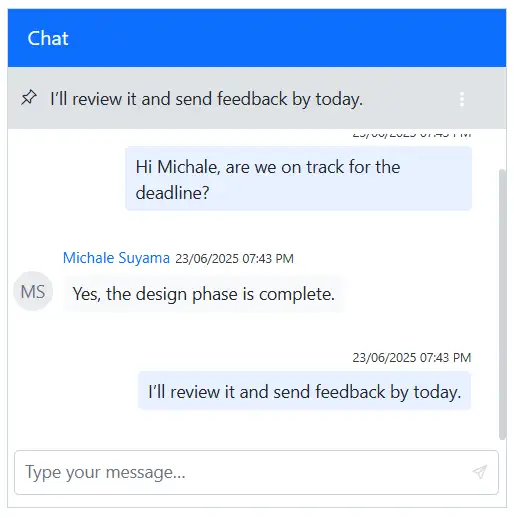
}Pinning a Message
Set the IsPinned property to true to highlight an important message at the top of the chat. Pinned messages can be unpinned or interacted with via the message options menu.
@using Syncfusion.Blazor.InteractiveChat

<div style="height: 400px; width: 400px;">
    <SfChatUI ID="chatUser" User="CurrentUserModel" Messages="ChatUserMessages"></SfChatUI>
</div>

@code {
    private static UserModel CurrentUserModel = new UserModel() { ID = "User1", User = "Albert" };
    private static UserModel MichaleUserModel = new UserModel() { ID = "User2", User = "Michale Suyama" };

    private List<ChatMessage> ChatUserMessages = new List<ChatMessage>()
    {
        new ChatMessage() { Text = "Hi Michale, are we on track for the deadline?", Author = CurrentUserModel },
        new ChatMessage() { Text = "Yes, the design phase is complete.", Author = MichaleUserModel },
        new ChatMessage() { Text = "I’ll review it and send feedback by today.", Author = CurrentUserModel, IsPinned = true }
    };
}
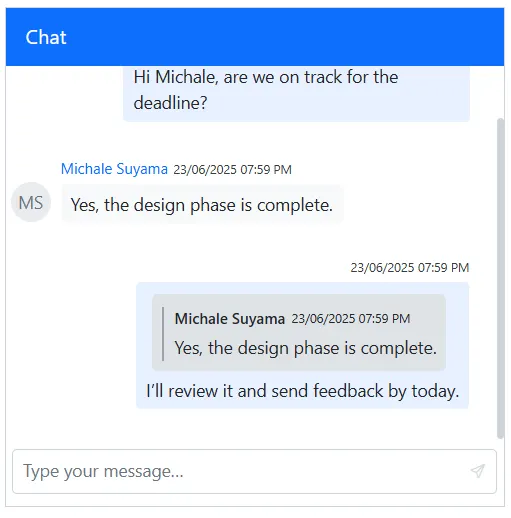
Replying to a Message
The RepliedTo property links a message to a previous one, creating a threaded conversation that preserves context. It references the original message’s ID, author, and content.
@using Syncfusion.Blazor.InteractiveChat

<div style="height: 400px; width: 400px;">
    <SfChatUI ID="chatUser" User="CurrentUserModel" Messages="ChatUserMessages"></SfChatUI>
</div>

@code {
    private static UserModel CurrentUserModel = new UserModel() { ID = "User1", User = "Albert" };
    private static UserModel MichaleUserModel = new UserModel() { ID = "User2", User = "Michale Suyama" };

    private List<ChatMessage> ChatUserMessages = new List<ChatMessage>()
    {
        new ChatMessage() { Text = "Hi Michale, are we on track for the deadline?", Author = CurrentUserModel, ID = "msg1" },
        new ChatMessage() { Text = "Yes, the design phase is complete.", Author = MichaleUserModel, ID = "msg2" },
        new ChatMessage() {
            Text = "I’ll review it and send feedback by today.",
            Author = CurrentUserModel,
            ID = "msg3",
            RepliedTo = new MessageReplyModel()
            {
                Text = "Yes, the design phase is complete.",
                User = MichaleUserModel,
                MessageID = "msg2"
            }
        }
    };
}
Forwarding a Message
The IsForwarded property, when set to true, adds a visual indicator to a message, clarifying that it has been forwarded from another conversation.
@using Syncfusion.Blazor.InteractiveChat

<div style="height: 400px; width: 400px;">
    <SfChatUI ID="chatUser" User="CurrentUserModel" Messages="ChatUserMessages"></SfChatUI>
</div>

@code {
    private static UserModel CurrentUserModel = new UserModel() { ID = "User1", User = "Albert" };
    private static UserModel MichaleUserModel = new UserModel() { ID = "User2", User = "Michale Suyama" };

    private List<ChatMessage> ChatUserMessages = new List<ChatMessage>()
    {
        new ChatMessage() { Text = "Hi Michale, are we on track for the deadline?", Author = CurrentUserModel },
        new ChatMessage() { Text = "Yes, the design phase is complete.", Author = MichaleUserModel },
        new ChatMessage() { Text = "I’ll review it and send feedback by today.", Author = CurrentUserModel, IsForwarded = true }
    };
}
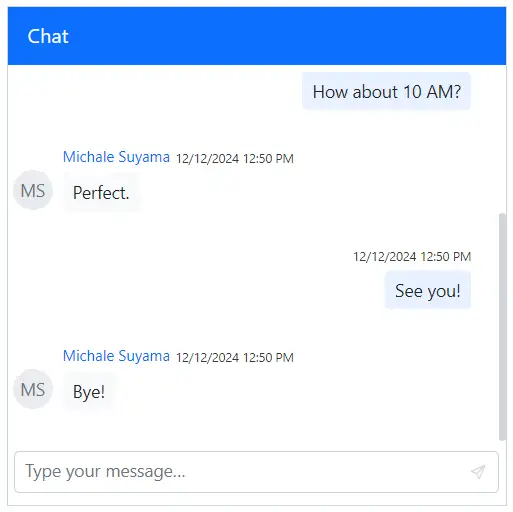
Enabling Auto-Scroll
The AutoScrollToBottom property automatically scrolls the conversation to the latest message when set to true. This helps maintain focus on the most recent activity. By default, the property is set to false.
- By default, it scrolls to bottom for each message being sent or when the scroll is maintained at the bottom in the chat, in order to prevent the automatic scroll for different user messages you can use the
AutoScrollToBottomproperty.
@using Syncfusion.Blazor.InteractiveChat

<div style="height: 400px; width: 400px;">
    <SfChatUI ID="chatUser" User="CurrentUserModel" AutoScrollToBottom="true" Messages="ChatUserMessages"></SfChatUI>
</div>

@code {
    private static UserModel CurrentUserModel = new UserModel() { ID = "User1", User = "Albert" };
    private static UserModel MichaleUserModel = new UserModel() { ID = "User2", User = "Michale Suyama" };

    private List<ChatMessage> ChatUserMessages = new List<ChatMessage>()
    {
        new ChatMessage() { Text = "Want to get coffee tomorrow?", Author = CurrentUserModel },
        new ChatMessage() { Text = "Sure! What time?", Author = MichaleUserModel },
        new ChatMessage() { Text = "How about 10 AM?", Author = CurrentUserModel },
        new ChatMessage() { Text = "Perfect.", Author = MichaleUserModel },
        new ChatMessage() { Text = "See you!", Author = CurrentUserModel },
        new ChatMessage() { Text = "Bye!", Author = MichaleUserModel }
    };
}
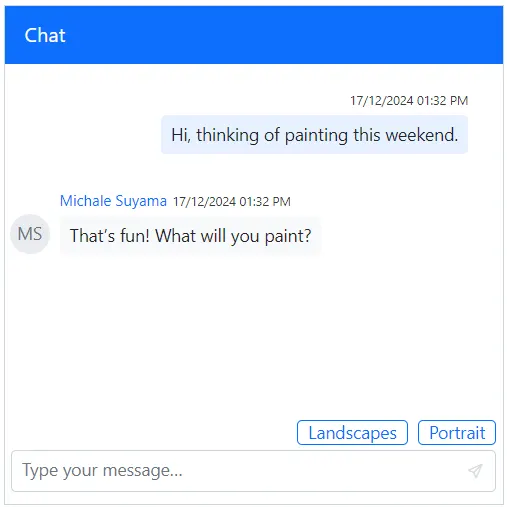
Adding Reply Suggestions
The Suggestions property provides a list of quick-reply options above the input field, which can be displayed initially or on-demand.
@using Syncfusion.Blazor.InteractiveChat

<div style="height: 400px; width: 400px;">
    <SfChatUI ID="chatUser" User="CurrentUserModel" Messages="ChatUserMessages" Suggestions="Suggestions"></SfChatUI>
</div>

@code {
    private static UserModel CurrentUserModel = new UserModel() { ID = "User1", User = "Albert" };
    private static UserModel MichaleUserModel = new UserModel() { ID = "User2", User = "Michale Suyama" };
    private List<string> Suggestions = new List<string>() { "Landscapes", "Portrait" };

    private List<ChatMessage> ChatUserMessages = new List<ChatMessage>()
    {
        new ChatMessage() { Text = "Hi, thinking of painting this weekend.", Author = CurrentUserModel },
        new ChatMessage() { Text = "That’s fun! What will you paint?", Author = MichaleUserModel }
    };
}
Enabling Compact Mode
Setting the EnableCompactMode property to true aligns all messages to the left, creating a streamlined and compact layout. This is ideal for group conversations or interfaces where space is limited. By default, this property is false.
@using Syncfusion.Blazor.InteractiveChat

<div style="height: 400px; width: 400px;">
    <SfChatUI ID="chatUser" User="CurrentUserModel" Messages="ChatUserMessages" EnableCompactMode="true"></SfChatUI>
</div>

@code {
    private static UserModel CurrentUserModel = new UserModel() { ID = "User1", User = "Albert" };
    private static UserModel MichaleUserModel = new UserModel() { ID = "User2", User = "Michale Suyama" };

    private List<ChatMessage> ChatUserMessages = new List<ChatMessage>()
    {
        new ChatMessage() { Text = "Hi Michale, are we on track for the deadline?", Author = CurrentUserModel },
        new ChatMessage() { Text = "Yes, the design phase is complete.", Author = MichaleUserModel },
        new ChatMessage() { Text = "I’ll review it and send feedback by today.", Author = CurrentUserModel }
    };
}
Configuring Message Options
The message toolbar can be customized using the MessageToolbar and MessageToolbarItem tag directives. By default, the toolbar includes Copy, Reply, Pin, and Delete options.
Copying a Message
A message can be quickly duplicated by clicking the copy icon in the message options toolbar.
Deleting a Message
A message can be removed from the conversation by clicking the trash icon in the message options toolbar.
Setting Toolbar Width
You can use the Width property to set width of the MessageToolbar tag directive of Chat UI. By default, the value is 100%.
@using Syncfusion.Blazor.InteractiveChat

<div style="height: 400px; width: 400px;">
    <SfChatUI ID="chatUser" User="CurrentUserModel" Messages="ChatUserMessages">
        <ChildContent>
            <MessageToolbar Width="50%">
            </MessageToolbar>
        </ChildContent>
    </SfChatUI>
</div>

@code {
    private static UserModel CurrentUserModel = new UserModel() { ID = "User1", User = "Albert" };
    private static UserModel MichaleUserModel = new UserModel() { ID = "User2", User = "Michale Suyama" };

    private List<ChatMessage> ChatUserMessages = new List<ChatMessage>()
    {
        new ChatMessage() { Text = "Hi Michale, are we on track for the deadline?", Author = CurrentUserModel },
        new ChatMessage() { Text = "Yes, the design phase is complete.", Author = MichaleUserModel },
        new ChatMessage() { Text = "I’ll review it and send feedback by today.", Author = CurrentUserModel }
    };
}
Customizing Items
Define custom toolbar actions using the MessageToolbarItem tag directive within the MessageToolbar.
@using Syncfusion.Blazor.InteractiveChat

<div style="height: 400px; width: 400px;">
    <SfChatUI ID="chatUser" User="CurrentUserModel" Messages="ChatUserMessages">
        <ChildContent>
            <MessageToolbar>
                <MessageToolbarItem IconCss="e-icons e-chat-forward" Tooltip="Forward"></MessageToolbarItem>
                <MessageToolbarItem IconCss="e-icons e-chat-copy" Tooltip="Copy"></MessageToolbarItem>
                <MessageToolbarItem IconCss="e-icons e-chat-reply" Tooltip="Reply"></MessageToolbarItem>
                <MessageToolbarItem IconCss="e-icons e-chat-pin" Tooltip="Pin"></MessageToolbarItem>
                <MessageToolbarItem IconCss="e-icons e-chat-trash" Tooltip="Delete"></MessageToolbarItem>
            </MessageToolbar>
        </ChildContent>
    </SfChatUI>
</div>

@code {
    private static UserModel CurrentUserModel = new UserModel() { ID = "User1", User = "Albert" };
    private static UserModel MichaleUserModel = new UserModel() { ID = "User2", User = "Michale Suyama" };

    private List<ChatMessage> ChatUserMessages = new List<ChatMessage>()
    {
        new ChatMessage() { Text = "Hi Michale, are we on track for the deadline?", Author = CurrentUserModel },
        new ChatMessage() { Text = "Yes, the design phase is complete.", Author = MichaleUserModel },
        new ChatMessage() { Text = "I’ll review it and send feedback by today.", Author = CurrentUserModel }
    };
}
Handling Toolbar Item Clicks
The ItemClicked event is triggered when a user clicks an item in the MessageToolbar.
@using Syncfusion.Blazor.InteractiveChat
<div style="height: 400px; width: 400px;">
<SfChatUI @ref="ChatUIInstance" ID="chatUser" User="CurrentUserModel" Messages="ChatUserMessages">
<ChildContent>
<MessageToolbar ItemClicked="MessageToolbarClicked">
<MessageToolbarItem IconCss="e-icons e-chat-forward" Tooltip="Forward"></MessageToolbarItem>
<MessageToolbarItem IconCss="e-icons e-chat-copy" Tooltip="Copy"></MessageToolbarItem>
<MessageToolbarItem IconCss="e-icons e-chat-reply" Tooltip="Reply"></MessageToolbarItem>
<MessageToolbarItem IconCss="e-icons e-chat-pin" Tooltip="Pin"></MessageToolbarItem>
<MessageToolbarItem IconCss="e-icons e-chat-trash" Tooltip="Delete"></MessageToolbarItem>
</MessageToolbar>
</ChildContent>
</SfChatUI>
</div>
@code {
private static UserModel CurrentUserModel = new UserModel() { ID = "User1", User = "Albert" };
private static UserModel MichaleUserModel = new UserModel() { ID = "User2", User = "Michale Suyama" };
private SfChatUI ChatUIInstance { get; set; }
private void MessageToolbarClicked(MessageToolbarItemClickedEventArgs args)
{
if (args.Item.IconCss == "e-icons e-chat-forward")
{
var newMessageObj = new ChatMessage()
{
Text = args.Message.Text,
ID = "chat-message-" + (ChatUIInstance.Messages.Count + 1).ToString(),
Author = args.Message.Author,
IsForwarded = true,
Status = args.Message.Status,
Timestamp = args.Message.Timestamp,
TimestampFormat = args.Message.TimestampFormat,
IsPinned = args.Message.IsPinned,
RepliedTo = args.Message.RepliedTo
};
ChatUIInstance.Messages.Add(newMessageObj);
}
}
private List<ChatMessage> ChatUserMessages = new List<ChatMessage>()
{
new ChatMessage() { Text = "Hi Michale, are we on track for the deadline?", Author = CurrentUserModel },
new ChatMessage() { Text = "Yes, the design phase is complete.", Author = MichaleUserModel },
new ChatMessage() { Text = "I’ll review it and send feedback by today.", Author = CurrentUserModel }
};
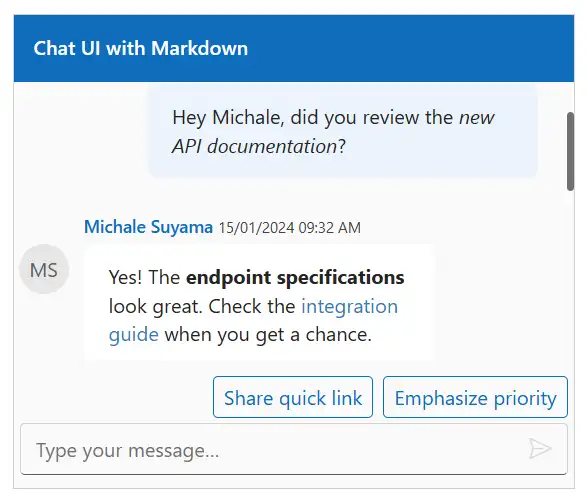
}Displaying Markdown Content
The Chat UI supports Markdown formatting for messages, enabling rich text capabilities such as bold, italics, links, and more.
Prerequisites
Install the Markdig library from NuGet to parse Markdown content.
dotnet add package MarkdigSupported Markdown Formats
The Chat UI leverages the Markdig library and supports common Markdown syntax, including:
-
Bold:
**text**or__text__ -
Italic:
*text*or_text_ -
Links:
[Link text](url) - Lists:
- Itemor1. Item - Code:
`code`or```code```
For a full list of supported formats, refer to the Markdig documentation.
Configuring Markdown in Chat
By integrating the Markdig library, you can parse Markdown text to enhance the chat experience. The Text property of each message can accept HTML generated from Markdown, allowing for formatted text display.
@using Syncfusion.Blazor.InteractiveChat
@using Markdig

<div class="control-section chat-ui">
    <div class="markdown-chatui">
        <SfChatUI @ref="ChatUI"
                  User="@currentUserModel"
                  Messages="@chatMessages"
                  HeaderText="@headerText"
                  Suggestions="@(suggestions.Select(s => s.DisplayText).ToList())"
                  MessageSend="HandleMessageSend"
                  ShowTimeBreak="true">
        </SfChatUI>
    </div>
</div>

<style>
    .markdown-chatui {
        height: 380px;
        width: 450px;
        margin: 0 auto;
    }
     .markdown-chatui p {
        margin: 0;
        display: inline-block;
    }
    @@media only screen and (max-width: 850px) {
        .markdown-chatui {
            width: 80%;
        }
    }
</style>

@code {
    private SfChatUI ChatUI { get; set; }
    private string headerText = "Chat UI with Markdown";
    private UserModel currentUserModel =  GetMarkdownUser("user1", "Albert");
    private UserModel michaleUserModel =  GetMarkdownUser("user2", "Michale Suyama");
    private List<ChatMessage> chatMessages = new List<ChatMessage>();
    private List<Suggestion> suggestions = new List<Suggestion>
    {
        new Suggestion
        {
            DisplayText = "Share quick link",
            MarkdownText = "Check out our [project dashboard](https://help.syncfusion.com) for updates!"
        },
        new Suggestion
        {
            DisplayText = "Emphasize priority",
            MarkdownText = "This is **high priority** and needs _immediate attention_."
        }
    };

    protected override void OnInitialized()
    {
        chatMessages.Add(new ChatMessage
            {
                Author = currentUserModel,
                Text = RenderMarkdown("Hey Michale, did you review the _new API documentation_?"),
                Timestamp = DateTime.UtcNow.AddMinutes(-5)
            });
        chatMessages.Add(new ChatMessage
            {
                Author = michaleUserModel,
                Text = RenderMarkdown("Yes! The **endpoint specifications** look great. Check the [integration guide](https://blazor.syncfusion.com/documentation/introduction) when you get a chance."),
                Timestamp = DateTime.UtcNow.AddMinutes(-5)
            });
    }

    private async Task HandleMessageSend(ChatMessageSendEventArgs args)
    {
        if (string.IsNullOrEmpty(args.Message.Text))
        {
            return;
        }
        args.Cancel = true;
        var suggestion = suggestions.FirstOrDefault(s => s.DisplayText == args.Message.Text);
        var messageText = suggestion != null ? suggestion.MarkdownText : args.Message.Text;

        var newMessage = new ChatMessage
            {
                Text = RenderMarkdown(messageText),
                Author = currentUserModel,
                Timestamp = DateTime.Now
            };

        chatMessages.Add(newMessage);
        await InvokeAsync(StateHasChanged);
    }

    private string RenderMarkdown(string markdownText)
    {
        var pipeline = new MarkdownPipelineBuilder().UseAdvancedExtensions().Build();
        return Markdig.Markdown.ToHtml(markdownText, pipeline);
    }

    public static UserModel GetMarkdownUser(string Id, string Username)
    {
        return new UserModel()
            {
                ID = Id,
                User = Username
            };
    }

    private class Suggestion
    {
        public string DisplayText { get; set; } = string.Empty;
        public string MarkdownText { get; set; } = string.Empty;
    }
}