Bind Data to the Blazor Components Using gRPC Service
1 Jul 202612 minutes to read
In this topic, you can learn how to consume data from gRPC service and bind it to a Blazor Component.
Prerequisite software
The following software are needed,
- Visual Studio 2022.
- .NET 8.0 or later.
Creating Blazor webassembly application
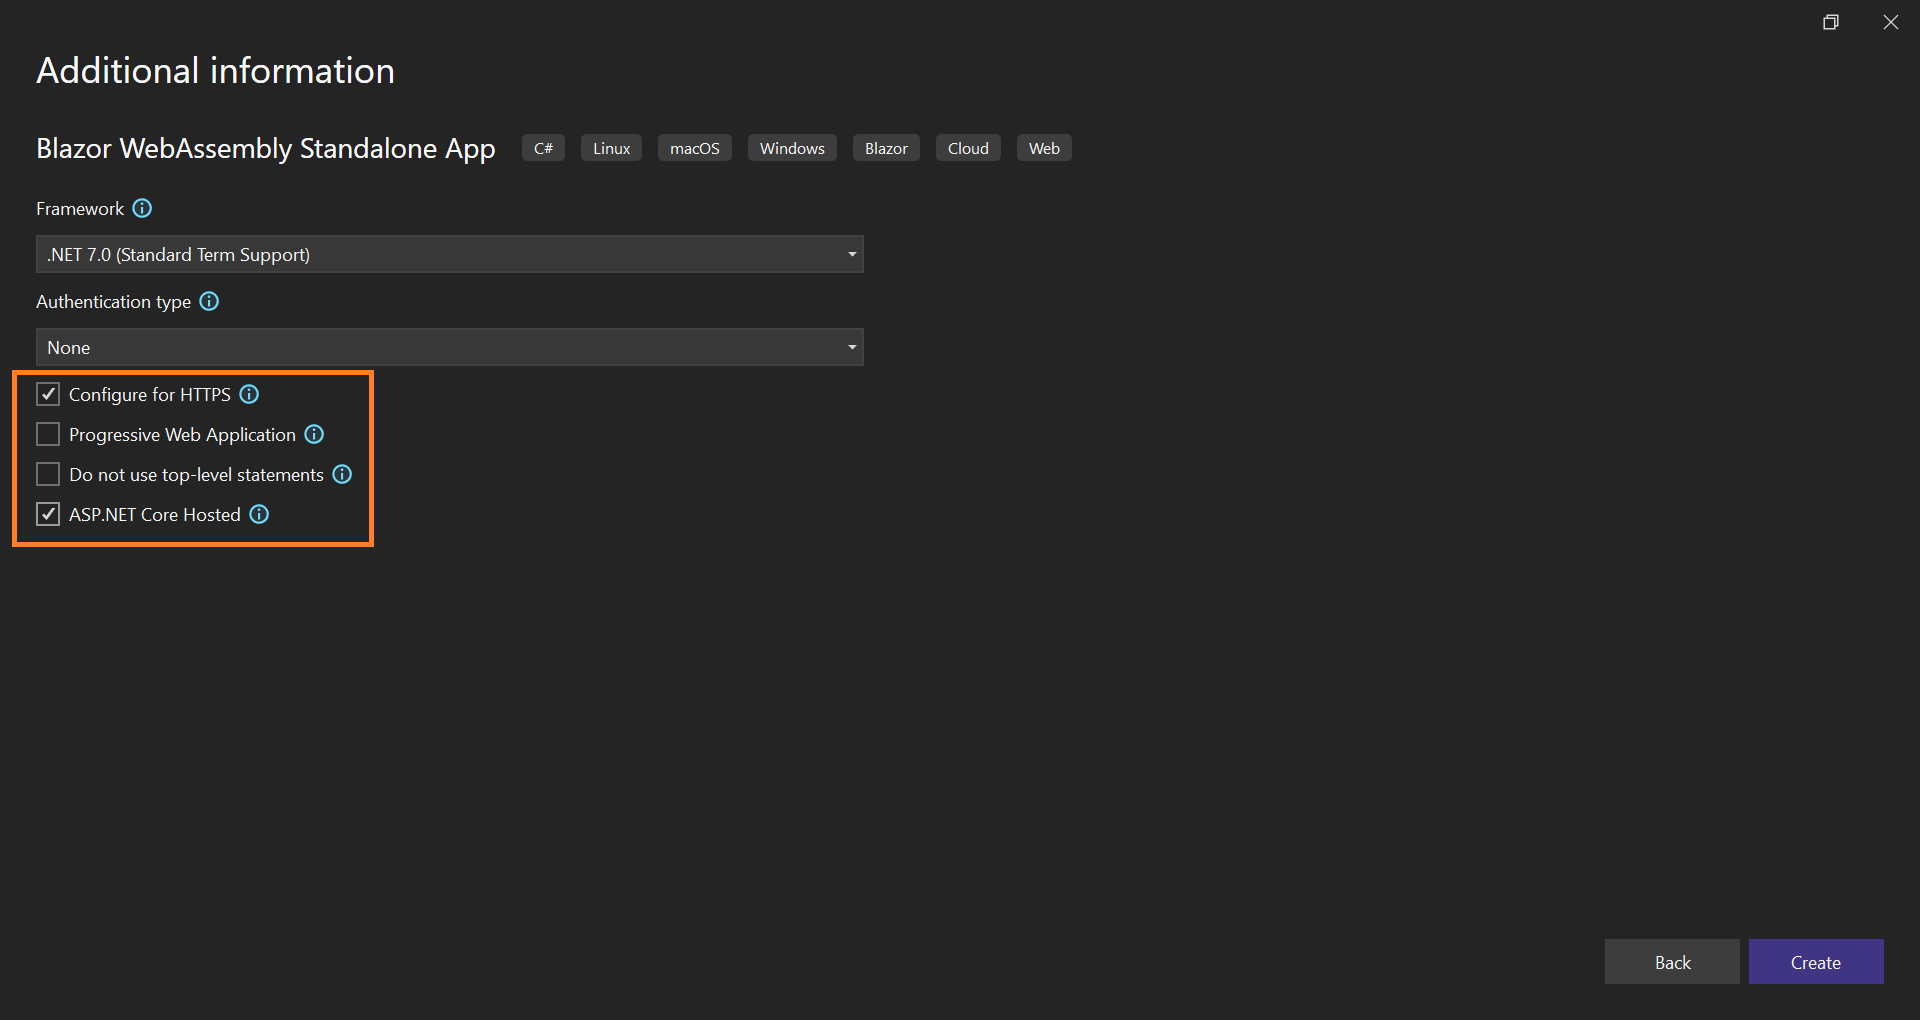
You can create a Blazor WebAssembly App with ASP.NET Core Hosted using Visual Studio via Microsoft Templates
Finally, ensure to select the ASP.NET Core Hosted application.
Adding gRPC dependencies
You need to install the following dependencies on your Client, Server, and Shared projects.
Starting with the Shared project, Right-click the project and go to Manage NuGet packages. Browse for and install the following packages in the Shared project:
Next, follow the same process and go to your Server project to install these packages:
Then, go to your Client project and install the following package:
Add proto file and service to the project
gRPC works with Proto files which are written in protocol buffer language that define your messaging. To learn more about the language, visit this guide.
To add a proto file, Right-click the Shared project, go to Add, and then select New item. You can choose a Class file and name it as order.proto and select Add.
Remove the boiler plate code in the file. Copy the following code and paste it into your proto file.
syntax = "proto3";

import "google/protobuf/empty.proto";
import "google/protobuf/timestamp.proto";

option csharp_namespace = "BlazorAPPgRPC.Shared";

package Orders;

service OrdersService {
  rpc GetOrders (google.protobuf.Empty) returns (OrdersResponse);
}

message OrdersResponse {
  repeated Orders = 1;
}

message Orders {
  google.protobuf.Timestamp dateTimeStamp = 1;
  int32 OrderID = 2;
  string CustomerName = 3;
  string ShipCountry = 4;
  string ShipCity = 5;
}
Go to the proto file properties and select the Protobuf compiler as the Build Action. Then, select the Client and Server option as the gRPC Stub Classes. Refer to the following screenshot.

Adding Orders Service
Now, add Orders partial class in the Shared project. The main properties of this class are generated from the .proto file. However, you can also add some extra useful properties to this partial class.
using Google.Protobuf.WellKnownTypes;
using System;

namespace BlazorAPPgRPC.Shared
{
    public partial class Orders
    {
        public DateTime OrderDate
        {
            get => DateTimeStamp.ToDateTime();
            set { DateTimeStamp = Timestamp.FromDateTime(value.ToUniversalTime()); }
        }
    }
}
Create Services folder in the Server project and add OrdersService file in that folder. Then, copy the following code and paste it into your service file or create your own service logic.
public class OrdersService : BlazorAPPgRPC.Shared.OrdersService.OrdersServiceBase
{
    private static readonly string[] Countries = new[]
    {
        "Berlin", "Tokyo", "Denmark", "Tokyo", "Olso"
    };
    private static readonly string[] Names = new[]
    {
        "VINET", "RIO", "RAJ", "MAH", "RAM"
    };
    private static readonly string[] Cities = new[]
    {
            "New York", "London", "Hue"
    };
    public override Task<OrdersResponse> GetOrders(Empty request, ServerCallContext context)
    {
        var response = new OrdersResponse();

        response.Orders.AddRange(GetOrders());

        return Task.FromResult<OrdersResponse>(response);
    }
    public IEnumerable<Orders> GetOrders()
    {
        var rng = new Random();
        return Enumerable.Range(1, 365).Select(index => new Orders
        {
            OrderID = index,
            OrderDate = DateTime.Now.AddDays(index),
            ShipCountry = Countries[rng.Next(Countries.Length)],
            CustomerName = Names[rng.Next(Names.Length)],
            ShipCity = Cities[rng.Next(Cities.Length)]
        });
    }
}
NOTE
The OrdersService class is inherited from BlazorAPPgRPC.Shared.OrdersService.OrdersServiceBase, which is generated automatically from the
.protofile.
Configure gRPC and gRPC-Web in the server
You need to register the gRPC service in your Startup.cs file. This enables you to use dependency injection to consume the service across the app. Add the following code to your ConfigureServices method in the Server Startup.cs file:
public void ConfigureServices(IServiceCollection services)
{
    services.AddScoped<OrdersService>();
    services.AddGrpc();
    . . .
}
Then, add the gRPC-Web middleware to the apps configuration and register the gRPC service. This must be added after UseRouting and before UseEndpoints in the Configure method.
public void Configure(IApplicationBuilder app, IWebHostEnvironment env)
{
    . . .
    app.UseRouting();
    app.UseGrpcWeb(new GrpcWebOptions { DefaultEnabled = true });
    app.UseEndpoints(endpoints =>
    {
        endpoints.MapGrpcService<OrdersService>();
        .  . .
    });
}
In the Client project, add the OrdersService to the container, then create a gRPC-Web channel pointing to the back-end server and instantiate the gRPC clients for this channel. Refer to the following code to modify the Program.cs file.
using Grpc.Net.Client;
using Grpc.Net.Client.Web;
using Microsoft.AspNetCore.Components;
. . .
public static async Task Main(string[] args)
{
    var builder = WebAssemblyHostBuilder.CreateDefault(args);
    . . .
    builder.Services.AddSingleton(services =>
    {
        var httpClient = new HttpClient(new GrpcWebHandler(GrpcWebMode.GrpcWeb, new HttpClientHandler()));
        var backendUrl = services.GetRequiredService<NavigationManager>().BaseUri;
        var channel = GrpcChannel.ForAddress(backendUrl, new GrpcChannelOptions { HttpClient = httpClient });

        return new OrdersService.OrdersServiceClient(channel);
    });
}
NOTE
The OrdersService.OrdersServiceClient class is also generated automatically from the
.protofile.
Add Blazor DataGrid package
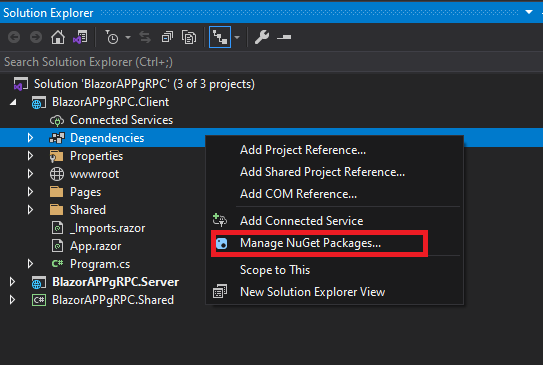
We are going to explain this data (gRPC service data) binding process using the DataGrid component. So, we are going to install the packages required to use the Blazor components. Now, right-click Dependencies in the project and select Manage NuGet Packages.
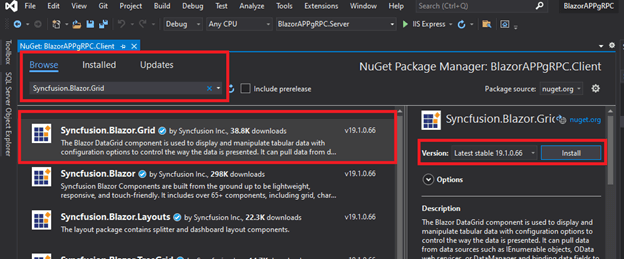
In the Browse tab, search and install the Syncfusion.Blazor.Grid NuGet package.
NOTE
For this demo,
Syncfusion.Blazor(19.1.0.66) NuGet package is used. A newSyncfusion.BlazorNuGet package with new enhancement will be released in our every-week release and main release. So, you can check and update to the latest versions.
Adding Blazor DataGrid component
Open _Import.razor file and add the following namespaces which are required to use Blazor DataGrid Component in this application.
@using Syncfusion.Blazor
@using Syncfusion.Blazor.Grids
Open Program.cs file in a Client project and register the service in the ConfigureServices method as follows.
using Syncfusion.Blazor;

namespace BlazorAPPgRPC.Client
{
    public class Program
    {
        public static async Task Main(string[] args)
        {
            var builder = WebAssemblyHostBuilder.CreateDefault(args);
            builder.RootComponents.Add<App>("#app");
            builder.Services.AddSyncfusionBlazor();
            . . .
        }
    }
}
In this demo application, the Bootstrap4 theme will be used. To add the theme, open ~/wwwroot/index.html file and add the following CSS reference code.
<link href="_content/Syncfusion.Blazor.Themes/ bootstrap4.css" rel="stylesheet" />In previous steps, we have successfully configured the Syncfusion® Blazor package in the application. Now, we can add the DataGrid Component to the Index.razor.
<SfGrid>

</SfGrid>
Bind data to Blazor DataGrid component
To consume data from the gRPC service, inject the OrdersServiceClient into the razor page and assign it to the DataGrid’s DataSource property.
Here, the DataSource property of the DataGrid component is used to bind the data to DataGrid in the WebAssembly application.
Grid columns can be defined using the GridColumn component. Columns are created using the following code, let’s see the properties used and their usage.
-
Fieldproperty specifies the column name of the Orders table to display in the grid column. - The
Widthproperty specifies the column width. -
Formatproperty helps to format number, currencies, and date in a particular culture. Here, the OrderDate column has been formatted. -
HeaderTextproperty specifies the column header name.
@inject OrdersService.OrdersServiceClient OrdersServiceClient
@using BlazorAPPgRPC.Shared
@using Google.Protobuf.WellKnownTypes

<h1>Orders</h1>

<p>This component demonstrates fetching data from the gRPC service.</p>

@if (orders == null)
{
    <p><em>Loading...</em></p>
}
else
{
    <SfGrid DataSource="@orders" AllowPaging="true">
        <GridColumns>
            <GridColumn Field=@nameof(Orders.OrderID) HeaderText="Order ID" TextAlign="TextAlign.Right" Width="120"></GridColumn>
            <GridColumn Field=@nameof(Orders.CustomerName) HeaderText="Customer Name" Width="150"></GridColumn>
            <GridColumn Field=@nameof(Orders.OrderDate) HeaderText=" Order Date" Format="d" Type="ColumnType.Date" TextAlign="TextAlign.Right" Width="130"></GridColumn>
            <GridColumn Field=@nameof(Orders.ShipCountry) HeaderText="Ship Country" TextAlign="TextAlign.Right" Width="120"></GridColumn>
            <GridColumn Field=@nameof(Orders.ShipCity) HeaderText="Ship City" Width="150"></GridColumn>
        </GridColumns>
    </SfGrid>
}

@code {

    private IList<Orders> orders;

    protected override async Task OnInitializedAsync()
    {
        orders = (await OrdersServiceClient.GetOrdersAsync(new Empty())).Orders;
    }
}
Now, the DataGrid will look like this while running the application. The displayed records are fetched from the gRPC service.

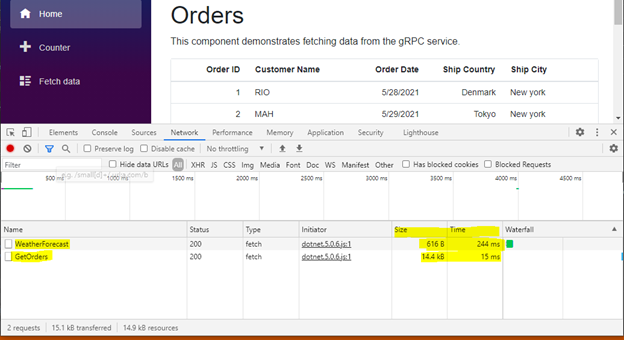
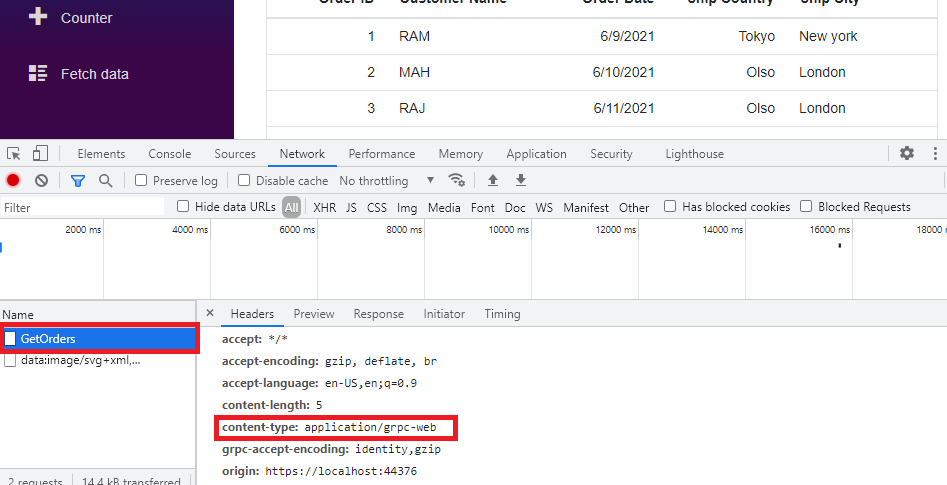
After rendering the Grid with data, you can verify that we are using the gRPC-Web service by using the following way. Open Network Tab and reload the index page.
The Orders data will be loaded, and you will see the name of the method GetOrders. Click on the GetOrders name to view the Response Headers which show the content-type being application/grpc-web.
In the Index.razor page, Grid with gRPC service has been rendered, and in the FetchData.razor page, Grid with normal REST service has been rendered.
You can see both page payload size and traffic time in the following screenshot. In the screenshot above, you can see that the REST service has sent 616 B, but the gRPC service has sent only 14.4 kB Also traffic time for REST is 244ms and the traffic time for gRPC is 15ms only.