Getting Started with bUnit Testing for Blazor Components
19 Jun 202616 minutes to read
This guide demonstrates how to test Blazor components using bUnit. It helps validate component behavior, verify rendered HTML output, and ensure that components function correctly through isolated, in-memory unit testing.
NOTE
bUnit is a third-party, open-source testing library maintained by the community. bUnit is not maintained by Syncfusion.
Prerequisites
- .NET SDK 8.0 or later (this guide uses .NET 10)
- Visual Studio 2022 or later, or Visual Studio Code with the C# Dev Kit extension
Set up the Blazor application
If you already have a Blazor project, proceed to the Set up the bUnit test project section. Otherwise, create one using the following Blazor getting started guides.
This guide covers bUnit testing with the Blazor DataGrid component. If you do not have an existing Blazor project with the Blazor DataGrid configured, follow the Getting Started with Blazor DataGrid guide to create and configure the application before proceeding.
Set up the bUnit test project
Install the template
Install the bunit.template from NuGet using this command. This step is the same regardless of the test framework you choose.
dotnet new install bunit.templateThis template needs to be installed only once. If it is already installed, you can skip this step.
Create a new test project
Open a terminal and create a new bUnit test project by running the command for your preferred test framework.
dotnet new bunit --framework xunit -o BlazorXUnitTesting
cd BlazorXUnitTesting
dotnet new bunit --framework nunit -o BlazorNUnitTesting
cd BlazorNUnitTestingdotnet new bunit --framework mstest -o BlazorMSTestTesting
cd BlazorMSTestTestingInstall packages
Install the required packages through NuGet Package Manager in Visual Studio (Tools → NuGet Package Manager → Manage NuGet Packages for Solution), or the integrated terminal in Visual Studio Code (dotnet add package), or the .NET CLI.
Syncfusion packages
Testing package
You can install the required packages by using the following .NET CLI commands.
dotnet add package Syncfusion.Blazor.Grid -v 34.1.29
dotnet add package Syncfusion.Blazor.Themes -v 34.1.29
dotnet add package bunit --version 2.7.2
NOTE
This guide was tested with bUnit version 2.7.2. Always verify the latest stable version on GitHub Releases.
Add the test project to your existing project
Add a project reference from your test project to your Blazor app project so the tests can access your components. Ensure you run this command from within the test project directory (e.g., BlazorXUnitTesting).
dotnet add reference ../path/to/YourBlazorApp/YourBlazorApp.csprojReplace ../path/to/YourBlazorApp/YourBlazorApp.csproj with the actual relative path to your Blazor application’s .csproj file.
Write a bUnit test
Create a TestBase class that serves as the base for all test classes. It registers the Blazor service, enables options support, and sets the JS interop to Loose mode so that JavaScript calls from Blazor components are accepted without throwing errors during testing.
The TestBase base class differs by framework: xUnit inherits bUnit’s TestContext, whereas NUnit and MSTest inherit bUnit’s BunitContext.
using Bunit;
using Microsoft.Extensions.DependencyInjection;
using Syncfusion.Blazor;

public abstract class TestBase : TestContext
{
    protected TestBase()
    {
        Services.AddSyncfusionBlazor();
        // Explicitly register options support, as the bUnit test context does not add it by default.
        Services.AddOptions();
        JSInterop.Mode = JSRuntimeMode.Loose;
    }
}
using Bunit;
using Microsoft.Extensions.DependencyInjection;
using Syncfusion.Blazor;
public abstract class TestBase : BunitContext
{
protected TestBase()
{
Services.AddSyncfusionBlazor();
// Explicitly register options support, as the bUnit test context does not add it by default.
Services.AddOptions();
JSInterop.Mode = JSRuntimeMode.Loose;
}
}using Bunit;
using Microsoft.Extensions.DependencyInjection;
using Syncfusion.Blazor;
public abstract class TestBase : BunitContext
{
protected TestBase()
{
Services.AddSyncfusionBlazor();
// Explicitly register options support, as the bUnit test context does not add it by default.
Services.AddOptions();
JSInterop.Mode = JSRuntimeMode.Loose;
}
}Each test class inherits from TestBase and uses the assertion style idiomatic to its framework: Assert.Equal for xUnit, Assert.That(..., Is.EqualTo(...)) for NUnit, and Assert.AreEqual for MSTest. The following tests cover the key behaviors of the Blazor DataGrid component.
using System.Linq;
using Bunit;
// Replace with your actual project namespace, e.g., MyApp.Components.Pages
using BlazorApp.Components.Pages;
using Xunit;

public class DataGridTests : TestBase
{
    [Fact]
    public void DataGrid_DataSource_Count()
    {
        var comp = Render<Home>();
        var instance = comp.Instance;
        // Validate DataSource Count as 75 which is based on DataGrid getting started code example
        Assert.Equal(75, instance.Orders.Count);
    }

    [Fact]
    public void DataGrid_Paging_Is_Configured()
    {
        var comp = Render<Home>();
        // Pager exists
        var pager = comp.Find(".e-pager");
        Assert.NotNull(pager);
        // Validate first page row count (PageSize = 12) which is based on DataGrid getting started code example
        var rows = comp.FindAll(".e-row");
        Assert.Equal(12, rows.Count);
    }

    [Fact]
    public void DataGrid_Column_Definition_Check()
    {
        var comp = Render<Home>();
        // Validate column header count as 5 which is based on DataGrid getting started code example
        var headers = comp.FindAll(".e-headercell");
        Assert.Equal(5, headers.Count);
        Assert.Equal("Order ID", headers[0].TextContent.Trim());
        Assert.Equal("Customer Name", headers[1].TextContent.Trim());
        Assert.Equal("Order Date", headers[2].TextContent.Trim());
        Assert.Equal("Freight", headers[3].TextContent.Trim());
        Assert.Equal("Ship Country", headers[4].TextContent.Trim());
    }

    [Fact]
    public void DataGrid_Field_Value_Check()
    {
        var comp = Render<Home>();
        var instance = comp.Instance;
        var firstData = instance.Orders.First();
        var firstRowCells = comp.Find(".e-row").Children;
        // OrderID
        Assert.Equal(firstData.OrderID.ToString(), firstRowCells[0].TextContent.Trim());
        // CustomerID
        Assert.Equal(firstData.CustomerID, firstRowCells[1].TextContent.Trim());
        // ShipCountry
        Assert.Equal(firstData.ShipCountry, firstRowCells[4].TextContent.Trim());
    }
}
using System.Linq;
using NUnit.Framework;
using Bunit;
// Replace with your actual project namespace, e.g., MyApp.Components.Pages
using BlazorApp.Components.Pages;
[TestFixture]
public class DataGridTests : TestBase
{
[Test]
public void DataGrid_DataSource_Count()
{
var comp = Render<Home>();
var instance = comp.Instance;
// Validate DataSource Count as 75 which is based on DataGrid getting started code example
Assert.That(instance.Orders.Count, Is.EqualTo(75));
}
[Test]
public void DataGrid_Paging_Is_Configured()
{
var comp = Render<Home>();
var pager = comp.Find(".e-pager");
Assert.That(pager, Is.Not.Null);
// Validate first page row count (PageSize = 12) which is based on DataGrid getting started code example
var rows = comp.FindAll(".e-row");
Assert.That(rows.Count, Is.EqualTo(12));
}
[Test]
public void DataGrid_Column_Definition_Check()
{
var comp = Render<Home>();
var headers = comp.FindAll(".e-headercell");
// Validate column header count as 5 which is based on DataGrid getting started code example
Assert.That(headers.Count, Is.EqualTo(5));
Assert.That(headers[0].TextContent.Trim(), Is.EqualTo("Order ID"));
Assert.That(headers[1].TextContent.Trim(), Is.EqualTo("Customer Name"));
Assert.That(headers[2].TextContent.Trim(), Is.EqualTo("Order Date"));
Assert.That(headers[3].TextContent.Trim(), Is.EqualTo("Freight"));
Assert.That(headers[4].TextContent.Trim(), Is.EqualTo("Ship Country"));
}
[Test]
public void DataGrid_Field_Value_Check()
{
var comp = Render<Home>();
var instance = comp.Instance;
var firstData = instance.Orders.First();
var firstRowCells = comp.Find(".e-row").Children;
Assert.That(firstRowCells[0].TextContent.Trim(), Is.EqualTo(firstData.OrderID.ToString()));
Assert.That(firstRowCells[1].TextContent.Trim(), Is.EqualTo(firstData.CustomerID));
Assert.That(firstRowCells[4].TextContent.Trim(), Is.EqualTo(firstData.ShipCountry));
}
}using Microsoft.VisualStudio.TestTools.UnitTesting;
using System.Linq;
using Bunit;
// Replace with your actual project namespace, e.g., MyApp.Components.Pages
using BlazorApp.Components.Pages;
[TestClass]
public class DataGridTests : TestBase
{
// Validate DataSource count as 75 which is based on DataGrid getting started code example
[TestMethod]
public void DataGrid_DataSource_Count()
{
var comp = Render<Home>();
var instance = comp.Instance;
Assert.AreEqual(75, instance.Orders.Count);
}
[TestMethod]
public void DataGrid_Paging_Is_Configured()
{
var comp = Render<Home>();
// Pager exists
var pager = comp.Find(".e-pager");
Assert.IsNotNull(pager);
// Validate first page row count (PageSize = 12) which is based on DataGrid getting started code example
var rows = comp.FindAll(".e-row");
Assert.AreEqual(12, rows.Count);
}
[TestMethod]
public void DataGrid_Column_Definition_Check()
{
var comp = Render<Home>();
// Validate column header count as 5 which is based on DataGrid getting started code example
var headers = comp.FindAll(".e-headercell");
Assert.AreEqual(5, headers.Count);
Assert.AreEqual("Order ID", headers[0].TextContent.Trim());
Assert.AreEqual("Customer Name", headers[1].TextContent.Trim());
Assert.AreEqual("Order Date", headers[2].TextContent.Trim());
Assert.AreEqual("Freight", headers[3].TextContent.Trim());
Assert.AreEqual("Ship Country", headers[4].TextContent.Trim());
}
[TestMethod]
public void DataGrid_Field_Value_Check()
{
var comp = Render<Home>();
var instance = comp.Instance;
var firstData = instance.Orders.First();
var firstRowCells = comp.Find(".e-row").Children;
Assert.AreEqual(firstData.OrderID.ToString(), firstRowCells[0].TextContent.Trim());
Assert.AreEqual(firstData.CustomerID, firstRowCells[1].TextContent.Trim());
Assert.AreEqual(firstData.ShipCountry, firstRowCells[4].TextContent.Trim());
}
}Run the tests
You can execute the bUnit tests to validate the behavior of your Blazor application.
From the test project directory, run the following command to execute all tests.
dotnet testAfter running the tests, the test execution completes with a Passed status in the console, indicating that all tested component behaviors pass as expected. bUnit renders components in-memory. No browser or running server is required.
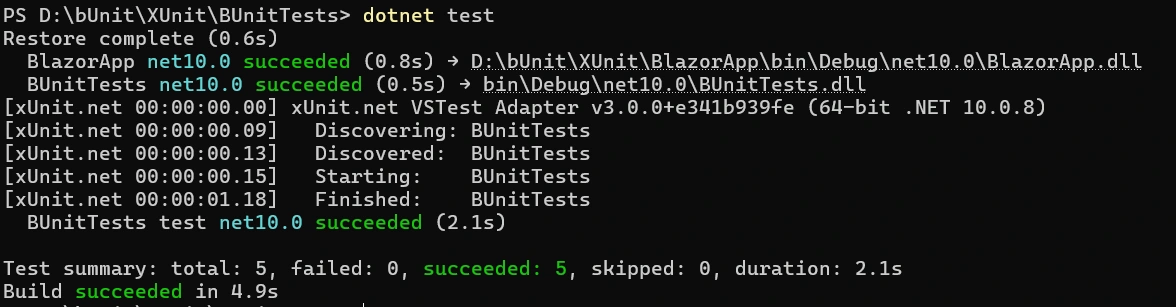
Test results shown for xUnit. NUnit and MSTest produce similar output with framework-specific test runner formatting.