How can I help you?
Hierarchical Layout in Diagram Component
2 Feb 202617 minutes to read
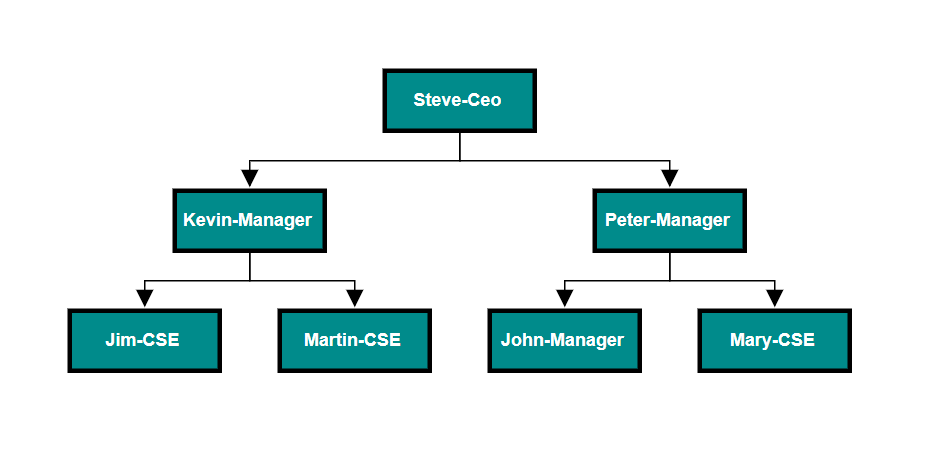
The hierarchical tree layout arranges nodes in a tree-like structure, where the nodes in the hierarchical layout may have multiple parents. There is no need to specify the layout root. To arrange nodes in a hierarchical structure, set the layout Type to HierarchicalTree. The following example shows how to arrange nodes in a hierarchical structure.
@using Syncfusion.Blazor.Diagram

<SfDiagramComponent Height="600px" Nodes="@_nodes" Connectors="@_connectors" NodeCreating="@OnNodeCreating" ConnectorCreating="@OnConnectorCreating">
    <Layout Type="LayoutType.HierarchicalTree" @bind-HorizontalSpacing="@_horizontalSpacing" @bind-VerticalSpacing="@_verticalSpacing">
    </Layout>
    <SnapSettings>
        <HorizontalGridLines LineColor="white" LineDashArray="2,2">
        </HorizontalGridLines>
        <VerticalGridLines LineColor="white" LineDashArray="2,2">
        </VerticalGridLines>
    </SnapSettings>
</SfDiagramComponent>

@code
{
    private int _left = 40;
    private int _top = 50;
    private DiagramObjectCollection<Node> _nodes = new DiagramObjectCollection<Node>();
    private DiagramObjectCollection<Connector> _connectors = new DiagramObjectCollection<Connector>();
    private int _horizontalSpacing = 40;
    private int _verticalSpacing = 40;

    private void OnNodeCreating(IDiagramObject obj)
    {
        Node node = obj as Node;
        node.Height = 40;
        node.Width = 100;
        //Initializing the default node's shape style.
        node.Style = new ShapeStyle() { Fill = "darkcyan", StrokeWidth = 3, StrokeColor = "Black" };
       node.Annotations[0].Style = new TextStyle() { Color = "white", Bold = true };
    }

    private void OnConnectorCreating(IDiagramObject connector)
    {
        (connector as Connector).Type = ConnectorSegmentType.Orthogonal;
    }

    protected override void OnInitialized()
    {
        //Initializing node and connectors.
        _nodes = new DiagramObjectCollection<Node>()
        {
            new Node() { ID = "node1", Annotations = new DiagramObjectCollection<ShapeAnnotation>() { new ShapeAnnotation { Content = "Steve-Ceo" } } },
            new Node() { ID = "node2", Annotations = new DiagramObjectCollection<ShapeAnnotation>() { new ShapeAnnotation { Content = "Kevin-Manager" } } },
            new Node() { ID = "node3", Annotations = new DiagramObjectCollection<ShapeAnnotation>() { new ShapeAnnotation { Content = "Peter-Manager" } } },
            new Node() { ID = "node4", Annotations = new DiagramObjectCollection<ShapeAnnotation>() { new ShapeAnnotation { Content = "Jim-CSE" } } },
            new Node() { ID = "node5", Annotations = new DiagramObjectCollection<ShapeAnnotation>() { new ShapeAnnotation { Content = "Martin-CSE" } } },
            new Node() { ID = "node6", Annotations = new DiagramObjectCollection<ShapeAnnotation>() { new ShapeAnnotation { Content = "John-Manager" } } },
            new Node() { ID = "node7", Annotations = new DiagramObjectCollection<ShapeAnnotation>() { new ShapeAnnotation { Content = "Mary-CSE" } } },
        };
        _connectors = new DiagramObjectCollection<Connector>()
        {
            new Connector() { ID = "connector1", SourceID = "node1", TargetID = "node2" },
            new Connector() { ID = "connector2", SourceID = "node1", TargetID = "node3" },
            new Connector() { ID = "connector3", SourceID = "node2", TargetID = "node4" },
            new Connector() { ID = "connector4", SourceID = "node2", TargetID = "node5" },
            new Connector() { ID = "connector5", SourceID = "node3", TargetID = "node6" },
            new Connector() { ID = "connector6", SourceID = "node3", TargetID = "node7" },
        };
    }
}
A complete working sample can be downloaded from GitHub
A hierarchical layout can also be created from a data source. The following example demonstrates how to render a hierarchical layout using DataSource.
@using Syncfusion.Blazor.Diagram

<SfDiagramComponent Height="600px" Nodes="@_nodes" Connectors="@_connectors" NodeCreating="@OnNodeCreating" ConnectorCreating="@OnConnectorCreating">
  <DataSourceSettings ID="Id" ParentID="Manager" DataSource="@_dataSource"> </DataSourceSettings>
    <Layout Type="LayoutType.HierarchicalTree" HorizontalSpacing="@_horizontalSpacing" VerticalSpacing="@_verticalSpacing" >
    </Layout>
    <SnapSettings>
        <HorizontalGridLines LineColor="white" LineDashArray="2,2">
        </HorizontalGridLines>
        <VerticalGridLines LineColor="white" LineDashArray="2,2">
        </VerticalGridLines>
    </SnapSettings>
</SfDiagramComponent>

@code
{
    private int _left = 40;
    private int _top = 50;
    private DiagramObjectCollection<Node> _nodes = new DiagramObjectCollection<Node>();
    private DiagramObjectCollection<Connector> _connectors = new DiagramObjectCollection<Connector>();
    private int _horizontalSpacing = 40;
    private int _verticalSpacing = 40;

    private void OnNodeCreating(IDiagramObject obj)
    {
        Node node = obj as Node;
        node.Height = 40;
        node.Width = 100;
        //Initializing the default node's shape style.
        node.Style = new ShapeStyle() { Fill = "darkcyan", StrokeWidth = 3, StrokeColor = "Black" };
    }

    private void OnConnectorCreating(IDiagramObject connector)
    {
        (connector as Connector).Type = ConnectorSegmentType.Orthogonal;
    }

    public class HierarchicalDetails
    {
        public string Id { get; set; }
        public string Role { get; set; }
        public string Manager { get; set; }
        public string ChartType { get; set; }
        public string Color { get; set; }
    }
    private List<HierarchicalDetails> _dataSource = new List<HierarchicalDetails>()
    {
        new HierarchicalDetails()   { Id = "parent", Role = "Board", Color = "#71AF17" },
        new HierarchicalDetails()   { Id = "1", Role = "General Manager", Manager = "parent", ChartType = "right", Color = "#71AF17" },
        new HierarchicalDetails()   { Id = "11", Role = "Assistant Manager", Manager = "1", Color = "#71AF17" },
        new HierarchicalDetails()   { Id = "2", Role = "Human Resource Manager", Manager = "1", ChartType = "right", Color = "#1859B7" },
        new HierarchicalDetails()   { Id = "3", Role = "Trainers", Manager = "2", Color = "#2E95D8" },
        new HierarchicalDetails()   { Id = "4", Role = "Recruiting Team", Manager = "2", Color = "#2E95D8" },
        new HierarchicalDetails()   { Id = "5", Role = "Finance Asst. Manager", Manager = "2", Color = "#2E95D8" },
        new HierarchicalDetails()   { Id = "6", Role = "Design Manager", Manager = "1", ChartType = "right", Color = "#1859B7" },
        new HierarchicalDetails()   { Id = "7", Role = "Design Supervisor", Manager = "6", Color = "#2E95D8" },
        new HierarchicalDetails()   { Id = "8", Role = "Development Supervisor", Manager = "6", Color = "#2E95D8" },
        new HierarchicalDetails()   { Id = "9", Role = "Drafting Supervisor", Manager = "6", Color = "#2E95D8" },
        new HierarchicalDetails()   { Id = "10", Role = "Operation Manager", Manager = "1", ChartType = "right", Color = "#1859B7" },
        new HierarchicalDetails()   { Id = "11", Role = "Statistic Department", Manager = "10", Color = "#2E95D8" },
        new HierarchicalDetails()   { Id = "12", Role = "Logistic Department", Manager = "10", Color = "#2E95D8" },
        new HierarchicalDetails()   { Id = "16", Role = "Marketing Manager", Manager = "1", ChartType = "right", Color = "#1859B7" },
        new HierarchicalDetails()   { Id = "17", Role = "Oversea sales Manager", Manager = "16", Color = "#2E95D8" },
        new HierarchicalDetails()   { Id = "18", Role = "Petroleum Manager", Manager = "16", Color = "#2E95D8" },
        new HierarchicalDetails()   { Id = "20", Role = "Service Dept. Manager", Manager = "16", Color = "#2E95D8" },
        new HierarchicalDetails()   { Id = "21", Role = "Quality Department", Manager = "16", Color = "#2E95D8" }
    };
}A complete working sample can be downloaded from GitHub
Note: In
DataSourceSettings, the type of theIDandParentIDproperties is string, and the providedDataSourceshould have a parent-child relationship. At least one node must have an emptyParentIDto act as the root.
Customizing the Properties
How to Change Orientation
Use the Orientation property to change the orientation at runtime. The following code shows how to change the layout.
@using Syncfusion.Blazor.Diagram

<SfDiagramComponent Height="600px" Width="500px" >
    <Layout Type="LayoutType.HierarchicalTree" @bind-Orientation="@_orientation"></Layout>
</SfDiagramComponent>

@code
{
    // Initializing the orientation value.
    private LayoutOrientation _orientation = LayoutOrientation.TopToBottom;

    public void UpdateOrientation()
    {
        // Update LayoutOrientation in runtime.
        _orientation = LayoutOrientation.BottomToTop;
    }
}
How to Update Spacing Between Nodes
Adjust the horizontal and vertical spacing for the diagram layout using the HorizontalSpacing and VerticalSpacing properties of the layout.
@using Syncfusion.Blazor.Diagram

<SfDiagramComponent @ref="_diagram" Width="900px" Height="800px">
    <Layout Type="LayoutType.HierarchicalTree" @bind-HorizontalSpacing="@_horizontalSpacing" @bind-VerticalSpacing="@_verticalSpacing"/>
</SfDiagramComponent>

@code
{
    // Initializing the Horizontal and Vertical value.
    private SfDiagramComponent _diagram;
    private int _horizontalSpacing = 40;
    private int _verticalSpacing = 50;

    // Update the spacing.
    public void UpdateSpacing()
    {
        _diagram.BeginUpdate();
        _horizontalSpacing += 10;
        _verticalSpacing += 10;
        _diagram.EndUpdateAsync();
    }
}
How to Update Margin
Use the Margin property to create padding around the layout within the viewport. This is useful to keep the tree away from the edges of the diagram.
@using Syncfusion.Blazor.Diagram

<SfDiagramComponent @ref="_diagram" Width="900px" Height="800px" >
  <Layout Type="LayoutType.HierarchicalTree">
     <LayoutMargin Top="@_top" Left="@_left"></LayoutMargin>
  </Layout>
</SfDiagramComponent>

@code
{
    // Initializing the Margin Top and Left value.
    private SfDiagramComponent _diagram;
    private int _left = 40;
    private int _top = 50;

    // Update the margin values.
    public void UpdateMargin()
    {
        _diagram.BeginUpdate();
        _left += 10;
        _top += 10;
        _diagram.EndUpdateAsync();
    }
}