Customizing Templates in Blazor ListView Component
23 Jun 202615 minutes to read
The ListView component is designed to customize each list items and group title. It uses Blazor Template engine to render the elements.
To customize the Blazor ListView component header, items, and group header using templates, you can check on this video.
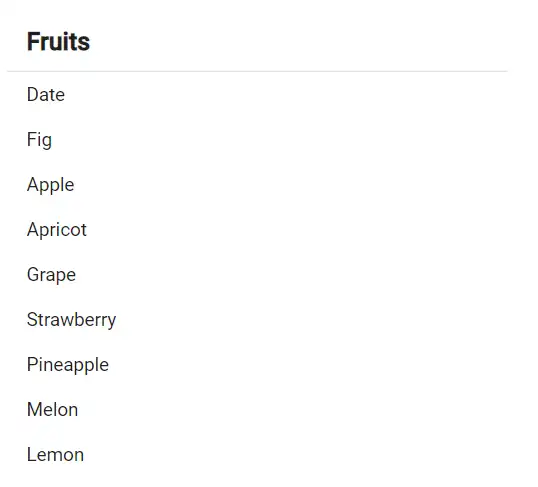
Header Template
ListView header can be customized with the help of the HeaderTemplate property. To customize header template in your application, set your customized template string to HeaderTemplate property along with ShowHeader property as true to display the ListView header.
@using Syncfusion.Blazor.Lists
<SfListView DataSource="@FruitsData" ShowHeader="true">
    <ListViewFieldSettings TValue="DataModel" Id="Id" Text="Text"></ListViewFieldSettings>
    <ListViewTemplates TValue="DataModel">
        <HeaderTemplate>
            <div class="headerContainer">
                <span class="fruitHeader">Fruits</span>
            </div>
        </HeaderTemplate>
    </ListViewTemplates>
</SfListView>

@code{
    List<DataModel> FruitsData = new List<DataModel>();

    protected override void OnInitialized()
    {
        base.OnInitialized();

        FruitsData.Add(new DataModel { Text = "Date", Id = "1" });
        FruitsData.Add(new DataModel { Text = "Fig", Id = "2" });
        FruitsData.Add(new DataModel { Text = "Apple", Id = "3" });
        FruitsData.Add(new DataModel { Text = "Apricot", Id = "4" });
        FruitsData.Add(new DataModel { Text = "Grape", Id = "5" });
        FruitsData.Add(new DataModel { Text = "Strawberry", Id = "6" });
        FruitsData.Add(new DataModel { Text = "Pineapple", Id = "7" });
        FruitsData.Add(new DataModel { Text = "Melon", Id = "8" });
        FruitsData.Add(new DataModel { Text = "Lemon", Id = "9" });
        FruitsData.Add(new DataModel { Text = "Cherry", Id = "10" });

    }

    public class DataModel
    {
        public string Text { get; set; }
        public string Id { get; set; }
    }
}
Template
ListView items can be customized with the help of the Template property. To customize list items in the application, set the customized template string to Template property.
The following built-in CSS classes can be used to customize the list-items.
| CSS class | Description |
|---|---|
| e-list-template, e-list-wrapper | These classes are used to differentiate normal and template rendering, which are mandatory for template rendering. The e-list-template class should be added to the root of the ListView element and e-list-wrapper class should be added to the template element wrapper. |
| e-list-content | This class is used to align list content and it should be added to the content element. <div class="e-list-wrapper"><span class="e-list-content">ListItem</span> </div>
|
| e-list-avatar | This class is used for avatar customization. It should be added to the template element wrapper. After adding it, we can customize our element with Avatar classes <div class="e-list-wrapper e-list-avatar"> <span class="e-avatar e-avatar-circle">MR</span><span class="e-list-content">ListItem</span></div>
|
| e-list-avatar-right | This class is used to align avatar to right side of the list item. It should be added to the template element wrapper. After adding it, customize the element with Avatar classes. <div class="e-list-wrapper e-list-avatar-right"> <span class="e-list-content">ListItem</span><span class="e-avatar e-avatar-circle">MR</span></div>
|
| e-list-badge | This class is used for badge customization. It should be added to the template element wrapper. After adding it, customize the element with Badge classes. <div class="e-list-wrapper e-list-badge"> <span class="e-list-content">ListItem</span><span class="e-badge e-badge-primary">MR</span></div>
|
| e-list-multi-line | This class is used for multi-line customization. It should be added to the template element wrapper. After adding it, customize List item’s header and description. <div class="e-list-wrapper e-list-multi-line"> <span class="e-list-content">ListItem</span></div>
|
| e-list-item-header | This class is used to align a list header and it should be added to the header element along with the multi-line class. <div class="e-list-wrapper e-list-multi-line"><span class="e-list-item-header">ListItem Header</span><span class="e-list-content">ListItem</span></div>
|
@using Syncfusion.Blazor.Lists
<SfListView Id="List"
             DataSource="@ListData"
             HeaderTitle="Contacts"
             ShowHeader="true"
             CssClass="e-list-template"
             Width="350"
             SortOrder="Syncfusion.Blazor.Lists.SortOrder.Ascending">
    <ListViewFieldSettings TValue="DataModel" Id="Id" Text="Text"></ListViewFieldSettings>
    <ListViewTemplates TValue="DataModel">
        <Template>
            <div class="e-list-wrapper e-list-multi-line e-list-avatar">
                @if (((context as DataModel).Avatar) != "")
                {
                <span class="e-avatar e-avatar-circle">@((context as DataModel).Avatar)</span>
                }
                else
                {
                    <span class="@((context as DataModel).Pic) e-avatar e-avatar-circle"> </span>
                }
                    <span class="e-list-item-header">@((context as DataModel).Text)</span>
            <span class="e-list-content">@((context as DataModel).Contact)</span>
            </div>
        </Template>
    </ListViewTemplates>
</SfListView>

@code{

    List<DataModel> ListData = new List<DataModel>();

    protected override void OnInitialized()
    {
        base.OnInitialized();
        ListData.Add(new DataModel
        {
            Text = "Jenifer",
            Contact = "(206) 555-985774",
            Id = "1",
            Avatar = "J",
            Pic = "pic01"
        });
        ListData.Add(new DataModel
        {
            Text = "Amenda",
            Contact = "(206) 555-3412",
            Id = "2",
            Avatar = "A",
            Pic = ""
        });
        ListData.Add(new DataModel
        {
            Text = "Isabella",
            Contact = "(206) 555-8122",
            Id = "4",
            Avatar = "",
            Pic = "pic02"
        });
        ListData.Add(new DataModel
        {
            Text = "William ",
            Contact = "(206) 555-9482",
            Id = "5",
            Avatar = "W",
            Pic = ""
        });
        ListData.Add(new DataModel
        {
            Text = "Jacob",
            Contact = "(71) 555-4848",
            Id = "6",
            Avatar = "",
            Pic = "pic04"
        });
        ListData.Add(new DataModel
        {
            Text = "Matthew",
            Contact = "(71) 555-7773",
            Id = "7",
            Avatar = "M",
            Pic = ""
        });
        ListData.Add(new DataModel
        {
            Text = "Oliver",
            Contact = "(71) 555-5598",
            Id = "8",
            Avatar = "",
            Pic = "pic03"
        });
        ListData.Add(new DataModel
        {
            Text = "Charlotte",
            Contact = "(206) 555-1189",
            Id = "9",
            Avatar = "C",
            Pic = ""
        });

    }

   public class DataModel
    {
        public string Id { get; set; }
        public string Text { get; set; }
        public string Contact { get; set; }
        public string Avatar { get; set; }
        public string Pic { get; set; }
    }
}

<style>
    .e-listview.e-control {
        width: 400px;
    }

    .pic01 {
        background-image: url("https://ej2.syncfusion.com/demos/src/grid/images/1.png");
    }

    .pic02 {
        background-image: url("https://ej2.syncfusion.com/demos/src/grid/images/3.png");
    }

    .pic03 {
        background-image: url("https://ej2.syncfusion.com/demos/src/grid/images/5.png");
    }

    .pic04 {
        background-image: url("https://ej2.syncfusion.com/demos/src/grid/images/2.png");
    }

    #List .e-list-item:nth-child(1) .e-avatar {
        background-color: #039be5;
    }

    #List .e-list-item:nth-child(2) .e-avatar {
        background-color: #e91e63;
    }

    #List .e-list-item:nth-child(6) .e-avatar {
        background-color: #009688;
    }

    #List .e-list-item:nth-child(8) .e-avatar {
        background-color: #000088;
    }
</style>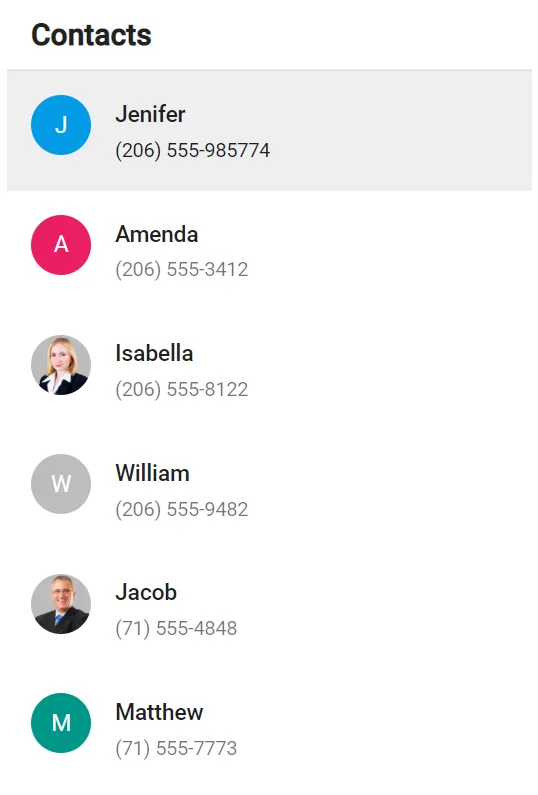
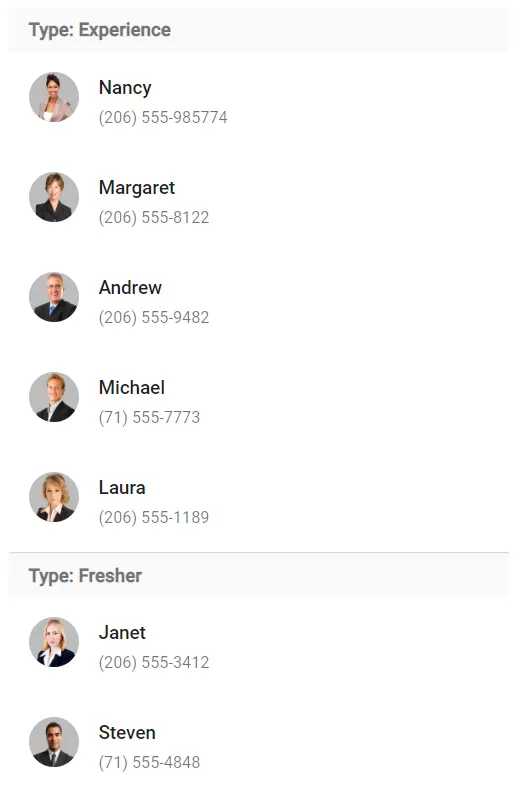
Group template
ListView group header can be customized with the help of the GroupTemplate property. To customize the group template in the application, set the customized template string to GroupTemplate property.
In the following example, ListView is grouped based on the category. The category of each list item should be mapped with GroupBy field of the data. The grouped list items have also displayed count in the group list header.
@using Syncfusion.Blazor.Lists
<SfListView ID="list" DataSource="@ListData" CssClass="e-list-template">
    <ListViewFieldSettings Id="Id" Text="Name" TValue="DataModel" GroupBy="Category"></ListViewFieldSettings>
    <ListViewTemplates TValue="DataModel">
        <Template>
            <div class="e-list-wrapper e-list-multi-line e-list-avatar">
                <img class="e-avatar e-avatar-circle" src=@context.Image style="background:#BCBCBC" />
                <span class="e-list-item-header">@context.Name</span>
                <span class="e-list-content">@context.Contact</span>
            </div>
        </Template>
        <GroupTemplate>
            <div>
                <span>Type: @context.Text</span>
            </div>
        </GroupTemplate>
    </ListViewTemplates>
</SfListView>

@code{

    List<DataModel> ListData = new List<DataModel>();

    protected override void OnInitialized()
    {
        base.OnInitialized();

        ListData.Add(new DataModel { Name = "Nancy", Contact = "(206) 555-985774", Id = "1", Image = "https://ej2.syncfusion.com/demos/src/grid/images/1.png", Category = "Experience" });
        ListData.Add(new DataModel { Name = "Janet", Contact = "(206) 555-3412", Id = "2", Image = "https://ej2.syncfusion.com/demos/src/grid/images/3.png", Category = "Fresher" });
        ListData.Add(new DataModel { Name = "Margaret", Contact = "(206) 555-8122", Id = "4", Image = "https://ej2.syncfusion.com/demos/src/grid/images/4.png", Category = "Experience" });
        ListData.Add(new DataModel { Name = "Andrew ", Contact = "(206) 555-9482", Id = "5", Image = "https://ej2.syncfusion.com/demos/src/grid/images/2.png", Category = "Experience" });
        ListData.Add(new DataModel { Name = "Steven", Contact = "(71) 555-4848", Id = "6", Image = "https://ej2.syncfusion.com/demos/src/grid/images/5.png", Category = "Fresher" });
        ListData.Add(new DataModel { Name = "Michael", Contact = "(71) 555-7773", Id = "7", Image = "https://ej2.syncfusion.com/demos/src/grid/images/6.png", Category = "Experience" });
        ListData.Add(new DataModel { Name = "Robert", Contact = "(71) 555-5598", Id = "8", Image = "https://ej2.syncfusion.com/demos/src/grid/images/7.png", Category = "Fresher" });
        ListData.Add(new DataModel { Name = "Laura", Contact = "(206) 555-1189", Id = "9", Image = "https://ej2.syncfusion.com/demos/src/grid/images/8.png", Category = "Experience" });
    }

    public class DataModel
    {
        public string Name { get; set; }
        public string Contact { get; set; }
        public string Id { get; set; }
        public string Image { get; set; }
        public string Category { get; set; }
    }

}

<style>
    .e-listview.e-control {
        width: 400px;
    }
</style>