Toolbar configuration in Markdown Editor Component
23 Jun 202612 minutes to read
The Blazor Markdown Editor provides a flexible toolbar that enhances the editing experience. Users can choose from multiple toolbar layouts, enable sticky behavior, and add custom tools based on their application requirements. This guide explains the available toolbar types, configuration options, and customization techniques.
Default toolbar items
By default, the Markdown Editor displays the following toolbar items:
Bold,Italic,|,Formats,Blockquote,OrderedList,UnorderedList,|,CreateLink,Image,|,SourceCode,Undo,Redo
These default items provide essential text editing features, including text formatting, list creation, block quotes, media insertion, and undo/redo actions.
Type of toolbar
The Blazor Markdown Editor allows you to configure different type of toolbars using the Type property of the RichTextEditorToolbarSettings.
The available toolbar types are:
- Expand
- MultiRow
- Scrollable
- Popup
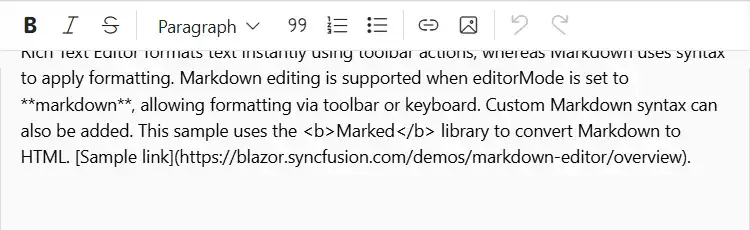
Expand Toolbar Configuration
The expand toolbar allows to hide the overflowing items in the next line by using the ToolbarType.Expand property. By clicking the expand arrow, you can view the overflowing toolbar items. The default mode of toolbar is Expand.
@using Syncfusion.Blazor.RichTextEditor

<SfRichTextEditor EditorMode="EditorMode.Markdown" value="@MarkdownValue" Width="500px">
    <RichTextEditorToolbarSettings Items="@Tools" Type="ToolbarType.Expand"/>
</SfRichTextEditor>

@code {

    private string MarkdownValue { get; set; } = @"Rich Text Editor formats text instantly using toolbar actions, whereas Markdown uses syntax to apply formatting. Markdown editing is supported when editorMode is set to **markdown**, allowing formatting via toolbar or keyboard. Custom Markdown syntax can also be added. This sample uses the <b>Marked</b> library to convert Markdown to HTML. [Sample link](https://blazor.syncfusion.com/demos/markdown-editor/overview).";

    private List<ToolbarItemModel> Tools = new List<ToolbarItemModel>()
    {
        new ToolbarItemModel() { Command = ToolbarCommand.Bold },
        new ToolbarItemModel() { Command = ToolbarCommand.Italic },
        new ToolbarItemModel() { Command = ToolbarCommand.StrikeThrough },
        new ToolbarItemModel() { Command = ToolbarCommand.Separator },
        new ToolbarItemModel() { Command = ToolbarCommand.Formats },
        new ToolbarItemModel() { Command = ToolbarCommand.SuperScript },
        new ToolbarItemModel() { Command = ToolbarCommand.SubScript },
        new ToolbarItemModel() { Command = ToolbarCommand.Blockquote },
        new ToolbarItemModel() { Command = ToolbarCommand.Separator },
        new ToolbarItemModel() { Command = ToolbarCommand.OrderedList },
        new ToolbarItemModel() { Command = ToolbarCommand.UnorderedList },
        new ToolbarItemModel() { Command = ToolbarCommand.CreateLink },
        new ToolbarItemModel() { Command = ToolbarCommand.Image },
        new ToolbarItemModel() { Command = ToolbarCommand.CreateTable },
        new ToolbarItemModel() { Command = ToolbarCommand.SourceCode },
        new ToolbarItemModel() { Command = ToolbarCommand.FullScreen },
        new ToolbarItemModel() { Command = ToolbarCommand.Separator },
        new ToolbarItemModel() { Command = ToolbarCommand.Undo },
        new ToolbarItemModel() { Command = ToolbarCommand.Redo }
    };
}
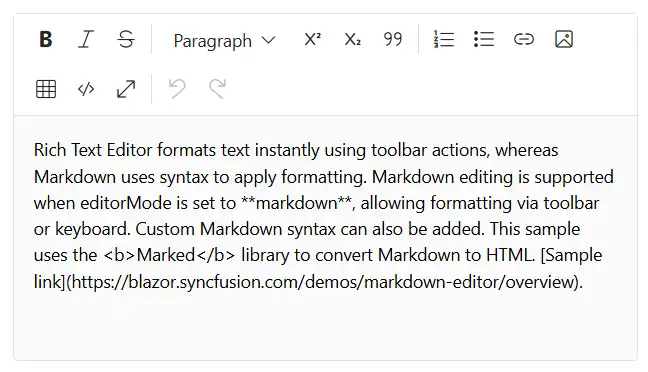
Multi-row Toolbar Setup
You can display the toolbar items in a row-wise format by using the ToolbarType.MultiRow property. All toolbar items are visible always.
@using Syncfusion.Blazor.RichTextEditor

<SfRichTextEditor EditorMode="EditorMode.Markdown" value="@MarkdownValue" Width="500px">
    <RichTextEditorToolbarSettings Items="@Tools" Type="ToolbarType.MultiRow"/>
</SfRichTextEditor>

@code {

    private string MarkdownValue { get; set; } = @"Rich Text Editor formats text instantly using toolbar actions, whereas Markdown uses syntax to apply formatting. Markdown editing is supported when editorMode is set to **markdown**, allowing formatting via toolbar or keyboard. Custom Markdown syntax can also be added. This sample uses the <b>Marked</b> library to convert Markdown to HTML. [Sample link](https://blazor.syncfusion.com/demos/markdown-editor/overview).";

    private List<ToolbarItemModel> Tools = new List<ToolbarItemModel>()
    {
        new ToolbarItemModel() { Command = ToolbarCommand.Bold },
        new ToolbarItemModel() { Command = ToolbarCommand.Italic },
        new ToolbarItemModel() { Command = ToolbarCommand.StrikeThrough },
        new ToolbarItemModel() { Command = ToolbarCommand.Separator },
        new ToolbarItemModel() { Command = ToolbarCommand.Formats },
        new ToolbarItemModel() { Command = ToolbarCommand.SuperScript },
        new ToolbarItemModel() { Command = ToolbarCommand.SubScript },
        new ToolbarItemModel() { Command = ToolbarCommand.Blockquote },
        new ToolbarItemModel() { Command = ToolbarCommand.Separator },
        new ToolbarItemModel() { Command = ToolbarCommand.OrderedList },
        new ToolbarItemModel() { Command = ToolbarCommand.UnorderedList },
        new ToolbarItemModel() { Command = ToolbarCommand.CreateLink },
        new ToolbarItemModel() { Command = ToolbarCommand.Image },
        new ToolbarItemModel() { Command = ToolbarCommand.CreateTable },
        new ToolbarItemModel() { Command = ToolbarCommand.SourceCode },
        new ToolbarItemModel() { Command = ToolbarCommand.FullScreen },
        new ToolbarItemModel() { Command = ToolbarCommand.Separator },
        new ToolbarItemModel() { Command = ToolbarCommand.Undo },
        new ToolbarItemModel() { Command = ToolbarCommand.Redo }
    };
}
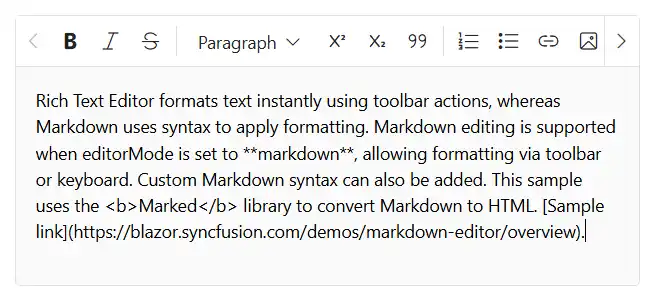
Scrollable Toolbar Implementation
You can display the toolbar items in a single line with horizontal scrolling by using the ToolbarType.Scrollable property.
@using Syncfusion.Blazor.RichTextEditor

<SfRichTextEditor EditorMode="EditorMode.Markdown" value="@MarkdownValue" Width="500px">
    <RichTextEditorToolbarSettings Items="@Tools" Type="ToolbarType.Scrollable"/>
</SfRichTextEditor>

@code {

    private string MarkdownValue { get; set; } = @"Rich Text Editor formats text instantly using toolbar actions, whereas Markdown uses syntax to apply formatting. Markdown editing is supported when editorMode is set to **markdown**, allowing formatting via toolbar or keyboard. Custom Markdown syntax can also be added. This sample uses the <b>Marked</b> library to convert Markdown to HTML. [Sample link](https://blazor.syncfusion.com/demos/markdown-editor/overview).";

    private List<ToolbarItemModel> Tools = new List<ToolbarItemModel>()
    {
        new ToolbarItemModel() { Command = ToolbarCommand.Bold },
        new ToolbarItemModel() { Command = ToolbarCommand.Italic },
        new ToolbarItemModel() { Command = ToolbarCommand.StrikeThrough },
        new ToolbarItemModel() { Command = ToolbarCommand.Separator },
        new ToolbarItemModel() { Command = ToolbarCommand.Formats },
        new ToolbarItemModel() { Command = ToolbarCommand.SuperScript },
        new ToolbarItemModel() { Command = ToolbarCommand.SubScript },
        new ToolbarItemModel() { Command = ToolbarCommand.Blockquote },
        new ToolbarItemModel() { Command = ToolbarCommand.Separator },
        new ToolbarItemModel() { Command = ToolbarCommand.OrderedList },
        new ToolbarItemModel() { Command = ToolbarCommand.UnorderedList },
        new ToolbarItemModel() { Command = ToolbarCommand.CreateLink },
        new ToolbarItemModel() { Command = ToolbarCommand.Image },
        new ToolbarItemModel() { Command = ToolbarCommand.CreateTable },
        new ToolbarItemModel() { Command = ToolbarCommand.SourceCode },
        new ToolbarItemModel() { Command = ToolbarCommand.FullScreen },
        new ToolbarItemModel() { Command = ToolbarCommand.Separator },
        new ToolbarItemModel() { Command = ToolbarCommand.Undo },
        new ToolbarItemModel() { Command = ToolbarCommand.Redo }
    };
}
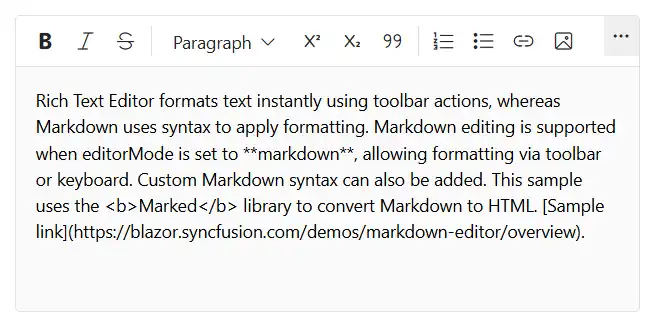
Popup Toolbar Implementation
The ToolbarType.Popup toolbar property displays items in a popup container, ideal for limited space or smaller screens.
@using Syncfusion.Blazor.RichTextEditor

<SfRichTextEditor EditorMode="EditorMode.Markdown" value="@MarkdownValue" Width="500px">
    <RichTextEditorToolbarSettings Items="@Tools" Type="ToolbarType.Popup" />
</SfRichTextEditor>

@code {

    private string MarkdownValue { get; set; } = @"Rich Text Editor formats text instantly using toolbar actions, whereas Markdown uses syntax to apply formatting. Markdown editing is supported when editorMode is set to **markdown**, allowing formatting via toolbar or keyboard. Custom Markdown syntax can also be added. This sample uses the <b>Marked</b> library to convert Markdown to HTML. [Sample link](https://blazor.syncfusion.com/demos/markdown-editor/overview).";

    private List<ToolbarItemModel> Tools = new List<ToolbarItemModel>()
    {
        new ToolbarItemModel() { Command = ToolbarCommand.Bold },
        new ToolbarItemModel() { Command = ToolbarCommand.Italic },
        new ToolbarItemModel() { Command = ToolbarCommand.StrikeThrough },
        new ToolbarItemModel() { Command = ToolbarCommand.Separator },
        new ToolbarItemModel() { Command = ToolbarCommand.Formats },
        new ToolbarItemModel() { Command = ToolbarCommand.SuperScript },
        new ToolbarItemModel() { Command = ToolbarCommand.SubScript },
        new ToolbarItemModel() { Command = ToolbarCommand.Blockquote },
        new ToolbarItemModel() { Command = ToolbarCommand.Separator },
        new ToolbarItemModel() { Command = ToolbarCommand.OrderedList },
        new ToolbarItemModel() { Command = ToolbarCommand.UnorderedList },
        new ToolbarItemModel() { Command = ToolbarCommand.CreateLink },
        new ToolbarItemModel() { Command = ToolbarCommand.Image },
        new ToolbarItemModel() { Command = ToolbarCommand.CreateTable },
        new ToolbarItemModel() { Command = ToolbarCommand.SourceCode },
        new ToolbarItemModel() { Command = ToolbarCommand.FullScreen },
        new ToolbarItemModel() { Command = ToolbarCommand.Separator },
        new ToolbarItemModel() { Command = ToolbarCommand.Undo },
        new ToolbarItemModel() { Command = ToolbarCommand.Redo }
    };
}
Sticky Toolbar Behavior
By default, toolbar is float at the top of the Rich Text Editor on scrolling. It can be customized by specifying the offset of the floating toolbar from documents top position using FloatingToolbarOffset.
You can enable or disable the floating toolbar using RichTextEditorToolbarSettings.EnableFloating property.
@using Syncfusion.Blazor.RichTextEditor

<SfRichTextEditor Height="800px" EditorMode="EditorMode.Markdown" Value="@MarkdownValue">
    <RichTextEditorToolbarSettings EnableFloating="true" />
</SfRichTextEditor>

@code{

    private string MarkdownValue { get; set; } = @"Rich Text Editor formats text instantly using toolbar actions, whereas Markdown uses syntax to apply formatting. Markdown editing is supported when editorMode is set to **markdown**, allowing formatting via toolbar or keyboard. Custom Markdown syntax can also be added. This sample uses the <b>Marked</b> library to convert Markdown to HTML. [Sample link](https://blazor.syncfusion.com/demos/markdown-editor/overview).";

}
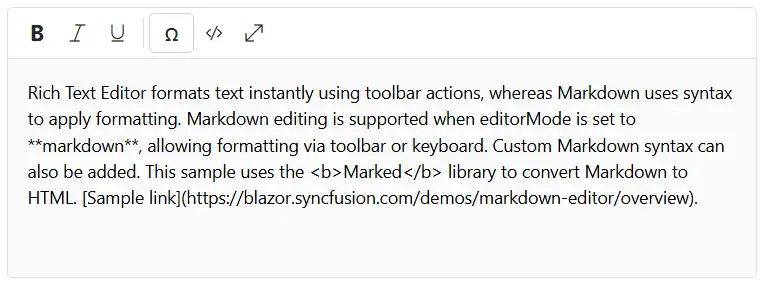
Adding Custom Toolbar Items
The Rich Text Editor allows you to configure your own tools to its toolbar using the RichTextEditorCustomToolbarItems tag directive within a RichTextEditorToolbarSettings. The tools can be plain text, icon, or HTML template. Also, define the order and group where the tool should be included.
This sample shows how to add your tools to the toolbar of the Rich Text Editor. The Ω command is added to insert special characters in the editor.
Refer to the following code sample for the custom tool with the tooltip text, which will be included in the RichTextEditorToolbarSettings.Items property.
@using Syncfusion.Blazor.Buttons
@using Syncfusion.Blazor.RichTextEditor

<SfRichTextEditor EditorMode="EditorMode.Markdown" Value="@MarkdownValue">
    <RichTextEditorToolbarSettings Items="@Tools">
        <RichTextEditorCustomToolbarItems>
            <RichTextEditorCustomToolbarItem Name="Symbol">
                <Template>
                    <SfButton @onclick="ClickHandler">Ω</SfButton>
                </Template>
            </RichTextEditorCustomToolbarItem>
        </RichTextEditorCustomToolbarItems>
    </RichTextEditorToolbarSettings>
</SfRichTextEditor>

@code {

    private string MarkdownValue { get; set; } = @"Rich Text Editor formats text instantly using toolbar actions, whereas Markdown uses syntax to apply formatting. Markdown editing is supported when editorMode is set to **markdown**, allowing formatting via toolbar or keyboard. Custom Markdown syntax can also be added. This sample uses the <b>Marked</b> library to convert Markdown to HTML. [Sample link](https://blazor.syncfusion.com/demos/markdown-editor/overview).";

    private List<ToolbarItemModel> Tools = new List<ToolbarItemModel>()
    {
        new ToolbarItemModel() { Command = ToolbarCommand.Bold },
        new ToolbarItemModel() { Command = ToolbarCommand.Italic },
        new ToolbarItemModel() { Command = ToolbarCommand.Underline },
        new ToolbarItemModel() { Command = ToolbarCommand.Separator },
        new ToolbarItemModel() { Name = "Symbol", TooltipText = "Insert Symbol" },
        new ToolbarItemModel() { Command = ToolbarCommand.SourceCode },
        new ToolbarItemModel() { Command = ToolbarCommand.FullScreen }
    };
    private void ClickHandler()
    {
        //Perform your action here
    }
}