How can I help you?
Styling Tools in Blazor Rich Text Editor Component
5 Nov 202521 minutes to read
Font family
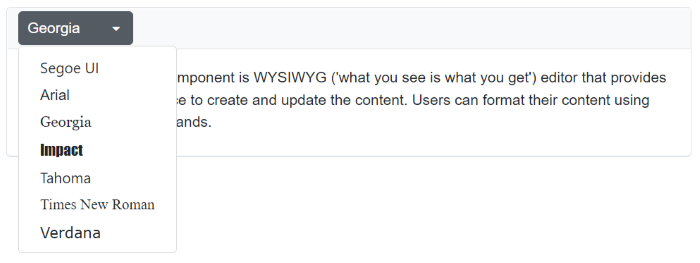
By default, the editor is initialized with the default items of the font family. To change it, select a different font family from the drop-down menu in the editor’s toolbar.
To apply a different font style to a section of the content, select the text you would like to change and select a required font style from the drop-down to apply the changes to the selected text.
Built-in font family
The following table lists the default font name and width of the FontName dropdown and the available list of font names.
| Default Key | Default Value |
|---|---|
| Width | 65px |
| Items | new List<DropDownItemModel>() { new DropDownItemModel() { Text = “Segoe UI”, Value = “Segoe UI” }, new DropDownItemModel() { Text = “Arial”, Value = “Arial,Helvetica,sans-serif” }, new DropDownItemModel() { Text = “Georgia”, Value = “Georgia,serif” }, new DropDownItemModel() { Text = “Impact”, Value = “Impact,Charcoal,sans-serif” }, new DropDownItemModel() { Text = “Tahoma”, Value = “Tahoma,Geneva,sans-serif” }, new DropDownItemModel() { Text = “Times New Roman”, Value = “Times New Roman,Times,serif” }, new DropDownItemModel() { Text = “Verdana”, Value = “Verdana,Geneva,sans-serif”} }; |
@using Syncfusion.Blazor.RichTextEditor

<SfRichTextEditor>
    <RichTextEditorToolbarSettings Items="@Tools" />
    <RichTextEditorFontFamily Default="Georgia" />
    <p>The Rich Text Editor component is the WYSIWYG ('what you see is what you get') editor that provides the best user experience to create and update the content. Users can format their content using standard toolbar commands.</p>
</SfRichTextEditor>
@code{

    private List<ToolbarItemModel> Tools = new List<ToolbarItemModel>()
    {
        new ToolbarItemModel() { Command = ToolbarCommand.FontName }
    };
}
Custom font family
The Rich Text Editor provides support for custom fonts with an existing list.
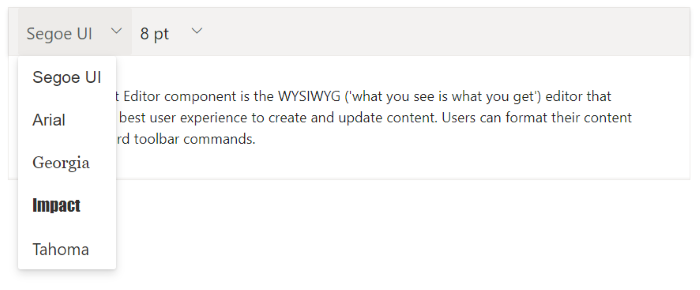
If you want to add additional font names and font sizes to the font drop-down, pass the font information as List<DropDownItemModel> data to the RichTextEditorFontFamily.Items property.
@using Syncfusion.Blazor.RichTextEditor

<SfRichTextEditor CssClass="customClass">
    <RichTextEditorToolbarSettings Items="@Tools" />
    <RichTextEditorFontFamily Default="Georgia" Items="@FontFamilyItems" />
    <p>The Rich Text Editor component is the WYSIWYG ('what you see is what you get') editor that provides the best user experience to create and update content. Users can format their content using standard toolbar commands.</p>
</SfRichTextEditor>

@code{
    private List<ToolbarItemModel> Tools = new List<ToolbarItemModel>()
    {
        new ToolbarItemModel() { Command = ToolbarCommand.FontName }
    };
   private List<DropDownItemModel> FontFamilyItems = new List<DropDownItemModel>()
    {
        new DropDownItemModel() { Text = "Segoe UI", Value = "Arial,Helvetica,sans-serif" },
        new DropDownItemModel() { Text = "Arial", Value = "Roboto" },
        new DropDownItemModel() { Text = "Georgia", Value = "Georgia,serif" },
        new DropDownItemModel() { Text = "Impact", Value = "Impact,Charcoal,sans-serif" },
        new DropDownItemModel() { Text = "Tahoma", Value = "Tahoma,Geneva,sans-serif" }
    };
}
Google font support
To use web fonts in the Rich Text Editor, the web fonts do not need to be present on the local machine. To add the web fonts to the Rich Text Editor, refer to the web font links and add the font names in the RichTextEditorFontFamily tag.
The following font style links are referred in the page.
Blazor Server App
-
For .NET 6 app, refer style in the
<head>of the ~/Pages/_Layout.cshtml file. -
For .NET 7 app, refer style in the
<head>of the ~/Pages/_Host.cshtml file.
<head>
    <link rel="stylesheet" href="http://fonts.googleapis.com/css?family=Roboto">
    <link rel="stylesheet" href="http://fonts.googleapis.com/css?family=Great+Vibes">
</head>
<head>
<link rel="stylesheet" href="http://fonts.googleapis.com/css?family=Roboto">
<link rel="stylesheet" href="http://fonts.googleapis.com/css?family=Great+Vibes">
</head>Blazor WebAssembly App
For Blazor WebAssembly App, refer style in the <head> of the ~/index.html file.
<head>
    <link rel="stylesheet" href="http://fonts.googleapis.com/css?family=Roboto">
    <link rel="stylesheet" href="http://fonts.googleapis.com/css?family=Great+Vibes">
</head>@using Syncfusion.Blazor.RichTextEditor
<SfRichTextEditor>
<RichTextEditorToolbarSettings Items="@Tools" />
<RichTextEditorFontFamily Items="@FontFamilyItems" />
<p>The Rich Text Editor component is the WYSIWYG ('what you see is what you get') editor that provides the best user experience to create and update content. Users can format their content using standard toolbar commands.</p>
</SfRichTextEditor>
@code {
private List<DropDownItemModel> FontFamilyItems = new List<DropDownItemModel>()
{
new DropDownItemModel() { CssClass = "e-segoe-ui", Command = "Font", SubCommand = "FontName", Text = "Segoe UI", Value = "Arial,Helvetica,sans-serif" },
new DropDownItemModel() { CssClass = "e-arial", Command = "Font", SubCommand = "FontName", Text = "Arial", Value = "Roboto" },
new DropDownItemModel() { CssClass = "e-georgia", Command = "Font", SubCommand = "FontName", Text = "Georgia", Value = "Georgia,serif" },
new DropDownItemModel() { CssClass = "e-impact", Command = "Font", SubCommand = "FontName", Text = "Impact", Value = "Impact,Charcoal,sans-serif" },
new DropDownItemModel() { CssClass = "e-tahoma", Command = "Font", SubCommand = "FontName", Text = "Tahoma", Value = "Tahoma,Geneva,sans-serif" }
};
private List<ToolbarItemModel> Tools = new List<ToolbarItemModel>()
{
new ToolbarItemModel() { Command = ToolbarCommand.FontName },
new ToolbarItemModel() { Command = ToolbarCommand.FontSize },
};
}
Font size
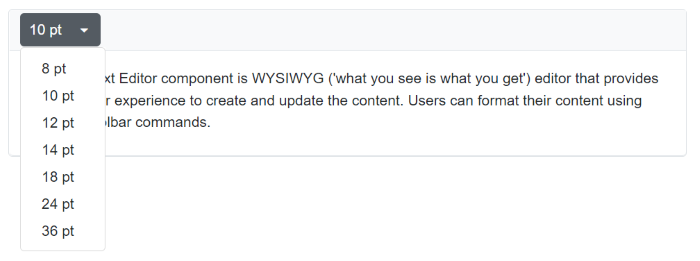
By default, the editor is initialized with default items for font size. To change it, select a different font size from the drop-down menu in the editor’s toolbar.
To apply a different font style to a section of the content, select the text that you would like to change and select a required font style from the drop-down to apply the changes to the selected text.
Built-in font size
The following table lists the default font size and width of the FontSize dropdown and the available list of the font size.
| Default Key | Default Value |
|---|---|
| Width | 35px. |
| Items | new List<DropDownItemModel>() { new DropDownItemModel() { Text = “8 pt”, Value = “8pt” }, new DropDownItemModel() { Text = “10 pt”, Value = “10pt” }, new DropDownItemModel() { Text = “12 pt”, Value = “12pt” }, new DropDownItemModel() { Text = “14 pt”, Value = “14pt” }, new DropDownItemModel() { Text = “18 pt”, Value = “18pt” }, new DropDownItemModel() { Text = “24 pt”, Value = “24pt” }, new DropDownItemModel() { Text = “36 pt”, Value = “36pt” } }; |
@using Syncfusion.Blazor.RichTextEditor

<SfRichTextEditor>
    <RichTextEditorToolbarSettings Items="@Tools" />
    <RichTextEditorFontSize Default="10pt" />
    <p>The Rich Text Editor component is the WYSIWYG ('what you see is what you get') editor that provides the best user experience to create and update content. Users can format their content using standard toolbar commands.</p>
</SfRichTextEditor>
@code{

    private List<ToolbarItemModel> Tools = new List<ToolbarItemModel>()
    {
        new ToolbarItemModel() { Command = ToolbarCommand.FontSize }
    };
}
Custom font size
The Rich Text Editor provides support for customizing the font size with the existing list. If you want to add additional font sizes to the font drop-down, pass the font information as List<DropDownItemModel> data to the RichTextEditorFontSize.Items property.
@using Syncfusion.Blazor.RichTextEditor

<SfRichTextEditor CssClass="customClass">
    <RichTextEditorToolbarSettings Items="@Tools" />
    <RichTextEditorFontSize Items="@FontSizeItems" />
    <p>The Rich Text Editor component is the WYSIWYG ('what you see is what you get') editor that provides the best user experience to create and update content. Users can format their content using standard toolbar commands.</p>
</SfRichTextEditor>

@code{
    private List<ToolbarItemModel> Tools = new List<ToolbarItemModel>()
    {
        new ToolbarItemModel() { Command = ToolbarCommand.FontSize },
    };
    private List<DropDownItemModel> FontSizeItems = new List<DropDownItemModel>()
    {
        new DropDownItemModel() { Text = "8 pt", Value = "8pt" },
        new DropDownItemModel() { Text = "10 pt", Value = "10pt" },
        new DropDownItemModel() { Text = "12 pt", Value = "12pt" },
        new DropDownItemModel() { Text = "14 pt", Value = "14pt" },
        new DropDownItemModel() { Text = "42 pt", Value = "42pt" }
    };
}
Font and background color
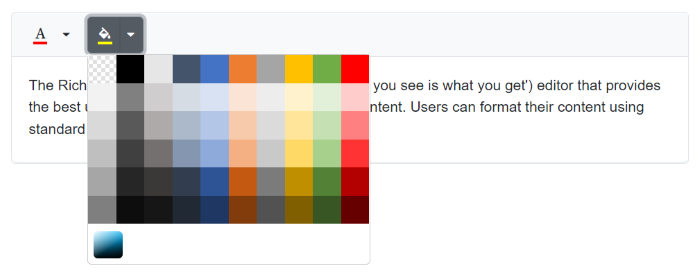
You can add the FontColor and BackgroundColor tool in the Rich Text Editor toolbar using the RichTextEditorFontSize.Items property.
@using Syncfusion.Blazor.RichTextEditor

<SfRichTextEditor>
    <RichTextEditorToolbarSettings Items="@Tools" />
    <RichTextEditorBackgroundColor ModeSwitcher="true" />
    <RichTextEditorFontColor ModeSwitcher="true" />
    <p>The Rich Text Editor component is the WYSIWYG ('what you see is what you get') editor that provides the best user experience to create and update content. Users can format their content using standard toolbar commands.</p>
</SfRichTextEditor>

@code{
    private List<ToolbarItemModel> Tools = new List<ToolbarItemModel>()
    {
        new ToolbarItemModel() { Command = ToolbarCommand.FontColor },
        new ToolbarItemModel() { Command = ToolbarCommand.BackgroundColor },
    };
}
Custom font and background colors
To apply font or background colors to selected content in the Rich Text Editor, use the Font Color and Background Color tools available in the toolbar.
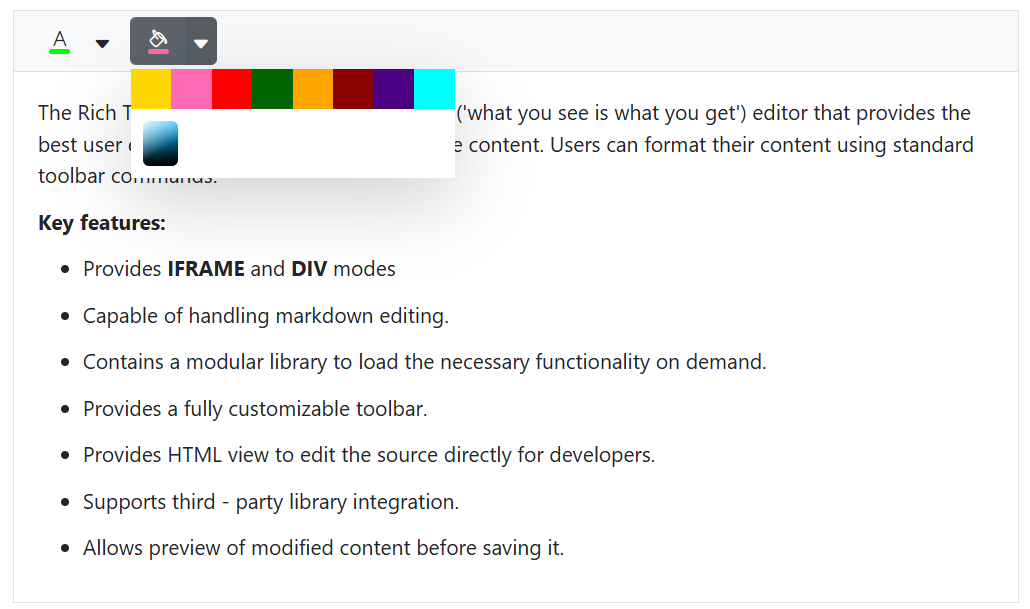
The Rich Text Editor supports providing custom font color and background color with an existing list through the ColorCode field of the RichTextEditorFontColor and RichTextEditorBackgroundColor.
The RichTextEditorFontColor and RichTextEditorBackgroundColor tag has two modes of Picker and Palette. The Palette mode has a predefined set of the ColorCode, and in the Picker mode, more colors have been provided. Through the ModeSwitcher, switch between these two options.
Show recent color
The ShowRecentColors feature in the Rich Text Editor provides quick access to a row of recently used colors displayed below the main palette. This streamlines editing by keeping frequently used colors easily accessible, improving styling efficiency and consistency.
This feature can be enabled separately for the RichTextEditorFontColor and RichTextEditorBackgroundColor tools, giving flexibility based on formatting needs. It is especially helpful when working with consistent color themes, eliminating the need to repeatedly search through the full palette.
@using Syncfusion.Blazor.RichTextEditor

<SfRichTextEditor>
    <RichTextEditorToolbarSettings Items="@Tools" />
    <RichTextEditorBackgroundColor ShowRecentColors="true" />
    <RichTextEditorFontColor ShowRecentColors="true" />
    <p>The Rich Text Editor component is the WYSIWYG ('what you see is what you get') editor that provides the best user experience to create and update content. Users can format their content using standard toolbar commands.</p>
</SfRichTextEditor>

@code{
    private List<ToolbarItemModel> Tools = new List<ToolbarItemModel>()
    {
        new ToolbarItemModel() { Command = ToolbarCommand.FontColor },
        new ToolbarItemModel() { Command = ToolbarCommand.BackgroundColor },
        new ToolbarItemModel() { Command = ToolbarCommand.Bold },
        new ToolbarItemModel() { Command = ToolbarCommand.Italic },
        new ToolbarItemModel() { Command = ToolbarCommand.Underline },
        new ToolbarItemModel() { Command = ToolbarCommand.Formats },
        new ToolbarItemModel() { Command = ToolbarCommand.Alignments },
        new ToolbarItemModel() { Command = ToolbarCommand.Blockquote },
        new ToolbarItemModel() { Command = ToolbarCommand.OrderedList },
        new ToolbarItemModel() { Command = ToolbarCommand.UnorderedList },
        new ToolbarItemModel() { Command = ToolbarCommand.CreateLink },
        new ToolbarItemModel() { Command = ToolbarCommand.Image },
        new ToolbarItemModel() { Command = ToolbarCommand.SourceCode },
        new ToolbarItemModel() { Command = ToolbarCommand.Undo },
        new ToolbarItemModel() { Command = ToolbarCommand.Redo }
    };
}
Built-in editor content styles
By default, the content styles of the Rich Text Editor are not returned while retrieving the HTML value from the editor. So, the styles are not applied when using the HTML value outside the editor. To get the styles from the Rich Text Editor’s content for your application, copy and use the following styles directly in your application. The styles listed are used in the UI elements of the Rich Text Editor.
NOTE
Make sure to add a CSS class
e-rte-contentto the content container.
.e-rte-content p {
  margin: 0 0 10px;
  margin-bottom: 10px;
}

.e-rte-content li {
  margin-bottom: 10px;
}

.e-rte-content h1 {
  font-size: 2.17em;
  font-weight: 400;
  line-height: 1;
  margin: 10px 0;
}

.e-rte-content h2 {
  font-size: 1.74em;
  font-weight: 400;
  margin: 10px 0;
}

.e-rte-content h3 {
  font-size: 1.31em;
  font-weight: 400;
  margin: 10px 0;
}

.e-rte-content h4 {
  font-size: 1em;
  font-weight: 400;
  margin: 0;
}

.e-rte-content h5 {
  font-size: 00.8em;
  font-weight: 400;
  margin: 0;
}

.e-rte-content h6 {
  font-size: 00.65em;
  font-weight: 400;
  margin: 0;
}

.e-rte-content blockquote {
  margin: 10px 0;
  margin-left: 0;
  padding-left: 5px;
}

.e-rte-content pre {
  background-color: inherit;
  border: 0;
  border-radius: 0;
  color: #333;
  font-size: inherit;
  line-height: inherit;
  margin: 0 0 10px;
  overflow: visible;
  padding: 0;
  white-space: pre-wrap;
  word-break: inherit;
  word-wrap: break-word;
}

.e-rte-content strong, .e-rte-content b {
  font-weight: 700;
}

.e-rte-content a {
  text-decoration: none;
  -webkit-user-select: auto;
  -ms-user-select: auto;
  user-select: auto;
}

.e-rte-content a:hover {
  text-decoration: underline;
}

.e-rte-content h3 + h4,
.e-rte-content h4 + h5,
.e-rte-content h5 + h6 {
  margin-top: 00.6em;
}

.e-rte-content .e-rte-image.e-imgbreak {
  border: 0;
  cursor: pointer;
  display: block;
  float: none;
  margin: 5px auto;
  max-width: 100%;
  position: relative;
}

.e-rte-content .e-rte-image {
  border: 0;
  cursor: pointer;
  display: block;
  float: none;
  margin: auto;
  max-width: 100%;
  position: relative;
}

.e-rte-content .e-rte-image.e-imginline {
  display: inline-block;
  float: none;
  margin-left: 5px;
  margin-right: 5px;
  max-width: calc(100% - (2 * 5px));
  vertical-align: bottom;
}

.e-rte-content .e-rte-image.e-imgcenter {
  cursor: pointer;
  display: block;
  float: none;
  margin: 5px auto;
  max-width: 100%;
  position: relative;
}

.e-rte-content .e-rte-image.e-imgleft {
  float: left;
  margin: 0 5px 0 0;
  text-align: left;
}

.e-rte-content .e-rte-image.e-imgright {
  float: right;
  margin: 0 0 0 5px;
  text-align: right;
}

.e-rte-content .e-rte-img-caption {
  display: inline-block;
  margin: 5px auto;
  max-width: 100%;
  position: relative;
}

.e-rte-content .e-rte-img-caption.e-caption-inline {
  display: inline-block;
  margin: 5px auto;
  margin-left: 5px;
  margin-right: 5px;
  max-width: calc(100% - (2 * 5px));
  position: relative;
  text-align: center;
  vertical-align: bottom;
}

.e-rte-content .e-rte-img-caption.e-imgcenter {
  display: block;
}

.e-rte-content .e-rte-img-caption .e-rte-image.e-imgright,
.e-rte-content .e-rte-img-caption .e-rte-image.e-imgleft {
  float: none;
  margin: 0;
}

.e-rte-content .e-rte-table {
  border-collapse: collapse;
  empty-cells: show;
}

.e-rte-content .e-rte-table td,
.e-rte-content .e-rte-table th {
  border: 1px solid #bdbdbd;
  height: 20px;
  min-width: 20px;
  padding: 2px 5px;
  vertical-align: middle;
}

.e-rte-content .e-rte-table.e-dashed-border td,
.e-rte-content .e-rte-table.e-dashed-border th {
  border-style: dashed;
}

.e-rte-content .e-rte-img-caption .e-img-inner {
  box-sizing: border-box;
  display: block;
  font-size: 16px;
  font-weight: initial;
  margin: auto;
  opacity: .9;
  position: relative;
  text-align: center;
  width: 100%;
}

.e-rte-content .e-rte-img-caption .e-img-wrap {
  display: inline-block;
  margin: auto;
  padding: 0;
  width: 100%;
}

.e-rte-content blockquote {
  border-left: solid 2px #333;
}

.e-rte-content a {
  color: #2e2ef1;
}

.e-rte-content .e-rte-table th {
  background-color: #e0e0e0;
}
Customizing numbered and bulleted lists
This feature allows users to change the appearance of the numbered and bulleted lists. Users can also apply different numbering or bullet formats lists such as lowercase greek, upper Alpha, square, and circles. Also, customize the style type of the lists to be populated in the dropdown from the toolbar by using the NumberFormatList and BulletFormatList properties in the Rich Text Editor.
@using Syncfusion.Blazor.RichTextEditor

<SfRichTextEditor>
    <RichTextEditorToolbarSettings Items="@Tools" />
    <p>The Rich Text Editor component is the WYSIWYG ('what you see is what you get') editor that provides the best user experience to create and update content. Users can format their content using standard toolbar commands.</p>
    <p><b> Key features:</b></p>
    <ul>
    <li><p> Provides <b>IFRAME</b> and <b>DIV</b> modes </p></li>
    <li><p> Capable of handling markdown editing.</p></li>
    </ul>
</SfRichTextEditor>

@code {
    private List<ToolbarItemModel> Tools = new List<ToolbarItemModel>()
    {
        new ToolbarItemModel() { Command = ToolbarCommand.NumberFormatList },
        new ToolbarItemModel() { Command = ToolbarCommand.BulletFormatList },
    };
}
Formatting code blocks
Configure code block formatting as a separate toolbar button by adding the InsertCode Command within the RichTextEditorToolbarSettings.Items property. The InsertCode button has a toggle state to apply code block formatting to the editor and remove code block formatting from the editor.
The following code will configure the InsertCode button in the toolbar and set the background color to pre tag for highlighting the code block.
@using Syncfusion.Blazor.RichTextEditor

<SfRichTextEditor>
    <RichTextEditorToolbarSettings Items="@Tools" />
        <p>The Rich Text Editor component is the WYSIWYG ('what you see is what you get') editor that provides the best user experience to create and update content. Users can format their content using standard toolbar commands.</p>
</SfRichTextEditor>

<style>
    .e-richtexteditor .e-rte-content .e-content pre {
        padding: 10px;
        background: #F4F5F7 !important;
    }
</style>

@code{
    private List<ToolbarItemModel> Tools = new List<ToolbarItemModel>()
    {
        new ToolbarItemModel() { Command = ToolbarCommand.InsertCode }
    };
}