Import and Export in Blazor Rich Text Editor
24 Jun 202624 minutes to read
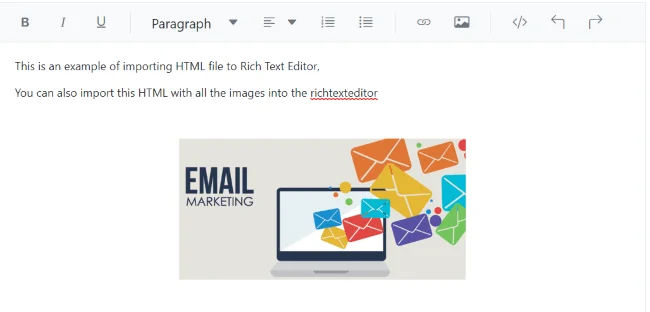
Import to HTML file
The Rich Text Editor allows you to load an external HTML file in the editor’s content, which contains the text with styling and images. Read the HTML file from your path using the Stream Reader class and assign it to the editor with the @bind-Value property.
@using System.IO
@using Syncfusion.Blazor.RichTextEditor

<SfRichTextEditor @bind-Value="@HtmlString">
    <p>Rich Text Editor allows to insert images from online source as well as local computer where you want to insert the image in your content.</p>
    <p><b>Get started Quick Toolbar to click on the image</b></p>
    <p>It is possible to add custom style on the selected image inside the Rich Text Editor through quick toolbar.</p>
</SfRichTextEditor>

@code {
    private string HtmlString { get; set; }
    private string PathToHTMLFile = Path.GetFullPath(Directory.GetCurrentDirectory() + @"\wwwroot\HtmlFiles\HtmlTest.html");
    protected override void OnInitialized()
    {
        using (FileStream fs = File.Open(PathToHTMLFile, FileMode.Open, FileAccess.ReadWrite))
        {
            using (StreamReader sr = new StreamReader(fs))
            {
                // Importing values from HTML file.
                HtmlString = sr.ReadToEnd();
            }
        }
    }
}
NOTE
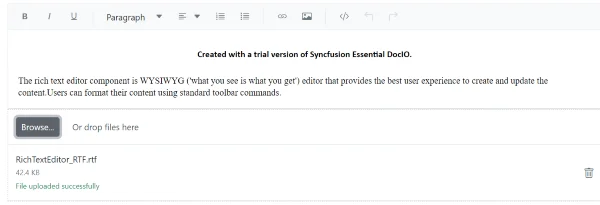
Import to RTF file
To import an RTF file into the editor, use the file uploader component and retrieve the file content from the uploader’s success event. Then, import the RTF values into the editor.
@using Import_RTF_File.Data
@using Syncfusion.Blazor.RichTextEditor
@using Syncfusion.Blazor.Inputs
@inject ExportService exportService

<SfRichTextEditor ID="defalt_RTE" @ref="RteObj" @bind-Value="@rteValue" EnableHtmlSanitizer="false">
    <RichTextEditorImageSettings SaveUrl="api/SampleData/Save" Path="../images/"></RichTextEditorImageSettings>
</SfRichTextEditor>
<SfUploader ID="UploadFiles">
    <UploaderAsyncSettings SaveUrl="api/SampleData/Import" RemoveUrl="https://aspnetmvc.syncfusion.com/services/api/uploadbox/Remove"></UploaderAsyncSettings>
    <UploaderEvents Success="@onSuccess"></UploaderEvents>
</SfUploader>

@code {
    SfRichTextEditor RteObj;
    private string rteValue { get; set; } = "<div>Example of Importing Text File into the Editor</div>";
    public void onSuccess(SuccessEventArgs args)
    {
        var headers = args.Response.Headers.ToString();
        var header = headers.Split("rtevalue: ");
        header = header[1].Split("\r");
        this.rteValue = header[0];
    }
}
NOTE
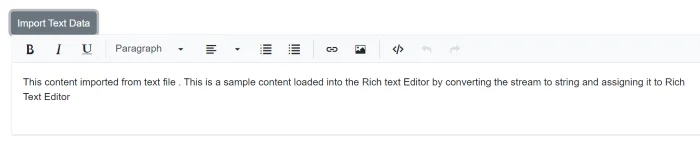
Import text file to editor
The Rich Text Editor allows you to load an external text file into the editor. Read the text file from your path using the Stream Reader class and assign it to the editor with the @bind-Value property.
@using Syncfusion.Blazor.RichTextEditor
@using Syncfusion.Blazor.Buttons
@using System.IO
@using System.Text

<SfButton OnClick="@importStream">Import Text Data</SfButton>
<SfRichTextEditor ID="defalt_RTE" @ref="RteObj" @bind-Value="@rteValue" EnableHtmlSanitizer="false">
</SfRichTextEditor>

@code {
    SfRichTextEditor RteObj;
    public string text { get; set; }
    private string rteValue { get; set; } = "<p>Click the button to import text file</p>";
    private string HtmlString { get; set; }
    private string PathToHTMLFile = Path.GetFullPath(Directory.GetCurrentDirectory() + @"\wwwroot\RTESample.txt");
    public void importStream()
    {
        using (FileStream fs = File.Open(PathToHTMLFile, FileMode.Open, FileAccess.ReadWrite))
        {
            using (StreamReader sr = new StreamReader(fs))
            {
                HtmlString = sr.ReadToEnd();
                this.rteValue = HtmlString;
            }
        }
    }
}
NOTE
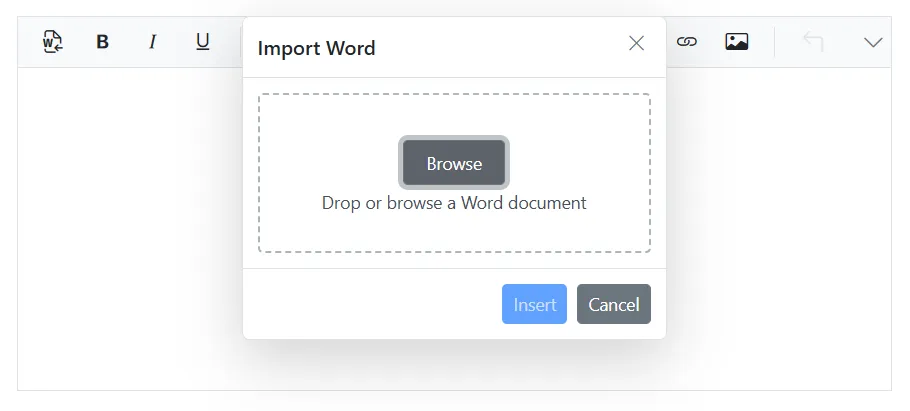
Importing content from Microsoft Word
The Rich Text Editor provides functionality to import content directly from Microsoft Word documents, while preserving the original formatting, structure, and styles. This feature ensures a smooth transition of content from Word to the editor, maintaining elements such as headings, lists, tables, and text styles.
To integrate an ImportWord option into the Rich Text Editor toolbar, you can add it as a custom toolbar items using the items property in toolbarSettings.
The following example illustrates how to set up the ImportWord in the Rich Text Editor to facilitate content importation from Word documents:
@using System.IO
@using Syncfusion.Blazor.RichTextEditor

<SfRichTextEditor Height="300px" Width="700px">
    <RichTextEditorToolbarSettings Items="@Tools"></RichTextEditorToolbarSettings>
    <RichTextEditorImportWord ServiceUrl="https://blazor.syncfusion.com/services/production/api/RichTextEditor/ImportFromWord"></RichTextEditorImportWord>
</SfRichTextEditor>

@code {
     private List<ToolbarItemModel> Tools = new List<ToolbarItemModel>()
    {
        new ToolbarItemModel() { Command = ToolbarCommand.ImportWord },
        new ToolbarItemModel() { Command = ToolbarCommand.Bold },
        new ToolbarItemModel() { Command = ToolbarCommand.Italic },
        new ToolbarItemModel() { Command = ToolbarCommand.Underline },
        new ToolbarItemModel() { Command = ToolbarCommand.Separator },
        new ToolbarItemModel() { Command = ToolbarCommand.Formats },
        new ToolbarItemModel() { Command = ToolbarCommand.Alignments },
        new ToolbarItemModel() { Command = ToolbarCommand.BulletFormatList },
        new ToolbarItemModel() { Command = ToolbarCommand.NumberFormatList },
        new ToolbarItemModel() { Command = ToolbarCommand.Separator},
        new ToolbarItemModel() { Command = ToolbarCommand.CreateLink },
        new ToolbarItemModel() { Command = ToolbarCommand.Image },
        new ToolbarItemModel() { Command = ToolbarCommand.Separator },
        new ToolbarItemModel() { Command = ToolbarCommand.SourceCode },
        new ToolbarItemModel() { Command = ToolbarCommand.Separator },
        new ToolbarItemModel() { Command = ToolbarCommand.Undo },
        new ToolbarItemModel() { Command = ToolbarCommand.Redo }
    };
}
Maximum file size restriction
You can restrict the word uploaded from the local machine when the uploaded word file size is greater than the allowed size by using the maxFileSize property. By default, the maximum file size is 30000000 bytes. You can configure this size as follows.
@using System.IO
@using Syncfusion.Blazor.RichTextEditor

<SfRichTextEditor Height="300px">
    <RichTextEditorToolbarSettings Items="@Tools"></RichTextEditorToolbarSettings>
    <RichTextEditorImportWord ServiceUrl="https://blazor.syncfusion.com/services/production/api/RichTextEditor/ImportFromWord" MaxFileSize="10000000"></RichTextEditorImportWord>
</SfRichTextEditor>

@code {
     private List<ToolbarItemModel> Tools = new List<ToolbarItemModel>()
    {
        new ToolbarItemModel() { Command = ToolbarCommand.ImportWord },
        new ToolbarItemModel() { Command = ToolbarCommand.Bold },
        new ToolbarItemModel() { Command = ToolbarCommand.Italic },
        new ToolbarItemModel() { Command = ToolbarCommand.Underline },
        new ToolbarItemModel() { Command = ToolbarCommand.Separator },
        new ToolbarItemModel() { Command = ToolbarCommand.Formats },
        new ToolbarItemModel() { Command = ToolbarCommand.Alignments },
        new ToolbarItemModel() { Command = ToolbarCommand.BulletFormatList },
        new ToolbarItemModel() { Command = ToolbarCommand.NumberFormatList },
        new ToolbarItemModel() { Command = ToolbarCommand.Separator},
        new ToolbarItemModel() { Command = ToolbarCommand.CreateLink },
        new ToolbarItemModel() { Command = ToolbarCommand.Image },
        new ToolbarItemModel() { Command = ToolbarCommand.Separator },
        new ToolbarItemModel() { Command = ToolbarCommand.SourceCode },
        new ToolbarItemModel() { Command = ToolbarCommand.Separator },
        new ToolbarItemModel() { Command = ToolbarCommand.Undo },
        new ToolbarItemModel() { Command = ToolbarCommand.Redo }
    };
}
Secure word file upload with authentication
You can add additional data with the word file uploaded from the Rich Text Editor on the client side, which can even be received on the server side. By using the FileUploading event and its customFormData argument, you can pass parameters to the controller action. On the server side, you can fetch the custom headers by accessing the form collection from the current request, which retrieves the values sent using the POST method.
@using System.IO
@using Syncfusion.Blazor.RichTextEditor

<SfRichTextEditor Height="300px">
    <RichTextEditorToolbarSettings Items="@Tools"></RichTextEditorToolbarSettings>
    <RichTextEditorEvents FileUploading="@FileUploading"></RichTextEditorEvents>
    <RichTextEditorImportWord ServiceUrl="api/Word/ImportFromWord" MaxFileSize="10000000"></RichTextEditorImportWord>
</SfRichTextEditor>

@code {
    private void FileUploading(FileUploadingEventArgs args)
    {
        var accessToken = "Authorization_token";
        // adding custom form Data
        args.CustomFormData = new List<object> { new { Authorization = accessToken } };
    }
     private List<ToolbarItemModel> Tools = new List<ToolbarItemModel>()
    {
        new ToolbarItemModel() { Command = ToolbarCommand.ImportWord },
        new ToolbarItemModel() { Command = ToolbarCommand.Bold },
        new ToolbarItemModel() { Command = ToolbarCommand.Italic },
        new ToolbarItemModel() { Command = ToolbarCommand.Underline },
        new ToolbarItemModel() { Command = ToolbarCommand.Separator },
        new ToolbarItemModel() { Command = ToolbarCommand.Formats },
        new ToolbarItemModel() { Command = ToolbarCommand.Alignments },
        new ToolbarItemModel() { Command = ToolbarCommand.BulletFormatList },
        new ToolbarItemModel() { Command = ToolbarCommand.NumberFormatList },
        new ToolbarItemModel() { Command = ToolbarCommand.Separator},
        new ToolbarItemModel() { Command = ToolbarCommand.CreateLink },
        new ToolbarItemModel() { Command = ToolbarCommand.Image },
        new ToolbarItemModel() { Command = ToolbarCommand.Separator },
        new ToolbarItemModel() { Command = ToolbarCommand.SourceCode },
        new ToolbarItemModel() { Command = ToolbarCommand.Separator },
        new ToolbarItemModel() { Command = ToolbarCommand.Undo },
        new ToolbarItemModel() { Command = ToolbarCommand.Redo }
    };
}using System;
using System.IO;
using System.Net.Http.Headers;
using Microsoft.AspNetCore.Mvc;
using Microsoft.AspNetCore.Http;
using System.Collections.Generic;
using Microsoft.AspNetCore.Hosting;
using Microsoft.AspNetCore.Http.Features;
namespace WordUpload.Controllers
{
[ApiController]
public class WordController : ControllerBase
{
private readonly IWebHostEnvironment hostingEnv;
public WordController(IWebHostEnvironment env)
{
this.hostingEnv = env;
}
[HttpPost("[action]")]
[Route("api/Word/ImportFromWord")]
public void ImportFromWord(IList<IFormFile> UploadFiles)
{
string currentPath = Request.Form["Authorization"].ToString();
}
}
}Export to RTF file
Use the Syncfusion.DocIO libraries to export the Rich Text Editor content to the RTF format. Ensure the Syncfusion.DocIO.NET NuGet package is installed in your project.
Click Export, and use Syncfusion.DocIO libraries to convert the Rich Text Editor content to an RTF file. Use the following code to export the RTF file.
@using Syncfusion.Blazor.RichTextEditor
@using Syncfusion.Blazor.Inputs
@inject NavigationManager navigationManager
@inject HttpClient Http
@using System.Net.Http
@using System.Threading.Tasks

<Syncfusion.Blazor.Buttons.SfButton OnClick="OnExport">Export</Syncfusion.Blazor.Buttons.SfButton>
<SfRichTextEditor ID="customtool" @ref="RteObj" @bind-Value="@rteValue" EnableHtmlSanitizer="false">
    <RichTextEditorImageSettings SaveUrl="api/SampleData/Save" Path="../images/"></RichTextEditorImageSettings>
</SfRichTextEditor>

@code {
    SfRichTextEditor RteObj;
    [Inject]
    IJSRuntime jsRuntime { get; set; }
    private string rteValue { get; set; } = "<p>Click the export button to download the RTE content in RTF format</p>";
    public async Task OnExport()
    {
        HttpClientHandler clientHandler = new HttpClientHandler();
        clientHandler.ServerCertificateCustomValidationCallback = (sender, cert, chain, sslPolicyErrors) => { return true; };
        HttpClient client = new HttpClient(clientHandler);
        var content = new StringContent(rteValue);
        content.Headers.Add("value", rteValue);
        await client.PostAsync(navigationManager.Uri + "api/SampleData/ExportToRtf", content);
        await SampleInterop.SaveAs<object>(jsRuntime, "Sample.rtf");
    }
}
NOTE
Export to HTML file
Use Syncfusion.DocIO libraries to export the Rich Text Editor content to HTML format. Make sure the required NuGet package is referenced in your project.
While clicking on the export button, it makes a call to the Export to HTML service.
<button @onclick="ExportFile">Export</button>
<SfRichTextEditor ID="defalt_RTE" @ref="RteObj" @bind-Value="@rteValue">
    <ChildContent>
        <RichTextEditorToolbarSettings Items="@Tools" Type="ToolbarType.Expand"></RichTextEditorToolbarSettings>
    </ChildContent>
</SfRichTextEditor>

@code {
    [Inject]
    IJSRuntime jsRuntime { get; set; }
    SfRichTextEditor RteObj;
    private string rteValue { get; set; } = "<p>Starting Text</p>";
    public object[] Tools = new object[]{
        "Bold", "Italic", "Underline", "SubScript", "SuperScript", "StrikeThrough",
        "FontName", "FontSize", "FontColor", "BackgroundColor",
        "LowerCase", "UpperCase", "|",
        "Formats", "Alignments", "OrderedList", "UnorderedList",
        "Outdent", "Indent", "|", "CreateTable",
        "CreateLink", "Image", "|", "ClearFormat", "Print",
        "SourceCode", "FullScreen", "|", "Undo", "Redo"
    };
    public void ExportFile()
    {
        exportService.ExportToHtml(rteValue);
    }
}
Here, the Syncfusion.DocIO values are converted into document type and then converted to HTML format.
public void ExportToHtml(string value)
{
    WordDocument document = GetDocument(value);
    //Saves the Word document to MemoryStream
    MemoryStream stream = new MemoryStream();
    document.Save(stream, FormatType.Html);
    stream.Position = 0;
    FileStream outputStream = new FileStream("filename.html", FileMode.Create, FileAccess.ReadWrite, FileShare.ReadWrite);
    document.Save(outputStream, FormatType.Html);
    document.Close();
    outputStream.Flush();
    outputStream.Dispose();
    // You can upload this stream to the azure
}
public WordDocument GetDocument(string htmlText)
{
    WordDocument document = null;
    MemoryStream stream = new MemoryStream();
    StreamWriter writer = new StreamWriter(stream, System.Text.Encoding.Default);
    htmlText = htmlText.Replace("\"", "'");
    XmlConversion XmlText = new XmlConversion(htmlText);
    XhtmlConversion XhtmlText = new XhtmlConversion(XmlText);
    writer.Write(XhtmlText.ToString());
    writer.Flush();
    stream.Position = 0;
    document = new WordDocument(stream, FormatType.Html, XHTMLValidationType.None);
    return document;
}
NOTE
Export to PDF / Microsoft Word
The Rich Text Editor’s export functionality allows users to convert their edited content into PDF or Word documents with a single click, preserving all text styles, images, tables, and other formatting elements.
You can add ExportWord and ExportPdf tools to the Rich Text Editor toolbar using the RichTextEditorToolbarSettings.Items property.
To enable the ExportWord and ExportPdf functionality, the ServiceUrl property must be correctly configured within the RichTextEditorExportWord and RichTextEditorExportPdf. These API endpoints handle the export process and manage the server-side generation of Word and PDF files, respectively.
The following code block provides a detailed explanation of the API endpoint used for the content export functionality:
public class ExportParam
{
    public string html { get; set; }
}

[AcceptVerbs("Post")]
[EnableCors("AllowAllOrigins")]
[Route("ExportToPdf")]
public ActionResult ExportToPdf([FromBody] ExportParam args)
{
    string htmlString = args?.html;
    if (string.IsNullOrEmpty(htmlString)) // Fixed: Added closing parenthesis
    {
        return BadRequest("HTML content is empty."); // Fixed: Return proper HTTP status instead of null
    }
    using (WordDocument wordDocument = new WordDocument())
    {
        wordDocument.EnsureMinimal();
        wordDocument.HTMLImportSettings.ImageNodeVisited += OpenImage;
        wordDocument.LastParagraph.AppendHTML(htmlString);
        DocIORenderer render = new DocIORenderer();
        PdfDocument pdfDocument = render.ConvertToPDF(wordDocument);
        wordDocument.HTMLImportSettings.ImageNodeVisited -= OpenImage;
        using (MemoryStream stream = new MemoryStream())
        {
            pdfDocument.Save(stream);
            return File(stream.ToArray(), System.Net.Mime.MediaTypeNames.Application.Pdf, "Sample.pdf");
        }
    }
}

[AcceptVerbs("Post")]
[EnableCors("AllowAllOrigins")]
[Route("ExportToDocx")]
public FileStreamResult ExportToDocx([FromBody] ExportParam args)
{
    string htmlString = args?.html;
    if (string.IsNullOrEmpty(htmlString)) // Fixed: Added closing parenthesis
    {
        return null;
    }
    // Fixed: Removed the 'using' block from MemoryStream so it stays open for the file transfer
    MemoryStream stream = new MemoryStream();
    using (WordDocument document = new WordDocument())
    {
        document.EnsureMinimal();
        document.HTMLImportSettings.ImageNodeVisited += OpenImage;
        bool isValidHtml = document.LastSection.Body.IsValidXHTML(htmlString, XHTMLValidationType.None);
        if (isValidHtml)
        {
            document.Sections[0].Body.Paragraphs[0].AppendHTML(htmlString);
        }
        document.HTMLImportSettings.ImageNodeVisited -= OpenImage;
        document.Save(stream, FormatType.Docx);
    } // WordDocument is disposed here safely
    stream.Position = 0; // Reset position so the file downloader can read it from the start
    // Fixed: Updated to correct modern DOCX MIME type
    return File(stream, "application/vnd.openxmlformats-officedocument.wordprocessingml.document", "Result.docx");
}
The FileName and Stylesheet properties within the ExportWord and ExportPdf allow for the customization of file names and stylesheets for the exported documents, respectively.
The ExportWord and ExportPdf functionality is integrated within the ActionBegin and ActionComplete events. If the cancel property is set to true in the ActionBegin event argument, the execution of the ExportWord and ExportPdf functionality can be prevented.
The ActionBegin event argument includes an ExportValue property, which contains the content to be exported. This content can be modified by configuring the ActionBegin event.
The following example demonstrates how to configure the ExportWord and ExportPdf tools in the Rich Text Editor, facilitating the export of content into Word or PDF documents:
@using Syncfusion.Blazor.RichTextEditor
@using Syncfusion.Blazor.Inputs
@using Syncfusion.Blazor.DropDowns
@inject IJSRuntime JS
<div class="control-section">
    <div class="control-wrapper">
        <div class="">
            <SfRichTextEditor @ref="EditorRef" ID="RT_Editor" ShowCharCount="true" AutoSaveOnIdle="true" EnableTabKey="true" EnableXhtml="true" Placeholder="@PlaceHolderText">
                <h2 style="text-align: center;">Invitation to Microsoft Webinar Meet-Up</h2><p>
                    Dear Guest,
                </p><p>
                    We're thrilled to extend a special invitation to you for an exclusive Microsoft webinar meet-up, where we'll explore the latest innovations and insights driving the future of technology. As a valued member of our community, we believe this event will offer invaluable knowledge and networking opportunities.
                </p><h2>Event Details:</h2><table class="e-rte-table" style="width: 100%; height: 125px;">
                    <tbody>
                    <tr style="height: 20%;">
                        <th class="">Time:</th>
                        <td>10:00 AM - 12:00 PM</td>
                    </tr>
                    <tr style="height: 20%;">
                        <th>Duration:</th>
                        <td>2 hours</td>
                    </tr>
                    <tr style="height: 20%;">
                        <th>Platform:</th>
                        <td>Microsoft Teams</td>
                    </tr>
                </tbody></table><p><br></p><h2>Agenda:</h2><ul>
                    <li>Introduction to Cutting-Edge Microsoft Technologies</li>
                    <li>Deep Dive into AI in Business: Leveraging Microsoft Azure Solutions</li>
                    <li>Live Q&A Session with Industry Experts</li>
                    <li>Networking Opportunities with Peers and Professionals</li>
                </ul><h2>Why Attend?</h2><ul>
                    <li>Gain insights into the latest trends and advancements in technology.</li>
                    <li>Interact with industry experts and expand your professional network.</li>
                    <li>Get your questions answered in real-time during the live Q&A session.</li>
                    <li>Access exclusive resources and offers available only to webinar attendees.</li>
                </ul><p>
                    Feel free to invite your colleagues and peers who might benefit from this enriching experience. Simply forward this email to them or share the event details.
                </p><p>
                    We're looking forward to your participation and to exploring the exciting world of Microsoft technology together. Should you have any questions or require further information, please don't hesitate to contact us at <a href="mailto:[email protected]">[email protected]</a>.</p><p>
                <br></p><p>Warm regards,</p><p>John Doe<br>Event Coordinator<br>ABC Company</p>
                <RichTextEditorToolbarSettings Items="@Tools"></RichTextEditorToolbarSettings>
                 <RichTextEditorExportPdf ServiceUrl="https://blazor.syncfusion.com/services/production/api/RichTextEditor/ExportToPdf" FileName="RichTextEditor.pdf"></RichTextEditorExportPdf>
                <RichTextEditorExportWord ServiceUrl="https://blazor.syncfusion.com/services/production/api/RichTextEditor/ExportToDocx" FileName="RichTextEditor.docx"></RichTextEditorExportWord>
                <RichTextEditorQuickToolbarSettings Table="@TableQuickToolbarItems" ShowOnRightClick="true" />
                <RichTextEditorImageSettings SaveUrl="@SaveURL" Path="@Path"></RichTextEditorImageSettings>
            </SfRichTextEditor>
        </div>
    </div>
</div>
@code {
    SfRichTextEditor EditorRef;
    private string SaveURL = "https://blazor.syncfusion.com/services/production/api/RichTextEditor/SaveFile";
    private string Path = "https://blazor.syncfusion.com/services/production/RichTextEditor/";
    private string PlaceHolderText = "Type something or use @ to tag a user...";
    private List<ToolbarItemModel> Tools = new List<ToolbarItemModel>()
    {
        new ToolbarItemModel() { Command = ToolbarCommand.Undo },
        new ToolbarItemModel() { Command = ToolbarCommand.Redo },
        new ToolbarItemModel() { Command = ToolbarCommand.Separator },
        new ToolbarItemModel() { Command = ToolbarCommand.ExportWord },
        new ToolbarItemModel() { Command = ToolbarCommand.ExportPdf },
        new ToolbarItemModel() { Command = ToolbarCommand.Separator },
        new ToolbarItemModel() { Command = ToolbarCommand.Bold },
        new ToolbarItemModel() { Command = ToolbarCommand.Italic },
        new ToolbarItemModel() { Command = ToolbarCommand.Underline },
        new ToolbarItemModel() { Command = ToolbarCommand.StrikeThrough },
        new ToolbarItemModel() { Command = ToolbarCommand.SuperScript },
        new ToolbarItemModel() { Command = ToolbarCommand.SubScript },
        new ToolbarItemModel() { Command = ToolbarCommand.Separator },
        new ToolbarItemModel() { Command = ToolbarCommand.FontName },
        new ToolbarItemModel() { Command = ToolbarCommand.FontSize },
        new ToolbarItemModel() { Command = ToolbarCommand.FontColor },
        new ToolbarItemModel() { Command = ToolbarCommand.BackgroundColor },
        new ToolbarItemModel() { Command = ToolbarCommand.Separator },
        new ToolbarItemModel() { Command = ToolbarCommand.LowerCase },
        new ToolbarItemModel() { Command = ToolbarCommand.UpperCase },
        new ToolbarItemModel() { Command = ToolbarCommand.Separator },
        new ToolbarItemModel() { Command = ToolbarCommand.Formats },
        new ToolbarItemModel() { Command = ToolbarCommand.Alignments },
        new ToolbarItemModel() { Command = ToolbarCommand.Blockquote },
        new ToolbarItemModel() { Command = ToolbarCommand.Separator },
        new ToolbarItemModel() { Command = ToolbarCommand.NumberFormatList },
        new ToolbarItemModel() { Command = ToolbarCommand.BulletFormatList },
        new ToolbarItemModel() { Command = ToolbarCommand.Separator },
        new ToolbarItemModel() { Command = ToolbarCommand.Outdent },
        new ToolbarItemModel() { Command = ToolbarCommand.Indent },
        new ToolbarItemModel() { Command = ToolbarCommand.Separator },
        new ToolbarItemModel() { Command = ToolbarCommand.CreateLink },
        new ToolbarItemModel() { Command = ToolbarCommand.Image },
        new ToolbarItemModel() { Command = ToolbarCommand.Video },
        new ToolbarItemModel() { Command = ToolbarCommand.Audio },
        new ToolbarItemModel() { Command = ToolbarCommand.CreateTable },
        new ToolbarItemModel() { Command = ToolbarCommand.Separator },
        new ToolbarItemModel() { Command = ToolbarCommand.ClearFormat },
        new ToolbarItemModel() { Command = ToolbarCommand.Print },
        new ToolbarItemModel() { Command = ToolbarCommand.SourceCode },
        new ToolbarItemModel() { Command = ToolbarCommand.FullScreen }
    };
    private List<TableToolbarItemModel> TableQuickToolbarItems = new List<TableToolbarItemModel>()
    {
        new TableToolbarItemModel() { Command = TableToolbarCommand.TableHeader },
        new TableToolbarItemModel() { Command = TableToolbarCommand.TableRows },
        new TableToolbarItemModel() { Command = TableToolbarCommand.TableColumns },
        new TableToolbarItemModel() { Command = TableToolbarCommand.TableCell },
        new TableToolbarItemModel() { Command = TableToolbarCommand.HorizontalSeparator },
        new TableToolbarItemModel() { Command = TableToolbarCommand.BackgroundColor },
        new TableToolbarItemModel() { Command = TableToolbarCommand.TableRemove },
        new TableToolbarItemModel() { Command = TableToolbarCommand.TableCellVerticalAlign },
        new TableToolbarItemModel() { Command = TableToolbarCommand.Styles }
    };
}
Exporting Rich Text Editor content to PDF or word using external tools
By default, when exporting content from the Blazor Rich Text Editor to generate PDF or Word documents using external tools (instead of Syncfusion’s built-in export services), the editor’s internal styles are not included in the retrieved HTML. This can lead to formatting inconsistencies in the final output.
To preserve the intended appearance of the content, you should manually apply the following CSS styles to the exported HTML container.
Make sure to add a CSS class
e-rte-contentto the content container.
.e-rte-content {
    font-size: 1em;
    font-weight: 400;
    margin: 0;
}
html {
    height: auto;
    margin: 0;
}
body {
    margin: 0;
    color: #333;
    word-wrap: break-word;
}
.e-content {
    min-height: 100px;
    outline: 0 solid transparent;
    padding: 16px;
    position: relative;
    overflow-x: auto;
    font-weight: normal;
    line-height: 1.5;
    font-size: 14px;
    text-align: inherit;
    font-family: \"Roboto\", \"Segoe UI\", \"GeezaPro\", \"DejaVu Serif\", \"sans-serif\", \"-apple-system\", \"BlinkMacSystemFont\";
}
p {
    margin-top: 0;
    margin-right: 0;
    margin-bottom: 10px;
    margin-left: 0;
}
h1 {
    font-size: 2.857em;
    font-weight: 600;
    line-height: 1.2;
    margin-top: 10px;
    margin-right: 0;
    margin-bottom: 10px;
    margin-left: 0;
}
h2 {
    font-size: 2.285em;
    font-weight: 600;
    line-height: 1.2;
    margin-top: 10px;
    margin-right: 0;
    margin-bottom: 10px;
    margin-left: 0;
}
h3 {
    font-size: 2em;
    font-weight: 600;
    line-height: 1.2;
    margin-top: 10px;
    margin-right: 0;
    margin-bottom: 10px;
    margin-left: 0;
}
h4 {
    font-size: 1.714em;
    font-weight: 600;
    line-height: 1.2;
    margin-top: 10px;
    margin-right: 0;
    margin-bottom: 10px;
    margin-left: 0;
}
h5 {
    font-size: 1.428em;
    font-weight: 600;
    line-height: 1.2;
    margin-top: 10px;
    margin-right: 0;
    margin-bottom: 10px;
    margin-left: 0;
}
h6 {
    font-size: 1.142em;
    font-weight: 600;
    line-height: 1.5;
    margin-top: 10px;
    margin-right: 0;
    margin-bottom: 10px;
    margin-left: 0;
}
blockquote {
    margin-top: 10px;
    margin-right: 0;
    margin-bottom: 10px;
    margin-left: 0;
    padding-left: 12px;
    border-left: 2px solid #5c5c5c;
}
pre {
    border: 0;
    border-radius: 0;
    color: #333;
    font-size: inherit;
    line-height: inherit;
    margin-top: 0;
    margin-right: 0;
    margin-bottom: 10px;
    margin-left: 0;
    overflow: visible;
    padding: 0;
    white-space: pre-wrap;
    word-break: inherit;
    word-wrap: break-word;
}
code {
    background-color: #9d9d9d26;
    color: #ed484c;
}
strong {
    font-weight: bold;
}
b {
    font-weight: bold;
}
a {
    text-decoration: none;
    user-select: auto;
}
li {
    margin-bottom: 10px;
}
li ol {
    margin-block-start: 10px;
}
li ul {
    margin-block-start: 10px;
}
ul {
    list-style-type: disc;
}
ul ul {
    list-style-type: circle;
}
ol ul {
    list-style-type: circle;
}
ul ul ul {
    list-style-type: square;
}
ol ul ul {
    list-style-type: square;
}
ul ol ul {
    list-style-type: square;
}
ol ol ul {
    list-style-type: square;
}
table {
    margin-bottom: 10px;
    border-collapse: collapse;
}
th {
    background-color: rgba(157, 157, 157, .15);
    border: 1px solid #BDBDBD;
    height: 20px;
    min-width: 20px;
    padding: 2px 5px;
}
td {
    border: 1px solid #BDBDBD;
    height: 20px;
    min-width: 20px;
    padding: 2px 5px;
}
.e-rte-image {
    border: 0;
    cursor: pointer;
    display: block;
    float: none;
    margin: auto;
    max-width: 100%;
    position: relative;
}
.e-rte-audio {
    border: 0;
    cursor: pointer;
    display: block;
    float: none;
    margin: auto;
    max-width: 100%;
    position: relative;
}
.e-rte-video {
    border: 0;
    cursor: pointer;
    display: block;
    float: none;
    margin: auto;
    max-width: 100%;
    position: relative;
}
.e-img-inline {
    margin-left: 5px;
    margin-right: 5px;
    display: inline-block;
    float: none;
    max-width: 100%;
    padding: 1px;
    vertical-align: bottom;
}
.e-audio-inline {
    margin-left: 5px;
    margin-right: 5px;
    display: inline-block;
    float: none;
    max-width: 100%;
    padding: 1px;
    vertical-align: bottom;
}
.e-video-inline {
    margin-left: 5px;
    margin-right: 5px;
    display: inline-block;
    float: none;
    max-width: 100%;
    padding: 1px;
    vertical-align: bottom;
}
.e-img-center {
    cursor: pointer;
    display: block;
    float: none;
    margin-top: 5px;
    margin-right: auto;
    margin-bottom: 5px;
    margin-left: auto;
    max-width: 100%;
    position: relative;
}
.e-video-center {
    cursor: pointer;
    display: block;
    float: none;
    margin-top: 5px;
    margin-right: auto;
    margin-bottom: 5px;
    margin-left: auto;
    max-width: 100%;
    position: relative;
}
.e-img-right {
    float: right;
    margin-top: 0;
    margin-right: auto;
    margin-bottom: 0;
    margin-left: auto;
    margin-left: 5px;
    text-align: right;
}
.e-video-right {
    float: right;
    margin-top: 0;
    margin-right: auto;
    margin-bottom: 0;
    margin-left: auto;
    margin-left: 5px;
    text-align: right;
}
.e-img-left {
    float: left;
    margin-top: 0;
    margin-right: auto;
    margin-bottom: 0;
    margin-left: auto;
    margin-right: 5px;
    text-align: left;
}
.e-video-left {
    float: left;
    margin-top: 0;
    margin-right: auto;
    margin-bottom: 0;
    margin-left: auto;
    margin-right: 5px;
    text-align: left;
}
.e-rte-img-caption {
    display: inline-block;
    margin-top: 5px;
    margin-right: auto;
    margin-bottom: 5px;
    margin-left: auto;
    max-width: 100%;
    position: relative;
}
.e-caption-inline {
    display: inline-block;
    margin-top: 5px;
    margin-right: auto;
    margin-bottom: 5px;
    margin-left: auto;
    margin-left: 5px;
    margin-right: 5px;
    max-width: calc(100% - (2 * 5px));
    position: relative;
    text-align: center;
    vertical-align: bottom;
}
.e-img-wrap {
    display: inline-block;
    margin: auto;
    padding: 0;
    text-align: center;
    width: 100%;
}
.e-img-break {
    border: 0;
    cursor: pointer;
    display: block;
    float: none;
    margin-top: 5px;
    margin-right: auto;
    margin-bottom: 5px;
    margin-left: auto;
    max-width: 100%;
    position: relative;
}
.e-audio-break {
    border: 0;
    cursor: pointer;
    display: block;
    float: none;
    margin-top: 5px;
    margin-right: auto;
    margin-bottom: 5px;
    margin-left: auto;
    max-width: 100%;
    position: relative;
}
.e-video-break {
    border: 0;
    cursor: pointer;
    display: block;
    float: none;
    margin-top: 5px;
    margin-right: auto;
    margin-bottom: 5px;
    margin-left: auto;
    max-width: 100%;
    position: relative;
}
Securely Export Word or PDF Documents with Authentication
You can include custom data when exporting Word or PDF documents, such as authentication tokens or other parameters. Use the OnExport event with its RequestHeader and CustomFormData properties to send these values to the server. On the server side, the authentication token can be read from the request headers, and the custom data can be accessed from the request body, which contains the values sent via a POST request.
The following example demonstrates how to pass authentication tokens and custom data during export:
@using Syncfusion.Blazor.RichTextEditor

<SfRichTextEditor>
    <RichTextEditorEvents OnExport="@Export" />
    <RichTextEditorToolbarSettings Items="@Items" />
    <RichTextEditorExportPdf ServiceUrl="@exportPdfServiceUrl" />
    <RichTextEditorExportWord ServiceUrl="@exportWordServiceUrl" />
    Rich Text Editor
</SfRichTextEditor>

@code {
    private string exportWordServiceUrl = "https://blazor.syncfusion.com/services/production/api/RichTextEditor/ExportToDocx";
    private string exportPdfServiceUrl = "https://blazor.syncfusion.com/services/production/api/RichTextEditor/ExportToPdf";
    private List<ToolbarItemModel> Items = new List<ToolbarItemModel>()
    {
        new ToolbarItemModel() { Command = ToolbarCommand.ExportPdf },
        new ToolbarItemModel() { Command = ToolbarCommand.ExportWord }
    };
    private void Export(ExportingEventArgs args)
    {
        // Assign different authentication tokens depending on the export type (Pdf or Word)
        var token = (args.ExportType == "Pdf" ? "Pdf Bearer token" : "Word Bearer token");
        args.RequestHeader = new Dictionary<string, string>
        {
            { "Authorization", token }
        };
        args.CustomFormData = new Dictionary<string, string>
        {
            { "userId", "12345" }
        };
    }
}using System;
using System.IO;
using System.Net.Http.Headers;
using Microsoft.AspNetCore.Mvc;
using Microsoft.AspNetCore.Http;
using System.Collections.Generic;
using Microsoft.AspNetCore.Hosting;
using Microsoft.AspNetCore.Http.Features;
namespace ExportService.Controllers
{
[ApiController]
public class ExportController : ControllerBase
{
private readonly IWebHostEnvironment hostingEnv;
public ExportController(IWebHostEnvironment env)
{
this.hostingEnv = env;
}
public class ExportParam
{
public string? Html { get; set; }
public object? FormData { get; set; }
}
[AcceptVerbs("Post")]
[EnableCors("AllowAllOrigins")]
[Route("api/RichTextEditor/ExportToPdf")]
public async Task<ActionResult> ExportToPdf([FromBody] ExportParam args)
{
// Fetch authentication token from request headers
var authorization = Request.Headers["Authorization"].ToString();
// Access custom form data from the request body
Console.WriteLine("Authorization: " + authorization);
Console.WriteLine("Form Data: " + args.FormData);
Console.WriteLine("HTML Content: " + args.Html);
// Your export logic here
// Validate token, process formData, generate PDF, etc.
return Ok();
}
}
}