DeepSeek AI Integration with Blazor Smart Paste Button
29 Jun 202611 minutes to read
The Blazor SmartPaste Button component enables AI-powered, context-aware content pasting into forms, typically using OpenAI or Azure OpenAI. This guide explains how to integrate the DeepSeek AI service with the Smart Paste Button using the IChatInferenceService interface, enabling custom AI-driven responses in a Blazor Web App.
Setting Up DeepSeek
-
Obtain a DeepSeek API Key
Create an account at DeepSeek Platform, sign in, and navigate to API Keys to generate an API key. -
Review Model Specifications
Refer to DeepSeek Models Documentation for details on available models (e.g.,deepseek-chat).
Create a DeepSeek AI Service
Create a service class to manage interactions with the DeepSeek API, including authentication and response processing for the Smart Paste Button.
- Create a
Servicesfolder in your project. - Add a new file named
DeepSeekAIService.csin theServicesfolder. - Implement the service as shown below, storing the API key securely in a configuration file or environment variable (e.g.,
appsettings.json).
using System.Net;
using System.Text;
using System.Text.Json;
using Microsoft.Extensions.AI;

public class DeepSeekAIService
{
    private readonly string _apiKey;
    private readonly string _modelName = "deepseek-chat"; // Example model
    private readonly string _endpoint = "https://api.deepseek.com/chat/completions";
    private static readonly HttpClient HttpClient = new(new SocketsHttpHandler
    {
        PooledConnectionLifetime = TimeSpan.FromMinutes(30),
        EnableMultipleHttp2Connections = true
    })
    {
        DefaultRequestVersion = HttpVersion.Version20 // Fallback to HTTP/2 for compatibility
    };
    private static readonly JsonSerializerOptions JsonOptions = new()
    {
        PropertyNamingPolicy = JsonNamingPolicy.CamelCase
    };

    public DeepSeekAIService(IConfiguration configuration)
    {
        _apiKey = configuration["DeepSeek:ApiKey"] ?? throw new ArgumentNullException("DeepSeek API key is missing.");
        if (!HttpClient.DefaultRequestHeaders.Contains("Authorization"))
        {
            HttpClient.DefaultRequestHeaders.Clear();
            HttpClient.DefaultRequestHeaders.Add("Authorization", $"Bearer {_apiKey}");
        }
    }

    public async Task<string> CompleteAsync(IList<ChatMessage> chatMessages)
    {
        var requestBody = new DeepSeekChatRequest
        {
            Model = _modelName,
            Temperature = 0.7f, // Controls response randomness (0.0 to 1.0)
            Messages = chatMessages.Select(m => new DeepSeekMessage
            {
                Role = m.Role == ChatRole.User ? "user" : "system", // Align with DeepSeek API roles
                Content = m.Text
            }).ToList()
        };

        var content = new StringContent(JsonSerializer.Serialize(requestBody, JsonOptions), Encoding.UTF8, "application/json");

        try
        {
            var response = await HttpClient.PostAsync(_endpoint, content);
            response.EnsureSuccessStatusCode();
            var responseString = await response.Content.ReadAsStringAsync();
            var responseObject = JsonSerializer.Deserialize<DeepSeekChatResponse>(responseString, JsonOptions);
            return responseObject?.Choices?.FirstOrDefault()?.Message?.Content ?? "No response from DeepSeek.";
        }
        catch (Exception ex) when (ex is HttpRequestException || ex is JsonException)
        {
            throw new InvalidOperationException("Failed to communicate with DeepSeek API.", ex);
        }
    }
}
NOTE
Store the DeepSeek API key in
appsettings.json(e.g.,{ "DeepSeek": { "ApiKey": "your-api-key" } }) or as an environment variable to ensure security.
Define Request and Response Models
Define C# classes to match the DeepSeek API’s JSON request and response format.
- Create a new file named
DeepSeekModels.csin theServicesfolder. - Add the following model classes:
public class DeepSeekMessage
{
    public string Role { get; set; }
    public string Content { get; set; }
}

public class DeepSeekChatRequest
{
    public string Model { get; set; }
    public float Temperature { get; set; }
    public List<DeepSeekMessage> Messages { get; set; }
}

public class DeepSeekChatResponse
{
    public List<DeepSeekChoice> Choices { get; set; }
}

public class DeepSeekChoice
{
    public DeepSeekMessage Message { get; set; }
}
Create a Custom AI Service
Implement the IChatInferenceService interface to connect the Smart Paste Button to the DeepSeek service, acting as a bridge for AI-generated responses.
- Create a new file named
DeepSeekInferenceService.csin theServicesfolder. - Add the following implementation:
using Syncfusion.Blazor.AI;
using System.Threading.Tasks;

public class DeepSeekInferenceService : IChatInferenceService
{
    private readonly DeepSeekAIService _deepSeekService;

    public DeepSeekInferenceService(DeepSeekAIService deepSeekService)
    {
        _deepSeekService = deepSeekService;
    }

    public async Task<string> GenerateResponseAsync(ChatParameters options)
    {
        return await _deepSeekService.CompleteAsync(options.Messages);
    }
}
Configure the Blazor App
Register the DeepSeek service and IChatInferenceService implementation in the dependency injection container.
Update the ~/Program.cs file as follows:
using Microsoft.AspNetCore.Components;
using Microsoft.AspNetCore.Components.Web;
using Syncfusion.Blazor;
using Syncfusion.Blazor.AI;

var builder = WebApplication.CreateBuilder(args);
....

builder.Services.AddSyncfusionBlazor();
builder.Services.AddSyncfusionSmartComponents();
builder.Services.AddSingleton<DeepSeekAIService>();
builder.Services.AddSingleton<IChatInferenceService, DeepSeekInferenceService>();

var app = builder.Build();
// ...
Add the Smart Paste Button
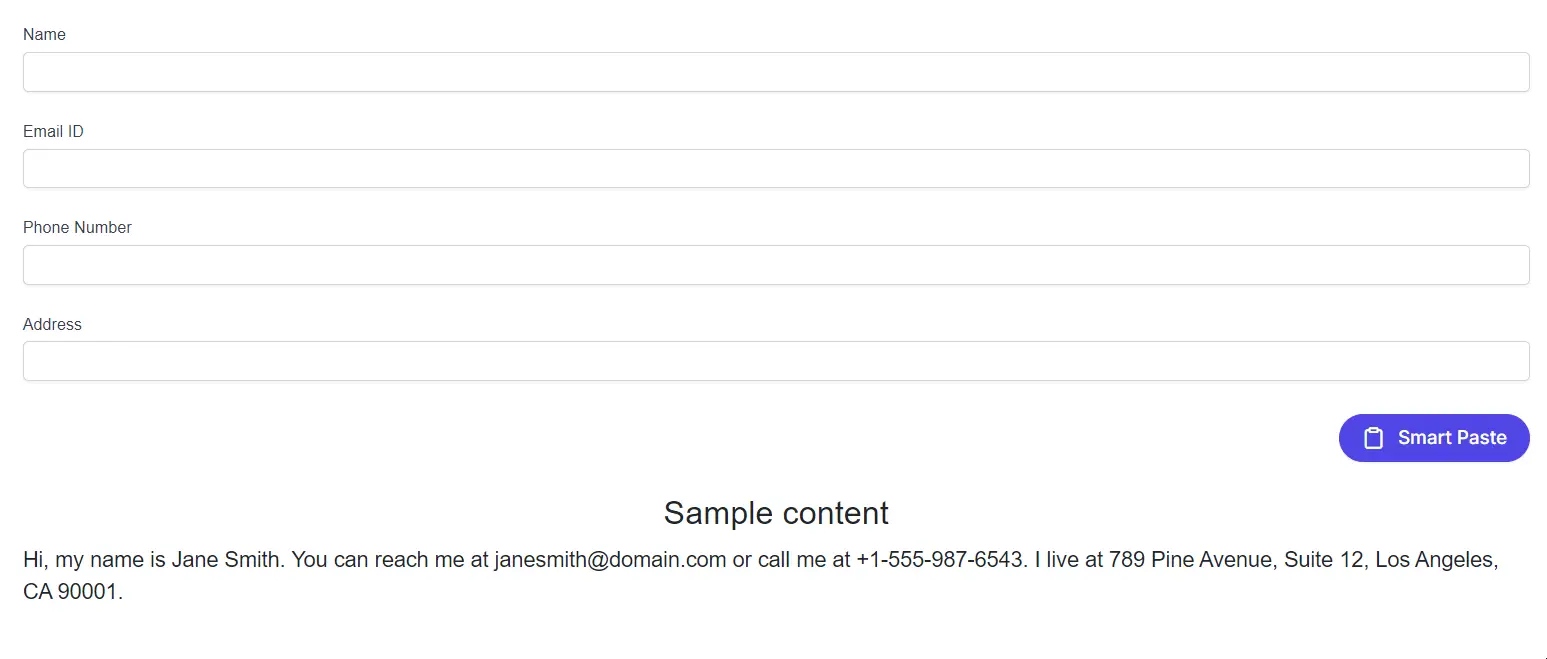
Add the Smart Paste Button to a form in the ~/Pages/Home.razor file to test the Groq AI integration.
@using Syncfusion.Blazor.DataForm
@using Syncfusion.Blazor.SmartComponents
@using System.ComponentModel.DataAnnotations

<SfDataForm ID="MyForm" Model="@EventRegistrationModel">
    <FormValidator>
        <DataAnnotationsValidator></DataAnnotationsValidator>
    </FormValidator>
    <FormItems>
        <FormItem Field="@nameof(EventRegistration.Name)" ID="firstname"></FormItem>
        <FormItem Field="@nameof(EventRegistration.Email)" ID="email"></FormItem>
        <FormItem Field="@nameof(EventRegistration.Phone)" ID="phonenumber"></FormItem>
        <FormItem Field="@nameof(EventRegistration.Address)" ID="address"></FormItem>
    </FormItems>
    <FormButtons>
        <SfSmartPasteButton IsPrimary="true" Content="Smart Paste" IconCss="e-icons e-paste"></SfSmartPasteButton>
    </FormButtons>
</SfDataForm>

<br>
<h4 style="text-align:center;">Sample Content</h4>
<div>
    Hi, my name is Jane Smith. You can reach me at example@domain.com or call me at +1-555-987-6543. I live at 789 Pine Avenue, Suite 12, Los Angeles, CA 90001.
</div>

@code {
    private EventRegistration EventRegistrationModel = new();

    public class EventRegistration
    {
        [Required(ErrorMessage = "Please enter your name.")]
        [Display(Name = "Name")]
        public string Name { get; set; }

        [Required(ErrorMessage = "Please enter your email address.")]
        [Display(Name = "Email ID")]
        public string Email { get; set; }

        [Required(ErrorMessage = "Please enter your mobile number.")]
        [Display(Name = "Phone Number")]
        public string Phone { get; set; }

        [Required(ErrorMessage = "Please enter your address.")]
        [Display(Name = "Address")]
        public string Address { get; set; }
    }
}
NOTE
Ensure the Blazor DataForm package is installed for form integration.
Testing the Integration
- Configure the Blazor Web App with the Groq AI service and Smart Paste Button as described above.
- Add the code to ~/Pages/Home.razor, Program.cs, and the
Servicesfolder. - Run the application using Ctrl+F5 (Windows) or ⌘+F5 (macOS).
- Copy the sample content provided in the Razor file.
- Click the Smart Paste button to verify that the form fields are populated correctly using the Groq AI service.
NOTE
Troubleshooting
If the DeepSeek AI integration does not work, try the following:
-
No Suggestions Displayed: Verify that the DeepSeek API key and model name are correct in the configuration. Check the
DeepSeekAIServiceimplementation for errors. -
HTTP Request Failures: Ensure a stable internet connection and that the DeepSeek API endpoint (
https://api.deepseek.com/v1/chat/completions) is accessible. Test with HTTP/2 if compatibility issues arise. -
Service Registration Errors: Confirm that
DeepSeekAIServiceandDeepSeekInferenceServiceare registered in Program.cs.