Integrate Google Dialogflow with Blazor Chat UI component
18 Jun 20268 minutes to read
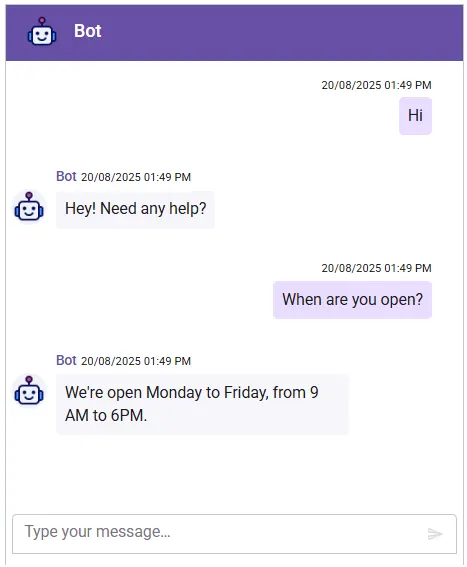
The Chat UI component integrates with Google Dialogflow to enable advanced conversational AI features in your Blazor applications. The component acts as a user interface for a support bot, where user prompts are sent to the Dialogflow service via API calls, providing natural language understanding and context-aware responses.
Prerequisites
Before starting, ensure you have the following:
-
Google Account: To access Google Dialogflow and Google Cloud Console.
-
Chat UI: Package Syncfusion Blazor package installed.
-
Dialogflow Service Account with the
Dialogflow API Clientrole and its JSON key file.
Set Up the Chat UI component
Follow the Getting Started guide to configure and render the Chat UI component in the application and that prerequisites are met.
Install Dependencies
- Install backend dependencies for Dialogflow and server setup using NuGet:
dotnet add package Google.Cloud.Dialogflow.V2
dotnet add package Newtonsoft.Json
Set Up the Dialogflow Agent
-
In the Dialogflow Console, create an agent, set a name (e.g., MyChatBot), and configure the default language (e.g., English - en).
-
Add intents with training phrases and responses (e.g., greetings, FAQs). Test using the Dialogflow simulator.
-
In the Google Cloud Console, go to APIs & Services > Credentials, create a service account with the Dialogflow API Client role, and download the JSON key file.
Security Note: Never commit the JSON key file to version component. Use environment variables or a secret manager (e.g., Google Cloud Secret Manager) for production.
Configure Backend API
In a Blazor application, create a minimal API endpoint to handle Dialogflow requests. Add the following to Program.cs:
using Google.Cloud.Dialogflow.V2;
using Google.Apis.Auth.OAuth2;
using Syncfusion.Blazor;

var builder = WebApplication.CreateBuilder(args);

// Add services...
builder.Services.AddRazorPages();
builder.Services.AddServerSideBlazor();

var app = builder.Build();

// Configure the HTTP request pipeline...
app.MapRazorPages();
app.MapBlazorHub();
app.MapFallbackToPage("/_Host");

// Minimal API for Dialogflow requests
app.MapPost("/api/chat/message", async ([FromBody] MessageRequest request) =>
{
    var credential = GoogleCredential.FromFile("service-acct.json");
    var sessionsClient = SessionsClient.Create(credential.ToChannelCredentials());
    var projectId = builder.Configuration["DialogflowProjectId"]; // Add to appsettings.json or extract from JSON

    var sessionId = request.SessionId ?? "default-session";
    var session = SessionName.FromProjectSession(projectId, sessionId);
    var queryInput = new QueryInput
    {
        Text = new TextInput
        {
            Text = request.Text,
            LanguageCode = "en-US"
        }
    };

    try
    {
        var response = await sessionsClient.DetectIntentAsync(new DetectIntentRequest { Session = session.ToString(), QueryInput = queryInput });
        var reply = response.QueryResult.FulfillmentText;
        return Results.Ok(new { reply });
    }
    catch (Exception ex)
    {
        return Results.Problem("Error connecting to Dialogflow.", ex, statusCode: 500);
    }
});

app.Run();

public class MessageRequest
{
    public string Text { get; set; } = string.Empty;
    public string SessionId { get; set; } = string.Empty;
}
Add the project ID to appsettings.json (extract from the JSON key file if needed):
{
  "DialogflowProjectId": "your-dialogflow-project-id"
}
Use a unique
sessionId(e.g., Guid) for each user to maintain conversation context.
Configure Message Send
Use the MessageSend event of the SfChatUI component to handle message exchanges. Each time a user sends a message, this event will be invoked with details of the sent message.
Forward Message to Backend
In the MessageSend event handler, send a POST request to your backend API endpoint (/api/chat/message). The backend forwards the message to Dialogflow and returns the response.
Displaying Bot Response
-
Use the
AddMessageAsyncmethod (via a reference to the component) to programmatically add the bot’s reply to the Chat UI. -
Create or modify a Razor component (
e.g., Pages/Chat.razor) to integrate the Chat UI with the Dialogflow backend:
@using Syncfusion.Blazor.InteractiveChat
@using System.Net.Http.Json

<div style="height: 400px; width: 400px;">
    <SfChatUI @ref="ChatUI" HeaderText="Bot" HeaderIconCss="e-header-icon" User="CurrentUserModel" MessageSend="OnMessageSend">
    </SfChatUI>
</div>

<style>
    .e-header-icon {
        background-image: url('https://ej2.syncfusion.com/demos/src/chat-ui/images/bot.png');
        background-size: cover;
    }
</style>

@code {
    private SfChatUI ChatUI { get; set; } = default!;
    private UserModel CurrentUserModel = new() { ID = "user1", User = "Albert" };
    private UserModel BotUserModel = new() { ID = "user2", User = "Bot", AvatarUrl = "https://ej2.syncfusion.com/demos/src/chat-ui/images/bot.png" };
    private string currentUserId = "user1";
    private readonly HttpClient httpClient = new();

    private async Task OnMessageSend(MessageSendEventArgs args)
    {
        // The user message will be added automatically after this event
        // Send to backend
        var request = new { text = args.Message.Text, sessionId = currentUserId };
        try
        {
            var response = await httpClient.PostAsJsonAsync("/api/chat/message", request);
            if (response.IsSuccessStatusCode)
            {
                var data = await response.Content.ReadFromJsonAsync<dynamic>();
                // Add bot's reply
                await ChatUI.AddMessageAsync(new ChatMessage { Text = data.reply.ToString(), Author = BotUserModel });
            }
            else
            {
                await ChatUI.AddMessageAsync(new ChatMessage { Text = "Sorry, I couldn't contact the server.", Author = BotUserModel });
            }
        }
        catch (Exception)
        {
            await ChatUI.AddMessageAsync(new ChatMessage { Text = "Sorry, I couldn't contact the server.", Author = BotUserModel });
        }
        args.Cancel = true; // Prevent default send if needed, but user message is already added
    }
}
Ensure Syncfusion scripts and styles are included in
_Host.cshtml(Blazor Server) orindex.html(Blazor WebAssembly) as per the getting started guide.
Run and Test
Start the Application
- Run the project using
dotnet runor Visual Studio. - Open your app in the browser (e.g.,
http://localhost:port) to chat with your dialogflow-powered bot.
Troubleshooting:
-
Permission Denied: Ensure the service account has theDialogflow API Clientrole in the Google Cloud Console. -
CORS Error: If using separate origins, configure CORS in Web.config (e.g., add custom headers under). -
No Response: Test intents in the Dialogflow Console simulator to ensure they are configured correctly. -
Quota Exceeded: Check Dialogflow API quotas in the Google Cloud Console. -
Network Issues: Confirm the application is running and the frontend is pointing to the correct API URL. -
Invalid Credentials: Verify the service account JSON or configuration settings are correctly set up.