Creating Razor Class Library (RCL) using Syncfusion® Blazor components
29 Jun 20268 minutes to read
This guide explains how to create a Razor Class Library (RCL) that includes Blazor components using Visual Studio and Visual Studio Code.
Prerequisites
Create a Razor Class Library in Visual Studio
-
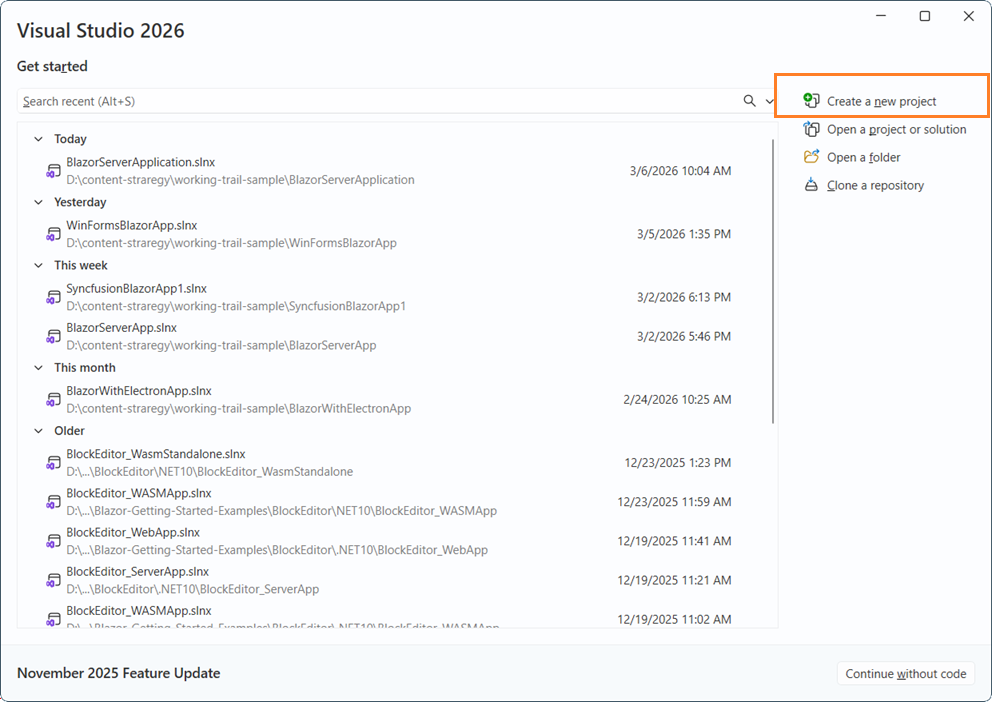
Choose Create a new project from the Visual Studio dashboard.
-
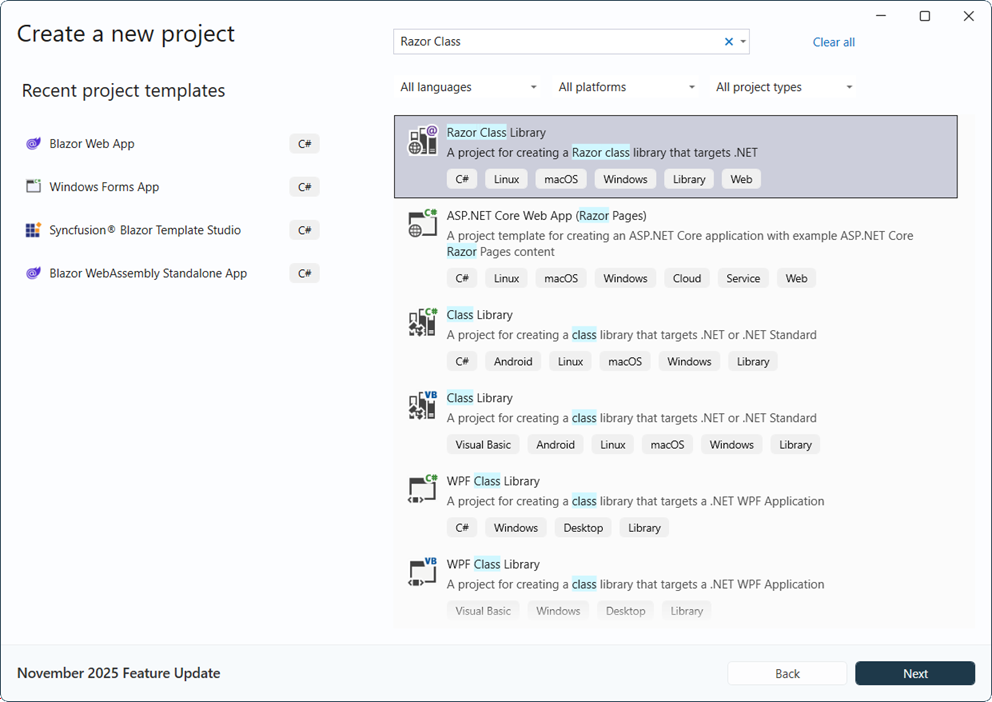
Select Razor Class Library from the template, and then click the Next button.
-
Now, the project configuration window will popup. Click Create button to create a new project with the default project configuration.

-
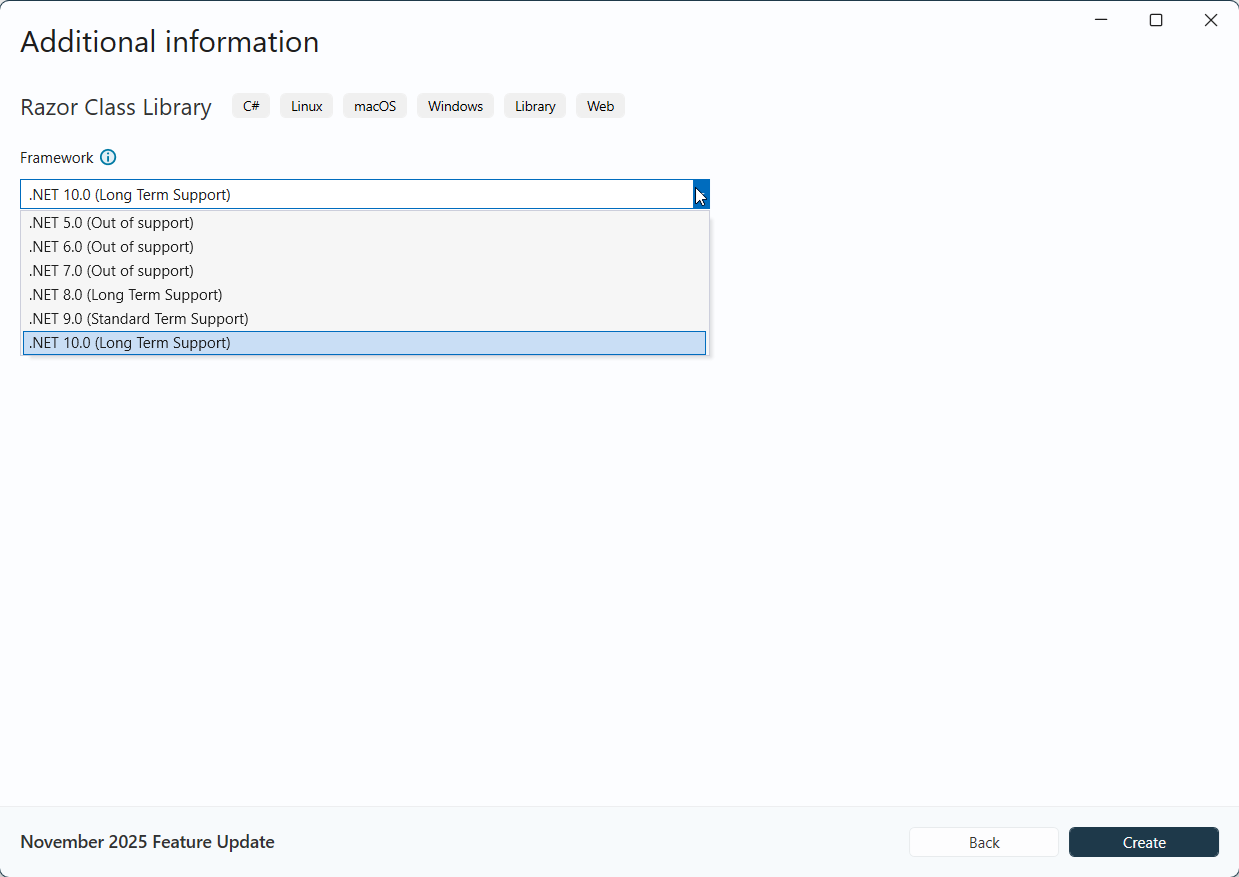
Select the target Framework .NET 8 or .NET 9 or .NET 10 at the top of the Application based on your required target that you want and then click the Create button to create a new Razor Class Library application.
Install Blazor Grid and Themes NuGet in the App
To add the Blazor DataGrid component to the library, open NuGet Package Manager in Visual Studio (Tools → NuGet Package Manager → Manage NuGet Packages for Solution), then install Syncfusion.Blazor.Grid and Syncfusion.Blazor.Themes. Alternatively, use the following Package Manager commands.
Install-Package Syncfusion.Blazor.Grid -Version 34.1.29
Install-Package Syncfusion.Blazor.Themes -Version 34.1.29
NOTE
Blazor components are available in nuget.org. Refer to the NuGet packages topic for the available NuGet package list with component details.
Importing Blazor component in Razor Class Library
Import and add the Blazor components in the ~/Component1.razor file. For example, the Blazor DataGrid component is imported and added in the ~/Component1.razor page.
@using Syncfusion.Blazor.Grid

<div class="my-component">
This Blazor component is defined in the <strong>RazorClassLibrary</strong> package.
</div><br />

<SfGrid DataSource="@Orders" />

@code {
    public List<Order> Orders { get; set; }

    protected override void OnInitialized()
    {
        Orders = Enumerable.Range(1, 5).Select(x => new Order()
        {
            OrderID = 1000 + x,
            CustomerID = (new string[] { "ALFKI", "ANANTR", "ANTON", "BLONP", "BOLID" })[new Random().Next(5)],
            Freight = 2 * x,
            OrderDate = DateTime.Now.AddDays(-x),
        }).ToList();
    }

    public class Order
    {
        public int? OrderID { get; set; }
        public string CustomerID { get; set; }
        public DateTime? OrderDate { get; set; }
        public double? Freight { get; set; }
    }
}
Create a Blazor project in Visual Studio
- Create a Blazor Web App or Blazor Server App or Blazor WebAssembly App using Visual Studio via Microsoft Templates or Syncfusion® Blazor Extension.
Prerequisites
Create a Razor Class Library in Visual Studio Code
Create a Razor Class Library using Visual Studio Code via Microsoft Templates.
dotnet new razorclasslib -o RazorUIClassLib
cd RazorUIClassLib
Install Blazor Grid and Themes NuGet in the App
If using the WebAssembly or Auto render modes in a Blazor Web App, install Blazor component NuGet packages in the client project.
- Press Ctrl+` to open the integrated terminal in Visual Studio Code.
- Ensure you’re in the project root directory where your
.csprojfile is located. - Run the following commands to install the Syncfusion.Blazor.Grid and Syncfusion.Blazor.Themes NuGet packages and ensure all dependencies are installed.
dotnet add package Syncfusion.Blazor.Grid -v 34.1.29
dotnet add package Syncfusion.Blazor.Themes -v 34.1.29
dotnet restore
NOTE
Blazor components are available on nuget.org. Refer to the NuGet packages topic for the available NuGet package list with component details.
Importing Blazor component in Razor Class Library
Import and add the Blazor components in the ~/Component1.razor file. For example, the Blazor DataGrid component is imported and added in the ~/Component1.razor page.
@using Syncfusion.Blazor.Grid

<div class="my-component">
This Blazor component is defined in the <strong>RazorClassLibrary</strong> package.
</div><br />

<SfGrid DataSource="@Orders" />

@code {
    public List<Order> Orders { get; set; }

    protected override void OnInitialized()
    {
        Orders = Enumerable.Range(1, 5).Select(x => new Order()
        {
            OrderID = 1000 + x,
            CustomerID = (new string[] { "ALFKI", "ANANTR", "ANTON", "BLONP", "BOLID" })[new Random().Next(5)],
            Freight = 2 * x,
            OrderDate = DateTime.Now.AddDays(-x),
        }).ToList();
    }

    public class Order
    {
        public int? OrderID { get; set; }
        public string CustomerID { get; set; }
        public DateTime? OrderDate { get; set; }
        public double? Freight { get; set; }
    }
}
Create a Blazor project in Visual Studio Code
Create a Blazor Web App or Blazor Server App or Blazor WebAssembly App using Visual Studio Code via Microsoft Templates or Syncfusion® Blazor Extension.
Configure the Razor Class Library and Blazor Application
-
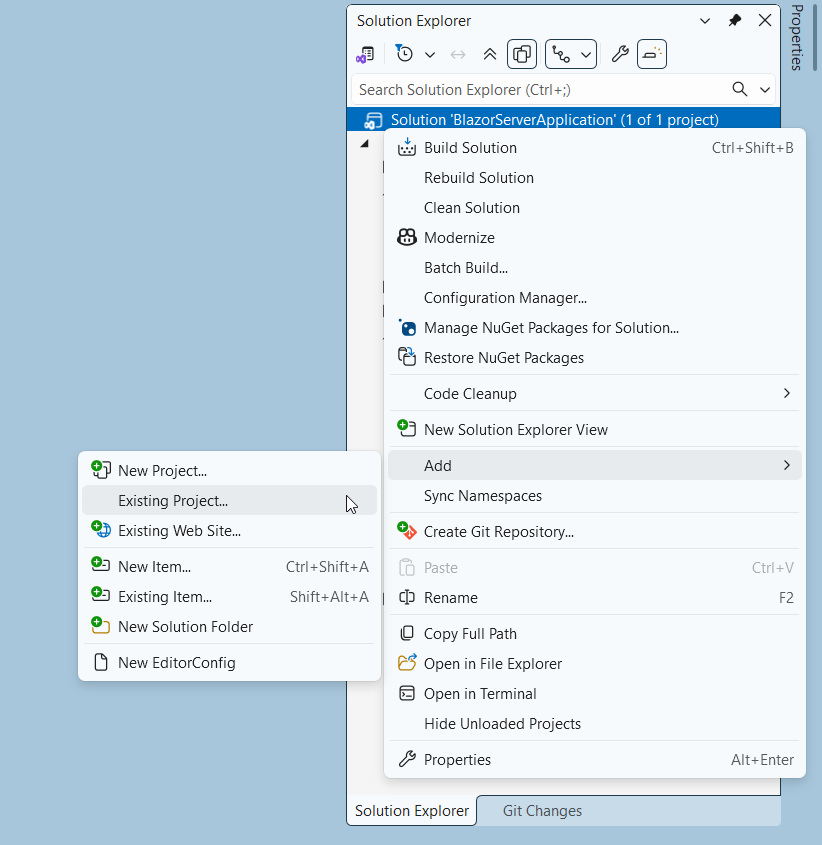
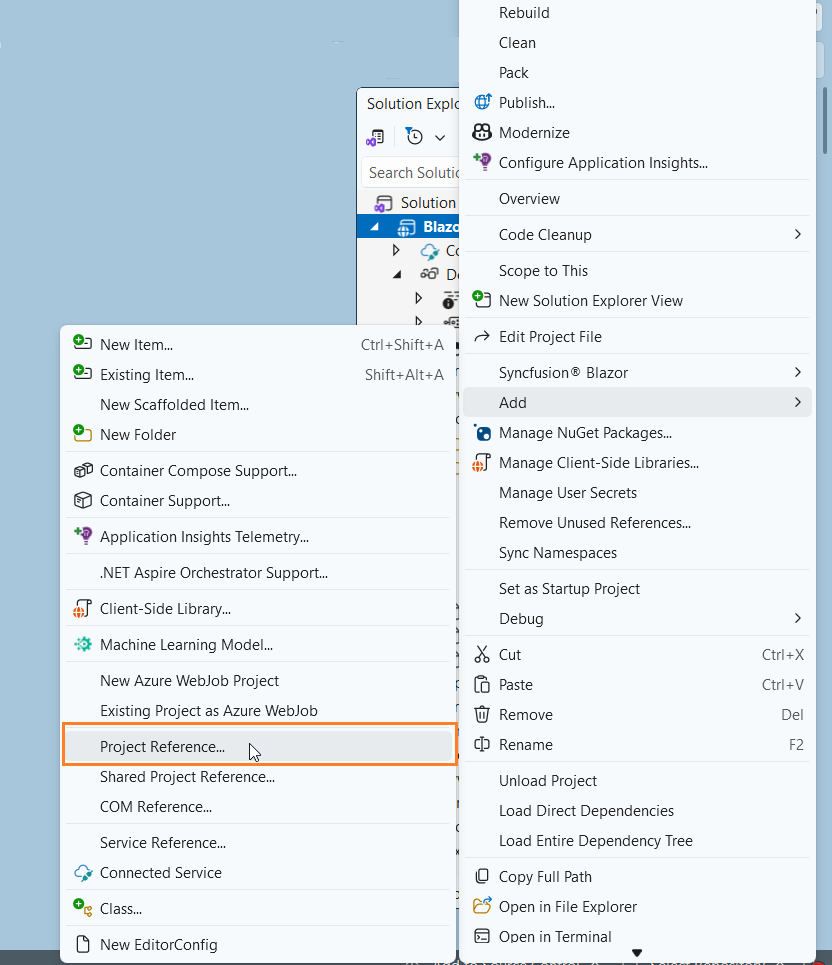
Right-click the solution in the Blazor application, and then select Add/Existing Project.
-
Add the Razor Class Library project by selecting the
RazorClassLibrary.csprojfile.
NOTE
The Razor Class Library project is added to the existing Blazor Application.
-
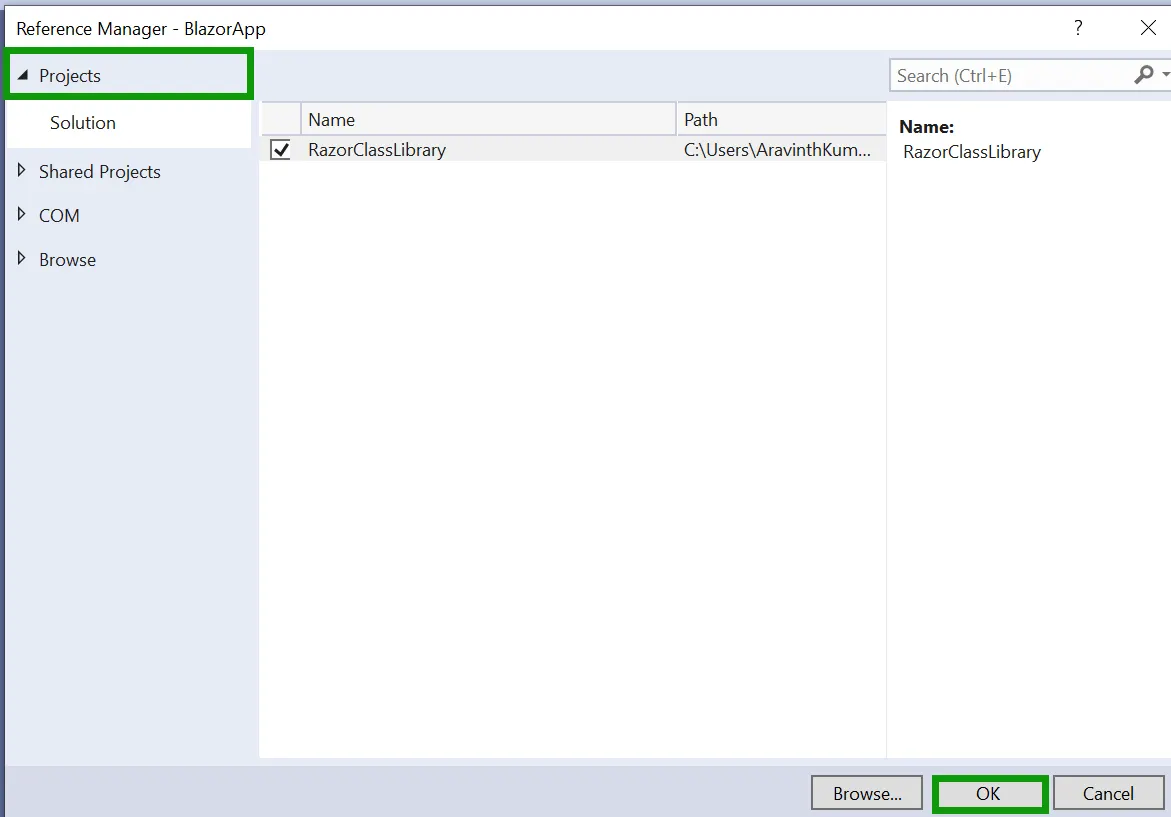
Right-click the Blazor App project, choose Add, and then select Project reference…. Now, click the checkbox and configure the Razor Class Library application.
Importing Razor Class Library in the Blazor Application
-
Open ~/_Imports.razor file in Blazor App and import the
RazorClassLibrary.@using RazorClassLibrary -
Register the Blazor Service in the ~/Program.cs file of the Blazor App.
- If you select an Interactive render mode as
WebAssemblyorAuto, need to register the Blazor service in both ~/Program.cs files of the Blazor Web App.
.... using Syncfusion.Blazor; .... builder.Services.AddSyncfusionBlazor(); .... - If you select an Interactive render mode as
-
Include Stylesheet and Script References based on the project type:
-
For Blazor WebAssembly Standalone App, include the stylesheet in the
<head>section and the script at the end of the<body>in the ~/wwwroot/index.html file. -
For Blazor Web App, include the stylesheet in the
<head>and the script at the end of the<body>in the ~/Components/Pages/App.razor file.
 <head>
     ....
     <link href="_content/Syncfusion.Blazor.Themes/bootstrap5.css" rel="stylesheet" />
 </head>
 ....
 <body>
     ....
     <script src="_content/Syncfusion.Blazor.Core/scripts/syncfusion-blazor.min.js" type="text/javascript"></script>
 </body>
NOTE
Check out the Blazor Themes topic to discover various methods (Static Web Assets, CDN, and CRG) for referencing themes in the Blazor application. Also, check out the Adding Script Reference topic to learn different approaches for adding script references in the Blazor application.
-
-
Now, add the created custom component in the ~/Components/Pages/.razor file.
<Component1></Component1> -
Run the application, The Blazor Grid component will be rendered in the default web browser.
