Google Maps in Blazor Maps component
23 Jun 202617 minutes to read
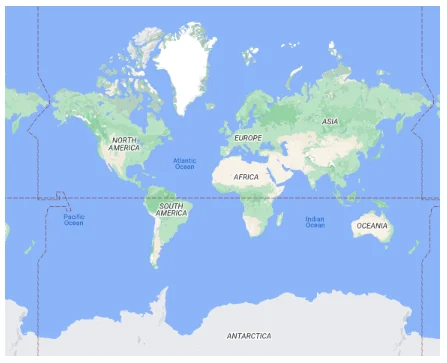
Google Maps is an online map provider owned by Google. It provides map tile images based on requests. The Blazor Maps component composes these tiles into a single view to render the map. Google Maps tiles can be displayed by specifying the tile service URL in the UrlTemplate property.
Displaying Google Maps
The Google Maps tile service can be accessed using the following URL:
https://tile.googleapis.com/v1/2dtiles/z/x/y?session=YOUR_SESSION_TOKEN&key=YOUR_API_KEY
In this URL template:
- {z} - Represents the map zoom level.
- {x} - Represents the horizontal tile index.
- {y} - Represents the vertical tile index.
These placeholders map to level, tileX, and tileY, respectively, to fetch the correct map tile.
NOTE
Refer to the Google documentation at https://developers.google.com/maps/documentation/tile/roadmap for the latest Google Maps URL template.
Below are the steps to integrate Google Maps tiles into the Maps component.
- Generate an API key from Google Cloud Platform.
- Generate a session token to retrieve Google Maps tiles.
- Initialize the Maps component using the Google Maps tile service URL, including the session token and API key.
The following walkthrough explains how to integrate Google Maps tiles into the Maps component using the provided code.
STEP 1: Generate an API key from Google Cloud Platform by enabling the necessary APIs, such as the Google Maps Tile API and Google Maps API. This key is required for authentication and must be included in each API call. Follow the steps in https://developers.google.com/maps/documentation/tile/get-api-key to generate an API key.
protected override async Task OnInitializedAsync()
{
    try
    {
        // Replace 'Your_Key' with your actual API key
        string apiKey = "Your_Key";
        string sessionToken = await FetchSessionToken(apiKey);

        // Update the UrlTemplate with the session token
        UrlTemplate = $"https://tile.googleapis.com/v1/2dtiles/level/tileX/tileY?session={sessionToken}&key={apiKey}";
    }
    catch (Exception ex)
    {
        Console.Error.WriteLine($"Failed to initialize the map: {ex.Message}");
    }
}
STEP 2: The FetchSessionToken method generates a session token for retrieving Google Maps tiles by sending a POST request to the createSession endpoint of the Google Maps Tile API.
private async Task<string> FetchSessionToken(string apiKey)
{
    try
    {
        // Define the API endpoint
        var apiUrl = $"https://tile.googleapis.com/v1/createSession?key={apiKey}";

        // Create the request body as an object
        var requestBody = new
        {
            mapType = "roadmap",
            language = "en-US",
            region = "US"
        };

        // Serialize the request body to JSON
        var jsonContent = new StringContent(
            JsonSerializer.Serialize(requestBody),
            Encoding.UTF8,
            "application/json"
        );

        // Send the POST request using HttpClient
        var response = await Http.PostAsync(apiUrl, jsonContent);

        // Check if the response is successful
        if (!response.IsSuccessStatusCode)
        {
            var errorData = JsonSerializer.Deserialize<ErrorResponse>(
                await response.Content.ReadAsStringAsync()
            );
            throw new Exception($"Error generating session token: {errorData?.Error?.Message}");
        }

        var responseData = await response.Content.ReadFromJsonAsync<SessionResponse>();
        // Return the session token
        return responseData?.Session;
    }
    catch (Exception ex)
    {
        throw new Exception($"Error fetching session token: {ex.Message}");
    }
}

// Classes to deserialize the API response
private class SessionResponse
{
    public string Session { get; set; }
}

private class ErrorResponse
{
    public ErrorDetails Error { get; set; }
}

private class ErrorDetails
{
    public string Message { get; set; }
}
STEP 3: To initialize the Maps component, invoke FetchSessionToken in OnInitializedAsync. After retrieving the session token, append both the session token and the API key to the UrlTemplate property of the Maps component. This enables authenticated access to map tiles, allowing the Maps component to render the map with the required data.
<SfMaps>
    <MapsLayers>
        <MapsLayer UrlTemplate="@UrlTemplate" TValue="string">
        </MapsLayer>
    </MapsLayers>
</SfMaps>
In the following example, Google Maps tiles are displayed by setting the UrlTemplate property with the tile server URL.
@using Syncfusion.Blazor.Maps
@using System.Text.Json
@using System.Text
@inject HttpClient Http

<SfMaps>
    <MapsLayers>
        <MapsLayer UrlTemplate="@UrlTemplate" TValue="string">
        </MapsLayer>
    </MapsLayers>
</SfMaps>

@code {
    private string UrlTemplate = "";

    protected override async Task OnInitializedAsync()
    {
        try
        {
            // Replace 'Your_Key' with your actual API key
            string apiKey = "Your_Key";
            string sessionToken = await FetchSessionToken(apiKey);

            // Update the UrlTemplate with the session token
            UrlTemplate = $"https://tile.googleapis.com/v1/2dtiles/level/tileX/tileY?session={sessionToken}&key={apiKey}";
        }
        catch (Exception ex)
        {
            Console.Error.WriteLine($"Failed to initialize the map: {ex.Message}");
        }
    }

    private async Task<string> FetchSessionToken(string apiKey)
    {
        try
        {
            // Define the API endpoint
            var apiUrl = $"https://tile.googleapis.com/v1/createSession?key={apiKey}";

            // Create the request body as an object
            var requestBody = new
            {
                mapType = "roadmap",
                language = "en-US",
                region = "US"
            };

            // Serialize the request body to JSON
            var jsonContent = new StringContent(
                JsonSerializer.Serialize(requestBody),
                Encoding.UTF8,
                "application/json"
            );

            // Send the POST request using HttpClient
            var response = await Http.PostAsync(apiUrl, jsonContent);

            // Check if the response is successful
            if (!response.IsSuccessStatusCode)
            {
                var errorData = JsonSerializer.Deserialize<ErrorResponse>(
                    await response.Content.ReadAsStringAsync()
                );
                throw new Exception($"Error generating session token: {errorData?.Error?.Message}");
            }

            var responseData = await response.Content.ReadFromJsonAsync<SessionResponse>();
            // Return the session token
            return responseData?.Session;
        }
        catch (Exception ex)
        {
            throw new Exception($"Error fetching session token: {ex.Message}");
        }
    }

    // Classes to deserialize the API response
    private class SessionResponse
    {
        public string Session { get; set; }
    }

    private class ErrorResponse
    {
        public ErrorDetails Error { get; set; }
    }

    private class ErrorDetails
    {
        public string Message { get; set; }
    }

}
Enable zooming and panning
The Google Maps layer supports both zooming and panning. Zooming provides a closer view of a specific area for detailed analysis, while panning enables navigation across the map to focus on the desired area.
To enable zooming, set the Enable property to true in MapsZoomSettings. Panning is enabled by default and can be configured using the EnablePanning property.
@using Syncfusion.Blazor.Maps

<SfMaps>
    @* To zoom and pan *@
    <MapsZoomSettings Enable="true">
        <MapsZoomToolbarSettings>
            <MapsZoomToolbarButton ToolbarItems="new List<ToolbarItem>() { ToolbarItem.Zoom, ToolbarItem.ZoomIn, ToolbarItem.ZoomOut,
            ToolbarItem.Pan, ToolbarItem.Reset }"></MapsZoomToolbarButton>
        </MapsZoomToolbarSettings>
    </MapsZoomSettings>
    <MapsLayers>
        <MapsLayer UrlTemplate="https://tile.googleapis.com/v1/2dtiles/level/tileX/tileY?session=Your_sessionToken&key=Your_apiKey" TValue="string">
        </MapsLayer>
    </MapsLayers>
</SfMaps>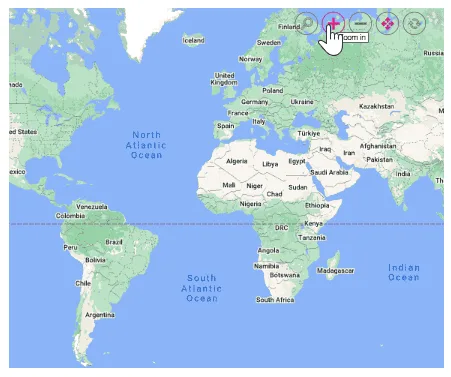
NOTE
Refer to the session token retrieval method described in the Displaying Google Maps section.
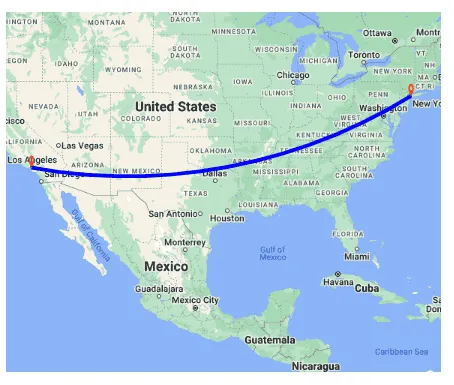
Adding markers and navigation line
Markers can be added to the Google Maps layer by setting the latitude and longitude of the location using the MapsMarker class. Navigation lines can be overlaid on the Google Maps layer to highlight paths between locations by providing the corresponding latitude and longitude values in MapsNavigationLine.
@using Syncfusion.Blazor.Maps

<SfMaps>
    <MapsZoomSettings ZoomFactor="4"></MapsZoomSettings>
    <MapsCenterPosition Latitude="29.394708" Longitude="-94.954653"></MapsCenterPosition>
    <MapsLayers>
        <MapsLayer UrlTemplate="https://tile.googleapis.com/v1/2dtiles/level/tileX/tileY?session=Your_sessionToken&key=Your_apiKey" TValue="string">
            @* Add markers *@
            <MapsMarkerSettings>
                <MapsMarker Visible="true" Height="25" Width="15" DataSource="Cities" TValue="City">
                </MapsMarker>
            </MapsMarkerSettings>
            @* Add navigation line *@
            <MapsNavigationLines>
                <MapsNavigationLine Visible="true" Color="blue" Angle="0.1" Latitude="new double[]{34.060620, 40.724546}"
                                    Longitude="new double[]{-118.330491,-73.850344}">
                </MapsNavigationLine>
            </MapsNavigationLines>
        </MapsLayer>
    </MapsLayers>
</SfMaps>

@code {
    public class City
    {
        public double Latitude { get; set; }
        public double Longitude { get; set; }
        public string Name { get; set; }
    }

    private List<City> Cities = new List<City> {
        new City { Latitude = 34.060620, Longitude = -118.330491, Name = "California" },
        new City{ Latitude = 40.724546, Longitude = -73.850344, Name = "New York"}
    };
}
NOTE
Refer to the session token retrieval method described in the Displaying Google Maps section.
Adding sublayer
A GeoJSON shape can be rendered as a sublayer on top of the Google Maps layer to highlight a specific continent or country. This is done by adding another layer using MapsLayer and setting its Type property to SubLayer.
@using Syncfusion.Blazor.Maps

<SfMaps>
    <MapsLayers>
        <MapsLayer UrlTemplate="https://tile.googleapis.com/v1/2dtiles/level/tileX/tileY?session=Your_sessionToken&key=Your_apiKey" TValue="string">
        </MapsLayer>
        @* To add geometry shape as sublayer *@
        <MapsLayer ShapeData='new {dataOptions = "https://cdn.syncfusion.com/maps/map-data/africa.json"}'
                   Type="Syncfusion.Blazor.Maps.Type.SubLayer" TValue="string">
            <MapsShapeSettings Fill="blue"></MapsShapeSettings>
        </MapsLayer>
    </MapsLayers>
</SfMaps>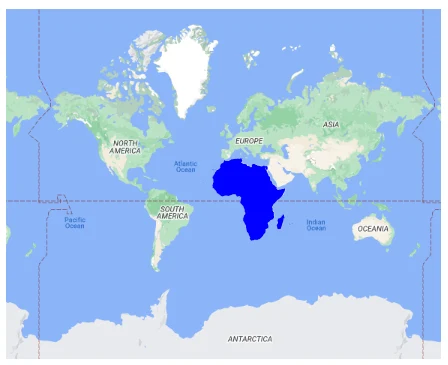
NOTE
Refer to the session token retrieval method described in the Displaying Google Maps section.
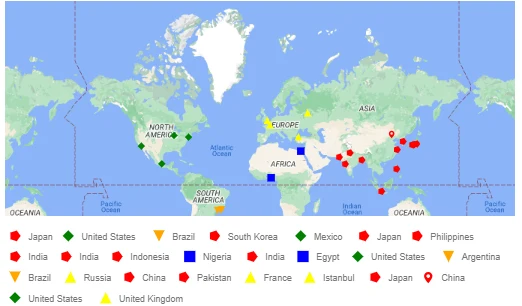
Enable legend
A legend can be added to the Google Maps layer by setting the Visible property of MapsLegendSettings to true.
In the following example, the legend is associated with markers on the Google Maps layer.
@using Syncfusion.Blazor.Maps

<SfMaps Format="N0" EnableGroupingSeparator="true">
    <MapsZoomSettings Enable="true">
        <MapsZoomToolbarSettings>
            <MapsZoomToolbarTooltipSettings FontFamily="inherit"></MapsZoomToolbarTooltipSettings>
        </MapsZoomToolbarSettings>
    </MapsZoomSettings>
    <MapsLegendSettings Visible="true" Position="LegendPosition.Float" Height="123px" Width="200px" Type="LegendType.Markers" X="10" Y="247" Background="#E6E6E6" ShapePadding="10">
        <MapsLegendTextStyle FontFamily="inherit" Color="#000000" />
    </MapsLegendSettings>
    <MapsTitleSettings Text="Top 10 populated cities in the World">
        <MapsTitleTextStyle Size="16px" FontFamily="inherit" />
    </MapsTitleSettings>
    <MapsLayers>
        <MapsLayer UrlTemplate="https://tile.googleapis.com/v1/2dtiles/level/tileX/tileY?session=Your_sessionToken&key=Your_apiKey" TValue="string">
        <MapsMarkerSettings>
                <MapsMarker Visible="true" TValue="PopulationCityDetails" DataSource="@PopulatedCities" Shape="MarkerType.Circle" Fill="#FFFFFF" ColorValuePath="Color" LegendText="Name" Height="15" Width="15">
                    <MapsMarkerTooltipSettings Visible="true" ValuePath="Population" Format="City Name: ${Name}</br>Population: ${Population} million">
                        <MapsMarkerTooltipTextStyle FontFamily="inherit"></MapsMarkerTooltipTextStyle>
                    </MapsMarkerTooltipSettings>
                </MapsMarker>
            </MapsMarkerSettings>
        </MapsLayer>
    </MapsLayers>
</SfMaps>

@code {
    public class PopulationCityDetails
    {
        public string Name { get; set; }
        public double Latitude { get; set; }
        public double Longitude { get; set; }
        public double Population { get; set; }
        public string Color { get; set; }
    };

    public List<PopulationCityDetails> PopulatedCities = new List<PopulationCityDetails> {
        new PopulationCityDetails { Name = "Tokyo", Latitude = 35.6805245924747, Longitude = 139.76770396213337, Population = 37435191, Color = "#2EB6C8" },
        new PopulationCityDetails { Name = "Delhi", Latitude = 28.644800, Longitude = 77.216721, Population = 29399141, Color = "#4A97F4" },
        new PopulationCityDetails { Name = "Shanghai", Latitude = 31.224361, Longitude = 121.469170, Population = 26317104, Color = "#498082" },
        new PopulationCityDetails { Name = "Sao Paulo", Latitude = -23.550424484747914, Longitude = -46.646471636488315, Population = 21846507, Color = "#FB9E67" },
        new PopulationCityDetails { Name = "Mexico City", Latitude = 19.427402397418774, Longitude = -99.131123716666, Population = 21671908, Color = "#8F9DE3" },
        new PopulationCityDetails { Name = "Cairo", Latitude = 30.033333, Longitude = 31.233334, Population = 20484965, Color = "#7B9FB0" },
        new PopulationCityDetails { Name = "Dhaka", Latitude = 23.777176, Longitude = 90.399452, Population = 20283552, Color = "#4DB647" },
        new PopulationCityDetails { Name = "Mumbai", Latitude = 19.08492049646163, Longitude = 72.87449446319248, Population = 20185064, Color = "#30BEFF" },
        new PopulationCityDetails { Name = "Beijing", Latitude = 39.90395970055848, Longitude = 116.38831272088059, Population = 20035455, Color = "#Ac72AD" },
        new PopulationCityDetails { Name = "Osaka", Latitude = 34.69024500601642, Longitude = 135.50746225677142, Population = 19222665, Color = "#EFE23E" }
    };
}
NOTE
Refer to the session token retrieval method described in the Displaying Google Maps section.