User Interactions in Blazor Maps Component
23 Jun 202624 minutes to read
Zooming
The zooming feature is used to zoom in and out of Maps to show in-depth information. It is controlled by the ZoomFactor property of the MapsZoomSettings class. The ZoomFactor is increased or decreased dynamically based on zoom in and out interaction. ZoomFactor is linear. It represents a magnification multiplier relative to the initial “fit to viewport” view. Increasing the value linearly magnifies the map; decreasing it zooms out. Fractional values are allowed.
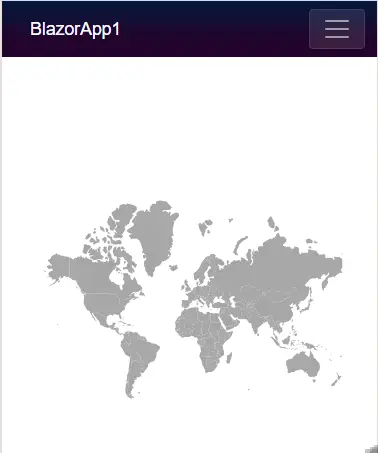
How the map renders at the default:
By default, ZoomFactor is 1. The map automatically fits the layer’s bounds into the available map area. You see the whole world or the whole shape layer centered and sized to the component.
What happens when you change ZoomFactor:
- Zoom in: Increasing ZoomFactor enlarges the content around the current center. Example: going from 1 to 2 approximately doubles the scale.
- Zoom out: Decreasing ZoomFactor reduces the scale, showing a larger area.
Enable zooming
Enable zooming by setting the Enable property of MapsZoomSettings to true.
@using Syncfusion.Blazor.Maps

<SfMaps>
    <MapsZoomSettings Enable="true"></MapsZoomSettings>
    <MapsLayers>
        <MapsLayer ShapeData='new {dataOptions ="https://cdn.syncfusion.com/maps/map-data/usa.json"}' TValue="string">
        </MapsLayer>
    </MapsLayers>
</SfMaps>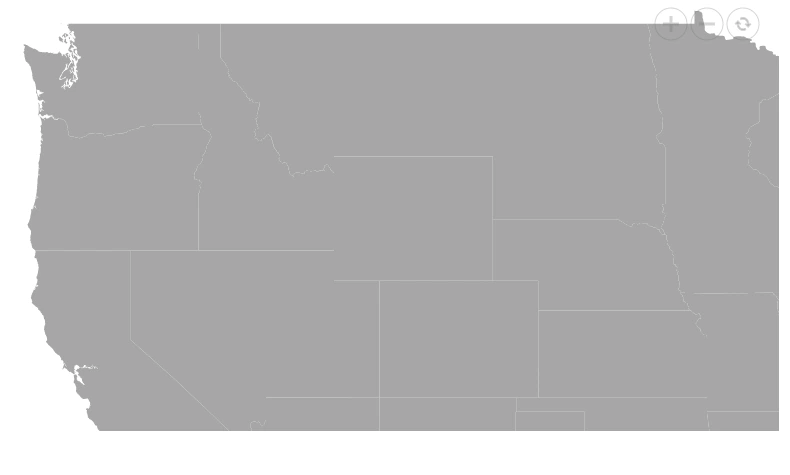
Enable panning
Enable panning by setting the EnablePanning property of MapsZoomSettings to true.
@using Syncfusion.Blazor.Maps

<SfMaps>
    <MapsZoomSettings Enable="true" EnablePanning="true"></MapsZoomSettings>
    <MapsLayers>
        <MapsLayer ShapeData='new {dataOptions ="https://cdn.syncfusion.com/maps/map-data/usa.json"}' TValue="string">
        </MapsLayer>
    </MapsLayers>
</SfMaps>
Various types of zooming
Zooming supports the following types:
Zooming toolbar
A built-in toolbar supports zooming and panning. It appears when the Enable property is set to true.
The toolbar includes the following options:
- Zoom - Performs selection zooming.
- Zoom In - Zooms in the map.
- Zoom Out - Zooms out the map.
- Pan - Switches to panning if selection zoom is enabled.
- Reset - Restores the default view.
By default, the toolbar renders with Zoom In, Zoom Out, and Reset.
@using Syncfusion.Blazor.Maps

<SfMaps>
    <MapsZoomSettings Enable="true">
    </MapsZoomSettings>
    <MapsLayers>
        <MapsLayer ShapeData='new {dataOptions ="https://cdn.syncfusion.com/maps/map-data/usa.json"}' TValue="string">
        </MapsLayer>
    </MapsLayers>
</SfMaps>
Pinch zooming
Enable or disable pinch zooming using the PinchZooming property in MapsZoomSettings.
@using Syncfusion.Blazor.Maps

<SfMaps>
    <MapsZoomSettings Enable="true" PinchZooming="true"></MapsZoomSettings>
    <MapsLayers>
        <MapsLayer ShapeData='new {dataOptions ="https://cdn.syncfusion.com/maps/map-data/usa.json"}' TValue="string">
        </MapsLayer>
    </MapsLayers>
</SfMaps>
Single-click zooming
Enable or disable single-click zooming using the ZoomOnClick property in MapsZoomSettings.
@using Syncfusion.Blazor.Maps

<SfMaps>
    <MapsZoomSettings Enable="true" ZoomOnClick="true"></MapsZoomSettings>
    <MapsLayers>
        <MapsLayer ShapeData='new {dataOptions ="https://cdn.syncfusion.com/maps/map-data/usa.json"}' TValue="string">
        </MapsLayer>
    </MapsLayers>
</SfMaps>
Double-click zooming
Enable or disable double-click zooming using the DoubleClickZoom property in MapsZoomSettings.
@using Syncfusion.Blazor.Maps

<SfMaps>
    <MapsZoomSettings Enable="true" DoubleClickZoom="true"></MapsZoomSettings>
    <MapsLayers>
        <MapsLayer ShapeData='new {dataOptions ="https://cdn.syncfusion.com/maps/map-data/usa.json"}' TValue="string">
        </MapsLayer>
    </MapsLayers>
</SfMaps>
Mouse wheel zooming
Enable or disable mouse wheel zooming using the MouseWheelZoom property in MapsZoomSettings.
@using Syncfusion.Blazor.Maps

<SfMaps>
    <MapsZoomSettings Enable="true" MouseWheelZoom="true"></MapsZoomSettings>
    <MapsLayers>
        <MapsLayer ShapeData='new {dataOptions ="https://cdn.syncfusion.com/maps/map-data/usa.json"}' TValue="string">
        </MapsLayer>
    </MapsLayers>
</SfMaps>
Selection zooming
Enable or disable selection zooming using the EnableSelectionZooming property in MapsZoomSettings. To enable selection zooming, set EnablePanning to false.
@using Syncfusion.Blazor.Maps

<SfMaps>
    <MapsZoomSettings Enable="true" EnableSelectionZooming="true" EnablePanning="true">
        <MapsZoomToolbarSettings>
            <MapsZoomToolbarButton ToolbarItems="new List<ToolbarItem>() { ToolbarItem.Zoom, ToolbarItem.ZoomIn, ToolbarItem.ZoomOut,
            ToolbarItem.Pan, ToolbarItem.Reset }"></MapsZoomToolbarButton>
        </MapsZoomToolbarSettings>
    </MapsZoomSettings>
    <MapsLayers>
        <MapsLayer ShapeData='new {dataOptions ="https://cdn.syncfusion.com/maps/map-data/usa.json"}' TValue="string">
        </MapsLayer>
    </MapsLayers>
</SfMaps>
Setting minimum and maximum values for zoom factor
Adjust the zoom range using MinZoom and MaxZoom properties in MapsZoomSettings. The default values are 1 for MinZoom and 10 for MaxZoom.
@using Syncfusion.Blazor.Maps

<SfMaps>
    <MapsZoomSettings Enable="true" MinZoom="2" MaxZoom="9"></MapsZoomSettings>
    <MapsLayers>
        <MapsLayer ShapeData='new {dataOptions ="https://cdn.syncfusion.com/maps/map-data/usa.json"}' TValue="string">
        </MapsLayer>
    </MapsLayers>
</SfMaps>
Zooming with layer animation
Apply animated zooming for shape layers using the AnimationDuration property in MapsLayer. The animation applies to the base layer when the duration is set on that layer.
@using Syncfusion.Blazor.Maps

<SfMaps>
    <MapsZoomSettings Enable="true">
    </MapsZoomSettings>
    <MapsLayers>
        <MapsLayer ShapeData='new {dataOptions ="https://cdn.syncfusion.com/maps/map-data/usa.json"}' TValue="string"
                   AnimationDuration="500">
        </MapsLayer>
    </MapsLayers>
</SfMaps>
Customizing the zoom toolbar
Use MapsZoomToolbarSettings to customize the zoom toolbar. The following properties are available:
- Orientation - Sets the toolbar orientation (horizontal or vertical).
- HorizontalAlignment - Positions the toolbar for horizontal orientation (near, center, far).
- VerticalAlignment - Positions the toolbar for vertical orientation (near, center, far).
- BackgroundColor - Sets the toolbar background color.
- BorderColor - Sets the toolbar border color.
- BorderWidth - Sets the toolbar border width.
- BorderOpacity - Sets the toolbar border opacity.
@using Syncfusion.Blazor.Maps

<SfMaps>
    <MapsZoomSettings Enable="true">
        <MapsZoomToolbarSettings BackgroundColor="pink" BorderColor="green" BorderOpacity="1" BorderWidth="3" Orientation="Orientation.Vertical" VerticalAlignment="Alignment.Near">
            <MapsZoomToolbarButton ToolbarItems="new List<ToolbarItem>() { ToolbarItem.Zoom,
                                       ToolbarItem.ZoomIn, ToolbarItem.ZoomOut, ToolbarItem.Pan, ToolbarItem.Reset }"></MapsZoomToolbarButton>
        </MapsZoomToolbarSettings>
    </MapsZoomSettings>
    <MapsLayers>
        <MapsLayer ShapeData='new {dataOptions ="https://cdn.syncfusion.com/maps/map-data/usa.json"}' TValue="string">
            <MapsShapeSettings Fill="#C1DFF5"></MapsShapeSettings>
        </MapsLayer>
    </MapsLayers>
</SfMaps>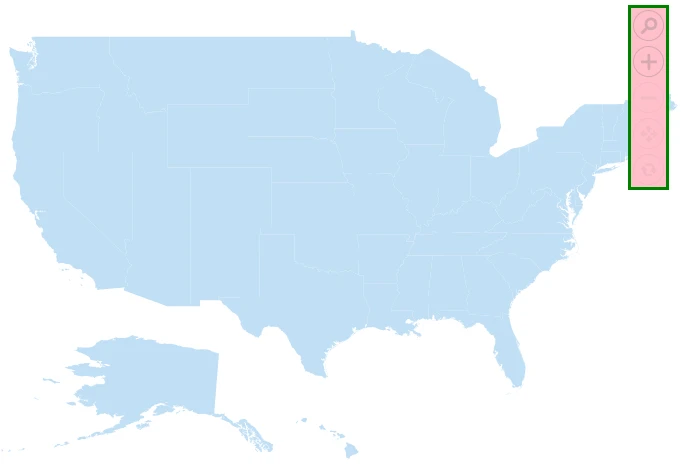
Customizing the buttons in the zoom toolbar
Use MapsZoomToolbarButton to customize the toolbar buttons. The following properties are available:
- ToolbarItems - Configures the items displayed in the toolbar.
- Color - Sets the icon color.
- Fill - Sets the button fill color.
- Opacity - Sets the button opacity.
- HighlightColor - Sets the hover color.
- SelectionColor - Sets the active state color.
- Radius - Sets the button corner radius.
- Padding - Sets the spacing between buttons.
- BorderColor - Sets the border color.
- BorderOpacity - Sets the border opacity.
- BorderWidth - Sets the border width.
@using Syncfusion.Blazor.Maps

<SfMaps>
    <MapsZoomSettings Enable="true">
         <MapsZoomToolbarSettings>
            <MapsZoomToolbarButton BorderColor="green" BorderOpacity="1" BorderWidth="2" Color="red" Fill="pink" HighlightColor="#5ed59a" SelectionColor="#d55e5e" Opacity="0.6"
                                   Padding="10" Radius="35"  ToolbarItems="new List<ToolbarItem>() { ToolbarItem.Zoom,
                                       ToolbarItem.ZoomIn, ToolbarItem.ZoomOut, ToolbarItem.Pan, ToolbarItem.Reset }"></MapsZoomToolbarButton>
        </MapsZoomToolbarSettings>
    </MapsZoomSettings>
    <MapsLayers>
        <MapsLayer ShapeData='new {dataOptions ="https://cdn.syncfusion.com/maps/map-data/usa.json"}' TValue="string">
        <MapsShapeSettings Fill="#C1DFF5"></MapsShapeSettings>
        </MapsLayer>
    </MapsLayers>
</SfMaps>
Customizing the tooltip of the zoom toolbar
Use MapsZoomToolbarTooltipSettings to customize the toolbar tooltip. The following properties are available:
- Visible - Enables or disables the tooltip.
- Fill - Sets the tooltip background color.
- BorderColor - Sets the tooltip border color.
- BorderOpacity - Sets the tooltip border opacity.
- BorderWidth - Sets the tooltip border width.
- FontColor - Sets the tooltip text color.
- FontFamily - Sets the tooltip font family.
- FontStyle - Sets the tooltip font style.
- FontWeight - Sets the tooltip font weight.
- FontSize - Sets the tooltip font size.
- FontOpacity - Sets the tooltip font opacity.
@using Syncfusion.Blazor.Maps

<SfMaps Width="700px" Height="500px">
    <MapsZoomSettings Enable="true">
         <MapsZoomToolbarSettings>
            <MapsZoomToolbarButton ToolbarItems="new List<ToolbarItem>() { ToolbarItem.Zoom,
                                       ToolbarItem.ZoomIn, ToolbarItem.ZoomOut, ToolbarItem.Pan, ToolbarItem.Reset }"></MapsZoomToolbarButton>
            <MapsZoomToolbarTooltipSettings Visible="true" BorderColor="green" BorderOpacity="1" BorderWidth="2" Fill="violet" FontColor="black" FontFamily="Times New Roman"
                                            FontOpacity="1" FontSize="22px" FontStyle="normal" FontWeight="200"></MapsZoomToolbarTooltipSettings>
        </MapsZoomToolbarSettings>
    </MapsZoomSettings>
    <MapsLayers>
        <MapsLayer ShapeData='new {dataOptions ="https://cdn.syncfusion.com/maps/map-data/usa.json"}' TValue="string">
        <MapsShapeSettings Fill="#C1DFF5"></MapsShapeSettings>
        </MapsLayer>
    </MapsLayers>
</SfMaps>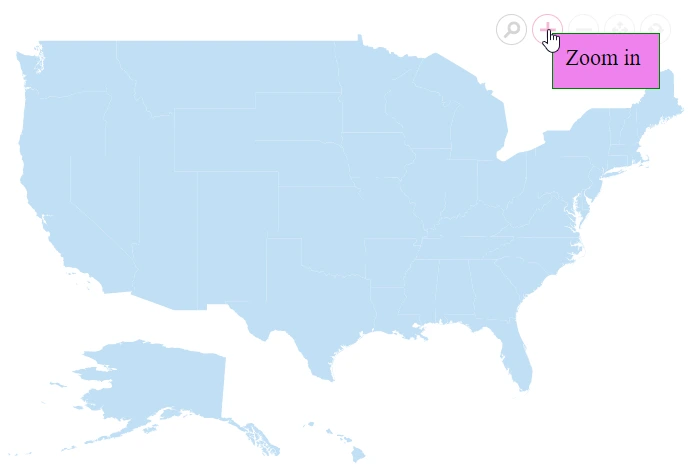
Selection
Shapes can be selected and deselected during interaction. Enable selection by setting the Enable property of MapsSelectionSettings to true.
The following properties and class customize selection for shapes, bubbles, and markers:
- MapsLayerSelectionBorder - Configures the selected element border color and width.
- Fill - Sets the selected element color.
- Opacity - Sets the selected element opacity.
- EnableMultiSelect - Enables selection of multiple shapes, markers, or bubbles.
@using Syncfusion.Blazor.Maps

<SfMaps>
    <MapsLayers>
        <MapsLayer ShapeData='new {dataOptions ="https://cdn.syncfusion.com/maps/map-data/usa.json"}' TValue="string">
            <MapsLayerSelectionSettings Enable="true" Fill="green">
                <MapsLayerSelectionBorder Color="White" Width="2"></MapsLayerSelectionBorder>
            </MapsLayerSelectionSettings>
        </MapsLayer>
    </MapsLayers>
</SfMaps>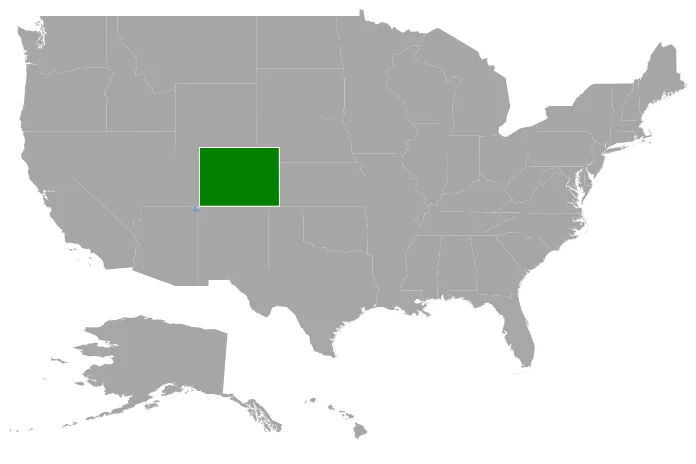
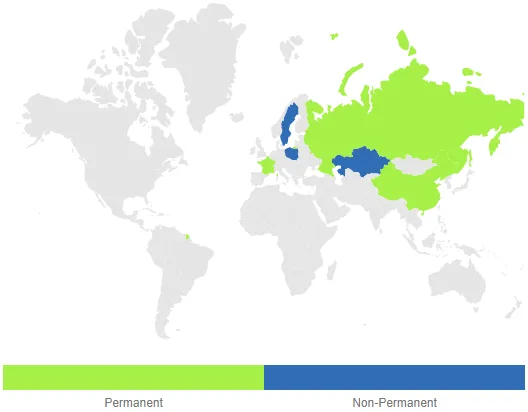
Selecting a legend item selects the shapes bound to that legend, and selecting a shape highlights the corresponding legend.
@using Syncfusion.Blazor.Maps

<SfMaps>
    <MapsLegendSettings Visible="true" Mode="LegendMode.Interactive"></MapsLegendSettings>
    <MapsLayers>
        <MapsLayer ShapeData='new {dataOptions ="https://cdn.syncfusion.com/maps/map-data/world-map.json"}' ShapeDataPath="Country"
                   DataSource="CouncilMemberdetails" ShapePropertyPath='new string[] {"name"}' TValue="UNCouncil">
            <MapsShapeSettings Fill="#E5E5E5" ColorValuePath="Membership">
                <MapsShapeColorMappings>
                    <MapsShapeColorMapping Value="Permanent" Color='new string[] {"#D84444"}' />
                    <MapsShapeColorMapping Value="Non-Permanent" Color='new string[] {"#316DB5"}' />
                </MapsShapeColorMappings>
            </MapsShapeSettings>
            <MapsLayerSelectionSettings Enable="true" Fill="#a7f047">
                <MapsLayerSelectionBorder Color="White" Width="2"></MapsLayerSelectionBorder>
            </MapsLayerSelectionSettings>
        </MapsLayer>
    </MapsLayers>
</SfMaps>

@code {
    public class UNCouncil
    {
        public string Country { get; set; }
        public string Membership { get; set; }
    }

    private List<UNCouncil> CouncilMemberdetails = new List<UNCouncil>{
        new UNCouncil { Country= "China", Membership= "Permanent" },
        new UNCouncil { Country= "France",Membership= "Permanent" },
        new UNCouncil { Country= "Russia",Membership= "Permanent" },
        new UNCouncil { Country= "Kazakhstan",Membership= "Non-Permanent" },
        new UNCouncil { Country= "Poland",Membership= "Non-Permanent" },
        new UNCouncil { Country= "Sweden",Membership= "Non-Permanent" }
    };
}
Enable selection for bubbles
Enable bubble selection by configuring MapsBubbleSelectionSettings in MapsBubble and setting Enable property to true.
@using Syncfusion.Blazor.Maps

<SfMaps>
    <MapsLayers>
        <MapsLayer ShapeData='new {dataOptions ="https://cdn.syncfusion.com/maps/map-data/world-map.json"}' ShapeDataPath="Name"
                   ShapePropertyPath='new string[] {"name"}' TValue="Country">
            @* To add bubbles based on population count *@
            <MapsBubbleSettings>
                <MapsBubble Visible="true" ValuePath="Population" ColorValuePath="Color" MinRadius=20 MaxRadius=40
                            DataSource="PopulationDetails" TValue="Country">
                <MapsBubbleSelectionSettings Enable="true" Fill="green"></MapsBubbleSelectionSettings>
                </MapsBubble>
            </MapsBubbleSettings>
        </MapsLayer>
    </MapsLayers>
</SfMaps>

@code {
    public class Country
    {
        public string Name { get; set; }
        public double Population { get; set; }
        public string Color { get; set; }
    }

    private List<Country> PopulationDetails = new List<Country> {
       new Country
       {
           Name ="United States", Population = 325020000, Color = "#b5e485"
       },
       new Country
       {
           Name = "Russia", Population = 142905208, Color = "#7bc1e8"
       },
       new Country
       {
           Name="India", Population=1198003000, Color = "#df819c"
       }
    };
}
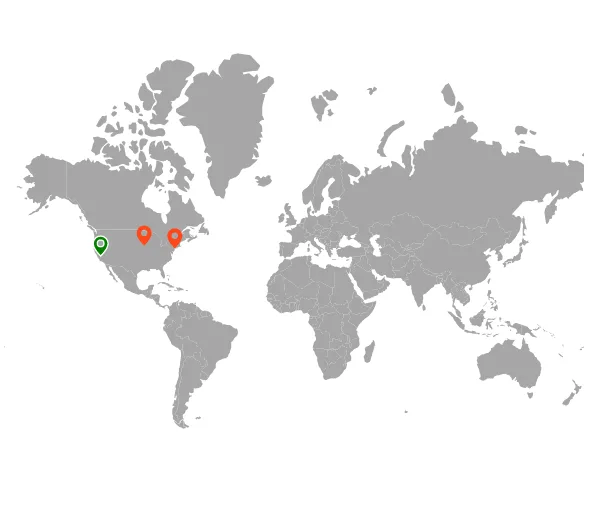
Enable selection for markers
Enable marker selection by configuring MapsMarkerSelectionSettings in MapsMarkerSettings and setting Enable property to true.
@using Syncfusion.Blazor.Maps

<SfMaps>
    <MapsLayers>
        <MapsLayer ShapeData='new {dataOptions= "https://cdn.syncfusion.com/maps/map-data/usa.json"}' TValue="string">
            <MapsMarkerSettings>
                <MapsMarker Visible="true" DataSource="California" Height="25" Width="15" TValue="City">
                    <MapsMarkerSelectionSettings Fill="green" Enable="true"></MapsMarkerSelectionSettings>
                </MapsMarker>
                <MapsMarker Visible="true" DataSource="NewYork" Height="25" Width="15" TValue="City">
                    <MapsMarkerSelectionSettings Fill="green" Enable="true"></MapsMarkerSelectionSettings>
                </MapsMarker>
                <MapsMarker Visible="true" DataSource="Iowa" Height="25" Width="15" TValue="City">
                    <MapsMarkerSelectionSettings Fill="green" Enable="true"></MapsMarkerSelectionSettings>
                </MapsMarker>
            </MapsMarkerSettings>
            <MapsShapeSettings Fill="lightgray"></MapsShapeSettings>
        </MapsLayer>
    </MapsLayers>
</SfMaps>

@code {
    public class City
    {
        public double Latitude { get; set; }
        public double Longitude { get; set; }
    };

    public List<City> California = new List<City> {
        new City { Latitude = 35.145083, Longitude = -117.960260 }
    };

    public List<City> NewYork = new List<City> {
        new City { Latitude = 40.724546, Longitude = -73.850344 }
    };

    public List<City> Iowa = new List<City> {
        new City { Latitude = 41.657782, Longitude = -91.533857 }
    };
}
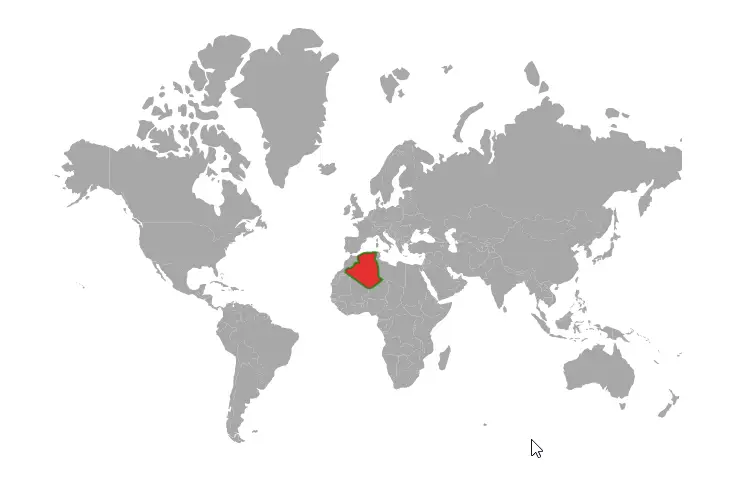
Enable selection for polygons
Enable polygon selection by setting the Enable property of MapsPolygonSelectionSettings to true. The following properties and class customize selected polygon shapes:
- EnableMultiSelect - Enables selection of multiple polygons.
- Fill - Sets the selected polygon color.
- Opacity - Sets the selected polygon opacity.
- MapsPolygonSelectionBorder - Configures the border color, width, and opacity.
The following example demonstrates selecting a polygon in a geometry map.
@using Syncfusion.Blazor.Maps

<SfMaps>
    <MapsLayers>
        <MapsLayer ShapeData='new {dataOptions= "https://cdn.syncfusion.com/maps/map-data/world-map.json"}' TValue="string">
            <MapsPolygons>
                <MapsPolygonSelectionSettings Enable=true EnableMultiSelect=false Fill="violet" Opacity="0.8">
                    <MapsPolygonSelectionBorder Color="cyan" Opacity="1" Width="7"></MapsPolygonSelectionBorder>
                </MapsPolygonSelectionSettings>
                <MapsPolygon Points="@Brazil" Fill="blue" Opacity="0.7" BorderColor="green" BorderWidth="2" BorderOpacity="0.7"></MapsPolygon>
            </MapsPolygons>
        </MapsLayer>
    </MapsLayers>
</SfMaps>

@code {
    List<Coordinate> Brazil = new List<Coordinate>();

    protected override async Task OnInitializedAsync()
    {
        await base.OnInitializedAsync();
        Brazil.Add(new Coordinate() { Longitude = -1.8920678947185365, Latitude = 35.06195799239681 });
        Brazil.Add(new Coordinate() { Longitude = -1.6479633699113947, Latitude = 33.58989612266137 });
        Brazil.Add(new Coordinate() { Longitude = -1.4201220366858252, Latitude = 32.819439646045254 });
        Brazil.Add(new Coordinate() { Longitude = -1.197974596225663, Latitude = 32.26940895444655 });
        Brazil.Add(new Coordinate() { Longitude = -2.891112397949655, Latitude = 32.10303058820031 });
        Brazil.Add(new Coordinate() { Longitude = -3.8246984550501963, Latitude = 31.34551662687602 });
        Brazil.Add(new Coordinate() { Longitude = -3.720166273688733, Latitude = 30.758086682848685 });
        Brazil.Add(new Coordinate() { Longitude = -5.6571886081189575, Latitude = 29.613582597203006 });
        Brazil.Add(new Coordinate() { Longitude = -7.423353242214745, Latitude = 29.44328441403087 });
        Brazil.Add(new Coordinate() { Longitude = -8.6048931685323, Latitude = 28.761444633616776 });
        Brazil.Add(new Coordinate() { Longitude = -8.695726975465703, Latitude = 27.353491085576195 });
        Brazil.Add(new Coordinate() { Longitude = 3.837867279970908, Latitude = 19.15916564839422 });
        Brazil.Add(new Coordinate() { Longitude = 6.0705408799045415, Latitude = 19.48749097192868 });
        Brazil.Add(new Coordinate() { Longitude = 12.055736352807713, Latitude = 23.694596786078293 });
        Brazil.Add(new Coordinate() { Longitude = 11.272522332402986, Latitude = 24.289329186946034 });
        Brazil.Add(new Coordinate() { Longitude = 10.30872578261932, Latitude = 24.65419958524693 });
        Brazil.Add(new Coordinate() { Longitude = 9.910236690050027, Latitude = 25.48943950947175 });
        Brazil.Add(new Coordinate() { Longitude = 9.432639882414293, Latitude = 26.398372489836902 });
        Brazil.Add(new Coordinate() { Longitude = 9.898266456582292, Latitude = 26.73489453809293 });
        Brazil.Add(new Coordinate() { Longitude = 9.560243026853641, Latitude = 30.31040379467153 });
        Brazil.Add(new Coordinate() { Longitude = 8.943853847283322, Latitude = 32.350324876652195 });
        Brazil.Add(new Coordinate() { Longitude = 7.57004059025715, Latitude = 33.75071049019398 });
        Brazil.Add(new Coordinate() { Longitude = 8.0906322609153, Latitude = 34.69043151009983 });
        Brazil.Add(new Coordinate() { Longitude = 8.363285449347273, Latitude = 35.38654406371319 });
        Brazil.Add(new Coordinate() { Longitude = 8.26139549449448, Latitude = 36.44751078733985 });
        Brazil.Add(new Coordinate() { Longitude = 8.61100824823302, Latitude = 36.881913362940196 });
        Brazil.Add(new Coordinate() { Longitude = 7.4216488925819135, Latitude = 37.021408008916254 });
        Brazil.Add(new Coordinate() { Longitude = 6.461182254165351, Latitude = 36.99092409199429 });
        Brazil.Add(new Coordinate() { Longitude = 5.297178918070159, Latitude = 36.69985479014656 });
        Brazil.Add(new Coordinate() { Longitude = 3.6718056161224695, Latitude = 36.86470546831693 });
        Brazil.Add(new Coordinate() { Longitude = 1.2050052555659931, Latitude = 36.57658056301722 });
        Brazil.Add(new Coordinate() { Longitude = -0.26968570003779746, Latitude = 35.806903541813625 });
        Brazil.Add(new Coordinate() { Longitude = -0.995191786435754, Latitude = 35.58466127904214 });
        Brazil.Add(new Coordinate() { Longitude = -1.8920678947185365, Latitude = 35.06195799239681 });
    }
}
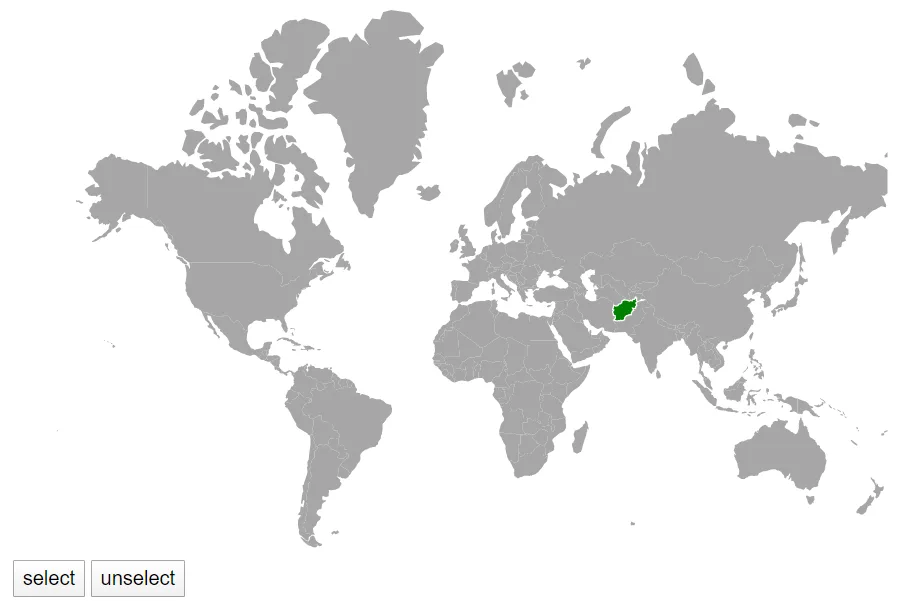
Public method for the shape selection
Use the ShapeSelection method to select a shape programmatically. Input parameters are the layerIndex, propertyName, shapeDataPath, and the isSelect boolean to select or deselect the shape.
@using Syncfusion.Blazor.Maps

<div>
    <SfMaps @ref="mapsref">
        <MapsLayers>
            <MapsLayer ShapeData='new {dataOptions= "https://cdn.syncfusion.com/maps/map-data/world-map.json"}' TValue="string">
                <MapsLayerSelectionSettings Enable="true" Fill="green">
                    <MapsLayerSelectionBorder Color="white" Width="2"></MapsLayerSelectionBorder>
                </MapsLayerSelectionSettings>
            </MapsLayer>
        </MapsLayers>
    </SfMaps>
</div>
<button id="select" @onclick="Select">select</button>
<button id="unselect" @onclick="Unselect">unselect</button>

@code {
    SfMaps mapsref;

    public void Select() {
        mapsref.ShapeSelectionAsync(0, "continent", "Asia", true);
    }

    public void Unselect() {
        mapsref.ShapeSelectionAsync(0, "continent", "Asia", false);
    }
}
Initial shape selection
Initialize selection using MapsInitialShapeSelection by mapping values to ShapePath and ShapeValue.
<SfMaps>
    <MapsLayers>
        <MapsLayer ShapeData='new {dataOptions= "https://cdn.syncfusion.com/maps/map-data/world-map.json"}' TValue="string">
            <MapsLayerSelectionSettings Enable="true" Fill="green" EnableMultiSelect="true">
                <MapsLayerSelectionBorder Color="white" Width="2"></MapsLayerSelectionBorder>
            </MapsLayerSelectionSettings>
            <MapsInitialShapeSelectionSettings>
                <MapsInitialShapeSelection ShapePath="continent" ShapeValue="Africa"></MapsInitialShapeSelection>
                <MapsInitialShapeSelection ShapePath="name" ShapeValue="India"></MapsInitialShapeSelection>
            </MapsInitialShapeSelectionSettings>
        </MapsLayer>
    </MapsLayers>
</SfMaps>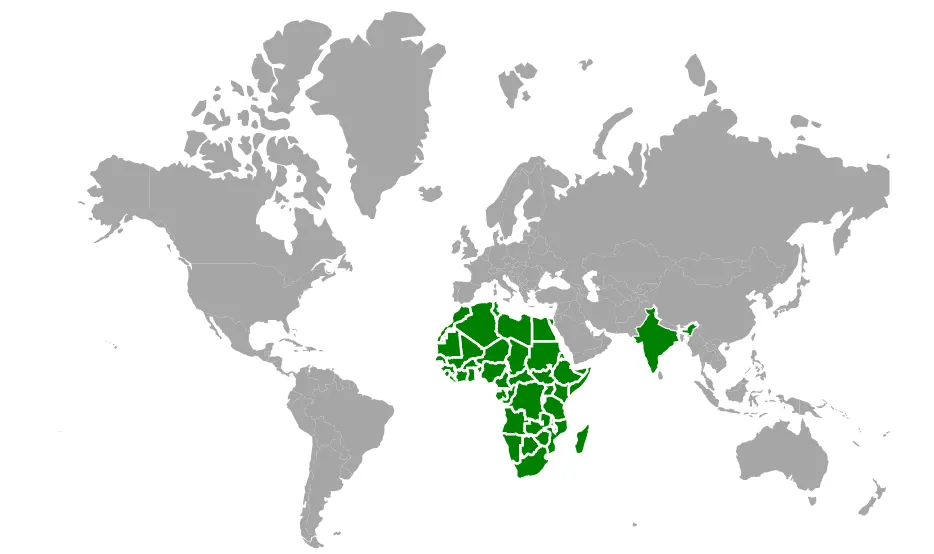
Initial marker selection
Select markers initially using InitialMarkerSelection. Markers render based on Latitude and Longitude.
@using Syncfusion.Blazor.Maps

<SfMaps>
    <MapsLayers>
        <MapsLayer ShapeData='new {dataOptions= "https://cdn.syncfusion.com/maps/map-data/usa.json"}' TValue="string">
            <MapsMarkerSettings>
                <MapsMarker Visible="true" DataSource="Cities" Height="25" Width="15" TValue="City">
                    <MapsMarkerSelectionSettings Fill="green" Enable="true"></MapsMarkerSelectionSettings>
                    <InitialMarkerSelectionSettings>
                        <InitialMarkerSelection Latitude="35.145083" Longitude="-117.960260"></InitialMarkerSelection>
                    </InitialMarkerSelectionSettings>
                </MapsMarker>
            </MapsMarkerSettings>
            <MapsShapeSettings Fill="lightgray"></MapsShapeSettings>
        </MapsLayer>
    </MapsLayers>
</SfMaps>

@code {
    public class City
    {
        public double Latitude { get; set; }
        public double Longitude { get; set; }
        public string Name { get; set; }
    }

    private List<City> Cities = new List<City> {
        new City { Latitude = 35.145083, Longitude = -117.960260, Name = "Californiya" },
        new City { Latitude = 40.724546, Longitude = -73.850344, Name = "New York" },
        new City { Latitude = 41.657782, Longitude = -91.533857, Name = "Iowa" }
    };
}
Highlight
Shapes can be highlighted on mouse hover, including shapes, bubbles, markers, and legends. Enable highlight by setting the Enable property of MapsHighlightSettings to true.
The following properties and classes customize highlight behavior for shapes, bubbles, and markers:
- Fill - Sets the highlight color.
- Opacity - Sets the highlight opacity.
- MapsLayerHighlightBorder - Configures the layer border during highlight.
- MapsBubbleHighlightBorder - Configures the bubble border during highlight.
- MapsMarkerHighlightBorder - Configures the marker border during highlight.
@using Syncfusion.Blazor.Maps

<SfMaps>
    <MapsLayers>
        <MapsLayer ShapeData='new {dataOptions ="https://cdn.syncfusion.com/maps/map-data/usa.json"}' TValue="string">
            <MapsLayerHighlightSettings Enable="true" Fill="green">
                <MapsLayerHighlightBorder Color="white" Width="2"></MapsLayerHighlightBorder>
            </MapsLayerHighlightSettings>
        </MapsLayer>
    </MapsLayers>
</SfMaps>
Hovering over a legend highlights the shapes bound to that legend, and hovering over a shape highlights the corresponding legend.
@using Syncfusion.Blazor.Maps

<SfMaps>
    <MapsLegendSettings Visible="true" Mode="LegendMode.Interactive"></MapsLegendSettings>
    <MapsLayers>
        <MapsLayer ShapeData='new {dataOptions ="https://cdn.syncfusion.com/maps/map-data/world-map.json"}' ShapeDataPath="Country"
                   DataSource="CouncilMemberDetails" ShapePropertyPath='new string[] {"name"}' TValue="UNCouncil">
            <MapsShapeSettings Fill="#E5E5E5" ColorValuePath="Membership">
                <MapsShapeColorMappings>
                    <MapsShapeColorMapping Value="Permanent" Color='new string[] {"#D84444"}' />
                    <MapsShapeColorMapping Value="Non-Permanent" Color='new string[] {"#316DB5"}' />
                </MapsShapeColorMappings>
            </MapsShapeSettings>
            <MapsLayerHighlightSettings Enable="true" Fill="#a7f047">
                <MapsLayerHighlightBorder Color="White" Width="2"></MapsLayerHighlightBorder>
            </MapsLayerHighlightSettings>
        </MapsLayer>
    </MapsLayers>
</SfMaps>

@code {
    public class UNCouncil
    {
        public string Country { get; set; }
        public string Membership { get; set; }
    }

    private List<UNCouncil> CouncilMemberDetails = new List<UNCouncil>{
        new UNCouncil { Country = "China", Membership = "Permanent" },
        new UNCouncil { Country = "France", Membership = "Permanent" },
        new UNCouncil { Country = "Russia", Membership = "Permanent" },
        new UNCouncil { Country = "Kazakhstan", Membership = "Non-Permanent" },
        new UNCouncil { Country = "Poland", Membership = "Non-Permanent" }
    };
}
Enable highlight for bubbles
Enable bubble highlight by configuring MapsBubbleHighlightSettings in MapsBubble and setting Enable property to true.
@using Syncfusion.Blazor.Maps

<SfMaps>
    <MapsLayers>
        <MapsLayer ShapeData='new {dataOptions ="https://cdn.syncfusion.com/maps/map-data/world-map.json"}'
                   ShapeDataPath="Name" ShapePropertyPath='new string[] {"name"}' TValue="Country">
            @* To add bubbles based on population count *@
            <MapsBubbleSettings>
                <MapsBubble Visible="true" ValuePath="Population" ColorValuePath="Color" MinRadius=20 MaxRadius=40
                            DataSource="PopulationDetails" TValue="Country">
                    <MapsBubbleHighlightSettings Enable="true" Fill="green">
                        <MapsBubbleHighlightBorder Width="2" Color="orange"></MapsBubbleHighlightBorder>
                    </MapsBubbleHighlightSettings>
                </MapsBubble>
            </MapsBubbleSettings>
        </MapsLayer>
    </MapsLayers>
</SfMaps>

@code {
    public class Country
    {
        public string Name { get; set; }
        public double Population { get; set; }
        public string Color { get; set; }
    }

    private List<Country> PopulationDetails = new List<Country> {
        new Country
       {
           Name = "United States", Population = 325020000, Color = "#b5e485"
       },
       new Country
       {
           Name = "Russia", Population = 142905208, Color = "#7bc1e8"
       },
       new Country
       {
           Name = "India", Population = 1198003000, Color = "#df819c"
       }
    };
}
Enable highlight for markers
Enable marker highlight by configuring MapsMarkerHighlightSettings in MapsMarker and setting Enable property to true.
@using Syncfusion.Blazor.Maps

<SfMaps>
    <MapsLayers>
        <MapsLayer ShapeData='new {dataOptions= "https://cdn.syncfusion.com/maps/map-data/usa.json"}' TValue="string">
            <MapsMarkerSettings>
                <MapsMarker Visible="true" DataSource="Cities" Height="25" Width="15" TValue="City">
                    <MapsMarkerHighlightSettings Fill="green" Enable="true"></MapsMarkerHighlightSettings>
                </MapsMarker>
            </MapsMarkerSettings>
            <MapsShapeSettings Fill="lightgray"></MapsShapeSettings>
        </MapsLayer>
    </MapsLayers>
</SfMaps>

@code {
    public class City
    {
        public double Latitude { get; set; }
        public double Longitude { get; set; }
        public string Name { get; set; }
    }

    private List<City> Cities = new List<City> {
        new City { Latitude = 35.145083, Longitude = -117.960260, Name = "California" },
        new City { Latitude = 40.724546, Longitude = -73.850344, Name = "New York" },
        new City { Latitude = 41.657782, Longitude = -91.533857, Name = "Iowa" }
    };
}
Enable highlight for polygons
Enable polygon highlight by setting the Enable property of MapsPolygonHighlightSettings to true. The following properties and class customize the highlighted polygon:
- Fill - Sets the highlight color.
- Opacity - Sets the highlight opacity.
- MapsPolygonHighlightBorder - Configures the border color, width and opacity.
The following example illustrates highlighting a polygon on a geometry map.
@using Syncfusion.Blazor.Maps

<SfMaps>
    <MapsLayers>
        <MapsLayer ShapeData='new {dataOptions= "https://cdn.syncfusion.com/maps/map-data/world-map.json"}' TValue="string">
            <MapsPolygons>
                <MapsPolygonHighlightSettings Enable=true Fill="yellow" Opacity="0.4" >
                    <MapsPolygonHighlightBorder Color="blue" Opacity="0.6" Width="4"></MapsPolygonHighlightBorder>
                </MapsPolygonHighlightSettings>
                <MapsPolygon Points="Brazil" Fill="red" Opacity="0.7" BorderColor="green" BorderWidth="2" BorderOpacity="0.7"></MapsPolygon>
            </MapsPolygons>
        </MapsLayer>
    </MapsLayers>
</SfMaps>

@code {
    List<Coordinate> Brazil = new List<Coordinate>();

    protected override async Task OnInitializedAsync()
    {
        await base.OnInitializedAsync();
        Brazil.Add(new Coordinate() { Longitude = -1.8920678947185365, Latitude = 35.06195799239681 });
        Brazil.Add(new Coordinate() { Longitude = -1.6479633699113947, Latitude = 33.58989612266137 });
        Brazil.Add(new Coordinate() { Longitude = -1.4201220366858252, Latitude = 32.819439646045254 });
        Brazil.Add(new Coordinate() { Longitude = -1.197974596225663, Latitude = 32.26940895444655 });
        Brazil.Add(new Coordinate() { Longitude = -2.891112397949655, Latitude = 32.10303058820031 });
        Brazil.Add(new Coordinate() { Longitude = -3.8246984550501963, Latitude = 31.34551662687602 });
        Brazil.Add(new Coordinate() { Longitude = -3.720166273688733, Latitude = 30.758086682848685 });
        Brazil.Add(new Coordinate() { Longitude = -5.6571886081189575, Latitude = 29.613582597203006 });
        Brazil.Add(new Coordinate() { Longitude = -7.423353242214745, Latitude = 29.44328441403087 });
        Brazil.Add(new Coordinate() { Longitude = -8.6048931685323, Latitude = 28.761444633616776 });
        Brazil.Add(new Coordinate() { Longitude = -8.695726975465703, Latitude = 27.353491085576195 });
        Brazil.Add(new Coordinate() { Longitude = 3.837867279970908, Latitude = 19.15916564839422 });
        Brazil.Add(new Coordinate() { Longitude = 6.0705408799045415, Latitude = 19.48749097192868 });
        Brazil.Add(new Coordinate() { Longitude = 12.055736352807713, Latitude = 23.694596786078293 });
        Brazil.Add(new Coordinate() { Longitude = 11.272522332402986, Latitude = 24.289329186946034 });
        Brazil.Add(new Coordinate() { Longitude = 10.30872578261932, Latitude = 24.65419958524693 });
        Brazil.Add(new Coordinate() { Longitude = 9.910236690050027, Latitude = 25.48943950947175 });
        Brazil.Add(new Coordinate() { Longitude = 9.432639882414293, Latitude = 26.398372489836902 });
        Brazil.Add(new Coordinate() { Longitude = 9.898266456582292, Latitude = 26.73489453809293 });
        Brazil.Add(new Coordinate() { Longitude = 9.560243026853641, Latitude = 30.31040379467153 });
        Brazil.Add(new Coordinate() { Longitude = 8.943853847283322, Latitude = 32.350324876652195 });
        Brazil.Add(new Coordinate() { Longitude = 7.57004059025715, Latitude = 33.75071049019398 });
        Brazil.Add(new Coordinate() { Longitude = 8.0906322609153, Latitude = 34.69043151009983 });
        Brazil.Add(new Coordinate() { Longitude = 8.363285449347273, Latitude = 35.38654406371319 });
        Brazil.Add(new Coordinate() { Longitude = 8.26139549449448, Latitude = 36.44751078733985 });
        Brazil.Add(new Coordinate() { Longitude = 8.61100824823302, Latitude = 36.881913362940196 });
        Brazil.Add(new Coordinate() { Longitude = 7.4216488925819135, Latitude = 37.021408008916254 });
        Brazil.Add(new Coordinate() { Longitude = 6.461182254165351, Latitude = 36.99092409199429 });
        Brazil.Add(new Coordinate() { Longitude = 5.297178918070159, Latitude = 36.69985479014656 });
        Brazil.Add(new Coordinate() { Longitude = 3.6718056161224695, Latitude = 36.86470546831693 });
        Brazil.Add(new Coordinate() { Longitude = 1.2050052555659931, Latitude = 36.57658056301722 });
        Brazil.Add(new Coordinate() { Longitude = -0.26968570003779746, Latitude = 35.806903541813625 });
        Brazil.Add(new Coordinate() { Longitude = -0.995191786435754, Latitude = 35.58466127904214 });
        Brazil.Add(new Coordinate() { Longitude = -1.8920678947185365, Latitude = 35.06195799239681 });
    }
}
Tooltip
Tooltips display additional information for layers, bubbles, or markers on mouse over or touch end. Enable tooltips using the Visible property in MapsLayerTooltipSettings, MapsBubbleTooltipSettings, or MapsMarkerTooltipSettings. Use TooltipDisplayMode property to change when the tooltip is shown. The available modes are:
- MouseMove
- Click
- DoubleClick
@using Syncfusion.Blazor.Maps

<SfMaps>
    <MapsLayers>
        <MapsLayer ShapeData='new {dataOptions= "https://cdn.syncfusion.com/maps/map-data/world-map.json"}' TValue="string">
            <MapsLayerTooltipSettings Visible="true" ValuePath="name">
            </MapsLayerTooltipSettings>
        </MapsLayer>
    </MapsLayers>
</SfMaps>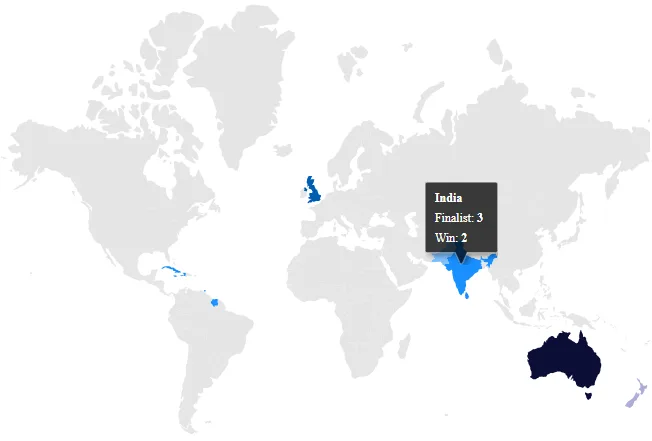
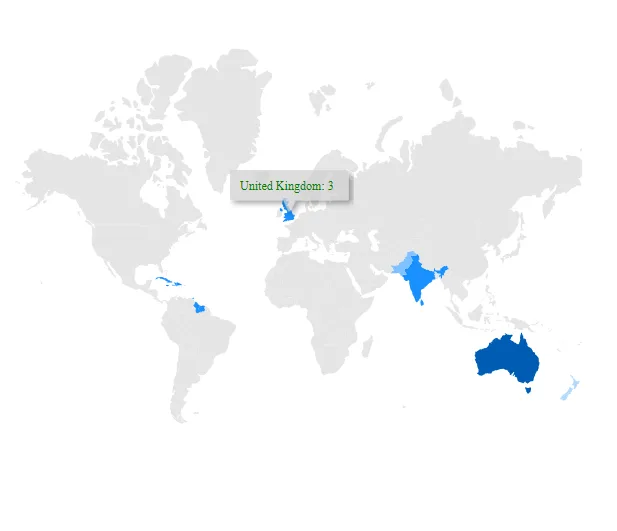
Customization
Use the following properties to customize tooltips:
- Fill - Sets the tooltip background color for layers, markers, and bubbles.
- Format - Configures the tooltip format for layers, markers, and bubbles.
@using Syncfusion.Blazor.Maps

<SfMaps>
    <MapsLayers>
        <MapsLayer ShapeData='new {dataOptions= "https://cdn.syncfusion.com/maps/map-data/world-map.json"}' ShapeDataPath="Name"
                   ShapePropertyPath='new string[] {"name"}' DataSource='PerformanceReport' TValue="Country">
            <MapsLayerTooltipSettings Visible="true" ValuePath="CountryName"
                                  Format="<b>${CountryName}</b><br>Finalist: <b>${Winner}</b><br>Win: <b>${Finalist}">
            </MapsLayerTooltipSettings>
            <MapsShapeSettings Fill="#E5E5E5" ColorValuePath="Finalist">
                <MapsShapeColorMappings>
                    <MapsShapeColorMapping Value="1" Color='new string[] {"#acaed8"}'></MapsShapeColorMapping>
                    <MapsShapeColorMapping Value="2" Color='new string[] {"#80c1ff"}'></MapsShapeColorMapping>
                    <MapsShapeColorMapping Value="3" Color='new string[] {"#1a90ff"}'></MapsShapeColorMapping>
                    <MapsShapeColorMapping Value="4" Color='new string[] {"#005cb3"}'></MapsShapeColorMapping>
                    <MapsShapeColorMapping Value="7" Color='new string[] {"#0b0d35"}'></MapsShapeColorMapping>
                </MapsShapeColorMappings>
            </MapsShapeSettings>
        </MapsLayer>
    </MapsLayers>
</SfMaps>

@code {
    public class Country
    {
        public string Name { get; set; }
        public string Winner { get; set; }
        public string Finalist { get; set; }
        public string CountryName { get; set; }
    }

    public List<Country> PerformanceReport = new List<Country> {
        new Country { CountryName = "India", Name = "India", Finalist = "3", Winner = "2" },
        new Country { CountryName = "United Kingdom", Name = "United Kingdom", Finalist = "4", Winner = "1" },
        new Country { CountryName = "Australia", Name = "Australia", Finalist = "7", Winner = "5" },
        new Country { CountryName = "Sri Lanka", Name = "Sri Lanka", Finalist = "3", Winner = "1" },
        new Country { CountryName = "Pakistan", Name = "Pakistan", Finalist = "2", Winner = "1" },
        new Country { CountryName = "New Zealand", Name = "New Zealand", Finalist = "1", Winner = "0" },
        new Country { CountryName = "West Indies", Name = "Dominican Rep", Finalist = "3", Winner = "2" },
        new Country { CountryName = "West Indies", Name = "Cuba", Finalist = "3", Winner = "2" },
        new Country { CountryName = "West Indies", Name = "Jamaica", Finalist = "3", Winner = "2" },
        new Country { CountryName = "West Indies", Name = "Haiti", Finalist = "3", Winner = "2" },
        new Country { CountryName = "West Indies", Name = "Gayana", Finalist = "3", Winner = "2" },
        new Country { CountryName = "West Indies", Name = "Suriname", Finalist = "3", Winner = "2" },
        new Country { CountryName = "West Indies", Name = "Trinidad and Tobago", Finalist = "3", Winner = "2" }
    };
}
Tooltip template
Render HTML in tooltips using the TooltipTemplate property of MapsLayerTooltipSettings.
@using Syncfusion.Blazor.Maps

<SfMaps>
    <MapsTitleSettings Text="Finalist in Cricket World Cup">
        <MapsTitleTextStyle Size="16px" />
    </MapsTitleSettings>
    <MapsZoomSettings Enable="false" />
    <MapsLayers>
        <MapsLayer ShapeData='new {dataOptions= "https://cdn.syncfusion.com/maps/map-data/world-map.json"}' DataSource="@PerformanceReport" TValue="Country"
                   ShapePropertyPath="@ShapePropertyPath" ShapeDataPath="Name">
            <MapsLayerTooltipSettings Visible="true" ValuePath="name">
                <TooltipTemplate>
                    @{
                        var Data = context as Country;
                            <div id="template">
                                <div class="toolback">
                                    <div class="listing2">
                                        <center>
                                            @Data.Name
                                        </center>
                                    </div>
                                    <hr style="margin-top: 2px;margin-bottom:5px;border:0.5px solid #DDDDDD">
                                        <div>
                                            <span class="listing1">Finalist : </span><span class="listing2">@Data.Winner</span>
                                        </div>
                                        <div>
                                            <span class="listing1">Win : </span><span class="listing2">@Data.Runner</span>
                                        </div>
                                </div>
                            </div>
                    }
                </TooltipTemplate>
            </MapsLayerTooltipSettings>
            <MapsShapeSettings Fill="#E5E5E5" ColorValuePath="Winner">
                <MapsShapeColorMappings>
                    <MapsShapeColorMapping Value="1" Color="@ShapeColorOne" />
                    <MapsShapeColorMapping Value="2" Color="@ShapeColorTwo" />
                    <MapsShapeColorMapping Value="3" Color="@ShapeColorThree" />
                    <MapsShapeColorMapping Value="7" Color="@ShapeColorFour" />
                </MapsShapeColorMappings>
            </MapsShapeSettings>
        </MapsLayer>
    </MapsLayers>
</SfMaps>

@code {
    public string[] ShapePropertyPath = { "name" };
    public string[] ShapeColorOne = { "#b3daff" };
    public string[] ShapeColorTwo = { "#80c1ff" };
    public string[] ShapeColorThree = { "#1a90ff" };
    public string[] ShapeColorFour = { "#005cb3" };

    public class Country
    {
        public string Name { get; set; }
        public string Winner { get; set; }
        public string Runner { get; set; }
        public string City { get; set; }
    }

    public List<Country> PerformanceReport = new List<Country> {
        new Country { Name = "India", Winner = "3", Runner = "2", City = "India" },
        new Country { Name = "Dominican Rep.", Winner = "3", Runner = "2", City = "West Indies" },
        new Country { Name = "Cuba", Winner = "3", Runner = "2", City = "West Indies" },
        new Country { Name = "Jamaica", Winner = "3", Runner = "2", City = "West Indies" },
        new Country { Name = "Haiti", Winner = "3", Runner = "2", City = "West Indies" },
        new Country { Name = "Guyana", Winner = "3", Runner = "2", City = "West Indies" },
        new Country { Name = "Suriname", Winner = "3", Runner = "2", City = "West Indies" },
        new Country { Name = "Trinidad and Tobago", Winner = "3", Runner = "2", City = "West Indies" },
        new Country { Name = "Sri Lanka", Winner = "3", Runner = "1", City = "Sri Lanka" },
        new Country { Name = "United Kingdom", Winner = "3", Runner = "0", City = "England" },
        new Country { Name = "Pakistan", Winner = "2", Runner = "1", City = "Pakistan" },
        new Country { Name = "New Zealand", Winner = "1", Runner = "0", City = "New Zealand" },
        new Country { Name = "Australia", Winner = "7", Runner = "5", City = "Australia" }
    };
}

<style>
    .toolback {
        width: 100px;
        border-radius: 4px;
        border: 1px #abb9c6;
        background: rgba(53, 63, 76, 0.90);
        box-shadow: 0px 2px 2px rgba(0, 0, 0, 0.40);
        padding-bottom: 5px;
        padding-top: 10px;
        padding-left: 10px;
        padding-right: 10px
    }
    .listing1 {
        font-size: 13px;
        color: #cccccc
    }
    .listing2 {
        font-size: 13px;
        color: #ffffff;
        font-weight: 500;
    }
</style>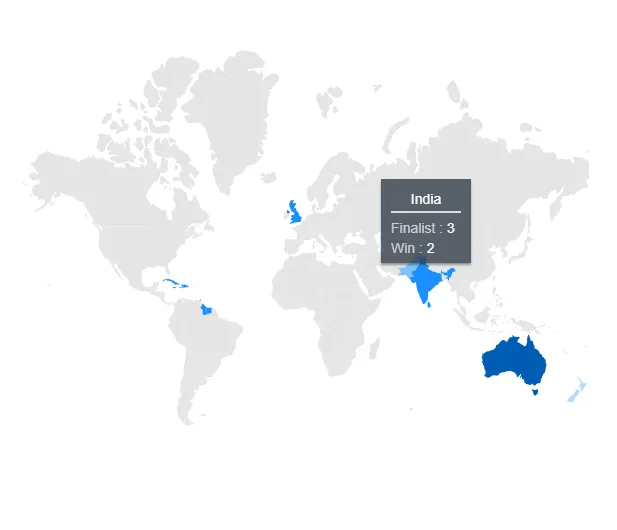
Changing duration in mobile devices
Control tooltip lifetime on mobile devices using Duration property in the tooltip settings for layers, markers, bubbles, polygons, and more. The default is 2000 milliseconds. A value of 0 keeps the tooltip visible until the next interaction; values greater than 0 remove the tooltip after the specified time.
The following example changes tooltip duration for layer tooltips in the Maps component.
@using Syncfusion.Blazor.Maps

<SfMaps>
    <MapsLayers>
        <MapsLayer ShapeData='new {dataOptions= "https://cdn.syncfusion.com/maps/map-data/world-map.json"}' TValue="string">
            <MapsLayerTooltipSettings Visible="true" ValuePath="name" Fill="#D0D0D0" Duration="3000">
                <MapsLayerTooltipTextStyle Color="green" FontFamily="Times New Roman" FontStyle="Normal"></MapsLayerTooltipTextStyle>
            </MapsLayerTooltipSettings>
        </MapsLayer>
    </MapsLayers>
</SfMaps>