How can I help you?
Smart Task Suggestion in Blazor Kanban Component
29 Jun 202620 minutes to read
This guide demonstrates how to use the Syncfusion.Blazor.AI package to enhance task planning in the Blazor Kanban component. The AI integration enables intelligent task generation based on project descriptions, sprint planning, and backlog management. These capabilities are powered by AI models hosted via services like OpenAI, Azure OpenAI, or Ollama.
Prerequisites
Ensure the following NuGet packages are installed based on your chosen AI service:
For OpenAI
- Microsoft.Extensions.AI
- Microsoft.Extensions.AI.OpenAI
For Azure OpenAI
- Microsoft.Extensions.AI
- Microsoft.Extensions.AI.OpenAI
- Azure.AI.OpenAI
For Ollama
- Microsoft.Extensions.AI
- OllamaSharp
Install-Package Syncfusion.Blazor.Kanban -Version 33.2.3
Install-Package Syncfusion.Blazor.Themes -Version 33.2.3
Install-Package Syncfusion.Blazor.AI -Version 33.2.3
Install-Package Microsoft.Extensions.AI
Install-Package Microsoft.Extensions.AI.OpenAI  # For OpenAI or Azure OpenAI
Install-Package Azure.AI.OpenAI  # For Azure OpenAI
Install-Package OllamaSharp  # For Ollama
Add Stylesheet and Script Resources
Include the theme stylesheet and script from NuGet via Static Web Assets in the <head> of your main page:
- For .NET 6 Blazor Server apps, add to ~/Pages/_Layout.cshtml.
- For .NET 8 or .NET 9 or .NET 10 Blazor Server apps, add to ~/Components/App.razor.
<head>
    <link href="_content/Syncfusion.Blazor.Themes/tailwind.css" rel="stylesheet" />
</head>
<body>
    <script src="_content/Syncfusion.Blazor.Core/scripts/syncfusion-blazor.min.js" type="text/javascript"></script>
</body>
NOTE
Explore the Blazor Themes topic for methods to reference themes (Static Web Assets, CDN, or CRG). Refer to the Adding Script Reference topic for different approaches to adding script references in your Blazor application.
Configure AI Service
Choose one of the following AI services (OpenAI, Azure OpenAI, or Ollama) based on your requirements:
- OpenAI: Best for cloud-based, general-purpose AI models with minimal setup.
- Azure OpenAI: Ideal for enterprise-grade deployments with enhanced security and scalability.
- Ollama: Suitable for self-hosted, privacy-focused AI models.
Follow the instructions for your selected service to register the AI model in your application.
OpenAI
Generate an API key from OpenAI and set openAIApiKey. Specify the desired model (e.g., gpt-3.5-turbo, gpt-4) in openAIModel.
- Install the required NuGet packages:
Install-Package Microsoft.Extensions.AI
Install-Package Microsoft.Extensions.AI.OpenAI- Add the following to the ~/Program.cs file in your Blazor WebApp:
using Syncfusion.Blazor.AI;
using Microsoft.Extensions.AI;
using OpenAI;

var builder = WebApplication.CreateBuilder(args);

string openAIApiKey = "API-KEY";
string openAIModel = "OPENAI_MODEL";
OpenAIClient openAIClient = new OpenAIClient(openAIApiKey);
IChatClient openAIChatClient = openAIClient.GetChatClient(openAIModel).AsIChatClient();
builder.Services.AddChatClient(openAIChatClient);
builder.Services.AddSingleton<IChatInferenceService, SyncfusionAIService>();

var app = builder.Build();
Azure OpenAI
Deploy an Azure OpenAI Service resource and model as described in Microsoft’s documentation. Obtain values for azureOpenAIKey, azureOpenAIEndpoint, and azureOpenAIModel.
- Install the required NuGet packages:
Install-Package Microsoft.Extensions.AI
Install-Package Microsoft.Extensions.AI.OpenAI
Install-Package Azure.AI.OpenAI- Add the following to the ~/Program.cs file in your Blazor WebApp:
using Syncfusion.Blazor.AI;
using Azure.AI.OpenAI;
using Microsoft.Extensions.AI;
using System.ClientModel;

var builder = WebApplication.CreateBuilder(args);

string azureOpenAIKey = "AZURE_OPENAI_KEY";
string azureOpenAIEndpoint = "AZURE_OPENAI_ENDPOINT";
string azureOpenAIModel = "AZURE_OPENAI_MODEL";
AzureOpenAIClient azureOpenAIClient = new AzureOpenAIClient(
     new Uri(azureOpenAIEndpoint),
     new ApiKeyCredential(azureOpenAIKey)
);
IChatClient azureOpenAIChatClient = azureOpenAIClient.GetChatClient(azureOpenAIModel).AsIChatClient();
builder.Services.AddChatClient(azureOpenAIChatClient);
builder.Services.AddSingleton<IChatInferenceService, SyncfusionAIService>();

var app = builder.Build();
Ollama
To use Ollama for self-hosted AI models:
- Download and install Ollama: Visit Ollama’s official website and install the application for your operating system.
-
Install a model: Choose a model from the Ollama Library (e.g.,
llama2:13b,mistral:7b). -
Configure the application: Provide the
EndpointURL (e.g.,http://localhost:11434) andModelName(e.g.,llama2:13b).
- Install the required NuGet packages:
Install-Package Microsoft.Extensions.AI
Install-Package OllamaSharp- Add the following to the ~/Program.cs file in your Blazor WebApp:
using Syncfusion.Blazor.AI;
using Microsoft.Extensions.AI;
using OllamaSharp;

var builder = WebApplication.CreateBuilder(args);

string ModelName = "MODEL_NAME";
IChatClient chatClient = new OllamaApiClient("http://localhost:11434", ModelName);
builder.Services.AddChatClient(chatClient);
builder.Services.AddSingleton<IChatInferenceService, SyncfusionAIService>();

var app = builder.Build();
-
Verify connectivity: Ensure the Ollama server is running and accessible at the specified endpoint (e.g.,
http://localhost:11434) before starting the application.
Register Blazor Service
Add the Blazor service to your ~/Program.cs file. The configuration depends on your app’s Interactive Render Mode:
- Server Mode: Register the service in the single ~/Program.cs file.
- WebAssembly or Auto Mode: Register the service in both the server-side ~/Program.cs and client-side ~/Program.cs files.
using Syncfusion.Blazor;

var builder = WebApplication.CreateBuilder(args);

builder.Services.AddRazorComponents()
    .AddInteractiveServerComponents()
    .AddInteractiveWebAssemblyComponents();
builder.Services.AddSyncfusionBlazor();

var app = builder.Build();
using Syncfusion.Blazor;
var builder = WebAssemblyHostBuilder.CreateDefault(args);
builder.Services.AddSyncfusionBlazor();
await builder.Build().RunAsync();AI-powered Kanban Smart Card Generation
The AI-powered Kanban feature integrates Blazor Kanban with an AI service to automatically generate structured task cards based on user input. This functionality simplifies project planning by allowing users to enter basic project details and the desired number of tasks. The backend logic then uses AI to create well-defined tasks, including fields like Title, Description, Status, and Story Points, and dynamically updates the Kanban board. This approach ensures faster task creation, consistent formatting, and an interactive experience for managing projects.
UI Structure
The Kanban AI interface starts with a simple form where users provide Project Details and the Number of Tasks to generate. Below these inputs, a Progress Button labeled “Generate Tasks” triggers the AI process. This button shows a loading state during task generation for better user feedback.
- Project Details: A multiline text box for describing the project.
- Number of Tasks: A numeric input for specifying how many tasks to generate.
-
Generate Button: A progress-enabled button that calls
GenerateTasks()to start AI-based task creation.
<div class="e-rte-label1" >
    <label>Project Details</label>
</div>
<div class="e-rte-field" style="margin: 10px">
    <SfTextBox @bind-Value="@TextBoxValue" Multiline=true />
</div>
<div class="e-rte-label2">
    <label>Number of tasks</label>
</div>
<div class="e-rte-field" style="margin: 10px">
    <SfTextBox @bind-Value="@TasksValue" min="1" Type="InputType.Number" />
</div>
<div class="d-flex justify-content-center" style="margin: 10px;">
    <SfProgressButton Content="@ContentGenerateTask" OnClick="@GenerateTasks" EnableProgress="false">
        <ProgressButtonEvents OnBegin="BeginGenerateTasks" OnEnd="EndGenerateTasks"></ProgressButtonEvents>
    </SfProgressButton>
</div>
Generating Tasks with AI
After the user enters project details and the number of tasks, clicking Generate Tasks calls GenerateTasks(), which triggers GenerateProjectTasks() to build a detailed prompt for the AI service. This prompt includes the project description, task count, and strict instructions to return data in JSON format with fields like Id, Title, Description, Status, StoryPoints, and Color.
The prompt is then sent to the AI using GetCompletionAsync(), which processes the request and returns a JSON response containing the generated tasks. The response is cleaned to remove unnecessary formatting and deserialized into a list of SmartSuggestionDataModel objects. These tasks are stored in smartSuggestion and displayed in the Kanban board or backlog view.
private async Task GenerateProjectTasks()
{
    try
    {
        if (!string.IsNullOrEmpty(TextBoxValue) && !string.IsNullOrEmpty(TasksValue))
        {
            string result = "";
            var description = $"Generate {TasksValue} task recommendations for {TextBoxValue}. Each task should include the following fields: Id (like example: ID should be in project name simple 4char word - 1), Title, Status, Description, Assignee, StoryPoints, Color and Due Date, formatted according to the dataset. Assign each task to the Assignee: empty string, set the Status to 'Open', and use black for the Color. Use the dataset provided below to create your recommendations. IMPORTANT: Return the data strictly in JSON format with all the required fields. Only the JSON data is needed, no additional text.Return only the JSON array format without any explanations.";
            result = await OpenAIService.GetCompletionAsync(description);
            if (result != null)
            {
                string data = result.Replace("```json", "").Replace("```", "").Replace("\r", "").Replace("\n", "").Replace("\t", "").Trim();
                List<SmartSuggestionDataModel> modifiedData;
                modifiedData = JsonSerializer.Deserialize<List<SmartSuggestionDataModel>>(data);
                smartSuggestion = modifiedData != null ? smartSuggestion.Concat(modifiedData).ToList() : smartSuggestion;
                this.isGeneratedProjectTasks = true;
            }
            ContentGenerateTask = "Generate Tasks";
        }
        else
        {
            waringText = string.IsNullOrEmpty(TextBoxValue) && string.IsNullOrEmpty(TasksValue) ? "Enter the required task creation details" : !string.IsNullOrEmpty(TasksValue) ? "Enter the Project Details" : "Enter the number of tasks";
        }
    }
    catch
    {
        await this.ToastObj.ShowAsync(new ToastModel { ContentTemplate = @GetTemplate(), ShowCloseButton = true, Timeout = 0 });
    }
}
Displaying AI-Generated Tasks in Kanban Cards
Once the AI-generated tasks are processed and stored in smartSuggestion, they are displayed in two ways:
- Kanban Board View
- Backlog Grid View
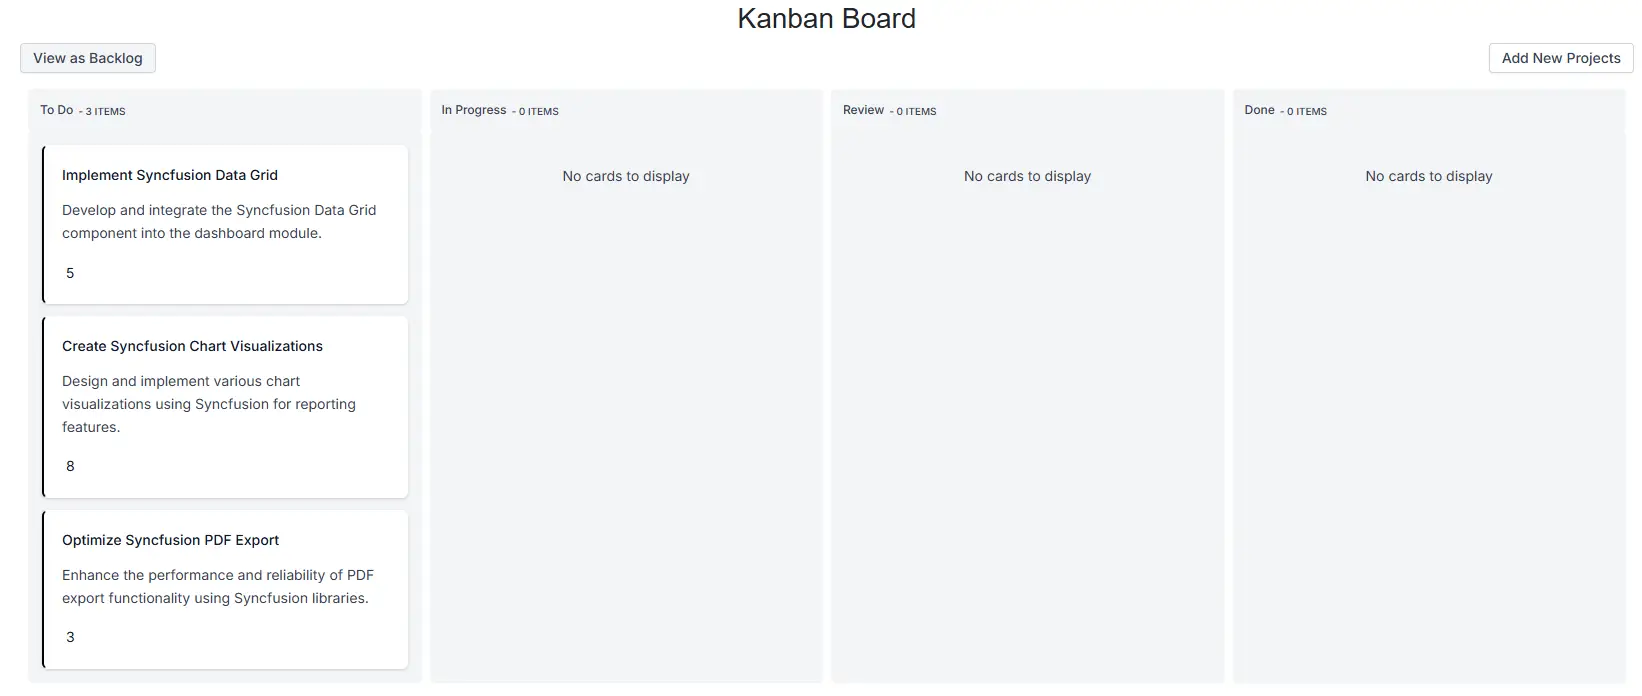
Kanban Board View
The Kanban board uses SfKanban to organize tasks into columns like To Do, In Progress, Review, and Done, based on the Status field. Each card shows the task title, description, and story points using a custom template for better readability.
- Kanban Columns: Defined by KeyField values such as Open, InProgress, Review, and Close.
- Card Template: Displays Title, Description, and StoryPoints in a structured layout.
-
Dynamic Binding: The DataSource property binds to
smartSuggestion, ensuring that newly generated tasks appear instantly.
<SfKanban TValue="SmartSuggestionDataModel" KeyField="Status" DataSource="@smartSuggestion">
    <KanbanColumns>
        <KanbanColumn HeaderText="To Do" KeyField="@(new List<string>() {"Open"})"></KanbanColumn>
        <KanbanColumn HeaderText="In Progress" KeyField="@(new List<string>() {"InProgress"})"></KanbanColumn>
        <KanbanColumn HeaderText="Review" KeyField="@(new List<string>() {"Review"})"></KanbanColumn>
        <KanbanColumn HeaderText="Done" KeyField="@(new List<string>() {"Close"})"></KanbanColumn>
    </KanbanColumns>
    <KanbanCardSettings HeaderField="Title" ContentField="Description" GrabberField="Color">
        <Template>
            @{
                SmartSuggestionDataModel card = (SmartSuggestionDataModel)context;
                <div class="card-template">
                    <div class="e-card-header">
                        <div class="e-card-header-caption">
                            <div class="e-card-header-title e-tooltip-text">@card.Title</div>
                        </div>
                    </div>
                    <div class="e-card-content">
                        <div class="e-text e-tooltip-text">@card.Description</div>
                    </div>
                    <div class="e-card-footer">
                        @{
                            <div class="e-card-tag e-tooltip-text">@card.StoryPoints</div>
                        }
                    </div>
                </div>
            }
        </Template>
    </KanbanCardSettings>
</SfKanban>
Backlog Grid View
When users switch to Backlog View, tasks are displayed in a grid using SfGrid. This view allows adding, deleting, and editing tasks through a dialog popup for structured input.
- Dialog Editing: Uses GridEditSettings with Dialog mode for structured editing.
- Validation: Ensures required fields like Task ID, Title, and Status are filled.
-
Data Binding: The DataSource property binds to
smartSuggestion, just like Kanban.
<SfGrid DataSource="@smartSuggestion" AllowPaging="true" Toolbar="@(new List<string>() { "Add" })">
    <GridEvents OnActionBegin="TaskEditingHandler" RowCreated="RowCreatedHandler" TValue="SmartSuggestionDataModel"></GridEvents>
    <GridEditSettings AllowAdding="true" AllowDeleting="true" AllowEditing="true" Mode="EditMode.Dialog" Dialog="DialogParams">
        <Template>
            @{
                var AISuggestion = (context as SmartSuggestionDataModel);
            }
            <div style="margin: 10px;">
                <div class="form-group" style="margin: 10px;">
                    <SfTextBox ID="OrderID" @bind-Value="@(AISuggestion.Id)" Enabled="@enableTaskEditing" FloatLabelType="FloatLabelType.Always" Placeholder="Task ID" Width="100%"></SfTextBox>
                </div>
                <div class="form-group" style="margin: 10px;">
                    <SfTextBox ID="Title" @bind-Value="@(AISuggestion.Title)" TValue="string" FloatLabelType="FloatLabelType.Always" Placeholder="Title" Width="100%"></SfTextBox>
                </div>
                <div class="form-group" style="margin: 10px;">
                    <SfTextBox ID="Description" @bind-Value="@(AISuggestion.Description)" FloatLabelType="FloatLabelType.Always" Multiline="true" Placeholder="Description" Width="100%"></SfTextBox>
                </div>
                <div class="form-group" style="margin: 10px;">
                    <SfNumericTextBox ID="Title" @bind-Value="@(AISuggestion.StoryPoints)" TValue="int" FloatLabelType="FloatLabelType.Always" Placeholder="StoryPoints" Width="100%"></SfNumericTextBox>
                </div>
                <div class="form-group" style="margin: 10px;">
                    <SfTextBox ID="Status" @bind-Value="@(AISuggestion.Status)" Enabled="@enableTaskEditing" TValue="string" FloatLabelType="FloatLabelType.Always" Placeholder="Status" Width="100%"></SfTextBox>
                </div>
            </div>
        </Template>
    </GridEditSettings>
    <GridColumns>
        <GridColumn Field=@nameof(SmartSuggestionDataModel.Id) HeaderText="Task ID" IsPrimaryKey="true" ValidationRules="@(new ValidationRules{ Required=true})"></GridColumn>
        <GridColumn Field=@nameof(SmartSuggestionDataModel.Title) HeaderText="Title" ValidationRules="@(new ValidationRules{ Required=true})" Format="C2"></GridColumn>
        <GridColumn Field=@nameof(SmartSuggestionDataModel.Description) HeaderText="Description" EditType=EditType.DefaultEdit></GridColumn>
        <GridColumn Field=@nameof(SmartSuggestionDataModel.StoryPoints) HeaderText="StoryPoints" ValidationRules="@(new ValidationRules{ Required=true})" EditType=EditType.DefaultEdit></GridColumn>
        <GridColumn Field=@nameof(SmartSuggestionDataModel.Status) HeaderText="Status" ValidationRules="@(new ValidationRules{ Required=true})"></GridColumn>
    </GridColumns>
    </SfGrid>
View Toggle: Users can switch between Kanban and Grid using the button below:
<SfButton OnClick="GoToBacklogBoardView" Content="@BacklogButtonViewContent"></SfButton>private void GoToBacklogBoardView()
{
if (BacklogButtonViewContent == "View as Board")
{
BacklogButtonViewContent = "View as Backlog";
showBacklogBoard = true;
}
else
{
showBacklogBoard = false;
BacklogButtonViewContent = "View as Board";
}
}Sample Code
A complete working example is available in the Blazor AI Samples GitHub repository.
Error Handling and Troubleshooting
If the AI service fails to return a valid response, the Kanban will display an error message (“Oops! Please try again!”). Common issues include:
-
Invalid API Key or Endpoint: Verify that the
openAIApiKey,azureOpenAIKey, or OllamaEndpointis correct and the service is accessible. -
Model Unavailable: Ensure the specified
openAIModel,azureOpenAIModel, orModelNameis deployed and supported. - Network Issues: Check connectivity to the AI service endpoint, especially for self-hosted Ollama instances.
- Large Prompts: Processing large text inputs may cause timeouts. Consider reducing the prompt size or optimizing the request for efficiency.