Data restructuring with Blazor TreeGrid and AI models
29 Jun 202620 minutes to read
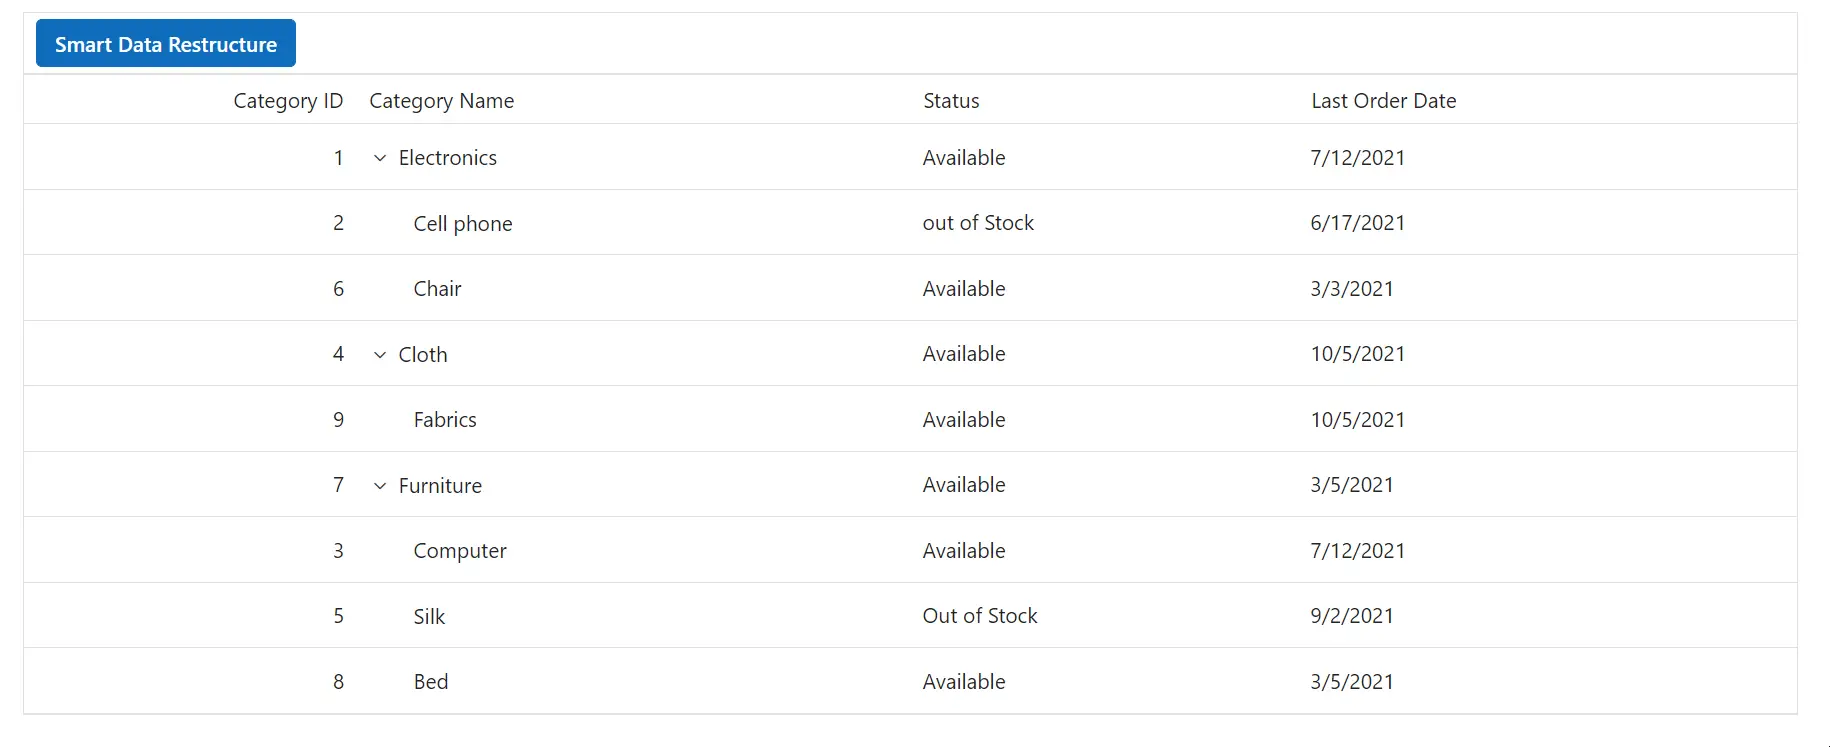
This guide demonstrates how to use the Syncfusion.Blazor.AI package to automatically organize hierarchical data in a Blazor TreeGrid component. The Syncfusion.Blazor.AI package enables integration with AI models to process and structure data, while Ollama provides self-hosted or cloud-based AI capabilities for analyzing relationships in datasets. In the example below, the application assigns appropriate ParentId values based on CategoryName relationships and dynamically updates the TreeGrid to reflect the corrected hierarchical structure.
Prerequisites
Ensure the following NuGet packages are installed based on the selected AI service.
For OpenAI
- Microsoft.Extensions.AI
- Microsoft.Extensions.AI.OpenAI
For Azure OpenAI
- Microsoft.Extensions.AI
- Microsoft.Extensions.AI.OpenAI
- Azure.AI.OpenAI
For Ollama
- Microsoft.Extensions.AI
- OllamaSharp
Install-Package Syncfusion.Blazor.TreeGrid -Version 34.1.29
Install-Package Syncfusion.Blazor.Themes -Version 34.1.29
Install-Package Syncfusion.Blazor.AI -Version 34.1.29
Install-Package Microsoft.Extensions.AI
Install-Package Microsoft.Extensions.AI.OpenAI  # For OpenAI or Azure OpenAI
Install-Package Azure.AI.OpenAI  # For Azure OpenAI
Install-Package OllamaSharp  # For Ollama
Add stylesheet and script resources
Include the theme stylesheet and script from NuGet via Static Web Assets in the <head> of the main page:
- For .NET 6 Blazor Server apps, add to ~/Pages/_Layout.cshtml.
- For .NET 8 or .NET 9 or .NET 10 Blazor Server apps, add to ~/Components/App.razor.
<head>
    <link href="_content/Syncfusion.Blazor.Themes/tailwind.css" rel="stylesheet" />
</head>
<body>
    <script src="_content/Syncfusion.Blazor.Core/scripts/syncfusion-blazor.min.js" type="text/javascript"></script>
</body>
NOTE
Explore the Blazor Themes topic for methods to reference themes (Static Web Assets, CDN, or CRG). Refer to the Adding Script Reference topic for different approaches to adding script references in your Blazor application.
Configure AI service
Choose one of the following AI services (OpenAI, Azure OpenAI, or Ollama) based on requirements:
- OpenAI: Cloud-based, general-purpose AI models with minimal setup.
- Azure OpenAI: Enterprise-grade deployment with enhanced security and scalability.
- Ollama: Self-hosted, privacy-focused AI models.
Follow the instructions for the selected service to register the AI model in the application.
OpenAI
Generate an API key from OpenAI and set openAIApiKey. Specify the desired model (for example, gpt-3.5-turbo, gpt-4) in openAIModel.
- Install the required NuGet packages:
Install-Package Microsoft.Extensions.AI
Install-Package Microsoft.Extensions.AI.OpenAI- Add the following to the ~/Program.cs file in the Blazor Web App:
using Syncfusion.Blazor.AI;
using Microsoft.Extensions.AI;
using OpenAI;

var builder = WebApplication.CreateBuilder(args);

string openAIApiKey = "API-KEY";
string openAIModel = "OPENAI_MODEL";
OpenAIClient openAIClient = new OpenAIClient(openAIApiKey);
IChatClient openAIChatClient = openAIClient.GetChatClient(openAIModel).AsIChatClient();
builder.Services.AddChatClient(openAIChatClient);
builder.Services.AddSingleton<IChatInferenceService, SyncfusionAIService>();

var app = builder.Build();
Azure OpenAI
Deploy an Azure OpenAI Service resource and model as described in Microsoft’s documentation. Obtain values for azureOpenAIKey, azureOpenAIEndpoint, and azureOpenAIModel.
- Install the required NuGet packages:
Install-Package Microsoft.Extensions.AI
Install-Package Microsoft.Extensions.AI.OpenAI
Install-Package Azure.AI.OpenAI- Add the following to the ~/Program.cs file in the Blazor Web App:
using Syncfusion.Blazor.AI;
using Azure.AI.OpenAI;
using Microsoft.Extensions.AI;
using System.ClientModel;

var builder = WebApplication.CreateBuilder(args);

string azureOpenAIKey = "AZURE_OPENAI_KEY";
string azureOpenAIEndpoint = "AZURE_OPENAI_ENDPOINT";
string azureOpenAIModel = "AZURE_OPENAI_MODEL";
AzureOpenAIClient azureOpenAIClient = new AzureOpenAIClient(
     new Uri(azureOpenAIEndpoint),
     new ApiKeyCredential(azureOpenAIKey)
);
IChatClient azureOpenAIChatClient = azureOpenAIClient.GetChatClient(azureOpenAIModel).AsIChatClient();
builder.Services.AddChatClient(azureOpenAIChatClient);
builder.Services.AddSingleton<IChatInferenceService, SyncfusionAIService>();

var app = builder.Build();
Ollama
To use Ollama for self-hosted AI models:
- Download and install Ollama: Visit Ollama’s official website and install the application for the operating system.
-
Install a model: Choose a model from the Ollama Library (for example,
llama2:13b,mistral:7b). -
Configure the application: Provide the
EndpointURL (for example,http://localhost:11434) andModelName(for example,llama2:13b).
- Install the required NuGet packages:
Install-Package Microsoft.Extensions.AI
Install-Package OllamaSharp- Add the following to the ~/Program.cs file in the Blazor Web App:
using Syncfusion.Blazor.AI;
using Microsoft.Extensions.AI;
using OllamaSharp;

var builder = WebApplication.CreateBuilder(args);

string ModelName = "MODEL_NAME";
IChatClient chatClient = new OllamaApiClient("http://localhost:11434", ModelName);
builder.Services.AddChatClient(chatClient);
builder.Services.AddSingleton<IChatInferenceService, SyncfusionAIService>();

var app = builder.Build();
-
Verify connectivity: Ensure the Ollama server is running and accessible at the specified endpoint (for example,
http://localhost:11434) before starting the application.
Register Blazor service
Add the Blazor service to the ~/Program.cs file. The configuration depends on the app’s Interactive Render Mode:
- Server mode: Register the service in the single ~/Program.cs file.
- WebAssembly or Auto mode: Register the service in both the server-side ~/Program.cs and client-side ~/Program.cs files.
using Syncfusion.Blazor;

var builder = WebApplication.CreateBuilder(args);

builder.Services.AddRazorComponents()
    .AddInteractiveServerComponents()
    .AddInteractiveWebAssemblyComponents();
builder.Services.AddSyncfusionBlazor();

var app = builder.Build();
using Syncfusion.Blazor;
var builder = WebAssemblyHostBuilder.CreateDefault(args);
builder.Services.AddSyncfusionBlazor();
await builder.Build().RunAsync();Razor component (Home.razor)
This section implements the Blazor TreeGrid with AI-driven data restructuring, using the AI model to assign ParentId values based on CategoryName relationships.
@page "/"

@inject IChatInferenceService AIService
@using Syncfusion.Blazor.TreeGrid
@using Syncfusion.Blazor.Navigations
@using Syncfusion.Blazor.Buttons
@using Syncfusion.Blazor.AI
@using System.Text.Json;

<div style="padding-bottom: 10px;">
    <span>@message</span>
</div>
<div style="width: 100%; position: relative">
    <SfTreeGrid @ref="TreeGrid" DataSource="@TreeGridData" IdMapping="CategoryId" ParentIdMapping="ParentId" TreeColumnIndex="1">
        <TreeGridEditSettings AllowEditing="true" />
        <TreeGridColumns>
            <TreeGridColumn Field="CategoryId" HeaderText="Category ID" IsPrimaryKey="true" Width="60" TextAlign="Syncfusion.Blazor.Grids.TextAlign.Right"></TreeGridColumn>
            <TreeGridColumn Field="CategoryName" HeaderText="Category Name" Width="100"></TreeGridColumn>
            <TreeGridColumn Field="Status" HeaderText="Status" Width="70"></TreeGridColumn>
            <TreeGridColumn Field="OrderDate" HeaderText="Last Order Date" Format="d" Width="90"></TreeGridColumn>
        </TreeGridColumns>
        <SfToolbar ID="TreeGrid_AISample_Toolbar">
            <ToolbarItems>
                <ToolbarItem>
                    <Template>
                        <SfButton IsPrimary ID="openAI" @onclick="OpenAIHandler">Smart Data Restructure</SfButton>
                    </Template>
                </ToolbarItem>
            </ToolbarItems>
        </SfToolbar>
    </SfTreeGrid>
</div>
Home.razor.cs
using Microsoft.Extensions.AI;
using Syncfusion.Blazor.AI;
using Syncfusion.Blazor.TreeGrid;
using System.Text.Json;

namespace AISamples.Components.Pages
{
    public partial class Home
    {
        public SfTreeGrid<TreeData.BusinessObject> TreeGrid;
        private string AIPrompt = string.Empty;
        private string message = string.Empty;
        public List<TreeData.BusinessObject> TreeGridData { get; set; }
        protected override void OnInitialized()
        {
            this.TreeGridData = TreeData.GetAdaptiveStructureData().ToList();
        }

        private async Task OpenAIHandler()
        {
            await TreeGrid.ShowSpinnerAsync();
            List<TreeData.BusinessObject> sortedCollection = new List<TreeData.BusinessObject>();
            var AIPrompt = GeneratePrompt(TreeGridData);
            ChatParameters chatParameters = new ChatParameters
            {
                Messages = new List<ChatMessage>
                {
                    new ChatMessage(ChatRole.User, AIPrompt)
                }
            };
            var result = await AIService.GenerateResponseAsync(chatParameters);
            result = result.Replace("```json", "").Replace("```", "").Trim();

            string response = JsonDocument.Parse(result).RootElement.GetProperty("TreeGridData").ToString();
            if (response is not null)
            {
                sortedCollection = JsonSerializer.Deserialize<List<TreeData.BusinessObject>>(response);
            }
            if (sortedCollection is not null && sortedCollection.Count > 0)
            {
                TreeGridData = sortedCollection.Cast<TreeData.BusinessObject>().ToList();
            }
            else
            {
                message = "Oops.! Please try Again !";
            }
            await TreeGrid.HideSpinnerAsync();
            await Task.CompletedTask;
        }

        private string GeneratePrompt(List<TreeData.BusinessObject> TreeGridData)
        {
            Dictionary<string, IEnumerable<object>> treeData = new Dictionary<string, IEnumerable<object>>();
            treeData.Add("TreeGridData", TreeGridData);
            var jsonData = JsonSerializer.Serialize(treeData);
            return @"I want you to act as a TreeGrid Data Organizer.
            Your task is to organize a dataset based on a hierarchical structure using 'CategoryId' and 'ParentId'.
            Each item in the dataset has a 'CategoryName' representing categories, and some categories have a null 'ParentId', indicating they are top-level categories.
            Your role will be to examine the entire dataset to identify related items based on their 'CategoryName' values and nest them under the appropriate top-level categories by updating their 'ParentId' to match the 'CategoryId' of the corresponding top-level category.
            For example, if a category like 'Furniture' exists, you should examine the dataset for items such as 'Chair' and 'Table' and update their 'ParentId' to the 'CategoryId' of 'Furniture'.
            The output should be the newly prepared TreeGridData with correctly assigned 'ParentId' values. Please ensure that all subcategories are correctly nested under their respective top-level categories.
            Return the newly prepared TreeGridData alone and don't share any other information with the response: Here is the dataset " + jsonData + "/n Note: Return response must be in json string and with no other explanation. ";
        }
        public class TreeData
        {
            public class BusinessObject
            {
                public int CategoryId { get; set; }
                public string CategoryName { get; set; }
                public string Status { get; set; }
                public DateTime OrderDate { get; set; }
                public int? ParentId { get; set; }
            }

            public static List<BusinessObject> GetAdaptiveStructureData()
            {
                List<BusinessObject> BusinessObjectCollection = new List<BusinessObject>();
                BusinessObjectCollection.Add(new BusinessObject() { CategoryId = 1, CategoryName = "Electronics", Status = "Available", OrderDate = new DateTime(2021, 7, 12), ParentId = null });
                BusinessObjectCollection.Add(new BusinessObject() { CategoryId = 2, CategoryName = "Cell phone", Status = "out of Stock", OrderDate = new DateTime(2021, 6, 17), ParentId = 1 });
                BusinessObjectCollection.Add(new BusinessObject() { CategoryId = 3, CategoryName = "Computer", Status = "Available", OrderDate = new DateTime(2021, 7, 12), ParentId = 7 });
                BusinessObjectCollection.Add(new BusinessObject() { CategoryId = 4, CategoryName = "Cloth", Status = "Available", OrderDate = new DateTime(2021, 10, 5), ParentId = null });
                BusinessObjectCollection.Add(new BusinessObject() { CategoryId = 5, CategoryName = "Silk", Status = "Out of Stock", OrderDate = new DateTime(2021, 9, 2), ParentId = 7 });
                BusinessObjectCollection.Add(new BusinessObject() { CategoryId = 6, CategoryName = "Chair", Status = "Available", OrderDate = new DateTime(2021, 3, 3), ParentId = 1 });
                BusinessObjectCollection.Add(new BusinessObject() { CategoryId = 7, CategoryName = "Furniture", Status = "Available", OrderDate = new DateTime(2021, 3, 5), ParentId = null });
                BusinessObjectCollection.Add(new BusinessObject() { CategoryId = 8, CategoryName = "Bed", Status = "Available", OrderDate = new DateTime(2021, 3, 5), ParentId = 7 });
                BusinessObjectCollection.Add(new BusinessObject() { CategoryId = 9, CategoryName = "Fabrics", Status = "Available", OrderDate = new DateTime(2021, 10, 5), ParentId = 4 });
                return BusinessObjectCollection;
            }
        }
    }
}
Error handling and troubleshooting
If the AI service fails to return a valid response, the TreeGrid displays an error message (“Oops! Please try again!”). Common issues include:
-
Invalid API key or endpoint: Verify that
openAIApiKey,azureOpenAIKey, or the OllamaEndpointis correct and the service is accessible. -
Model unavailable: Ensure the specified
openAIModel,azureOpenAIModel, orModelNameis deployed and supported. - Network issues: Check connectivity to the AI service endpoint, especially for self-hosted Ollama instances.
- Large datasets: Processing large datasets may cause timeouts. Consider batching data or optimizing the prompt.
Performance considerations
When handling large datasets, ensure the Ollama server has sufficient resources (CPU/GPU) to process requests efficiently. For datasets exceeding 10,000 records, consider splitting the data into smaller batches to avoid performance bottlenecks. Test the application with your specific dataset to determine optimal performance.
Sample code
A complete working example is available in the Blazor AI Samples GitHub repository.