Getting Started with Blazor AI AssistView Component
10 Jul 20266 minutes to read
This section briefly explains how to include the Blazor AI AssistView component in a Blazor WebAssembly App using Visual Studio, Visual Studio Code, and the .NET CLI.
Create a new Blazor WebAssembly (Standalone) App
Create a Blazor WebAssembly App using Visual Studio via Microsoft Templates or the Blazor Extension.
Run the following command to create a new Blazor WebAssembly App.
dotnet new blazorwasm -o BlazorApp
cd BlazorApp
Alternatively, create a Blazor WebAssembly App using Visual Studio Code via Microsoft Templates or the Blazor Extension, or the C# Dev Kit extension.
Run the following command to create a new Blazor WebAssembly App.
dotnet new blazorwasm -o BlazorApp
cd BlazorApp
Install the required Blazor packages
Install the Syncfusion.Blazor.InteractiveChat and Syncfusion.Blazor.Themes NuGet packages. All Syncfusion Blazor packages are available on nuget.org. See the NuGet packages topic for details.
- Go to Tools → NuGet Package Manager → Manage NuGet Packages for Solution.
- Search the required NuGet packages (
Syncfusion.Blazor.InteractiveChatandSyncfusion.Blazor.Themes) and install them.
Alternatively, you can install the same packages using the Package Manager Console with the following commands.
Install-Package Syncfusion.Blazor.InteractiveChat -Version 34.1.29
Install-Package Syncfusion.Blazor.Themes -Version 34.1.29
Open the terminal and run the following commands.
dotnet add package Syncfusion.Blazor.InteractiveChat -v 34.1.29
dotnet add package Syncfusion.Blazor.Themes -v 34.1.29
Open the command prompt and run the following commands.
dotnet add package Syncfusion.Blazor.InteractiveChat -v 34.1.29
dotnet add package Syncfusion.Blazor.Themes -v 34.1.29
Add import namespaces
After the packages are installed, open the ~/_Imports.razor file and import the Syncfusion.Blazor and Syncfusion.Blazor.InteractiveChat namespaces.
@using Syncfusion.Blazor
@using Syncfusion.Blazor.InteractiveChat
Register the Blazor service
Open the Program.cs file in Blazor WebAssembly App and register the Blazor service.
....
using Syncfusion.Blazor;
....
builder.Services.AddSyncfusionBlazor();
....
Add stylesheet and script resources
The theme stylesheet and script can be accessed from NuGet through Static Web Assets. Include the stylesheet and script references in the ~wwwroot/index.html file.
...
<link href="_content/Syncfusion.Blazor.Themes/fluent2.css" rel="stylesheet" />
...
<script src="_content/Syncfusion.Blazor.Core/scripts/syncfusion-blazor.min.js" type="text/javascript"></script>
Add Blazor AI AssistView component
Open a Razor file located in the ~/Pages/*.razor (for example, Home.razor) and add the Blazor AI AssistView component inside the razor file.
@using Syncfusion.Blazor.InteractiveChat

<div class="aiassist-container" style="height: 350px; width: 650px;">
    <SfAIAssistView PromptSuggestions="@promptSuggestions"
                    PromptRequested="@PromptRequest">
    </SfAIAssistView>
</div>

@code
{
List<string> promptSuggestions = new List<string>
{
"How do I prioritize my tasks?",
"How can I improve my time management skills?"
};

public class AssistModel
{
    public string Prompt { get; set; }
    public string Response { get; set; }
}

private List<AssistModel> prompts = new List<AssistModel>()
{
    new AssistModel()
    {
        Prompt = "How do I prioritize my tasks?",
        Response = "Prioritize tasks by urgency and impact: tackle high-impact tasks first, delegate when possible, and break large tasks into smaller steps. For more assistance, feel free to ask—I'm here to help!"
    },
    new AssistModel()
    {
        Prompt = "How can I improve my time management skills?",
        Response = "To improve time management skills, try setting clear goals, using a planner or digital tools, prioritizing tasks, breaking tasks into smaller steps, and minimizing distractions. Regularly review and adjust your approach for better efficiency."
    }
};

private async Task PromptRequest(AssistViewPromptRequestedEventArgs args)
{
    await Task.Delay(3000);

    var isPromptFound = prompts.Any(prompt => prompt.Prompt == args.Prompt);
    var promptData = prompts.FirstOrDefault(prompt => prompt.Prompt == args.Prompt);

    var defaultResponse = "For real-time prompt processing, connect the AI AssistView component to your preferred AI service, such as OpenAI or Azure Cognitive Services. Ensure you obtain the necessary API credentials to authenticate and enable seamless integration.";

    args.Response = isPromptFound ? promptData.Response : defaultResponse;
}
}
Run the application
Press Ctrl+F5 (Windows) or ⌘+F5 (macOS) to launch the application. The Blazor AI AssistView component will render in your default web browser.
Open the terminal and run the following command.
dotnet runOpen the command prompt and run the following command.
dotnet run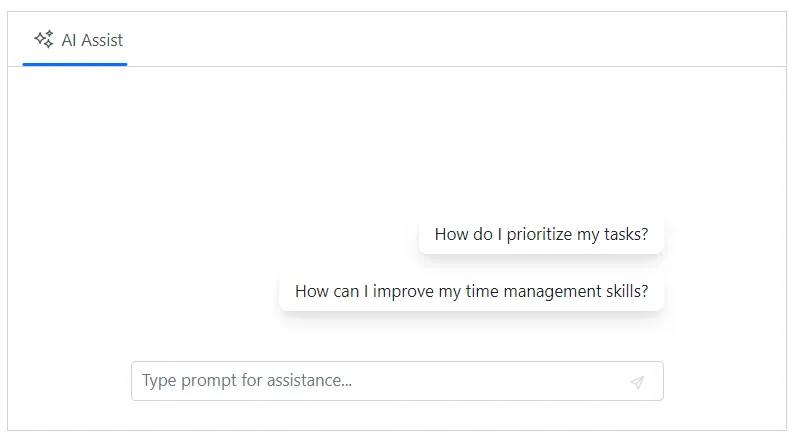
Note: Starting from version 33.1x, when a user submits a prompt to the AI AssistView, the component automatically scrolls and focuses on the latest prompt and response. This behavior eliminates the need for users to manually scroll down to see the new response, ensuring they always view the most recent AI response without interruption. Prior to version 33.1x, the previous responses remained visible when new responses were added.
NOTE