How can I help you?
How to Bind Data Using Dapper and Perform CRUD Operations
15 Sep 202516 minutes to read
In this section, you can learn how to consume data from a database using Dapper, bind it to a Syncfusion<sup style="font-size:70%">®</sup> Blazor DataGrid Component, and perform CRUD operations.
Prerequisite software
- Visual Studio 2022.
- MS SQL Server.
Creating Blazor application
- Open Visual Studio and follow the steps in the documentation to create the Blazor Server Application.
Creating the database
First, create a database named BugTracker and a table named Bugs to hold the list of bugs.
- Open SQL Server 2017 / latest version.
- Now, create a new database named
BugTracker. - Right-click on the created database and select New Query.
- Use the following SQL query to create a table named Bugs.
Create Table Bugs(
Id BigInt Identity(1,1) Primary Key Not Null,
Summary Varchar(400) Not Null,
BugPriority Varchar(100) Not Null,
Assignee Varchar(100),
BugStatus Varchar(100) Not Null)
Now, the table design will look like below.

Adding Dapper package and creating a model class
To use Dapper and access database in the application, you need to install the following NuGet packages.
Run the following commands in the Package Manager Console.
-
The following command enable us to use Dapper in our application.
Install-Package Dapper -Version 2.1.24 -
The following command provide database access classes such as
SqlConnection,SqlCommand, etc. Also provides data provider for MS SQL Server.Install-Package Microsoft.Data.SqlClient
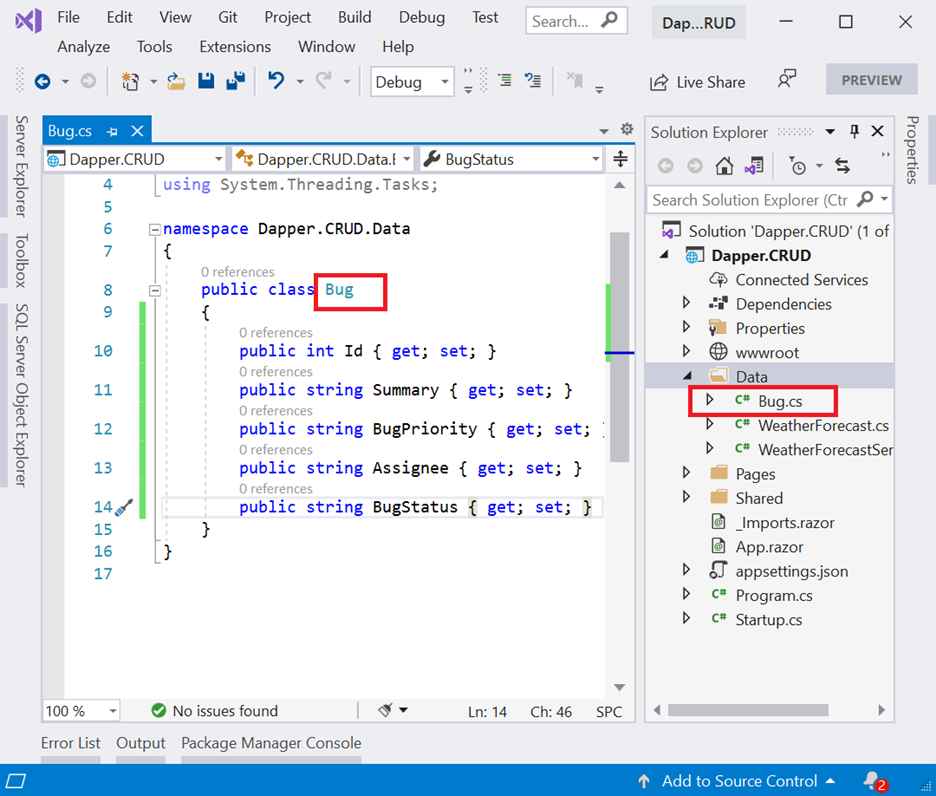
Most of the ORMs provide scaffolding options to create model classes. Dapper doesn’t have any in-built scaffolding option. So, you need to create model class manually. Here, you are creating a class named Bug.cs in the Data folder as follows.
namespace {Your namespace}
{
    public class Bug
    {
        public int Id { get; set; }

        public string Summary { get; set; }

        public string BugPriority { get; set; }

        public string Assignee { get; set; }

        public string BugStatus { get; set; }
    }
}
Creating data access layer
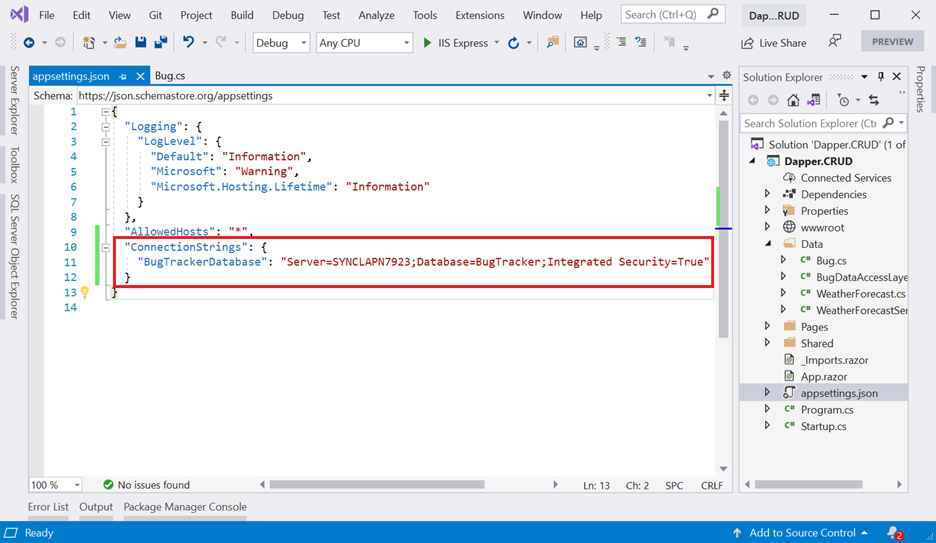
Before creating a data access layer, you need to set the connection string of our database in the appsettings.json file as follows.
"ConnectionStrings": {
  "BugTrackerDatabase": "Server= {Your Server Name};Database=BugTracker;Integrated Security=True"
}
Now, right-click the Data folder and select Class to create a new class named BugDataAccessLayer.cs. Replace this class with the following code, which contains code to handle CRUD in the Bugs table.
In the following example,
- In the constructor of the
BugDataAccessLayer,IConfigurationis injected, which helps us to get the connection string provided in theappsettings.json. -
GetBugsAsyncmethod performs select operation and returns a list of bugs from the Bugs table. -
AddBugAsyncmethod inserts a new bug into the Bugs table. -
UpdateBugAsyncmethod updates the given bug object in the table. -
RemoveBugAsyncmethod removes the given bug by Id.
public class BugDataAccessLayer
{
    public IConfiguration Configuration;
    private const string BUGTRACKER_DATABASE = "BugTrackerDatabase";
    private const string SELECT_BUG = "select * from bugs";
    public BugDataAccessLayer(IConfiguration configuration)
    {
        Configuration = configuration; //Inject configuration to access Connection string from appsettings.json.
    }

    public async Task<List<Bug>> GetBugsAsync()
    {
        using (IDbConnection db = new SqlConnection(Configuration.GetConnectionString(BUGTRACKER_DATABASE)))
        {
            db.Open();
            IEnumerable<Bug> result = await db.QueryAsync<Bug>(SELECT_BUG);
            return result.ToList();
        }
    }

    public async Task<int> GetBugCountAsync()
    {
        using (IDbConnection db = new SqlConnection(Configuration.GetConnectionString(BUGTRACKER_DATABASE)))
        {
            db.Open();
            int result = await db.ExecuteScalarAsync<int>("select count(*) from bugs");
            return result;
        }
    }

    public async Task AddBugAsync(Bug bug)
    {
        using (IDbConnection db = new SqlConnection(Configuration.GetConnectionString(BUGTRACKER_DATABASE)))
        {
            db.Open();
            await db.ExecuteAsync("insert into bugs (Summary, BugPriority, Assignee, BugStatus) values (@Summary, @BugPriority, @Assignee, @BugStatus)", bug);
        }
    }

    public async Task UpdateBugAsync(Bug bug)
    {
        using (IDbConnection db = new SqlConnection(Configuration.GetConnectionString(BUGTRACKER_DATABASE)))
        {
            db.Open();
            await db.ExecuteAsync("update bugs set Summary=@Summary, BugPriority=@BugPriority, Assignee=@Assignee, BugStatus=@BugStatus where id=@Id", bug);
        }
    }

    public async Task RemoveBugAsync(int bugid)
    {
        using (IDbConnection db = new SqlConnection(Configuration.GetConnectionString(BUGTRACKER_DATABASE)))
        {
            db.Open();
            await db.ExecuteAsync("delete from bugs Where id=@BugId", new { BugId = bugid });
        }
    }
}
Now, register BugDataAccessLayer as scoped service in the Program.cs file as follows.
....
builder.Services.AddScoped<BugDataAccessLayer>();
Adding Syncfusion® Blazor DataGrid component
To add Blazor DataGrid component in the app, open the NuGet package manager in Visual Studio (Tools → NuGet Package Manager → Manage NuGet Packages for Solution), search and install Syncfusion.Blazor.Grid and Syncfusion.Blazor.Themes.
Alternatively, you can utilize the following package manager command to achieve the same.
Install-Package Syncfusion.Blazor.Grid -Version 32.2.3
Install-Package Syncfusion.Blazor.Themes -Version 32.2.3
NOTE
Syncfusion® Blazor components are available in nuget.org. Refer to NuGet packages topic for available NuGet packages list with component details.
Open _Import.razor file and add the following namespaces which are required to use the Syncfusion® Blazor DataGrid Component in this application.
@using Syncfusion.Blazor
@using Syncfusion.Blazor.Grids
@using Syncfusion.Blazor.Data
Open Program.cs file in your application and register the Syncfusion® service.
....
using Syncfusion.Blazor;
....
builder.Services.AddSyncfusionBlazor();
....Syncfusion® Blazor provides different themes. They are:
- Bootstrap4
- Material
- Fabric
- Bootstrap
- High Contrast
In this demo application, the Bootstrap4 theme will be used.
-
For .NET 7 app, add theme in the
<head>of the ~/Pages/_Host.cshtml file. -
For .NET 6 app, add theme in the
<head>of the ~/Pages/_Layout.cshtml file.
<head>
    ....
    <link href="_content/Syncfusion.Blazor.Themes/bootstrap4.css" rel="stylesheet" />
</head>
Also, include the script reference in the following files
-
For .NET 7 app, add script reference at end of the
<body>section of the ~/Pages/_Host.cshtml file. -
For .NET 6 app, add script reference at end of the
<body>section of the ~/Pages/_Layout.cshtml file.
<body>
    ....
    <script src="_content/Syncfusion.Blazor.Core/scripts/syncfusion-blazor.min.js" type="text/javascript"></script>
</body>
In previous steps, you have successfully configured the Syncfusion® Blazor package in the application. Now, you can add the DataGrid Component to the index.razor page of your app.
<SfGrid>
</SfGrid>
Binding data to the DataGrid component
Now, get SQL data using Dapper and bind it to the DataGrid component. To bind the database table to Syncfusion® Blazor DataGrid, use the custom data binding feature here.
The following points must be considered for creating a custom adaptor.
- Our custom adaptor must extend the
DataAdaptorclass. - Override available CRUD methods to handle data querying and manipulation.
- Register our custom adaptor class as a service in the
Program.cs.
Now, create a new class named BugDataAdaptor.cs under the Data folder and replace the following code in that class.
In the following code example,
- Extended
BugDataAdaptorclass withDataAdaptorbase class. - Injected
BugDataAccessLayerinstance to perform data operations.
public class BugDataAdaptor: DataAdaptor
{
    private BugDataAccessLayer _dataLayer;
    public BugDataAdaptor(BugDataAccessLayer bugDataAccessLayer)
    {
        _dataLayer = bugDataAccessLayer;
    }

    public override async Task<object> ReadAsync(DataManagerRequest dataManagerRequest, string key = null)
    {
        List<Bug> bugs = await _dataLayer.GetBugsAsync();
        int count = await _dataLayer.GetBugCountAsync();
        return dataManagerRequest.RequiresCounts ? new DataResult() { Result = bugs, Count = count } : (object)bugs;
    }
}
Now, Open the Program.cs file in the application and register the BugDataAdaptor class.
....
builder.Services.AddScoped<BugDataAccessLayer>();
builder.Services.AddSyncfusionBlazor();
builder.Services.AddScoped<BugDataAdaptor>();
.....
Now, you need to add the SfDataManager in Grid for binding the data to the Grid and added column definition.
In the following code example,
-
Defined
SfDataManagercomponent to provide data source to the grid. You can see that we have specified theAdaptorInstanceproperty with the type of the custom adaptor we created in the previous step and mentioned theAdaptorproperty asAdaptors.CustomAdaptor. -
TValueis specified asBugclass.
<SfGrid TValue="Bug">
    <SfDataManager AdaptorInstance="typeof(BugDataAdaptor)" Adaptor="Adaptors.CustomAdaptor"></SfDataManager>
</SfGrid>
Grid columns can be defined using the GridColumn component. Next, you can create columns using the following code. Let’s explore the properties used and their applications.
<SfGrid TValue="Bug">
    <SfDataManager AdaptorInstance="typeof(BugDataAdaptor)" Adaptor="Adaptors.CustomAdaptor"></SfDataManager>
    <GridColumns>
        <GridColumn Field="@nameof(Bug.Id)" IsPrimaryKey="true" Visible="false"></GridColumn>
        <GridColumn Field="@nameof(Bug.Summary)" Width="100"></GridColumn>
        <GridColumn Field="@nameof(Bug.BugPriority)" HeaderText="Priority" Width="100"></GridColumn>
        <GridColumn Field="@nameof(Bug.Assignee)" Width="100"></GridColumn>
        <GridColumn Field="@nameof(Bug.BugStatus)" HeaderText="Status" Width="100"></GridColumn>
    </GridColumns>
</SfGrid>
Now, the DataGrid will look like this while running the application. The displayed records are fetched from the database.

Handling CRUD operations with our Syncfusion® Blazor DataGrid component
You can enable editing in the grid component using the GridEditSettings component. Grid provides various modes of editing options such as Inline/Normal, Dialog, and Batch editing. Refer to the following documentation for your reference.
NOTE
Normal editing is the default edit mode for the DataGrid component. You need to set the IsPrimaryKey property of Column as True for a particular column, whose value is a unique value for editing purposes.
Here, we are using inline edit mode and the Toolbar property to show toolbar items for editing.
<SfGrid TValue="Bug" Toolbar="@(new List<string>() { "Add", "Edit", "Delete", "Update", "Cancel" })">
    <SfDataManager AdaptorInstance="typeof(BugDataAdaptor)" Adaptor="Adaptors.CustomAdaptor"></SfDataManager>
    <GridEditSettings AllowAdding="true" AllowEditing="true" AllowDeleting="true"></GridEditSettings>
    <GridColumns>
        <GridColumn Field="@nameof(Bug.Id)" IsPrimaryKey="true" Visible="false"></GridColumn>
        <GridColumn Field="@nameof(Bug.Summary)" Width="100"></GridColumn>
        <GridColumn Field="@nameof(Bug.BugPriority)" HeaderText="Priority" Width="100"></GridColumn>
        <GridColumn Field="@nameof(Bug.Assignee)" Width="100"></GridColumn>
        <GridColumn Field="@nameof(Bug.BugStatus)" HeaderText="Status" Width="100"></GridColumn>
    </GridColumns>
</SfGrid>
You have already created CRUD operations methods in the data access layer section itself. Now, you are going to call those methods while performing CRUD actions in DataGrid.
Insert a row
Add the following codes(InsertAsync) in the BugDataAdaptor(CustomAdaptor) class to perform insert operation.
public override async Task<object> InsertAsync(DataManager dataManager, object data, string key)
{
    await _dataLayer.AddBugAsync(data as Bug);
    return data;
}
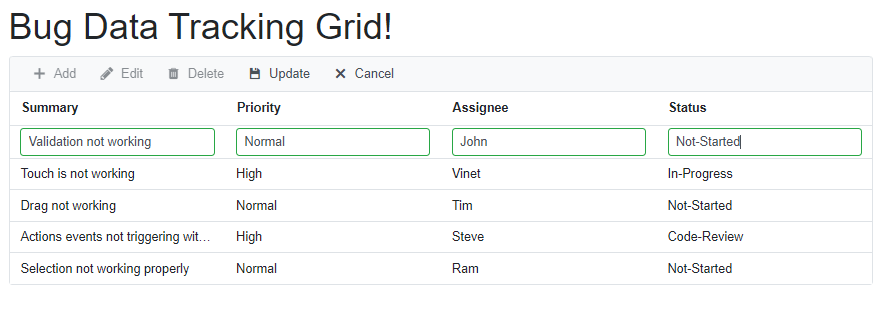
To insert a new row, click the Add toolbar button. The new record edit form will look like below.

Clicking the Update toolbar button will call the InsertAsync method of our BugDataAdaptor to insert the record in the Bug table. Now, the successfully inserted record in the grid will look like below.

Update a row
Add the following codes (UpdateAsync) in the BugDataAdaptor(CustomAdaptor) class to perform update operation.
public override async Task<object> UpdateAsync(DataManager dataManager, object data, string keyField, string key)
{
    await _dataLayer.UpdateBugAsync(data as Bug);
    return data;
}
To edit a row, select any row and click the Edit toolbar button. The edit form will look like below.

Here, the Status field value is changed from Not started to In progress. Clicking the Update toolbar button will call the UpdateAsync method of BugDataAdaptor to update the record in the Bug table. Now, the successfully updated record in the grid will look like below.

Delete a row
Add the following codes(RemoveAsync) in the BugDataAdaptor(CustomAdaptor) class to perform update operation.
public override async Task<object> RemoveAsync(DataManager dataManager, object primaryKeyValue, string keyField, string key)
{
    await _dataLayer.RemoveBugAsync(Convert.ToInt32(primaryKeyValue));
    return primaryKeyValue;
}
To delete a row, select any row and click the Delete toolbar button. Clicking the Delete toolbar button will call the RemoveAsync method of our BugDataAdaptor to update the record in the Bug table.
NOTE
Find the sample from this Github location.