Bind data from RESTful web services to Syncfusion® Blazor components
1 Jul 202621 minutes to read
This article shows how to retrieve data from a RESTful web services, bind it to the Grid component, and perform CRUD operations. Data is fetched from an ODatav4 service using the ODataV4Adaptor of SfDataManager.
Choose the suitable adaptor based on the RESTful service which you are using to bind data for the Blazor component. Refer to the following documentation to know about the available Adaptors of SfDataManager.
Prerequisite software
The following software are required:
- Visual Studio 2022
- .NET 6.0 or later
Create the database
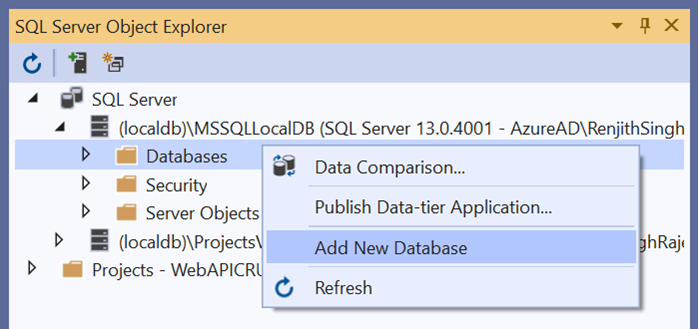
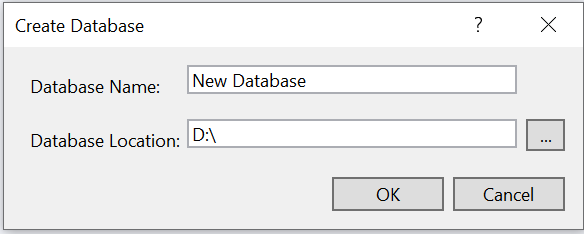
Open Visual Studio , select View -> SQL Server Object Explorer. Right-click on the Databases folder to create a new Database and name it as OrdersDetails.
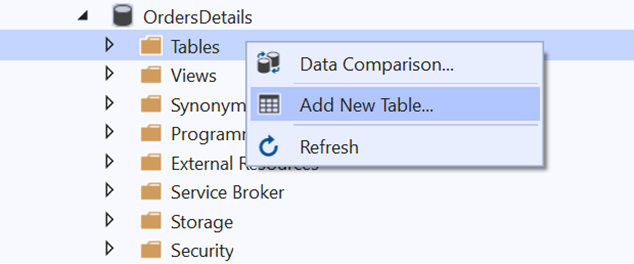
Right-click on the Tables folder of the created database and click Add New Table.
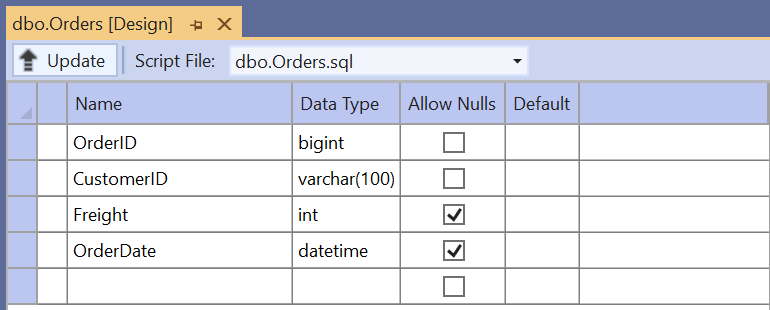
Use the following query to add a new table named Orders.
Create Table Orders(
 OrderID BigInt Identity(1,1) Primary Key Not Null,
 CustomerID Varchar(100) Not Null,
 Freight int Null,
 OrderDate datetime null
)
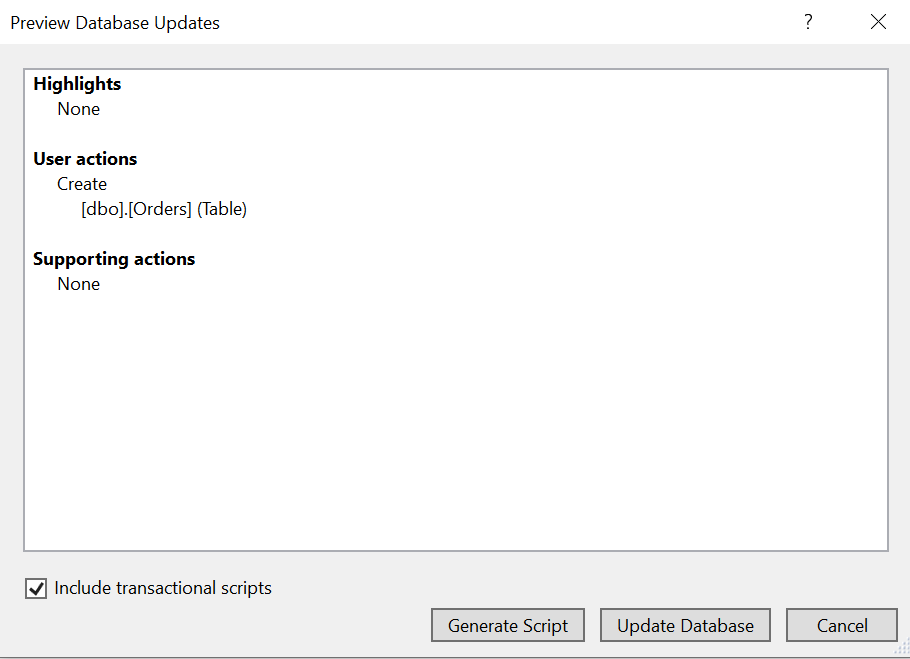
Now, the Orders table design will look like below. Click on the Update button.
Now, click on Update Database.
Create OData service project
Open Visual Studio 2022 and create an empty ASP.NET Core Web Application named ODataServiceProject. After creating the application, install the Microsoft.AspNetCore.OData package by running the following command in the Package Manager Console.
Install-Package Microsoft.AspNetCore.OData
This package contains everything you need to create OData v4.0 endpoints using ASP.NET Core MVC and to support OData query syntax for your web APIs.
Generate DbContext and model class from the database
Now, you need to scaffold DbContext and model classes from the existing OrdersDetails database. To perform scaffolding and work with the SQL Server database in our application, install the following NuGet packages.
-
Microsoft.EntityFrameworkCore.Tools : This package creates database context and model classes from the database.
-
Microsoft.EntityFrameworkCore.SqlServer :The database provider that allows Entity Framework Core to work with SQL Server.
Run the following commands in the Package Manager Console.
Install-Package Microsoft.EntityFrameworkCore.Tools
Install-Package Microsoft.EntityFrameworkCore.SqlServer
Once the above packages are installed, you can scaffold DbContext and Model classes. Run the following command in the Package Manager Console.
Scaffold-DbContext “Data Source=(localdb)\MSSQLLocalDB;Initial Catalog=OrdersDetails;Integrated Security=True;Connect Timeout=30;Encrypt=False;TrustServerCertificate=False;ApplicationIntent=ReadWrite;MultiSubnetFailover=False” Microsoft.EntityFrameworkCore.SqlServer -OutputDir Models
The above scaffolding command contains the following details for creating DbContext and model classes for the existing database and its tables.
- Connection string: Data Source=(localdb)\MSSQLLocalDB;Initial Catalog=OrdersDetails;Integrated Security=True;Connect Timeout=30;Encrypt=False;TrustServerCertificate=False;ApplicationIntent=ReadWrite;MultiSubnetFailover=False
- Data provider: Microsoft.EntityFrameworkCore.SqlServer
- Output directory: -OutputDir Models
After running the above command, the OrdersDetailsContext.cs and Orders.cs files will be created under the ODataServiceProject.Models folder as follows.
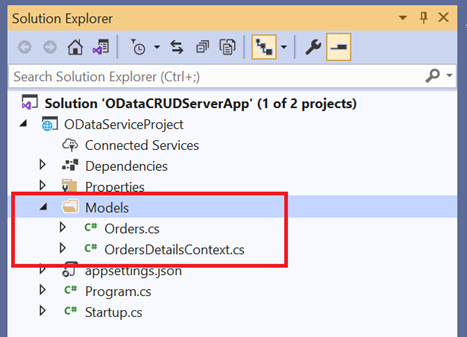
You can see that OrdersDetailsContext.cs file contains the connection string details in the OnConfiguring method.
using System;
using Microsoft.EntityFrameworkCore;
using Microsoft.EntityFrameworkCore.Metadata;

namespace ODataServiceProject.Models
{
    public partial class OrdersDetailsContext : DbContext
    {
        public OrdersDetailsContext()
        {
        }

        public OrdersDetailsContext(DbContextOptions<OrdersDetailsContext> options)
            : base(options)
        {
        }

        public virtual DbSet<Orders> Orders { get; set; }

        protected override void OnConfiguring(DbContextOptionsBuilder optionsBuilder)
        {
            if (!optionsBuilder.IsConfigured)
            {
                optionsBuilder.UseSqlServer("Data Source=(localdb)\\MSSQLLocalDB;Initial Catalog=OrdersDetails;Integrated Security=True;Connect Timeout=30;Encrypt=False;TrustServerCertificate=False;ApplicationIntent=ReadWrite;MultiSubnetFailover=False");
            }
        }

        ...
    }
}
It is not recommended to have a connection string with sensitive information in the OrdersDetailsContext.cs file, so the connection string is moved to the appsettings.json file.
{
  "Logging": {
    "LogLevel": {
      "Default": "Information",
      "Microsoft.AspNetCore": "Warning"
    }
  },
  "AllowedHosts": "*",
  "ConnectionStrings": {
    "OrdersDetailsDatabase": "Data Source=(localdb)\\MSSQLLocalDB;Initial Catalog=OrdersDetails;Integrated Security=True;Connect Timeout=30;Encrypt=False;TrustServerCertificate=False;ApplicationIntent=ReadWrite;MultiSubnetFailover=False"
  }
}
Now, the DbContext must be configured using connection string and registered as scoped service using the AddDbContext method in Program.cs.
builder.Services.AddDbContext<OrdersDetailsContext>(option =>
                option.UseSqlServer(builder.Configuration.GetConnectionString("OrdersDetailsDatabase")));
Creating ODataV4 service
The application is now configured to connect with the OrdersDetails database using Entity Framework. Now, it’s time to consume data from the OrdersDetails database. To do so, you need an OData controller to serve data from the DbContext to the Blazor application.
To create OData controller, right-click Controller folder in ODataServiceProject and select Add -> New Item -> API controller with read/write actions. We are naming this controller as OrdersController as it returns Orders table records.
Now, replace the controller with the following code which contains code to handle CRUD operations in the Orders table.
using Microsoft.AspNet.OData;
using System.Threading.Tasks;
using ODataServiceProject.Models;
using Microsoft.AspNetCore.Mvc;

// For more information on enabling Web API for empty projects, visit https://go.microsoft.com/fwlink/?LinkID=397860

namespace ODataServiceProject.Controllers
{
    [Route("api/[controller]")]
    public class OrdersController : ODataController
    {
        private OrdersDetailsContext _db;
        public OrdersController(OrdersDetailsContext context)
        {
            _db = context;
        }
        [HttpGet]
        [EnableQuery]
        public IActionResult Get()
        {
            return Ok(_db.Orders);
        }
        [EnableQuery]
        public async Task<IActionResult> Post([FromBody] Orders book)
        {
            _db.Orders.Add(book);
            _db.SaveChanges();
            return Created(book);
        }
        [EnableQuery]
        public async Task<IActionResult> Patch([FromODataUri] long key, [FromBody] Delta<Orders> book)
        {
            var entity = await _db.Orders.FindAsync(key);
            book.Patch(entity);
            await _db.SaveChangesAsync();
            return Updated(entity);
        }
        [EnableQuery]
        public long Delete([FromODataUri] long key)
        {
            var deleterow = _db.Orders.Find(key);
            _db.Orders.Remove(deleterow);
            _db.SaveChanges();
            return key;
        }
    }
}
Add the following line in the launchSettings.json file.
{
  "iisSettings": {
    "windowsAuthentication": false,
    "anonymousAuthentication": true,
    "iisExpress": {
      "applicationUrl": "http://localhost:59323",
      "sslPort": 44392
    }
  },
  "profiles": {
    "IIS Express": {
      "commandName": "IISExpress",
      "launchBrowser": true,
      "launchUrl": "odata/orders",
      "environmentVariables": {
        "ASPNETCORE_ENVIRONMENT": "Development"
      }
    },
    "ODataServiceProject": {
      "commandName": "Project",
      "dotnetRunMessages": "true",
      "launchBrowser": true,
      "applicationUrl": "https://localhost:5001;http://localhost:5000",
      "environmentVariables": {
        "ASPNETCORE_ENVIRONMENT": "Development"
      }
    }
  }
}
Additionally, make sure to include the AddCors() and UseCors() methods in Program.cs file of ODataService project when configuring with a Blazor Web App.
Open Program.cs file in .NET 6 and .NET 7 application and configure by referring to the following codes.
var builder = WebApplication.CreateBuilder(args);

// Add services to the container.

static IEdmModel GetEdmModel()
{
    ODataConventionModelBuilder builder = new ODataConventionModelBuilder();
    var books = builder.EntitySet<Orders>("Orders");
    FunctionConfiguration myFirstFunction = books.EntityType.Collection.Function("MyFirstFunction");
    myFirstFunction.ReturnsCollectionFromEntitySet<Orders>("Orders");
    return builder.GetEdmModel();
}

builder.Services.AddControllers();
// Learn more about configuring Swagger/OpenAPI at https://aka.ms/aspnetcore/swashbuckle
builder.Services.AddEndpointsApiExplorer();
builder.Services.AddSwaggerGen(c =>
{
    c.SwaggerDoc("v1", new() { Title = "ODataTutorial", Version = "v1" });
});
builder.Services.AddDbContext<OrdersDetailsContext>(option =>
                option.UseSqlServer(builder.Configuration.GetConnectionString("OrdersDetailsDatabase")));
builder.Services.AddControllers().AddOData(opt => opt.AddRouteComponents("odata", GetEdmModel()).Count().Filter().OrderBy().Expand().Select().SetMaxTop(null));
//if your configured with Blazor Web App only, call AddCors method
builder.Services.AddCors(options =>
{
    options.AddPolicy("NewPolicy", builder =>
    builder.AllowAnyOrigin()
        .AllowAnyMethod()
        .AllowAnyHeader());
});
var app = builder.Build();

//if your configured with Blazor Web App only, call UseCors method
if (app.Environment.IsDevelopment())
{
    app.UseSwagger();
    app.UseSwaggerUI();
}
app.UseHttpsRedirection();
app.UseCors("NewPolicy");
app.UseAuthorization();

app.MapControllers();

app.Run();
Create Blazor Web App
Create a Blazor Web App using Visual Studio 2022 via Microsoft templates or the Blazor Extension.
Configure the appropriate interactive render mode and interactivity location when creating the Blazor Web App.
Create Blazor Server Application
Create a Blazor Server App using Visual Studio via Microsoft templates or the Blazor Extension.
Add Blazor Grid and Themes NuGet in Blazor App
To add Blazor DataGrid component in the app, open the NuGet package manager in Visual Studio (Tools → NuGet Package Manager → Manage NuGet Packages for Solution), search and install Syncfusion.Blazor.Grid and Syncfusion.Blazor.Themes.
If using WebAssembly or Auto render modes in a Blazor Web App, install Syncfusion® Blazor NuGet packages in the client project.
Alternatively, you can utilize the following package manager command to achieve the same.
Install-Package Syncfusion.Blazor.Grid -Version 34.1.29
Install-Package Syncfusion.Blazor.Themes -Version 34.1.29
NOTE
Blazor components are available in nuget.org. Refer to NuGet packages topic for available NuGet packages list with component details.
Open ~/_Imports.razor file and import the following namespace.
@using Syncfusion.Blazor
@using Syncfusion.Blazor.Grids
Now, register the Blazor Service in the ~/Program.cs file of your App.
For a Blazor Web App with WebAssembly or Auto (Server and WebAssembly) interactive render mode, register the Blazor service in both ~/Program.cs files of your web app.
....
using Syncfusion.Blazor;
....
builder.Services.AddSyncfusionBlazor();
....
Themes provide life to components. Blazor has different themes. They are:
- Bootstrap5
- Material 3
- Tailwind CSS
- High Contrast
- Fluent
In this demo application, the latest theme is used.
- For Blazor Web App, reference the stylesheet inside the
<head>of ~/Pages/_Layout.cshtml. - For Blazor WebAssembly App, reference the stylesheet inside the
<head>of ~/wwwroot/index.html. - For Blazor Server App, reference the stylesheet inside the
<head>of- ~/Pages/_Host.cshtml file for .NET 7.
- ~/Pages/_Layout.cshtml file for .NET 6.
<link href="_content/Syncfusion.Blazor.Themes/bootstrap5.css" rel="stylesheet" />- For Blazor Web App, reference scripts in end of
<body>section at~/Components/App.razorfile. - For Blazor WASM App, reference scripts in end of
<body>section at~/wwwroot/index.htmlfile. - For Blazor Server App, reference scripts in end of
<body>section at~/Pages/_Layout.cshtmlfile for.NET 6project and in~/Pages/_Host.cshtmlfile for.NET 7project.
<body>
    ....
    <script src="_content/Syncfusion.Blazor.Core/scripts/syncfusion-blazor.min.js" type="text/javascript"></script>
</body>
Add Blazor DataGrid component to an application
In previous steps, you have successfully configured the Syncfusion® Blazor package in the application. Now, you can add the grid component to the .razor page inside the Pages folder.
If you have set the interactivity location to Per page/component in the web app, ensure that you define a render mode at the top of the Blazor component-included razor page as follows:
@* Your App render mode define here *@
@rendermode InteractiveAuto<SfGrid TValue="Orders"></SfGrid>Binding data to Blazor DataGrid component using ODataV4Adaptor
To consume data from the OData controller, add SfDataManager with ODataV4Adaptor. Refer to the following documentation for more details on ODataV4Adaptor.
<SfGrid TValue="Orders">
    <SfDataManager Url="https://localhost:44392/odata/orders" Adaptor="Adaptors.ODataV4Adaptor"></SfDataManager>
</SfGrid>
NOTE
In the example above, a localhost URL is used. Replace it with the actual URL of your OData service.
Grid columns can be defined by using the GridColumn component. We are going to create columns using the following code.
<SfGrid TValue="Orders">
    <SfDataManager Url="https://localhost:44392/odata/orders" Adaptor="Adaptors.ODataV4Adaptor"></SfDataManager>
    <GridColumns>
        <GridColumn Field=@nameof(Orders.OrderId) HeaderText="Order ID" IsPrimaryKey="true" Visible="false" TextAlign="TextAlign.Right" Width="120"></GridColumn>
        <GridColumn Field=@nameof(Orders.CustomerId) HeaderText="Customer Name" Width="150"></GridColumn>
        <GridColumn Field=@nameof(Orders.OrderDate) HeaderText=" Order Date" Format="d" Type="ColumnType.Date" TextAlign="TextAlign.Right" Width="130"></GridColumn>
        <GridColumn Field=@nameof(Orders.Freight) HeaderText="Freight" Format="C2" TextAlign="TextAlign.Right" Width="120"></GridColumn>
    </GridColumns>
</SfGrid>

@code {
    public class Order
    {
        public long OrderId { get; set; }

        public string CustomerId { get; set; } = null!;

        public int? Freight { get; set; }

        public DateTime? OrderDate { get; set; }
    }
}
When you run the application, the Get() method will be called in your OData controller.
[Route("api/[controller]")]
public class OrdersController : ODataController
{
    private OrdersDetailsContext _db;
    public OrdersController(OrdersDetailsContext context)
    {
        _db = context;
    }
    [HttpGet]
    [EnableQuery]
    public IActionResult Get()
    {
        return Ok(_db.Orders);
    }
    ...
}
Handling CRUD operations with our Blazor DataGrid component
Enable editing in the grid component using GridEditSettings. The Grid supports several editing modes: Inline/Normal, Dialog, and Batch.
Here, Inline edit mode is used with the Toolbar to show editing actions.
We have added the DataGrid Editing and Toolbar code with previous Grid model.
<SfGrid TValue="Orders" Toolbar="@(new List<string>() { "Add", "Edit", "Delete", "Cancel", "Update" })">
    <SfDataManager Url="https://localhost:44392/odata/orders" Adaptor="Adaptors.ODataV4Adaptor"></SfDataManager>
    <GridEditSettings AllowAdding="true" AllowDeleting="true" AllowEditing="true" Mode="EditMode.Normal"></GridEditSettings>
    <GridColumns>
        <GridColumn Field=@nameof(Orders.OrderId) HeaderText="Order ID" IsPrimaryKey="true" Visible="false" TextAlign="TextAlign.Right" Width="120"></GridColumn>
        <GridColumn Field=@nameof(Orders.CustomerId) HeaderText="Customer Name" Width="150"></GridColumn>
        <GridColumn Field=@nameof(Orders.OrderDate) HeaderText=" Order Date" Format="d" Type="ColumnType.Date" TextAlign="TextAlign.Right" Width="130"></GridColumn>
        <GridColumn Field=@nameof(Orders.Freight) HeaderText="Freight" Format="C2" TextAlign="TextAlign.Right" Width="120"></GridColumn>
    </GridColumns>
</SfGrid>

@code {
    public class Order
    {
        public long OrderId { get; set; }

        public string CustomerId { get; set; } = null!;

        public int? Freight { get; set; }

        public DateTime? OrderDate { get; set; }
    }
}
NOTE
Normal editing is the default mode. Set the IsPrimaryKey property to true for the column that holds a unique key.
Insert a row
To insert a new row, click the Add toolbar button. The new record edit form will look like below.

Clicking the Update toolbar button will insert the record in the Orders table by calling the below POST method of the OData controller.
public async Task<IActionResult> Post([FromBody] Orders book)
{
    _db.Orders.Add(book);
    _db.SaveChanges();
    return Created(book);
}
Update a row
To edit a row, select any row and click the Edit toolbar button. The edit form will look like below. Edit the Customer Name column.

Clicking the Update toolbar button will update the record in the Orders table by calling the below PATCH method of the OData controller.
public async Task<IActionResult> Patch([FromODataUri] long key, [FromBody] Delta<Orders> book)
{
    var entity = await _db.Orders.FindAsync(key);
    book.Patch(entity);
    await _db.SaveChangesAsync();
    return Updated(entity);
}
The resultant grid will look like below.

Delete a row
To delete a row, select any row and click the Delete toolbar button. Deleting operation will send a DELETE request to the OData controller with the selected record’s primary key value to remove the corresponding record from the Orders table.
public long Delete([FromODataUri] long key)
{
    var deleterow = _db.Orders.Find(key);
    _db.Orders.Remove(deleterow);
    _db.SaveChanges();
    return key;
}
NOTE
Find the sample at this GitHub repository.