Getting Started with Blazor File Manager Component in Server App
10 Oct 202524 minutes to read
This section briefly explains about how to include Blazor FileManager component in your Blazor Server App using Visual Studio, Visual Studio Code and .NET CLI.
Prerequisites
Create a new Blazor App in Visual Studio
You can create a Blazor Server App using Blazor Web App template in Visual Studio via Microsoft Templates or the Syncfusion® Blazor Extension. For detailed instructions, refer to this Blazor Server App Getting Started documentation.
Install Syncfusion® Blazor File Manager and Themes NuGet in the App
To add Blazor FileManager component in the app, open the NuGet package manager in Visual Studio (Tools → NuGet Package Manager → Manage NuGet Packages for Solution), search and install Syncfusion.Blazor.FileManager and Syncfusion.Blazor.Themes. Alternatively, you can utilize the following package manager command to achieve the same.
Install-Package Syncfusion.Blazor.FileManager -Version 32.1.19
Install-Package Syncfusion.Blazor.Themes -Version 32.1.19
NOTE
Syncfusion® Blazor components are available in nuget.org. Refer to NuGet packages topic for available NuGet packages list with component details.
Prerequisites
Create a new Blazor App in Visual Studio Code
You can create a Blazor Server App using Visual Studio Code via Microsoft Templates or the Syncfusion® Blazor Extension. For detailed instructions, refer to this Blazor Server App Getting Started documentation.
Alternatively, you can create a Server application using the following command in the terminal(Ctrl+`).
dotnet new blazor -o BlazorApp -int Server
cd BlazorApp
Install Syncfusion® Blazor File Manager and Themes NuGet in the App
- Press Ctrl+` to open the integrated terminal in Visual Studio Code.
- Ensure you’re in the project root directory where your
.csprojfile is located. - Run the following command to install a Syncfusion.Blazor.FileManager and Syncfusion.Blazor.Themes NuGet package and ensure all dependencies are installed.
dotnet add package Syncfusion.Blazor.FileManager -v 32.1.19
dotnet add package Syncfusion.Blazor.Themes -v 32.1.19
dotnet restore
NOTE
Syncfusion® Blazor components are available in nuget.org. Refer to NuGet packages topic for available NuGet packages list with component details.
Prerequisites
Latest version of the .NET Core SDK. If you previously installed the SDK, you can determine the installed version by executing the following command in a command prompt (Windows) or terminal (macOS) or command shell (Linux).
dotnet --versionCreate a Blazor Server App using .NET CLI
Run the dotnet new blazorserver command to create a new Blazor Server App in a command prompt (Windows) or terminal (macOS) or command shell (Linux).
dotnet new blazor -o BlazorApp -int Server
cd BlazorApp
This command creates new Blazor Server App and places it in a new directory called BlazorApp inside your current location. See Create Blazor app topic and dotnet new CLI command topics for more details.
Install Syncfusion® Blazor FileManager and Themes NuGet in the App
Here’s an example of how to add Blazor FileManager component in the application using the following command in the command prompt (Windows) or terminal (Linux and macOS) to install a Syncfusion.Blazor.FileManager and Syncfusion.Blazor.Themes NuGet package. See Install and manage packages using the dotnet CLI topics for more details.
dotnet add package Syncfusion.Blazor.FileManager -Version 32.1.19
dotnet add package Syncfusion.Blazor.Themes -Version 32.1.19
dotnet restore
NOTE
Syncfusion® Blazor components are available in nuget.org. Refer to NuGet packages topic for available NuGet packages list with component details.
Add Import Namespaces
Open the ~/_Imports.razor file and import the Syncfusion.Blazor and Syncfusion.Blazor.FileManager namespace.
@using Syncfusion.Blazor
@using Syncfusion.Blazor.FileManager
Register Syncfusion® Blazor Service
Register the Syncfusion® Blazor Service in the ~/Program.cs file of your Blazor Server App.
....
....
using Syncfusion.Blazor;

var builder = WebApplication.CreateBuilder(args);

// Add services to the container.
....
....
builder.Services.AddSyncfusionBlazor();

....
Add stylesheet and script resources
The theme stylesheet and script can be accessed from NuGet through Static Web Assets. Include the stylesheet and script in the <head> and the script reference at the end of the <body> in the App.razor file as shown below:
<head>
    ....
    <link href="_content/Syncfusion.Blazor.Themes/bootstrap5.css" rel="stylesheet" />
</head>

<body>
    ....
    <script src="_content/Syncfusion.Blazor.Core/scripts/syncfusion-blazor.min.js" type="text/javascript"></script>

    //Blazor FileManager Component script reference.

</body>
NOTE
Check out the Blazor Themes topic to discover various methods (Static Web Assets, CDN, and CRG) for referencing themes in your Blazor application. Also, check out the Adding Script Reference topic to learn different approaches for adding script references in your Blazor application.
Add Blazor File Manager component
Add the Syncfusion® Blazor File Manager component in the ~/Components/Pages/Home.razor file. If an interactivity location as per page/component, define a render mode at the top of the Home.razor page.
NOTE
If an Interactivity Location is set to
Globaland the Render Mode is set toServer, the render mode is configured in theApp.razorfile by default.
@* desired render mode define here *@
@rendermode InteractiveServer
@using Syncfusion.Blazor.FileManager

<SfFileManager TValue="FileManagerDirectoryContent">
    <FileManagerAjaxSettings Url="https://ej2-aspcore-service.azurewebsites.net/api/FileManager/FileOperations"
                             UploadUrl="https://ej2-aspcore-service.azurewebsites.net/api/FileManager/Upload"
                             DownloadUrl="https://ej2-aspcore-service.azurewebsites.net/api/FileManager/Download"
                             GetImageUrl="https://ej2-aspcore-service.azurewebsites.net/api/FileManager/GetImage">
    </FileManagerAjaxSettings>
</SfFileManager>
Create Models
Create a new folder named Models in the server project. Add the necessary model files to this folder for handling file operations. Download the PhysicalFileProvider.cs and Base folder from this repository and place them in the Models folder.
Create a new folder controller
To initialize a local service, create a new folder name with Controllers inside the server part of the project. Then, create a new file FileManagerController with extension .cs inside the Controllers folder.
Make sure your controller FileManagerController.cs uses the model classes you’ve created. Import the model namespace at the top of your controller file
File Manager’s base functions are available in the below namespace.
using Syncfusion.EJ2.FileManager.Base;File Manager’s operations are available in the below namespace.
using Syncfusion.EJ2.FileManager.PhysicalFileProvider;Initialize the service in controller
File Manager supports the basic file actions like Read, Delete, Copy, Move, Get Details, Search, Rename, and Create New Folder.
To initialize a local service, create a new folder name with Controllers inside the server part of the project. Then, create a new file FileManagerController with extension .cs inside the Controllers folder and add the following code in that file.
using Microsoft.AspNetCore.Mvc;
using System;
using System.Collections.Generic;
using Microsoft.AspNetCore.Hosting;
using Microsoft.AspNetCore.Http;
using Microsoft.AspNetCore.Http.Features;
//File Manager's base functions are available in the below namespace.
using Syncfusion.EJ2.FileManager.Base;
//File Manager's operations are available in the below namespace.
using Syncfusion.EJ2.FileManager.PhysicalFileProvider;
using System.IO;
using System.Linq;
using System.Threading.Tasks;

namespace filemanager.Server.Controllers
{
    [Route("api/[controller]")]
    public class FileManagerController : Controller
    {
        public PhysicalFileProvider operation;
        public string basePath;
        string root = "wwwroot\\Files";
        [Obsolete]
        public FileManagerController(IWebHostEnvironment hostingEnvironment)
        {
            this.basePath = hostingEnvironment.ContentRootPath;
            this.operation = new PhysicalFileProvider();
            this.operation.RootFolder(this.basePath + "\\" + this.root); // It denotes in which files and folders are available.
        }

        // Processing the File Manager operations.
        [Route("FileOperations")]
        public object FileOperations([FromBody] FileManagerDirectoryContent args)
        {
            switch (args.Action)
            {
                // Add your custom action here.
                case "read":
                    // Path - Current path; ShowHiddenItems - Boolean value to show/hide hidden items.
                    return this.operation.ToCamelCase(this.operation.GetFiles(args.Path, args.ShowHiddenItems));
                case "delete":
                    // Path - Current path where the folder to be deleted; Names - Name of the files to be deleted
                    return this.operation.ToCamelCase(this.operation.Delete(args.Path, args.Names));
                case "copy":
                    //  Path - Path from where the file was copied; TargetPath - Path where the file/folder is to be copied; RenameFiles - Files with same name in the copied location that is confirmed for renaming; TargetData - Data of the copied file
                    return this.operation.ToCamelCase(this.operation.Copy(args.Path, args.TargetPath, args.Names, args.RenameFiles, args.TargetData));
                case "move":
                    // Path - Path from where the file was cut; TargetPath - Path where the file/folder is to be moved; RenameFiles - Files with same name in the moved location that is confirmed for renaming; TargetData - Data of the moved file
                    return this.operation.ToCamelCase(this.operation.Move(args.Path, args.TargetPath, args.Names, args.RenameFiles, args.TargetData));
                case "details":
                    // Path - Current path where details of file/folder is requested; Name - Names of the requested folders
                    return this.operation.ToCamelCase(this.operation.Details(args.Path, args.Names));
                case "create":
                    // Path - Current path where the folder is to be created; Name - Name of the new folder
                    return this.operation.ToCamelCase(this.operation.Create(args.Path, args.Name));
                case "search":
                    // Path - Current path where the search is performed; SearchString - String typed in the searchbox; CaseSensitive - Boolean value which specifies whether the search must be casesensitive
                    return this.operation.ToCamelCase(this.operation.Search(args.Path, args.SearchString, args.ShowHiddenItems, args.CaseSensitive));
                case "rename":
                    // Path - Current path of the renamed file; Name - Old file name; NewName - New file name
                    return this.operation.ToCamelCase(this.operation.Rename(args.Path, args.Name, args.NewName));
            }
            return null;
        }
    }
}
To configure and map the controller, open the ~/Program.cs file of the server part of the application. Add the following code to configure the service for the controller and map the controller after app.UseRouting():
builder.Services.AddControllers();
...
app.UseRouting();
app.MapControllers();
This will configure and map the controller in your Blazor App.
Create Web Server App
Add the Syncfusion® Blazor File Manager component in ~/Pages/Index.razor file.
@using Syncfusion.Blazor.FileManager

<SfFileManager TValue="FileManagerDirectoryContent">
    <FileManagerAjaxSettings Url="/api/FileManager/FileOperations"
                             UploadUrl="/api/FileManager/Upload"
                             DownloadUrl="/api/FileManager/Download"
                             GetImageUrl="/api/FileManager/GetImage">
    </FileManagerAjaxSettings>
</SfFileManager>
Add your required files and folders under the wwwroot\Files directory.
- In your project, the
wwwrootdirectory is where static files are served from. It is typically found at the root level of your server project. - Inside the
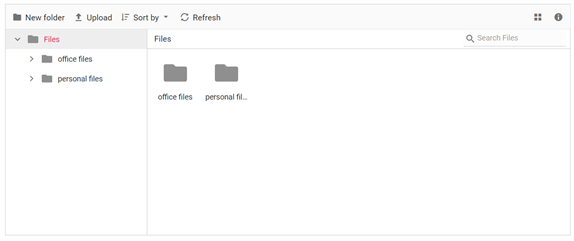
wwwrootdirectory, create a new folder namedFiles. This will be used to store static files like images, documents, or other resources that you want to serve directly. - Press Ctrl+F5 (Windows) or ⌘+F5 (macOS) to launch the application. This will render the Syncfusion® Blazor File Manager component in your default web browser.

NOTE
File download support
To perform the download operation, initialize the DownloadUrl property in a FileManagerAjaxSettings.
@using Syncfusion.Blazor.FileManager

<SfFileManager TValue="FileManagerDirectoryContent">
    <FileManagerAjaxSettings Url="/api/FileManager/FileOperations"
                                DownloadUrl="/api/FileManager/Download">
    </FileManagerAjaxSettings>
</SfFileManager>
Initialize the Download FileOperation in Controller part with the following code snippet.
namespace filemanager.Server.Controllers
{
    [Route("api/[controller]")]
    public class FileManagerController : Controller
    {
        // Processing the Download operation.
        [Route("Download")]
        public IActionResult Download(string downloadInput)
        {
            var options = new JsonSerializerOptions
            {
                PropertyNamingPolicy = JsonNamingPolicy.CamelCase,
            };
            FileManagerDirectoryContent args = JsonSerializer.Deserialize<FileManagerDirectoryContent>(downloadInput, options);
            return operation.Download(args.Path, args.Names, args.Data);
        }
    }
}
File upload support
To perform the upload operation, initialize the UploadUrl property in a FileManagerAjaxSettings.
@using Syncfusion.Blazor.FileManager

<SfFileManager TValue="FileManagerDirectoryContent">
    <FileManagerAjaxSettings Url="/api/FileManager/FileOperations"
                                UploadUrl="/api/FileManager/Upload">
    </FileManagerAjaxSettings>
</SfFileManager>
Initialize the Upload File Operation in Controller part with the following code snippet.
namespace filemanager.Server.Controllers
{
    [Route("api/[controller]")]
    public class FileManagerController : Controller
    {
        // Processing the Upload operation.
        [Route("Upload")]
        [DisableRequestSizeLimit]
        public IActionResult Upload(string path, long size, IList<IFormFile> uploadFiles, string action)
        {
            try
            {
                FileManagerResponse uploadResponse;
                foreach (var file in uploadFiles)
                {
                    var folders = (file.FileName).Split('/');
                    // checking the folder upload
                    if (folders.Length > 1)
                    {
                        for (var i = 0; i < folders.Length - 1; i++)
                        {
                            string newDirectoryPath = Path.Combine(this.basePath + path, folders[i]);
                            if (Path.GetFullPath(newDirectoryPath) != (Path.GetDirectoryName(newDirectoryPath) + Path.DirectorySeparatorChar + folders[i]))
                            {
                                throw new UnauthorizedAccessException("Access denied for Directory-traversal");
                            }
                            if (!Directory.Exists(newDirectoryPath))
                            {
                                this.operation.ToCamelCase(this.operation.Create(path, folders[i]));
                            }
                            path += folders[i] + "/";
                        }
                    }
                }
                uploadResponse = operation.Upload(path, uploadFiles, action, size, null);
                if (uploadResponse.Error != null)
                {
                    Response.Clear();
                    Response.ContentType = "application/json; charset=utf-8";
                    Response.StatusCode = Convert.ToInt32(uploadResponse.Error.Code);
                    Response.HttpContext.Features.Get<IHttpResponseFeature>().ReasonPhrase = uploadResponse.Error.Message;
                }
            }
            catch (Exception e)
            {
                ErrorDetails er = new ErrorDetails();
                er.Message = e.Message.ToString();
                er.Code = "417";
                er.Message = "Access denied for Directory-traversal";
                Response.Clear();
                Response.ContentType = "application/json; charset=utf-8";
                Response.StatusCode = Convert.ToInt32(er.Code);
                Response.HttpContext.Features.Get<IHttpResponseFeature>().ReasonPhrase = er.Message;
                return Content("");
            }
            return Content("");
        }
    }
}
Image preview support
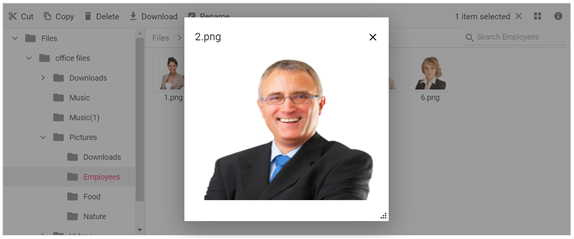
To perform image preview support in the File Manager component, initialize the GetImageUrl property in a FileManagerAjaxSettings.
@using Syncfusion.Blazor.FileManager

<SfFileManager TValue="FileManagerDirectoryContent">
    <FileManagerAjaxSettings Url="/api/FileManager/FileOperations"
                                GetImageUrl="/api/FileManager/GetImage">
    </FileManagerAjaxSettings>
</SfFileManager>
Initialize the GetImage File Operation in Controller part with the following code snippet.
namespace filemanager.Server.Controllers
{
    [Route("api/[controller]")]
    public class FileManagerController : Controller
    {
        // Processing the GetImage operation.
        [Route("GetImage")]
        public IActionResult GetImage(FileManagerDirectoryContent args)
        {
            return this.operation.GetImage(args.Path, args.Id,false,null, null);
        }
    }
}
See Also
Getting Started with Syncfusion® Blazor for Client-Side in .NET Core CLI
Getting Started with Syncfusion® Blazor for Client-Side in Visual Studio
Getting Started with Syncfusion® Blazor for Server-Side in .NET Core CLI