How can I help you?
Getting Started with Blazor WebAssembly Standalone App
7 Nov 20257 minutes to read
This article provides step-by-step instructions for building a Blazor WebAssembly App with the Blazor DataGrid component using Visual Studio, Visual Studio Code, and the .NET CLI.
Using Playground
Blazor Playground allows interaction with Syncfusion Blazor components directly in a web browser without needing to install any NuGet packages. By default, the Syncfusion.Blazor package is included.
Using Syncfusion® Blazor Templates
You can create a Blazor WebAssembly Standalone App using Syncfusion® Blazor Templates in both Visual Studio and Visual Studio Code.
Manually Creating a Project
This section provides a brief guide on how to manually create a Blazor WebAssembly App using Visual Studio, Visual Studio Code, and the .NET CLI.
Prerequisites
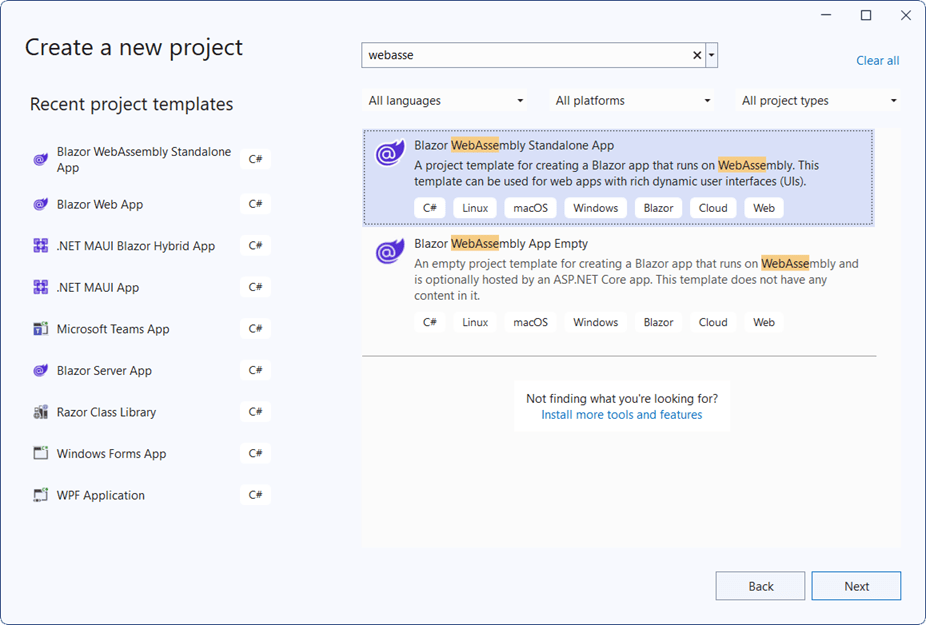
Create a new Blazor WebAssembly App (Standalone) in Visual Studio
You can create a Blazor WebAssembly App using Visual Studio via the Microsoft Templates or the Syncfusion® Blazor extension.

Install Syncfusion® Blazor Grid and Themes NuGet in the App
Here’s an example of how to add Blazor DataGrid component in the app, open the NuGet package manager in Visual Studio (Tools → NuGet Package Manager → Manage NuGet Packages for Solution), search and install Syncfusion.Blazor.Grid and Syncfusion.Blazor.Themes. Alternatively, you can utilize the following package manager command to achieve the same.
Install-Package Syncfusion.Blazor.Grid -Version 32.2.3
Install-Package Syncfusion.Blazor.Themes -Version 32.2.3
NOTE
Syncfusion® Blazor components are available in nuget.org. Refer to NuGet packages topic for available NuGet packages list with component details.
Prerequisites
Create a Blazor WebAssembly App in Visual Studio Code
You can create a Blazor WebAssembly App using Visual Studio Code via the Microsoft Templates or the Syncfusion® Blazor extension.
Alternatively, create a WebAssembly application by using the following commands in the integrated terminal (Ctrl+`).
dotnet new blazorwasm -o BlazorApp
cd BlazorApp
This command creates a new Blazor WebAssembly App and places it in a new directory called BlazorApp inside the current location. See Create a Blazor App and the dotnet new command for more details.
Install Syncfusion® Blazor Grid and Themes NuGet in the App
- Press Ctrl+` to open the integrated terminal in Visual Studio Code.
- Ensure you’re in the project root directory where your
.csprojfile is located. - Run the following commands to install the Syncfusion.Blazor.Grid and Syncfusion.Blazor.Themes NuGet packages and ensure all dependencies are installed.
dotnet add package Syncfusion.Blazor.Grid -Version 32.2.3
dotnet add package Syncfusion.Blazor.Themes -Version 32.2.3
dotnet restore
NOTE
Syncfusion® Blazor components are available in nuget.org. Refer to NuGet packages topic for available NuGet packages list with component details.
Prerequisites
Install the latest version of the .NET SDK. If the .NET SDK was previously installed, determine the installed version by running the following command in a command prompt (Windows), terminal (macOS), or command shell (Linux).
dotnet --versionCreate a Blazor WebAssembly App using .NET CLI
Run the dotnet new blazorwasm command to create a new Blazor WebAssembly App in a command prompt (Windows) or terminal (macOS) or command shell (Linux).
dotnet new blazorwasm -o BlazorApp
cd BlazorApp
This command creates a new Blazor WebAssembly App and places it in a new directory called BlazorApp inside the current location. See Create a Blazor app and the dotnet new CLI command for more details.
Install Syncfusion® Blazor Grid and Themes NuGet in the App
To add the Blazor DataGrid component to the application, run the following commands in a command prompt (Windows), command shell (Linux), or terminal (macOS) to install the Syncfusion.Blazor.Grid and Syncfusion.Blazor.Themes NuGet packages. See Install and manage packages using the dotnet CLI for more details.
dotnet add package Syncfusion.Blazor.Grid -Version 32.2.3
dotnet add package Syncfusion.Blazor.Themes -Version 32.2.3
dotnet restore
NOTE
Syncfusion® Blazor components are available in nuget.org. Refer to NuGet packages topic for available NuGet packages list with component details.
Add Import Namespaces
Open the ~/_Imports.razor file and import the Syncfusion.Blazor and Syncfusion.Blazor.Grids namespaces.
@using Syncfusion.Blazor
@using Syncfusion.Blazor.Grids
Register Syncfusion® Blazor Service
Register the Syncfusion® Blazor service in the ~/Program.cs file of the Blazor WebAssembly App.
using Microsoft.AspNetCore.Components.Web;
using Microsoft.AspNetCore.Components.WebAssembly.Hosting;
using Syncfusion.Blazor;

var builder = WebAssemblyHostBuilder.CreateDefault(args);
builder.RootComponents.Add<App>("#app");
builder.RootComponents.Add<HeadOutlet>("head::after");

builder.Services.AddScoped(sp => new HttpClient { BaseAddress = new Uri(builder.HostEnvironment.BaseAddress) });

builder.Services.AddSyncfusionBlazor();
await builder.Build().RunAsync();
....
Add stylesheet and script resources
The theme stylesheet and script can be accessed from NuGet through Static Web Assets. Reference the stylesheet and script in the <head> of the ~wwwroot/index.html file.
<head>
    ....
    <link href="_content/Syncfusion.Blazor.Themes/bootstrap5.css" rel="stylesheet" />
    <script src="_content/Syncfusion.Blazor.Core/scripts/syncfusion-blazor.min.js" type="text/javascript"></script>
</head>
NOTE
Check out the Blazor Themes topic to discover various methods (Static Web Assets, CDN, and CRG) for referencing themes in a Blazor application. Also, see Adding Script Reference to learn different approaches for adding script references in a Blazor application.
Add Syncfusion® Blazor component
Add the Syncfusion® Blazor DataGrid component in the ~/Pages/Index.razor file.
@using Syncfusion.Blazor.Grids

<SfGrid DataSource="@Orders" />

@code{
    public List<Order> Orders { get; set; }

    protected override void OnInitialized()
    {
        Orders = Enumerable.Range(1, 10).Select(x => new Order()
        {
            OrderID = 1000 + x,
            CustomerID = (new string[] { "ALFKI", "ANANTR", "ANTON", "BLONP", "BOLID" })[new Random().Next(5)],
            Freight = 2 * x,
            OrderDate = DateTime.Now.AddDays(-x),
        }).ToList();
    }

    public class Order {
        public int? OrderID { get; set; }
        public string CustomerID { get; set; }
        public DateTime? OrderDate { get; set; }
        public double? Freight { get; set; }
    }
}- Press Ctrl+F5 (Windows) or ⌘+F5 (macOS) to launch the application. This renders the Syncfusion® Blazor DataGrid component in the default web browser.
