How can I help you?
Getting Started with Blazor In-place Editor Component in Web App
29 Jan 202624 minutes to read
This section briefly explains about how to include Blazor In-place Editor component in your Blazor Web App using Visual Studio, Visual Studio Code, and the .NET CLI.
Prerequisites
Create a new Blazor Web App in Visual Studio
Create a Blazor Web App using Visual Studio 2022 via Microsoft Templates or the Syncfusion® Blazor Extension. For detailed instructions, refer to this Blazor Web App Getting Started documentation.
Configure the appropriate Interactive render mode and Interactivity location while creating a Blazor Web App.

Install Syncfusion® Blazor InPlaceEditor and Themes NuGet in the Blazor Web App
To add the Blazor In-place Editor component in the app, open the NuGet package manager in Visual Studio (Tools → NuGet Package Manager → Manage NuGet Packages for Solution), then search and install Syncfusion.Blazor.InPlaceEditor and Syncfusion.Blazor.Themes.
If using the WebAssembly or Auto render modes in the Blazor Web App, install Syncfusion® Blazor component NuGet packages in the client project.
Alternatively, run the following commands in the Package Manager Console to achieve the same.
Install-Package Syncfusion.Blazor.InPlaceEditor -Version 32.2.3
Install-Package Syncfusion.Blazor.Themes -Version 32.2.3
NOTE
Syncfusion® Blazor components are available in nuget.org. Refer to the NuGet packages topic for the available NuGet packages list with component details.
Prerequisites
Create a new Blazor Web App in Visual Studio Code
Create a Blazor Web App using Visual Studio Code via Microsoft Templates or the Syncfusion® Blazor Extension. For detailed instructions, refer to this Blazor Web App Getting Started documentation.
Configure the appropriate interactive render mode and interactivity location when setting up a Blazor Web App. For detailed information, refer to the interactive render mode documentation.
For example, to create a Blazor Web App with the Auto interactive render mode, use the following commands:
dotnet new blazor -o BlazorWebApp -int Auto
cd BlazorWebApp
cd BlazorWebApp.Client
Install Syncfusion® Blazor InPlaceEditor and Themes NuGet in the App
If using the WebAssembly or Auto render modes in the Blazor Web App, install Syncfusion® Blazor component NuGet packages in the client project.
- Press Ctrl+` to open the integrated terminal in Visual Studio Code.
- Ensure you’re in the project root directory where your
.csprojfile is located. - Run the following command to install a Syncfusion.Blazor.InPlaceEditor and Syncfusion.Blazor.Themes NuGet package and ensure all dependencies are installed.
dotnet add package Syncfusion.Blazor.InPlaceEditor -v 32.2.3
dotnet add package Syncfusion.Blazor.Themes -v 32.2.3
dotnet restore
NOTE
Syncfusion® Blazor components are available in nuget.org. Refer to the NuGet packages topic for the available NuGet packages list with component details.
Prerequisites
Install the latest version of .NET SDK. If you previously installed the SDK, you can determine the installed version by executing the following command in a command prompt (Windows) or terminal (macOS) or command shell (Linux).
dotnet --versionCreate a Blazor Web App using .NET CLI
Run the following command to create a new Blazor Web App in a command prompt (Windows) or terminal (macOS) or command shell (Linux). For detailed instructions, refer to this Blazor Web App Getting Started documentation.
Configure the appropriate interactive render mode and interactivity location when setting up a Blazor Web Application. For detailed information, refer to the interactive render mode documentation.
For example, to create a Blazor Web App with the Auto interactive render mode, use the following commands:
dotnet new blazor -o BlazorApp -int Auto
cd BlazorApp
cd BlazorApp.Client
This command creates a new Blazor Web App and places it in a new directory called BlazorApp inside your current location. See the Create a Blazor App and dotnet new CLI command topics for more details.
Install Syncfusion® Blazor InPlaceEditor and Themes NuGet in the App
Here’s an example of how to add Blazor In-place Editor component in the application using the following command in the command prompt (Windows) or terminal (Linux and macOS) to install a Syncfusion.Blazor.InPlaceEditor and Syncfusion.Blazor.Themes NuGet package. See Install and manage packages using the dotnet CLI topics for more details.
If using the WebAssembly or Auto render modes in the Blazor Web App, install Syncfusion® Blazor component NuGet packages in the client project.
dotnet add package Syncfusion.Blazor.InPlaceEditor --version 32.2.3
dotnet add package Syncfusion.Blazor.Themes --version 32.2.3
dotnet restore
NOTE
Syncfusion® Blazor components are available in nuget.org. Refer to the NuGet packages topic for the available NuGet packages list with component details.
Add Import Namespaces
Open the ~/_Imports.razor file from the client project and import the Syncfusion.Blazor and Syncfusion.Blazor.InPlaceEditor namespaces.
@using Syncfusion.Blazor
@using Syncfusion.Blazor.InPlaceEditor
Register Syncfusion® Blazor Service
Register the Syncfusion® Blazor Service in the ~/Program.cs file of your Blazor Web App.
If the Interactive Render Mode is set to WebAssembly or Auto, register the Syncfusion® Blazor service in the ~/Program.cs files of the main server project and associated .Client project.
...
...
using Syncfusion.Blazor;

var builder = WebApplication.CreateBuilder(args);

// Add services to the container.
builder.Services.AddRazorComponents()
    .AddInteractiveServerComponents()
    .AddInteractiveWebAssemblyComponents();
builder.Services.AddSyncfusionBlazor();

var app = builder.Build();
....
...
using Syncfusion.Blazor;
var builder = WebAssemblyHostBuilder.CreateDefault(args);
builder.Services.AddSyncfusionBlazor();
await builder.Build().RunAsync();Add stylesheet and script resources
The theme stylesheet and script can be accessed from NuGet through Static Web Assets. Include the stylesheet reference in the <head> section and the script reference at the end of the <body> in the ~/Components/App.razor file as shown below:
<head>
    ....
    <link href="_content/Syncfusion.Blazor.Themes/bootstrap5.css" rel="stylesheet" />
</head>
....
<body>
    ....
    <script src="_content/Syncfusion.Blazor.Core/scripts/syncfusion-blazor.min.js" type="text/javascript"></script>
</body>
NOTE
Check out the Blazor Themes topic to discover various methods (Static Web Assets, CDN, and CRG) for referencing themes in your Blazor application. Also, check out the Adding Script Reference topic to learn different approaches for adding script references in your Blazor application.
Add Syncfusion® Blazor In-place Editor component
Add the Syncfusion® Blazor In-place Editor component to a Razor page located under the Pages folder (e.g., Pages/Home.razor) in either the Server or Client project. If an interactivity location as Per page/component in the web app, define a render mode at top of the component, as follows:
| Interactivity location | RenderMode | Code |
|---|---|---|
| Per page/component | Auto | @rendermode InteractiveAuto |
| WebAssembly | @rendermode InteractiveWebAssembly | |
| None | — |
NOTE
If an Interactivity Location is set to
Globaland the Render Mode is set toAutoorWebAssembly, the render mode is configured in theApp.razorfile by default.
@* desired render mode define here *@
@rendermode InteractiveAuto@using Syncfusion.Blazor.Inputs
@using Syncfusion.Blazor.InPlaceEditor
<table>
<tr>
<td>
<label class="control-label" style="text-align: left;font-size: 14px;font-weight: 400">
TextBox
</label>
</td>
<td>
<SfInPlaceEditor @bind-Value="@TextValue" TValue="string">
<EditorComponent>
<SfTextBox @bind-Value="@TextValue" Placeholder="Enter employee name"></SfTextBox>
</EditorComponent>
</SfInPlaceEditor>
</td>
</tr>
</table>
@code {
public string TextValue = "Andrew";
}NOTE
Specify the editor Type when using non-default editors (for example,
DropDownList,Date, orAutoComplete). Configure two-way binding between the In-place Editor and its editor component to synchronize values.
- Press Ctrl+F5 (Windows) or ⌘+F5 (macOS) to launch the application. This will render the Syncfusion® Blazor In-place Editor component in the default web browser.

NOTE
Render Blazor In-place Editor with popup
The following code explains how to initialize a simple In-place Editor with popup in the Blazor page.
@using Syncfusion.Blazor.InPlaceEditor
@using Syncfusion.Blazor.DropDowns

<table>
    <tr>
        <td>
            <label class="control-label">
                Choose a Country:
            </label>
        </td>
        <td>
            <SfInPlaceEditor Type="Syncfusion.Blazor.InPlaceEditor.InputType.AutoComplete" @bind-Value="@AutoValue" Mode="Syncfusion.Blazor.InPlaceEditor.RenderMode.Popup" TValue="string">
                <EditorComponent>
                    <SfAutoComplete TValue="string" TItem="Countries" @bind-Value="@AutoValue" Placeholder="e.g. Australia" DataSource="@LocalData">
                        <AutoCompleteFieldSettings Value="Name"></AutoCompleteFieldSettings>
                    </SfAutoComplete>
                </EditorComponent>
            </SfInPlaceEditor>
        </td>
    </tr>
</table>

@code {
    public string AutoValue = "Australia";

    public class Countries
    {
        public string Name { get; set; }
        public string Code { get; set; }
    }

    List<Countries> LocalData = new List<Countries> {
        new Countries() { Name = "Australia", Code = "AU" },
        new Countries() { Name = "Bermuda", Code = "BM" },
        new Countries() { Name = "Canada", Code = "CA" },
        new Countries() { Name = "Cameroon", Code = "CM" },
        new Countries() { Name = "Denmark", Code = "DK" }
    };
}

Configuring DropDownList
Render the Blazor DropDownList by changing the Type property to DropDownList and configuring the DropDownList component inside the editor component.
@using Syncfusion.Blazor.DropDowns
@using Syncfusion.Blazor.InPlaceEditor

<SfInPlaceEditor @bind-Value="@DropdownValue" Type="Syncfusion.Blazor.InPlaceEditor.InputType.DropDownList" TValue="string">
    <EditorComponent>
        <SfDropDownList TValue="string" TItem="Games"  @bind-Value="@DropdownValue" Placeholder="Select a game" DataSource="@LocalData">
            <DropDownListFieldSettings Value="ID" Text="Text"></DropDownListFieldSettings>
        </SfDropDownList>
    </EditorComponent>
</SfInPlaceEditor>

@code {
    public string DropdownValue = "Game4";

    public class Games
    {
        public string ID { get; set; }
        public string Text { get; set; }
    }
    List<Games> LocalData = new List<Games> {
    new Games() { ID= "Game1", Text= "American Football" },
    new Games() { ID= "Game2", Text= "Badminton" },
    new Games() { ID= "Game3", Text= "Basketball" },
    new Games() { ID= "Game4", Text= "Cricket" },
    new Games() { ID= "Game5", Text= "Football" },
    new Games() { ID= "Game6", Text= "Golf" },
    new Games() { ID= "Game7", Text= "Hockey" },
    new Games() { ID= "Game8", Text= "Rugby"},
    new Games() { ID= "Game9", Text= "Snooker" },
    new Games() { ID= "Game10", Text= "Tennis"},
  };
}
Integrate DatePicker
Render the Blazor DatePicker by changing the Type property to Date and configuring the DatePicker component inside the editor component. Also configure its properties directly on the DatePicker component.
@using Syncfusion.Blazor.InPlaceEditor
@using Syncfusion.Blazor.Calendars

<SfInPlaceEditor Type="Syncfusion.Blazor.InPlaceEditor.InputType.Date" TValue="DateTime?" @bind-Value="@DateValue">
    <EditorComponent>
        <SfDatePicker TValue="DateTime?" @bind-Value="@DateValue" Placeholder="Choose a Date"></SfDatePicker>
    </EditorComponent>
</SfInPlaceEditor>

@code {
    public DateTime? DateValue { get; set; } = new DateTime(DateTime.Now.Year, DateTime.Now.Month, DateTime.Now.Day);

}
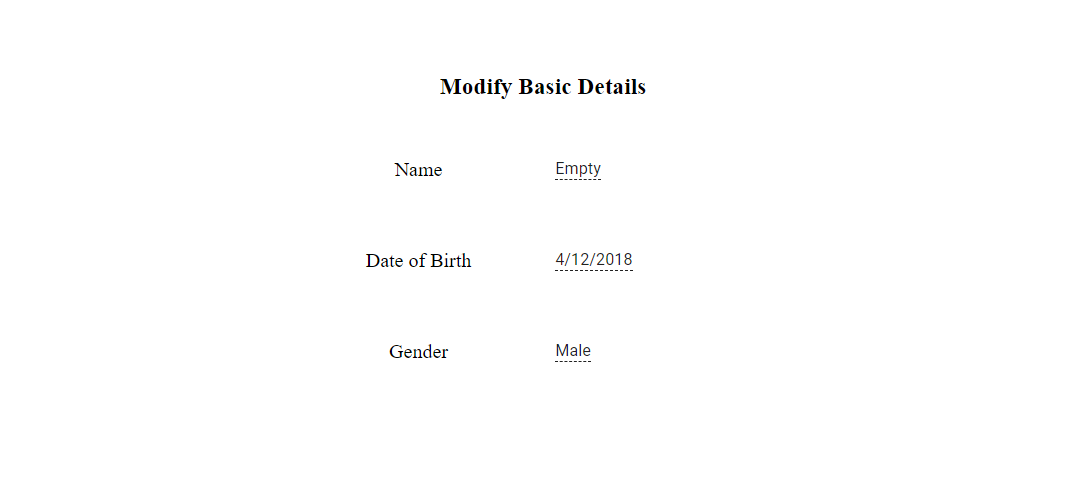
In the following code, it is configured to render the DatePicker, DropDownList and Textbox components.
@using Syncfusion.Blazor.InPlaceEditor
@using Syncfusion.Blazor.Inputs
@using Syncfusion.Blazor.Calendars
@using Syncfusion.Blazor.DropDowns

<div id="container" class="control-group">
    <h3> Modify Basic Details </h3>
    <table style="margin: 10px auto;">
        <tr>
            <td>Name</td>
            <td class='left'>
                <SfInPlaceEditor @bind-Value="@TextValue" TValue="string">
                    <EditorComponent>
                        <SfTextBox @bind-Value="@TextValue" Placeholder="Enter your name"></SfTextBox>
                    </EditorComponent>
                </SfInPlaceEditor>
            </td>
        </tr>
        <tr>
            <td>Date of Birth</td>
            <td class='left'>
                <SfInPlaceEditor Type="Syncfusion.Blazor.InPlaceEditor.InputType.Date" TValue="DateTime?" @bind-Value="@DateValue">
                    <EditorComponent>
                        <SfDatePicker TValue="DateTime?" @bind-Value="@DateValue" Placeholder="Select date"></SfDatePicker>
                    </EditorComponent>
                </SfInPlaceEditor>
            </td>
        </tr>
        <tr>
            <td>Gender</td>
            <td class='left'>
                <SfInPlaceEditor @bind-Value="@DropdownValue" Type="Syncfusion.Blazor.InPlaceEditor.InputType.DropDownList"  TValue="string">
                    <EditorComponent>
                        <SfDropDownList Width="90%" TItem="Gender" TValue="string" DataSource="@dropdownData" @bind-Value="@DropdownValue">
                            <DropDownListFieldSettings Text="text" Value="text"></DropDownListFieldSettings>
                        </SfDropDownList>
                    </EditorComponent>
                </SfInPlaceEditor>
            </td>
        </tr>
    </table>
</div>

<style>
    #container {
        text-align: center;
        margin-top: 50px;
    }

        #container table {
            width: 400px;
            margin: auto;
        }

            #container table td {
                height: 70px;
                width: 150px;
            }

            #container table .left {
                text-align: left;
            }
</style>

@code {
    public DateTime? DateValue { get; set; } = new DateTime(DateTime.Now.Year, DateTime.Now.Month, DateTime.Now.Day);
    public string TextValue = "Andrew";
    public string DropdownValue = "Male";

    public class Gender
    {
        public string value { get; set; }
        public string text { get; set; }
    }
    List<Gender> dropdownData = new List<Gender>()
    {
        new Gender(){ text= "Male" },
        new Gender(){ text= "Female" }
    };
}
Submitting data to the server (save)
Submit the editor value to the server by configuring the SaveUrl, Adaptor, and PrimaryKey properties.
| Property | Usage |
|---|---|
SaveUrl |
Gets the URL for the server submit action. |
Adaptor |
Specifies the adaptor type used by DataManager to communicate with the data source. |
PrimaryKey |
Defines the unique primary key of the editable field used for saving data in the database. |
The
PrimaryKeyproperty is mandatory. If it is not set, edited data are not sent to the server.
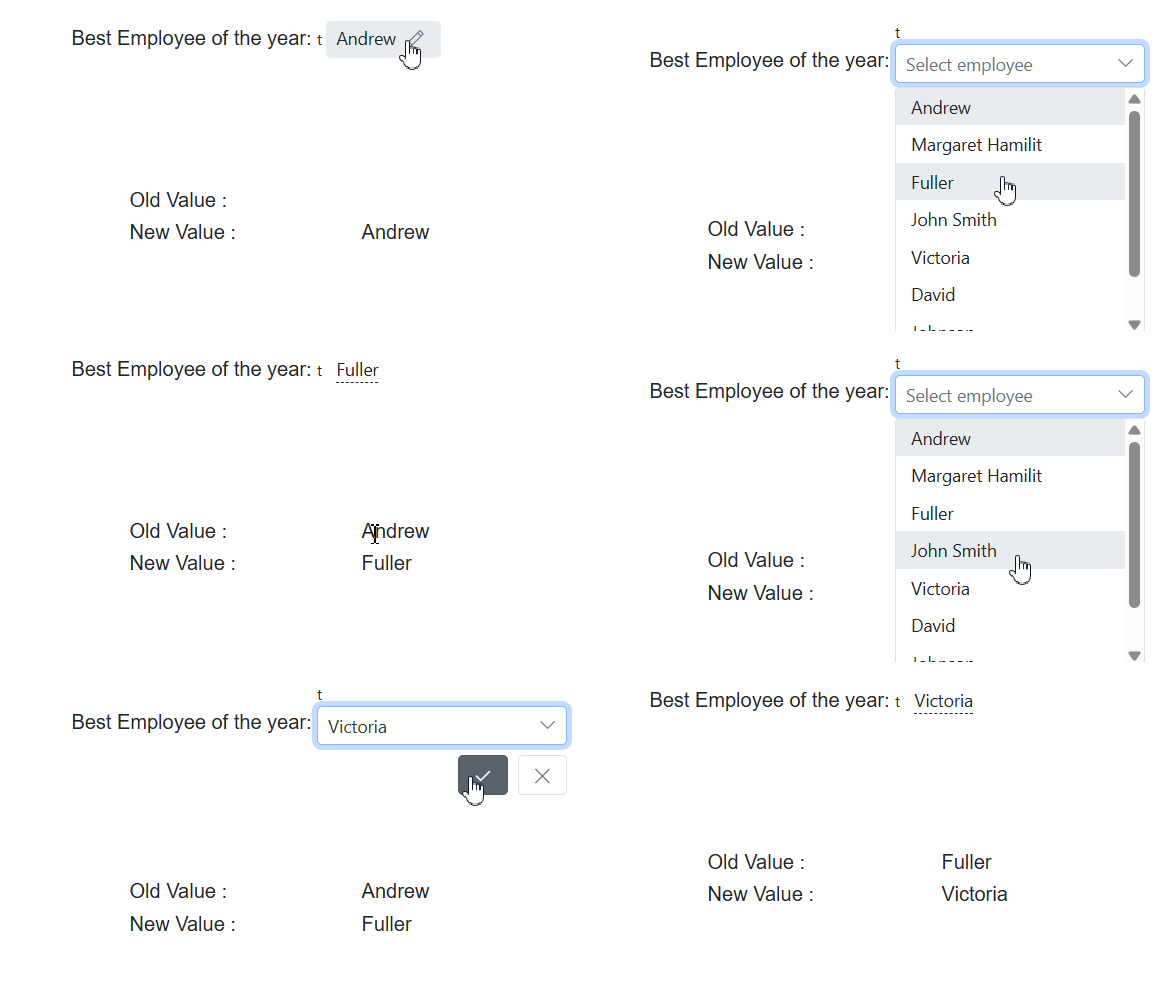
Refresh Blazor In-place Editor with modified value
After submit, the edited data is sent to the server, and the updated value is reflected in the In-place Editor.
@using Syncfusion.Blazor.DropDowns
@using Syncfusion.Blazor.InPlaceEditor

<div id="container">
    <div class="control-group">
        Best Employee of the year:

        <SfInPlaceEditor @ref="InPlaceObj" PrimaryKey="Employee" Name="Employee" Adaptor="Adaptors.UrlAdaptor" SaveUrl="https://ej2services.syncfusion.com/production/web-services/api/Editor/UpdateData" Type="Syncfusion.Blazor.InPlaceEditor.InputType.DropDownList" @bind-Value="@DropdownValue" TValue="string">
            <EditorComponent>
                <SfDropDownList TValue="string" TItem="Employees" Placeholder="Select employee" PopupHeight="200px" DataSource="@LocalData">
                    <DropDownListFieldSettings Value="ID" Text="Text"></DropDownListFieldSettings>
                </SfDropDownList>
            </EditorComponent>
            <InPlaceEditorEvents Created="@OnCreate" OnActionSuccess="@OnSuccess" TValue="string"></InPlaceEditorEvents>
        </SfInPlaceEditor>

    </div>
    <table style="margin:60px auto;width:25%">
        <tr>
            <td style="text-align: left">
                Old Value :
            </td>
            <td id="oldValue" style="text-align: left">
                @PreviousValue
            </td>
        </tr>
        <tr>
            <td style="text-align: left">
                New Value :
            </td>
            <td id="newValue" style="text-align: left">
                @CurrentValue
            </td>
        </tr>
    </table>
</div>

<style>
    .e-inplaceeditor {
        min-width: 200px;
        text-align: left;
    }

    #container .control-group {
        text-align: center;
        margin: 100px auto;
    }
</style>

@code {
    SfInPlaceEditor<string> InPlaceObj;
    public string PreviousValue { get; set; }
    public string DropdownValue = "Andrew";
    public string CurrentValue { get; set; }

    public class Employees
    {
        public string ID { get; set; }
        public string Text { get; set; }
    }
    List<Employees> LocalData = new List<Employees> {
    new Employees() { ID= "Andrew", Text= "Andrew" },
    new Employees() { ID= "Margaret Hamilit", Text= "Margaret Hamilit" },
    new Employees() { ID= "Fuller", Text= "Fuller" },
    new Employees() { ID= "John Smith", Text= "John Smith" },
    new Employees() { ID= "Victoria", Text= "Victoria" },
    new Employees() { ID= "David", Text= "David" },
    new Employees() { ID= "Johnson", Text= "Johnson" },
    new Employees() { ID= "Rosy", Text= "Rosy"}
  };

    public void OnCreate(Object args)
    {
        this.CurrentValue = this.DropdownValue;
    }

    public void OnSuccess(ActionEventArgs<string> args)
    {
        this.PreviousValue = this.CurrentValue;
        this.CurrentValue = this.DropdownValue;
    }
}