Connecting ASP.NET Core Minimal API to Scheduler Component
8 Jul 202623 minutes to read
The Blazor Scheduler component supports binding data from ASP.NET Core Minimal API endpoints hosted within the same application. This approach enables seamless integration of appointment data with full CRUD (Create, Read, Update, Delete) functionality without requiring a separate backend project.
This documentation explains how to create a Blazor Server application that hosts Minimal API endpoints in the same project, enabling the Scheduler component to perform CRUD operations on in-memory appointment data through RESTful HTTP requests.
Prerequisites
Install the following software and packages before starting the process:
| Software/Package | Version | Purpose |
|---|---|---|
| Visual Studio 2026 | 18.0 or later | Development IDE with Blazor workload |
| .NET SDK | net10.0 or compatible | Runtime and build tools |
| Syncfusion.Blazor.Schedule | Latest Version | Scheduler component |
| Syncfusion.Blazor.Themes | Latest Version | Styling for Scheduler |
Binding data from Minimal API endpoints
This section explains how to create an ASP.NET Core Minimal API backend within a Blazor Server application and bind appointment data to the Blazor Scheduler component. The following steps demonstrate the actual project creation flow.
Step 1: Create a Blazor Web App
Create a Blazor Web App using Visual Studio 2026 or .NET CLI.
Using Visual Studio 2026:
- Open Visual Studio 2026
- Click Create a new project
- Search for Blazor Web App template
- Configure project name as BlazorSchedulerApp
- Select .NET 10.0 as the target framework
- Set Interactive render mode to Server
- Set Interactivity location to Per page/component
- Click Create
Using .NET CLI:
dotnet new blazor -n BlazorSchedulerApp --interactivity Server
cd BlazorSchedulerApp
Configure the Interactive render mode to InteractiveServer during project creation as the Scheduler requires interactivity for CRUD operations.
Step 2: Install Required NuGet Packages
Install the Blazor packages using the .NET CLI:
Using .NET CLI:
dotnet add package Syncfusion.Blazor.Schedule
dotnet add package Syncfusion.Blazor.Themes
The installed packages are reflected in the BlazorSchedulerApp.csproj file:
<ItemGroup>
    <PackageReference Include="Syncfusion.Blazor.Schedule" Version="*" />
    <PackageReference Include="Syncfusion.Blazor.Themes" Version="*" />
</ItemGroup>
After installing packages, build the project to ensure all dependencies are restored correctly:
dotnet build
Step 3: Add Import Namespaces
Open the Components/_Imports.razor file and import the Syncfusion.Blazor and Syncfusion.Blazor.Schedule namespaces.
@using Syncfusion.Blazor
@using Syncfusion.Blazor.Schedule
Step 4: Add stylesheet and script resources
The theme stylesheet and script can be accessed from NuGet through Static Web Assets. Include the stylesheet reference in the <head> section and the script reference at the end of the <body> in the /Components/App.razor file as shown below:
<head>
    ....
    <link href="_content/Syncfusion.Blazor.Themes/tailwind3.css" rel="stylesheet" />
</head>

<body>
    ....
    <script src="_content/Syncfusion.Blazor.Core/scripts/syncfusion-blazor.min.js" type="text/javascript"></script>
</body>
Step 5: Create the Appointment Model
Create a model class to represent scheduler appointments with all required properties.
[Models/AppointmentData.cs]
namespace BlazorSchedulerApp.Models;

public class AppointmentData
{
    public int Id { get; set; }
    public string Subject { get; set; }
    public string Location { get; set; } = string.Empty;
    public DateTime StartTime { get; set; }
    public DateTime EndTime { get; set; }
    public string Description { get; set; } = string.Empty;
    public bool IsAllDay { get; set; }
    public string? RecurrenceRule { get; set; }
    public int? RecurrenceID { get; set; }
    public string? RecurrenceException { get; set; }
}
Open the Components/_Imports.razor file and import the BlazorSchedulerApp.Models namespaces.
@using BlazorSchedulerApp.ModelsKey Properties Explanation:
- Id: Primary key for the appointment (auto-generated by API)
- Subject: Title of the appointment
- StartTime/EndTime: Date and time range for the appointment
- Location: Where the appointment takes place
- IsAllDay: Flag for all-day events
- RecurrenceRule: Rule for recurring appointments (e.g., daily, weekly)
- RecurrenceID: Links recurring appointment instances
- RecurrenceException: Handles exceptions in recurring series
Note: All properties use default values to avoid null reference issues. The API will handle generating unique IDs for new appointments.
Step 6: Create the Appointment Service
Implement a service layer to handle HTTP communication with the Minimal API endpoints.
[Services/AppointmentService]
using BlazorSchedulerApp.Models;
using System.Net.Http.Json;

namespace BlazorSchedulerApp.Services;

public class AppointmentService
{
    private readonly HttpClient _httpClient;

    public AppointmentService(HttpClient httpClient)
    {
        _httpClient = httpClient;
    }

    /// <summary>
    /// Retrieves all appointments from the API
    /// </summary>
    public async Task<List<AppointmentData>> GetAppointmentsAsync()
    {
        try
        {
            var result = await _httpClient.GetFromJsonAsync<List<AppointmentData>>("/api/appointments");
            return result ?? new List<AppointmentData>();
        }
        catch (Exception ex)
        {
            Console.WriteLine($"Error fetching appointments: {ex.Message}");
            return new List<AppointmentData>();
        }
    }

    /// <summary>
    /// Retrieves a single appointment by ID
    /// </summary>
    public async Task<AppointmentData?> GetAppointmentByIdAsync(int id)
    {
        try
        {
            return await _httpClient.GetFromJsonAsync<AppointmentData>($"/api/appointments/{id}");
        }
        catch (Exception ex)
        {
            Console.WriteLine($"Error fetching appointment: {ex.Message}");
            return null;
        }
    }

    /// <summary>
    /// Creates a new appointment via the API
    /// </summary>
    public async Task<AppointmentData?> CreateAppointmentAsync(AppointmentData appointment)
    {
        try
        {
            var response = await _httpClient.PostAsJsonAsync("/api/appointments", appointment);
            if (response.IsSuccessStatusCode)
            {
                return await response.Content.ReadFromJsonAsync<AppointmentData>();
            }
            return null;
        }
        catch (Exception ex)
        {
            Console.WriteLine($"Error creating appointment: {ex.Message}");
            return null;
        }
    }

    /// <summary>
    /// Updates an existing appointment via the API
    /// </summary>
    public async Task<bool> UpdateAppointmentAsync(int id, AppointmentData appointment)
    {
        try
        {
            var response = await _httpClient.PutAsJsonAsync($"/api/appointments/{id}", appointment);
            return response.IsSuccessStatusCode;
        }
        catch (Exception ex)
        {
            Console.WriteLine($"Error updating appointment: {ex.Message}");
            return false;
        }
    }

    /// <summary>
    /// Deletes an appointment via the API
    /// </summary>
    public async Task<bool> DeleteAppointmentAsync(int id)
    {
        try
        {
            var response = await _httpClient.DeleteAsync($"/api/appointments/{id}");
            return response.IsSuccessStatusCode;
        }
        catch (Exception ex)
        {
            Console.WriteLine($"Error deleting appointment: {ex.Message}");
            return false;
        }
    }
}
Open the Components/_Imports.razor file and import the BlazorSchedulerApp.Services namespaces.
@using BlazorSchedulerApp.ServicesStep 7: Configure Application Services
The Program.cs file must be updated to register required services, including Blazor components, HttpClient, CORS, and Razor components.This section configures the foundational services used across the Scheduler application.
[Program.cs]
using BlazorSchedulerApp.Components;
using BlazorSchedulerApp.Models;
using BlazorSchedulerApp.Services;
using Microsoft.AspNetCore.Components;
using Syncfusion.Blazor;

var builder = WebApplication.CreateBuilder(args);

// Add services to the container.
builder.Services.AddRazorComponents()
    .AddInteractiveServerComponents();

// Add HttpClient for AppointmentService
builder.Services.AddScoped(sp =>
{
    var navigationManager = sp.GetRequiredService<NavigationManager>();
    return new HttpClient
    {
        BaseAddress = new Uri(navigationManager.BaseUri)
    };
});
builder.Services.AddScoped<AppointmentService>();

// Add Blazor service
builder.Services.AddSyncfusionBlazor();

// Configure CORS
builder.Services.AddCors(options =>
{
    options.AddDefaultPolicy(policy =>
    {
        policy.AllowAnyOrigin()
              .AllowAnyMethod()
              .AllowAnyHeader();
    });
});

var app = builder.Build();

// In-memory data storage for appointments
var appointments = new List<AppointmentData>
{
    new AppointmentData
    {
        Id = 1,
        Subject = "Team Meeting",
        Location = "Conference Room A",
        StartTime = DateTime.Today.AddHours(10),
        EndTime = DateTime.Today.AddHours(11),
        Description = "Weekly team sync-up meeting"
    },
    new AppointmentData
    {
        Id = 2,
        Subject = "Client Presentation",
        Location = "Boardroom",
        StartTime = DateTime.Today.AddDays(1).AddHours(14),
        EndTime = DateTime.Today.AddDays(1).AddHours(16),
        Description = "Quarterly review with client"
    },
    new AppointmentData
    {
        Id = 3,
        Subject = "Project Planning",
        Location = "Room 301",
        StartTime = DateTime.Today.AddDays(2).AddHours(9),
        EndTime = DateTime.Today.AddDays(2).AddHours(10).AddMinutes(30),
        Description = "Planning session for new project"
    }
};

// Configure the HTTP request pipeline.
if (!app.Environment.IsDevelopment())
{
    app.UseExceptionHandler("/Error", createScopeForErrors: true);
    app.UseHsts();
}

app.UseHttpsRedirection();
app.UseAntiforgery();
app.UseCors();
Step 8: Create Minimal API Endpoints
Update Program.cs to define Minimal API endpoints for CRUD operations.
[Program.cs]
// GET: Get all appointments
app.MapGet("/api/appointments", () =>
{
    return Results.Ok(appointments);
})
.WithName("GetAppointments");

// GET: Get appointment by ID
app.MapGet("/api/appointments/{id}", (int id) =>
{
    var appointment = appointments.FirstOrDefault(a => a.Id == id);
    return appointment is not null ? Results.Ok(appointment) : Results.NotFound();
})
.WithName("GetAppointmentById");

// POST: Create new appointment
app.MapPost("/api/appointments", (AppointmentData appointment) =>
{
    appointment.Id = appointments.Any() ? appointments.Max(a => a.Id) + 1 : 1;
    appointments.Add(appointment);
    return Results.Created($"/api/appointments/{appointment.Id}", appointment);
})
.WithName("CreateAppointment");

// PUT: Update appointment
app.MapPut("/api/appointments/{id}", (int id, AppointmentData updatedAppointment) =>
{
    var appointment = appointments.FirstOrDefault(a => a.Id == id);
    if (appointment is null)
        return Results.NotFound();

    appointment.Subject = updatedAppointment.Subject;
    appointment.Location = updatedAppointment.Location;
    appointment.StartTime = updatedAppointment.StartTime;
    appointment.EndTime = updatedAppointment.EndTime;
    appointment.Description = updatedAppointment.Description;
    appointment.IsAllDay = updatedAppointment.IsAllDay;
    appointment.RecurrenceRule = updatedAppointment.RecurrenceRule;
    appointment.RecurrenceID = updatedAppointment.RecurrenceID;
    appointment.RecurrenceException = updatedAppointment.RecurrenceException;

    return Results.Ok(appointment);
})
.WithName("UpdateAppointment");

// DELETE: Delete appointment
app.MapDelete("/api/appointments/{id}", (int id) =>
{
    var appointment = appointments.FirstOrDefault(a => a.Id == id);
    if (appointment is null)
        return Results.NotFound();

    appointments.Remove(appointment);
    return Results.NoContent();
})
.WithName("DeleteAppointment");

// ============= End of Minimal API Endpoints =============

app.MapStaticAssets();
app.MapRazorComponents<App>()
    .AddInteractiveServerRenderMode();

app.Run();
Minimal API Benefits:
- No controllers or routing configuration required
- Lightweight and performant
- Easy to understand and maintain
- Perfect for small APIs within the same application
Step 9: Create the Scheduler Component
Replace the contents of Home.razor with the following Blazor Scheduler component that provides full CRUD functionality.
[Home.razor]
@page "/"
@rendermode InteractiveServer
@inject AppointmentService AppointmentService

<PageTitle>Appointment Scheduler</PageTitle>

<div class="scheduler-container">

    <SfSchedule TValue="AppointmentData"
                @ref="ScheduleRef"
                Height="650px"
                @bind-SelectedDate="@CurrentDate"
                @bind-CurrentView="@CurrentView"
                ShowQuickInfo="true">

        <ScheduleViews>
            <ScheduleView Option="View.Day"></ScheduleView>
            <ScheduleView Option="View.Week"></ScheduleView>
            <ScheduleView Option="View.WorkWeek"></ScheduleView>
            <ScheduleView Option="View.Month"></ScheduleView>
            <ScheduleView Option="View.Agenda"></ScheduleView>
        </ScheduleViews>

        <ScheduleEventSettings TValue="AppointmentData" DataSource="@Appointments">
        </ScheduleEventSettings>

        <ScheduleEvents TValue="AppointmentData" OnActionBegin="OnActionBegin">
        </ScheduleEvents>
    </SfSchedule>
</div>

@code {
    private SfSchedule<AppointmentData>? ScheduleRef;
    private DateTime CurrentDate = DateTime.Today;
    private View CurrentView = View.Week;
    private List<AppointmentData> Appointments = new();

    protected override async Task OnInitializedAsync()
    {
        await LoadAppointments();
    }

    private async Task LoadAppointments()
    {
        Appointments = await AppointmentService.GetAppointmentsAsync();
        StateHasChanged();
    }

    private async Task OnActionBegin(ActionEventArgs<AppointmentData> args)
    {
        try
        {
            if (args.ActionType == ActionType.EventCreate && args.AddedRecords != null && args.AddedRecords.Any())
            {
                foreach (var appointment in args.AddedRecords)
                {
                    var created = await AppointmentService.CreateAppointmentAsync(appointment);
                    if (created != null)
                    {
                        // Update the appointment with the server-generated ID
                        appointment.Id = created.Id;
                    }
                }
            }
            else if (args.ActionType == ActionType.EventChange && args.ChangedRecords != null && args.ChangedRecords.Any())
            {
                foreach (var appointment in args.ChangedRecords)
                {
                    await AppointmentService.UpdateAppointmentAsync(appointment.Id, appointment);
                }
            }
            else if (args.ActionType == ActionType.EventRemove && args.DeletedRecords != null && args.DeletedRecords.Any())
            {
                foreach (var appointment in args.DeletedRecords)
                {
                    await AppointmentService.DeleteAppointmentAsync(appointment.Id);
                }
            }
        }
        catch (Exception ex)
        {
            Console.WriteLine($"Error in OnActionBegin: {ex.Message}");
            args.Cancel = true;
        }
    }

}
Key Implementation Details:
- @rendermode InteractiveServer: Enables server-side interactivity required for CRUD operations
- OnActionBegin: Handles all CRUD operations by calling the AppointmentService
- OnPopupOpen: Sets default values when opening the appointment editor
- Default Title Logic: Automatically sets “Add Title” for appointments with empty subjects
- Error Handling: Cancels the operation if an error occurs to prevent data inconsistency
Why Use OnActionBegin?
The OnActionBegin event fires before any Scheduler action completes, allowing you to:
- Intercept the operation and call your own API
- Add custom validation and business logic
- Handle errors gracefully
- Control exactly when and how data is saved
Step 10: Run the Application
Step 1: Build the Application
Ensure there are no compilation errors:
dotnet buildStep 2: Run the Application
Start the application:
dotnet runOr use watch mode for automatic reload during development:
dotnet watchStep 3: Access the Scheduler
The application will start at http://localhost:5175 (or the port configured in your launchSettings.json).
Open your browser and navigate to:
http://localhost:5175
Output Preview
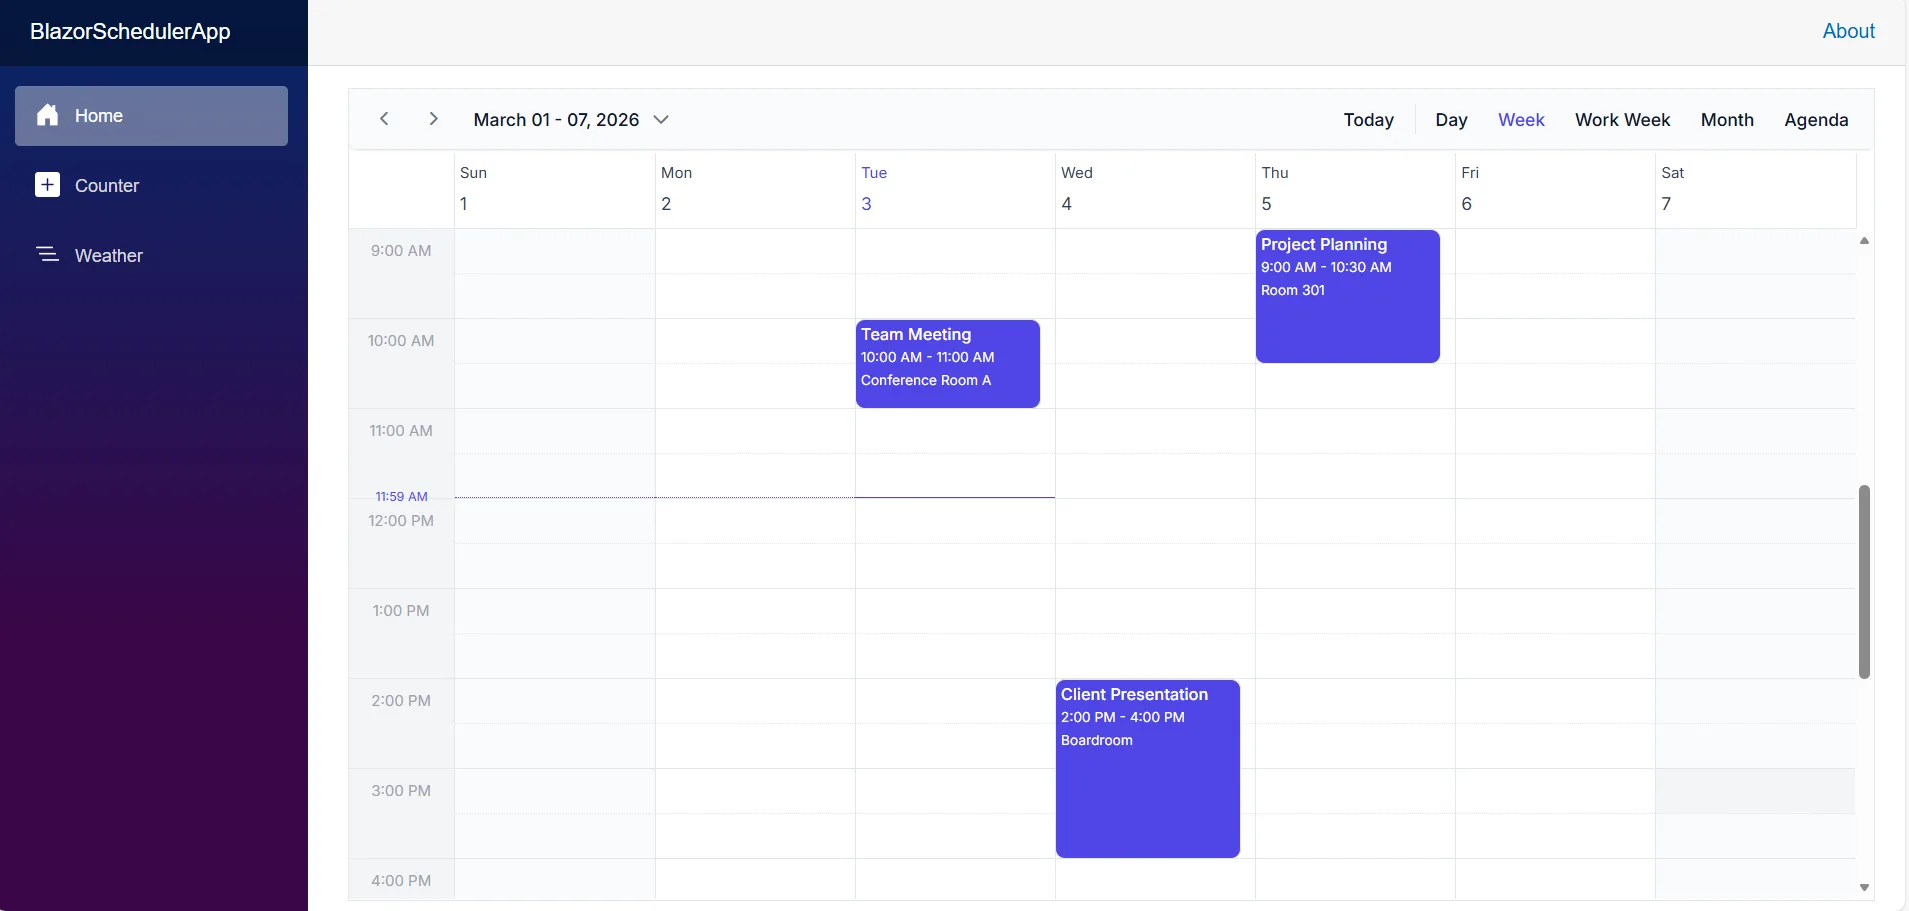
Image illustrating the Blazor Scheduler with Minimal API
Complete Sample Repository
A complete, working sample implementation is available in the GitHub repository.
Troubleshooting
JavaScript Errors: ‘sfBlazor’ is undefined
Issue: Errors like Could not find 'sfBlazor.Toolbar.initialize'
Fix: Add script in App.razor before </body>:
<script src="_content/Syncfusion.Blazor.Core/scripts/syncfusion-blazor.min.js" type="text/javascript"></script>API Returns 404 Not Found
Issue: API calls fail with 404 errors
Fix:
- Ensure endpoints are defined before
app.MapRazorComponents<App>()inProgram.cs - Verify routes match (e.g.,
/api/appointments) - Check browser console for actual URL
Service Injection Error
Issue: Cannot provide a value for property 'AppointmentService'
Fix:
- Register service in
Program.cs:builder.Services.AddScoped<AppointmentService>(); - Add
@inject AppointmentService AppointmentServiceinScheduler.razor - Rebuild project
Theme Not Applying
Issue: Scheduler looks unstyled
Fix:
- Verify theme CSS in
App.razor:_content/Syncfusion.Blazor.Themes/tailwind3.css - Clear browser cache
- Check Syncfusion.Blazor.Themes package is installed
To learn more about the functionality of the Schedule component, refer to the documentation.