Getting Started with Smart Rich Text Editor in Blazor Web App
29 Jun 202613 minutes to read
This section explains how to add the Blazor Smart Rich Text Editor component in your Blazor Web App using Visual Studio, Visual Studio Code, and the .NET CLI.
Prerequisites
Create a new Blazor Web App in Visual Studio
Create a Blazor Web App using Visual Studio via Microsoft Templates or the Syncfusion® Blazor Extension. For detailed instructions, refer to the Blazor Web App Getting Started documentation.
Prerequisites
Create a new Blazor Web App in Visual Studio Code
Create a Blazor Web App using Visual Studio Code via Microsoft Templates or the Blazor Extension. For detailed instructions, refer to the Blazor Web App Getting Started documentation.
For example, in a Blazor Web App with the Auto interactive render mode, use the following commands in the integrated terminal (Ctrl+`):
dotnet new blazor -o BlazorWebApp -int Auto
cd BlazorWebApp
cd BlazorWebApp.Client
Prerequisites
Install the latest version of .NET SDK. If you previously installed the SDK, determine the installed version by executing the following command in a command prompt (Windows) or terminal (macOS) or command shell (Linux).
dotnet --versionCreate a Blazor Web App using .NET CLI
Run the following command to create a new Blazor Web App in a command prompt (Windows) or terminal (macOS) or command shell (Linux). For detailed instructions, refer to the Blazor Web App Getting Started documentation.
For example, in a Blazor Web App with the Auto interactive render mode, use the following commands:
dotnet new blazor -o BlazorWebApp -int Auto
cd BlazorWebApp
cd BlazorWebApp.Client
NOTE
Configure the appropriate Interactive render mode and Interactivity location while creating a Blazor Web App. For detailed information, refer to the interactive render mode documentation.
Install Blazor Smart Rich Text Editor and Themes NuGet
Install the following NuGet packages in your project:
You can install these packages using different methods as shown below:
-
In Visual Studio Navigate to:
Tools → NuGet Package Manager → Manage NuGet Packages for Solution
- Search for the required packages.
- Select the package and click Install.
-
In Visual Studio Navigate to:
Tools → NuGet Package Manager → Package Manager Console
-
Run the following commands:
Install-Package Syncfusion.Blazor.SmartRichTextEditor -Version 34.1.29
Install-Package Syncfusion.Blazor.Themes -Version 34.1.29- Open your project.
- Open the terminal:
- In Visual Studio Code: use the integrated terminal (Ctrl + `)
- Or use any system terminal for CLI
- Run the following commands:
dotnet add package Syncfusion.Blazor.SmartRichTextEditor --version 34.1.29
dotnet add package Syncfusion.Blazor.Themes --version 34.1.29
NOTE
Blazor components are available in nuget.org. Refer to NuGet packages topic for available NuGet packages list with component details.
Register Blazor Service
Open ~/_Imports.razor file in the Components folder and import the Syncfusion.Blazor and Syncfusion.Blazor.SmartRichTextEditor namespace.
@using Syncfusion.Blazor
@using Syncfusion.Blazor.SmartRichTextEditor
Now, register the Blazor Service in the ~/Program.cs file of your Blazor Web App.
using Microsoft.AspNetCore.Components;
using Microsoft.AspNetCore.Components.Web;
using Syncfusion.Blazor;

var builder = WebApplication.CreateBuilder(args);

// Add services to the container.
builder.Services.AddRazorPages();
builder.Services.AddServerSideBlazor();
builder.Services.AddSyncfusionBlazor();

var app = builder.Build();
....
Configure AI Service
Follow the instructions below to register an AI model in your application.
OpenAI
Install the following NuGet packages to your project:
You can install these packages using different methods as shown below:
-
In Visual Studio Navigate to:
Tools → NuGet Package Manager → Manage NuGet Packages for Solution
- Search for the required packages.
- Select the package and click Install.
-
In Visual Studio Navigate to:
Tools → NuGet Package Manager → Package Manager Console
-
Run the following commands:
Install-Package Microsoft.Extensions.AI
Install-Package Microsoft.Extensions.AI.OpenAI- Open your project.
- Open the terminal:
- In Visual Studio Code: use the integrated terminal (Ctrl + `)
- Or use any system terminal for CLI
- Run the following commands:
dotnet add package Microsoft.Extensions.AI
dotnet add package Microsoft.Extensions.AI.OpenAI-
For OpenAI, obtain an API key from OpenAI and specify the desired model (e.g.,
gpt-3.5-turbo,gpt-4). Store the API key securely in a configuration file. -
To configure the AI service, add the following settings to the ~/Program.cs file in your Blazor Web app.
using Syncfusion.Blazor;
using Syncfusion.Blazor.AI;
using Microsoft.Extensions.AI;
using OpenAI;

var builder = WebApplication.CreateBuilder(args);

// Add services to the container.
builder.Services.AddRazorComponents()
    .AddInteractiveServerComponents();

builder.Services.AddSyncfusionBlazor();

string openAIApiKey = "API-KEY";
string openAIModel = "OPENAI_MODEL";
OpenAIClient openAIClient = new OpenAIClient(openAIApiKey);
IChatClient openAIChatClient = openAIClient.GetChatClient(openAIModel).AsIChatClient();
builder.Services.AddChatClient(openAIChatClient);

builder.Services.AddSingleton<IChatInferenceService, SyncfusionAIService>();

var app = builder.Build();

// ... rest of configuration
Azure OpenAI
Install the following NuGet packages to your project:
You can install these packages using different methods as shown below:
-
In Visual Studio Navigate to:
Tools → NuGet Package Manager → Manage NuGet Packages for Solution
- Search for the required packages.
- Select the package and click Install.
-
In Visual Studio Navigate to:
Tools → NuGet Package Manager → Package Manager Console
-
Run the following commands:
Install-Package Microsoft.Extensions.AI
Install-Package Microsoft.Extensions.AI.OpenAI
Install-Package Azure.AI.OpenAI- Open your project.
- Open the terminal:
- In Visual Studio Code: use the integrated terminal (Ctrl + `)
- Or use any system terminal for CLI
- Run the following commands:
dotnet add package Microsoft.Extensions.AI
dotnet add package Microsoft.Extensions.AI.OpenAI
dotnet add package Azure.AI.OpenAI-
For Azure OpenAI, first deploy an Azure OpenAI Service resource and model, then values for
azureOpenAIKey,azureOpenAIEndpointandazureOpenAIModelwill all be provided to you. -
To configure the AI service, add the following settings to the ~/Program.cs file in your Blazor Web app.
using Syncfusion.Blazor;
using Syncfusion.Blazor.AI;
using Azure.AI.OpenAI;
using Microsoft.Extensions.AI;
using System.ClientModel;

var builder = WebApplication.CreateBuilder(args);

// Add services to the container.
builder.Services.AddRazorComponents()
    .AddInteractiveServerComponents();

builder.Services.AddSyncfusionBlazor();

string azureOpenAIKey = "AZURE_OPENAI_KEY";
string azureOpenAIEndpoint = "AZURE_OPENAI_ENDPOINT";
string azureOpenAIModel = "AZURE_OPENAI_MODEL";
AzureOpenAIClient azureOpenAIClient = new AzureOpenAIClient(
     new Uri(azureOpenAIEndpoint),
     new ApiKeyCredential(azureOpenAIKey)
);
IChatClient azureOpenAIChatClient = azureOpenAIClient.GetChatClient(azureOpenAIModel).AsIChatClient();
builder.Services.AddChatClient(azureOpenAIChatClient);

builder.Services.AddSingleton<IChatInferenceService, SyncfusionAIService>();

var app = builder.Build();

// ... rest of configuration
NOTE
To configure other AI services, refer to the following sections Ollama AI Service and Custom AI Service.
Add stylesheet and script resources
The theme stylesheet and script can be accessed from NuGet through Static Web Assets. Reference the stylesheet and script in the <head> of the main page:
- For Blazor Web App, include it in the ~/Components/App.razor file.
<head>
     ....
    <link href="_content/Syncfusion.Blazor.Themes/tailwind.css" rel="stylesheet" />
</head>

<body>
     ....
    <script src="_content/Syncfusion.Blazor.Core/scripts/syncfusion-blazor.min.js" type="text/javascript"></script>
</body>
NOTE
Check out the Blazor Themes topic to discover various methods (Static Web Assets, CDN, and CRG) for referencing themes in your Blazor application. Also, check out the Adding Script Reference topic to learn different approaches for adding script references in your Blazor application.
Add Blazor Smart Rich Text Editor component
Add the Blazor Smart Rich Text Editor component in the ~/Components/Pages/Home.razor or any other page file.
NOTE
Notice the
@rendermode InteractiveServerdirective on the page. This is required for Blazor Web App to enable server-side interactivity.
@rendermode InteractiveServer
@using Syncfusion.Blazor.SmartRichTextEditor
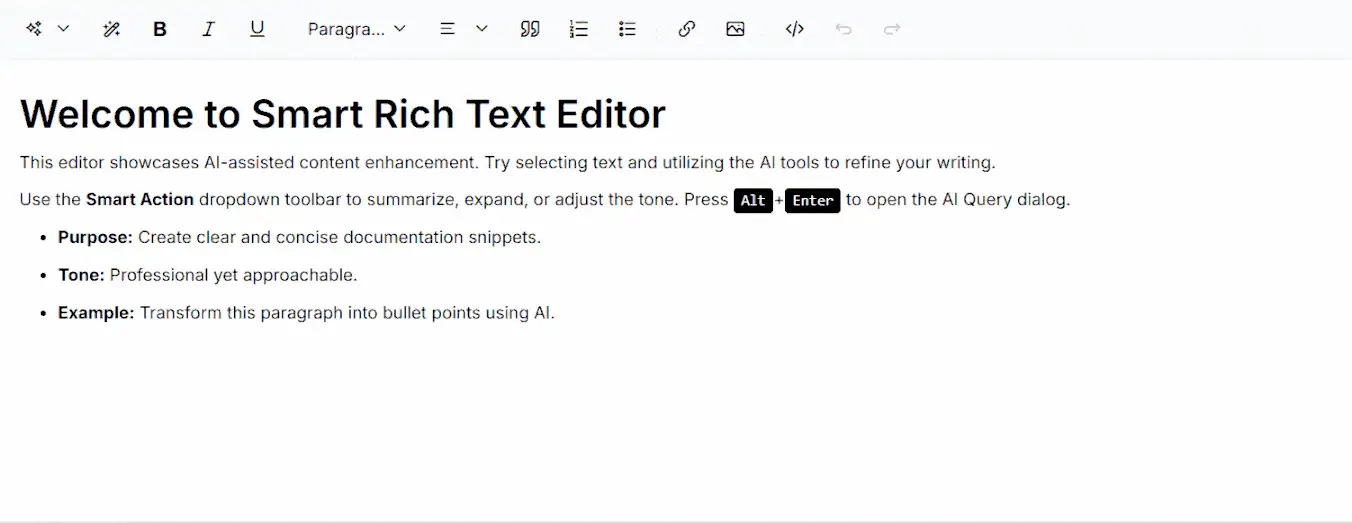
<SfSmartRichTextEditor>
<h2>Welcome to Smart Rich Text Editor</h2>
<p>This editor showcases AI-assisted content enhancement. Try selecting text and utilizing the AI tools to refine your writing.</p>
<p>Use the <strong>Smart Action</strong> dropdown toolbar to summarize, expand, or adjust the tone. Press <kbd>Alt</kbd>+<kbd>Enter</kbd> to open the AI Query dialog.</p>
<ul>
<li><strong>Purpose:</strong> Create clear and concise documentation snippets.</li>
<li><strong>Tone:</strong> Professional yet approachable.</li>
<li><strong>Example:</strong> Transform this paragraph into bullet points using AI.</li>
</ul>
<AssistViewSettings Placeholder="Start typing or use AI assistance to enhance your content..." />
</SfSmartRichTextEditor>-
To launch the application, press Ctrl+F5 in Visual Studio, run
dotnet runfrom the CLI or integrated terminal in VS Code, or use the Run command in your preferred IDE to render the Blazor Smart Rich Text Editor component in the default web browser. -
Start typing content and use the AI tools in the toolbar to enhance your editing experience.
-
Use Alt+Enter to open the AI Query dialog for content improvement.
NOTE
When using the .NET CLI or Visual Studio Code, ensure that you run the application from the server (host) project directory, not from the
.Clientproject. The client project does not run independently and is hosted by the server application.
NOTE