How can I help you?
Integrating Syncfusion® Blazor Components in Angular
31 Mar 20268 minutes to read
This guide demonstrates how to use Syncfusion® Blazor components inside an Angular application.
Blazor and Angular are two different web technologies. Blazor uses .NET and Razor components, while Angular uses TypeScript and HTML. Normally, these frameworks cannot share UI components. However, Blazor custom elements make this possible. A custom element turns a Blazor component into a standard HTML tag that Angular can recognize and render.
A common use case for this integration is when an existing Angular application needs advanced UI features such as rich grids, charts, or schedulers without rewriting the project in Blazor. By exposing Syncfusion Blazor components as custom elements, teams can seamlessly add powerful .NET-based controls into Angular pages. This is especially helpful in enterprise dashboards, order management, analytics, and admin portals where capabilities like sorting, filtering, exporting, and high-performance data handling are required, all while keeping the Angular app intact.
Prerequisites
Creating the Blazor application
Create the project
If you already have a Blazor project, proceed to the package installation section. Otherwise, create one using Syncfusion Blazor getting started guides.
Install custom elements packages
To enable custom elements, install the required Microsoft packages.
dotnet add package Microsoft.AspNetCore.Components.Web --version 10.0.3
dotnet add package Microsoft.AspNetCore.Components.CustomElements --version 10.0.3
Add Syncfusion component
Create a .razor file to incorporate the Syncfusion DataGrid component:
In this example, the file name used is OrdersGrid.razor
@using Syncfusion.Blazor.Grids
@namespace BlazorServerHost.Pages

<SfGrid DataSource="@Orders" >
<GridColumns>
        <GridColumn Field="OrderID" HeaderText="Order ID" TextAlign="TextAlign.Right" Width="100"></GridColumn>
        <GridColumn Field="CustomerID" HeaderText="Customer ID" Width="100"></GridColumn>
        <GridColumn Field="OrderDate" HeaderText="Order Date" Width="100"></GridColumn>
        <GridColumn Field="Freight" HeaderText="Freight" Width="120"></GridColumn>
    </GridColumns>
</SfGrid>

@code{
    public List<Order> Orders { get; set; }

    protected override void OnInitialized()
    {
        Orders = Enumerable.Range(1, 10).Select(x => new Order()
        {
            OrderID = 1000 + x,
            CustomerID = (new string[] { "ALFKI", "ANANTR", "ANTON", "BLONP", "BOLID" })[new Random().Next(5)],
            Freight = 2 * x,
            OrderDate = DateTime.Now.AddDays(-x),
        }).ToList();
    }

    public class Order {
        public int? OrderID { get; set; }
        public string CustomerID { get; set; }
        public DateTime? OrderDate { get; set; }
        public double? Freight { get; set; }
    }
}
Register the above Syncfusion DataGrid component as a custom element
To use your Razor component inside an Angular application, you must register it as a Blazor Custom Element. This registration exposes your .razor file as a standard HTML tag.
Any Razor component that you want to use in Angular must be registered inside the Program.cs file. Add the following line:
builder.RootComponents.RegisterCustomElement<SfxGridWasm.Pages.OrdersGrid>("sf-orders-grid");This line registers the OrdersGrid component as a custom element named <sf-orders-grid>, making it available for use within your Angular application.
Integrating the custom elements in Angular
Create the Angular app
If you already have an Angular project, move to the next step. Otherwise, create one using the Angular CLI.
ng new AngularApp --standaloneConfigure Angular proxy
Blazor and Angular run on different local servers. To allow Angular to load Blazor files, you must create a proxy file.
Create a new file named proxy.conf.json inside the Angular project’s src/ folder and add the below content.
{

  "/blazor": {
    "target": "http://localhost:5021", // Provide the hosted URL of the Blazor application.
    "secure": false,
    "changeOrigin": true,
    "logLevel": "debug",
    "pathRewrite": { "^/blazor": "" }
  },
  "/_framework": {
    "target": "http://localhost:5021",
    "secure": false,
    "changeOrigin": true,
    "logLevel": "debug"
  },
  "/_content": {
    "target": "http://localhost:5021",
    "secure": false,
    "changeOrigin": true,
    "logLevel": "debug"
  }
}
Then update the start script in package.json.
"start": "ng serve --proxy-config proxy.conf.json"Load Blazor runtime and Syncfusion theme/scripts
The Blazor runtime and Syncfusion scripts/themes are required to load Syncfusion Blazor components inside Angular. Add the following to your Angular project’s index.html file.
<link rel="stylesheet" href="/blazor/_content/Syncfusion.Blazor.Themes/fluent2.css" />
<script src="/blazor/_content/Syncfusion.Blazor/scripts/syncfusion-blazor.min.js"></script>
NOTE
Syncfusion provides multiple theme variants, allowing selection of the theme that best aligns with the application’s UI design. Additional theme options and customization details are available in the theming documentation.
WebAssembly:
<script src="/blazor/_framework/blazor.webassembly.js"></script>Server:
<script src="/blazor/_framework/blazor.server.js"></script>Use the custom element in Angular
Define the schemas and the custom element tag in the app.ts file.
import { Component, CUSTOM_ELEMENTS_SCHEMA } from '@angular/core';

@Component({
  selector: 'app-root',
  template: `<sf-orders-grid></sf-orders-grid>`,
  schemas: [CUSTOM_ELEMENTS_SCHEMA]
})

export class AppComponent {}
CUSTOM_ELEMENTS_SCHEMA allows Angular to accept unknown HTML tags such as <sf-orders-grid>.
Running both applications
You can run both apps separately or together.
Option 1: Run separately
Blazor host:
dotnet runAngular app:
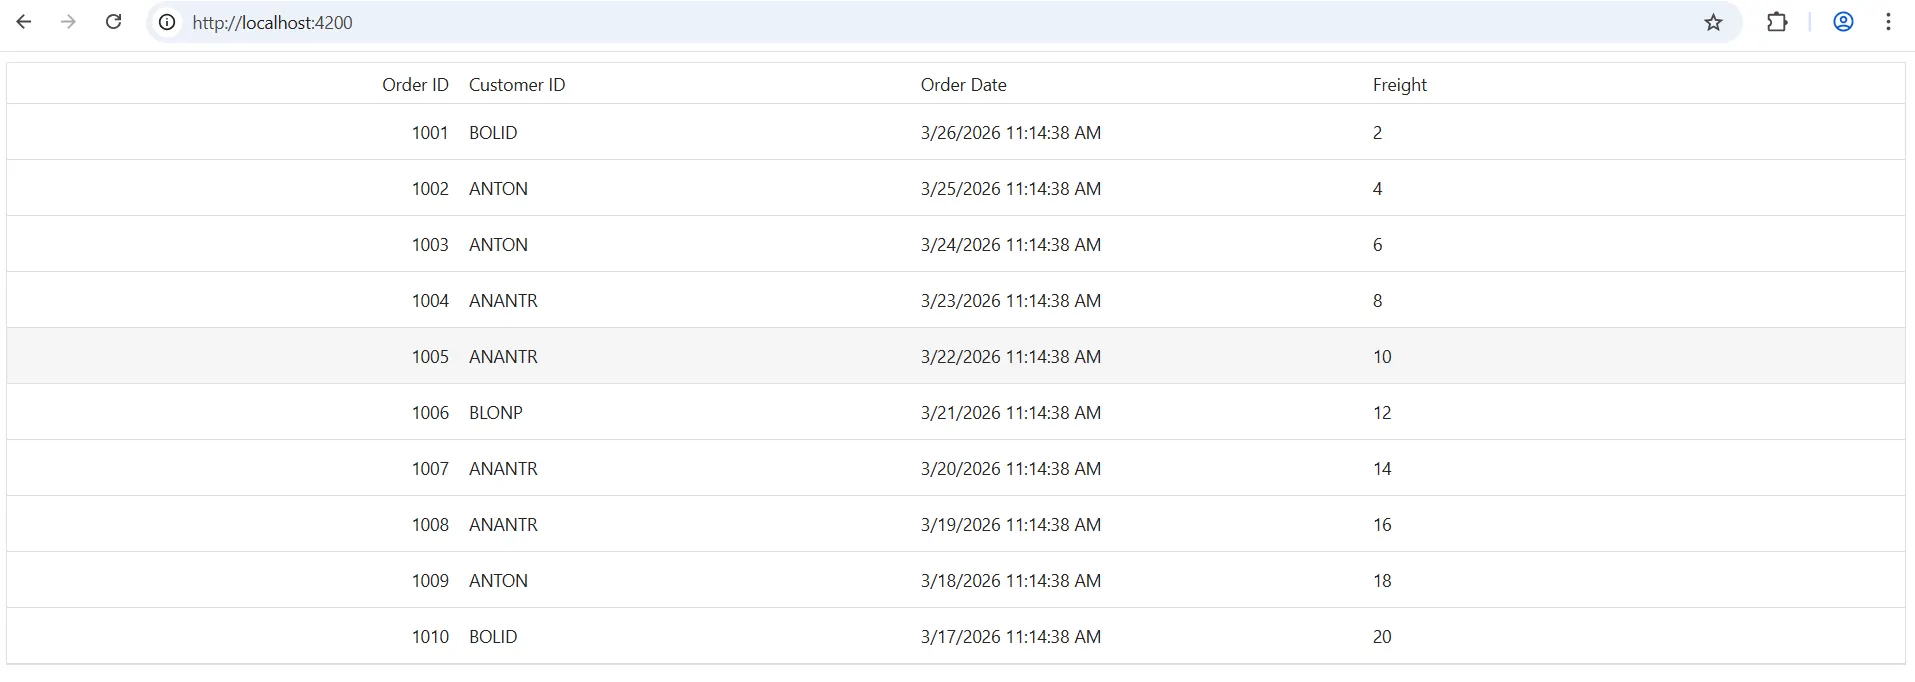
npm startOpen the Angular development URL to see the Blazor DataGrid component inside Angular.
NOTE
Start the Blazor application first so that Angular can load its resources through the proxy.
Option 2: Run both using the concurrently package
npm install --save-dev concurrentlyNOTE
Install this package only once.
Add the following scripts to package.json.
"start:blazor": "dotnet watch run --project ../SfxGridWasm", //Replace this with your Blazor project name.

"start:ng": "ng serve --proxy-config proxy.conf.json",

"start:all": "concurrently -k -n BLAZOR,ANGULAR -c cyan,green \"npm:start:blazor\" \"npm:start:ng\"",
Then, run both with one command:
npm run start:allOnce the compilation completes, open your browser and navigate to http://localhost:4200/ to see your application with the integrated Syncfusion DataGrid component: