Connect Blazor DataGrid with GraphQL using Hot Chocolate
22 Jun 202624 minutes to read
GraphQL is a query language that allows applications to request exactly the data needed, nothing more and nothing less. Unlike traditional REST APIs that return fixed data structures, GraphQL enables the client to specify the shape and content of the response.
Traditional REST APIs and GraphQL differ mainly in how data is requested and returned: REST APIs expose multiple endpoints that return fixed data structures, often including unnecessary fields and requiring several requests to fetch related data, while GraphQL uses a single endpoint where queries define the exact fields needed, enabling precise responses and allowing related data to be retrieved efficiently in one request. This makes GraphQL especially useful for Blazor DataGrid integration, the reason is data‑centric UI components require well‑structured and selective datasets to support efficient filtering, reduce network calls, and improve overall performance.
Key GraphQL Concepts
- Queries: A query is a request to read data. Queries do not modify data; they only retrieve it.
- Mutations: A mutation is a request to modify data. Mutations create, update, or delete records.
- Resolvers: Each query or mutation is handled by a resolver, which is a function responsible for fetching data or executing an operation. Query resolvers handle read operations, while mutation resolvers handle write operations.
- Schema: Defines the structure of the API. The schema describes available data types, the fields within those types, and the operations that can be executed. Query definitions specify how data can be retrieved, and mutation definitions specify how data can be modified.
Hot Chocolate is an open‑source GraphQL server framework for .NET. Hot Chocolate enables the creation of GraphQL APIs using ASP.NET Core and integrates seamlessly with modern .NET applications, including Blazor.
Prerequisites
Install the following software and packages before starting the process:
| Software/Package | Version | Purpose |
|---|---|---|
| Visual Studio 2026 | 18.0 or later | Development IDE with Blazor workload |
| .NET SDK | net8.0 or compatible | Runtime and build tools |
| HotChocolate.AspNetCore | 15.1 or later | GraphQL server framework |
| Syncfusion.Blazor.Grid | 34.1.29 | DataGrid component |
| Syncfusion.Blazor.Themes | 34.1.29 | Styling for DataGrid |
Setting Up the GraphQL Backend
Step 1: Install Required NuGet Packages and Configure Launch Settings
Before installing NuGet packages, a new Blazor Web Application must be created using the default template. The template automatically generates essential starter files—such as Program.cs, appsettings.json, launchSettings.json, the wwwroot folder, and the Components folder.
For this guide, a Blazor application named Grid_GraphQLAdaptor has been created.
Install NuGet Packages
NuGet packages are software libraries that add functionality to applications. The following packages enable GraphQL server functionality+ and DataGrid components.
Required Packages:
- HotChocolate.AspNetCore (version 15.1 or later) - GraphQL server framework
- Syncfusion.Blazor.Grid (version 34.1.29) - DataGrid component
- Syncfusion.Blazor.Themes (version 34.1.29) - Styling for DataGrid
Method 1: Using Package Manager Console
- Open Visual Studio 2026.
- Navigate to Tools → NuGet Package Manager → Package Manager Console.
- Run the following commands:
Install-Package HotChocolate.AspNetCore -Version 15.1.12
Install-Package Syncfusion.Blazor.Grid -Version 34.1.29
Install-Package Syncfusion.Blazor.Themes -Version 34.1.29
Method 2: Using NuGet Package Manager UI
- Open Visual Studio 2026 → Tools → NuGet Package Manager → Manage NuGet Packages for Solution.
- Search for and install each package individually:
- HotChocolate.AspNetCore (version 15.1.12 or later)
- Syncfusion.Blazor.Grid (version 34.1.29)
- Syncfusion.Blazor.Themes (version 34.1.29)
All required packages are now installed.
Step 2: Register Hot Chocolate Services in Program.cs
The Program.cs file configures and registers the GraphQL services.
Instructions:
- Open the
Program.csfile at the project root. - Add the following code after
var builder = WebApplication.CreateBuilder(args);:
[Program.cs]

using Grid_GraphQLAdaptor.Models;
using HotChocolate.Execution.Configuration;

var builder = WebApplication.CreateBuilder(args);

// Register Hot Chocolate GraphQL services
builder.Services
    .AddGraphQLServer()
    .AddQueryType<GraphQLQuery>()
    .AddMutationType<GraphQLMutation>();

var app = builder.Build();

// Map the GraphQL endpoint (default: /graphql)
app.MapGraphQL();

app.Run();
Details:
-
AddGraphQLServer()- Initializes the Hot Chocolate GraphQL server -
AddQueryType<GraphQLQuery>()- Registers query resolvers for read operations -
AddMutationType<GraphQLMutation>()- Registers mutation resolvers for write operations -
MapGraphQL()- Exposes the GraphQL endpoint at/graphql
The GraphQL backend is now configured and ready. The GraphQL endpoint is accessible at https://localhost:xxxx/graphql.
Step 3: Configure Launch Settings (Port Configuration)
The launchsettings.json file controls the port number where the application runs. This file is located in the Properties folder at Properties/launchsettings.json.
Instructions to Change the Port:
- Open the Properties folder in the project root.
- Double-click launchsettings.json to open the file.
- Locate the
httpsprofile section:
"https": {
  "commandName": "Project",
  "dotnetRunMessages": true,
  "launchBrowser": true,
  "applicationUrl": "https://localhost:7001;http://localhost:5001",
  "environmentVariables": {
    "ASPNETCORE_ENVIRONMENT": "Development"
  }
}- Modify the
applicationUrlproperty to change the port numbers:-
https://localhost:7001- HTTPS port (change 7001 to desired port) -
http://localhost:5001- HTTP port (change 5001 to desired port)
-
- Example configuration with custom ports:
"https": {
  "commandName": "Project",
  "dotnetRunMessages": true,
  "launchBrowser": true,
  "applicationUrl": "https://localhost:7777;http://localhost:5555",
  "environmentVariables": {
    "ASPNETCORE_ENVIRONMENT": "Development"
  }
}- Save the file and restart the application for the changes to take effect.
Important Notes:
- Port numbers must be between 1024 and 65535.
- Avoid using ports already in use by other applications.
- The GraphQL endpoint will be accessible at the configured HTTPS URL (e.g.,
https://localhost:7777/graphql).
All configuration steps are now complete.
Step 4: Create the Data Model
A data model represents the structure of data that the application stores. It defines the properties (fields) that make up a record. Each property corresponds to a column in the database table. The data model acts as the blueprint for how data is organized and accessed throughout the application.
In the context of an expense tracker, the data model defines what information is stored for each expense entry. Properties include the expense identifier, employee details, department, category, and financial amounts.
Instructions:
- Create a new folder named Models in the project root directory.
- Inside the Models folder, create a new file named ExpenseRecord.cs.
- Define the ExpenseRecord class with the following code:
File Location: Models/ExpenseRecord.cs
namespace Grid_GraphQLAdaptor.Models
{
    /// <summary>
    /// Represents a single expense record stored in the database.
    /// Each property corresponds to a database column.
    /// </summary>
    public class ExpenseRecord
    {
        /// <summary>
        /// Unique identifier for each expense record.
        /// This is the primary key in the database.
        /// </summary>
        public string ExpenseId { get; set; }

        /// <summary>
        /// Name of the employee who submitted the expense.
        /// </summary>
        public string EmployeeName { get; set; }

        /// <summary>
        /// Email address of the employee.
        /// </summary>
        public string EmployeeEmail { get; set; }

        /// <summary>
        /// Department to which the employee belongs.
        /// </summary>
        public string Department { get; set; }

        /// <summary>
        /// Category of the expense (e.g., Travel, Meals, Office Supplies).
        /// </summary>
        public string Category { get; set; }

        /// <summary>
        /// Base amount of the expense before tax.
        /// </summary>
        public decimal Amount { get; set; }

        /// <summary>
        /// Tax percentage applied to the expense.
        /// </summary>
        public decimal TaxPct { get; set; }

        /// <summary>
        /// Total amount including tax (calculated: Amount + (Amount * TaxPct / 100)).
        /// </summary>
        public decimal TotalAmount { get; set; }
    }
}
Property Mapping Reference
The following table shows how C# properties map to database columns and GraphQL field names:
| Property Name (C#) | Database Column | GraphQL Field Name | Data Type | Purpose |
|---|---|---|---|---|
ExpenseId |
expense_id |
expenseId |
String |
Unique identifier for the expense record |
EmployeeName |
employee_name |
employeeName |
String |
Name of the employee submitting the expense |
EmployeeEmail |
employee_email |
employeeEmail |
String |
Email address for contact purposes |
Department |
department |
department |
String |
Organizational department |
Category |
category |
category |
String |
Type or classification of expense |
Amount |
amount |
amount |
Decimal |
Base expense amount before tax |
TaxPct |
tax_pct |
taxPct |
Decimal |
Tax percentage applied |
TotalAmount |
total_amount |
totalAmount |
Decimal |
Final amount including tax |
Important Convention: Camel Case Conversion
Hot Chocolate GraphQL automatically converts C# property names (PascalCase) to GraphQL field names (camelCase). This convention ensures consistent naming in the GraphQL schema:
- C# Property:
EmployeeName→ GraphQL Field:employeeName - C# Property:
ExpenseId→ GraphQL Field:expenseId - C# Property:
TotalAmount→ GraphQL Field:totalAmount
Explanation:
- The [Key] attribute marks the
ExpenseIdproperty as the primary key (a unique identifier for each record). - Each property represents a column in the database table.
- The model provides the data structure that GraphQL uses to process queries and mutations.
The expense data model has been successfully created.
Step 5: GraphQL Query Resolvers
A query resolver is a method in the backend that handles read requests from the client. When the Blazor DataGrid needs to fetch data, it sends a GraphQL query to the server. The query resolver receives this request, processes it, and returns the appropriate data. Query resolvers do not modify data; they only retrieve and return it.
In simple terms, a GraphQL query asks a question,
and a resolver is the one who answers it.
Instructions:
- Inside the Models folder, create a new file named GraphQLQuery.cs.
- Add the following code to define the query resolver:
[Models/GraphQLQuery.cs]

using Grid_GraphQLAdaptor.Models;

public class GraphQLQuery
{
    /// <summary>
    /// Query resolver for fetching expense record data with data operations support.
    /// </summary>
    public ExpenseRecordDataResponse GetExpenseRecordData(DataManagerRequestInput dataManager)
    {
        // Retrieve all expense records from the data source.
        List<ExpenseRecord> dataSource = ExpenseRecord.GetAllRecords();

        // Apply search, filter, sort, and paging operations as provided by the DataGrid.
        // Operations are applied sequentially: search → filter → sort → paging.

        // Store the total count before paging.
        int totalRecords = dataSource.Count;

        // Return response with total count and paginated data.
        return new ExpenseRecordDataResponse
        {
            Count = totalRecords,
            Result = dataSource
        };
    }
}

/// <summary>
/// Response structure for query results. Must include Count (total records) and Result (current page).
/// </summary>
public class ExpenseRecordDataResponse
{
    public int Count { get; set; }
    public List<ExpenseRecord> Result { get; set; } = new List<ExpenseRecord>();
}
Details:
- The
GetExpenseRecordDatamethod receivesDataManagerRequestInput, which contains filter, sort, search, and paging parameters from the DataGrid - Hot Chocolate automatically converts the method name
GetExpenseRecordDatato camelCase:expenseRecordDatain the GraphQL schema - The response must contain
Count(total records) andResult(current page data) for the DataGrid to process pagination
The query resolver has been created successfully.
Step 6: Create the DataManagerRequestInput Class
A DataManagerRequestInput class is a GraphQL input type that represents all the parameters the Blazor DataGrid sends to the backend when requesting data. This class acts as a container for filtering, sorting, searching, paging, and other data operation parameters.
Purpose
When the DataGrid performs operations like pagination, sorting, filtering, or searching, it packages all these parameters into a DataManagerRequestInput object and sends it to the GraphQL backend. The backend then uses these parameters to fetch and return only the data the grid needs.
Instructions:
- Inside the Models folder, create a new file named DataManagerRequestInput.cs.
- Define the DataManagerRequestInput class and supporting classes with the following code:
namespace Grid_GraphQLAdaptor.Models;

/// <summary>
/// Represents the input structure for data manager requests from the Blazor DataGrid.
/// Contains all parameters needed for data operations like filtering, sorting, paging, and searching.
/// </summary>
public class DataManagerRequestInput
{
    /// <summary>
    /// Number of records to skip from the beginning (used for pagination).
    /// Example: Skip=10 means start from the 11th record.
    /// </summary>
    [GraphQLName("Skip")]
    public int Skip { get; set; }

    /// <summary>
    /// Number of records to retrieve (page size).
    /// Example: Take=10 means retrieve 10 records per page.
    /// </summary>
    [GraphQLName("Take")]
    public int Take { get; set; }

    /// <summary>
    /// Indicates whether the total record count should be calculated.
    /// Set to true when pagination requires knowing the total number of records.
    /// </summary>
    [GraphQLName("RequiresCounts")]
    public bool RequiresCounts { get; set; } = false;

    /// <summary>
    /// Search criteria for finding specific records.
    /// Contains the search text and which fields to search in.
    /// </summary>
    [GraphQLName("Search")]
    public List<SearchFilter>? Search { get; set; }

    // Add other parameters

}

/// <summary>
/// Represents an aggregate operation (Sum, Average, Min, Max, Count).
/// Used to calculate aggregate values on specified fields.
/// </summary>
public class Aggregate
{
    /// <summary>
    /// Field name to aggregate (e.g., "Amount", "TotalAmount").
    /// </summary>
    [GraphQLName("Field")]
    public string? Field { get; set; }

    /// <summary>
    /// Type of aggregation: Sum, Average, Min, Max, Count.
    /// </summary>
    [GraphQLName("Type")]
    public string? Type { get; set; }
}

/// <summary>
/// Represents search criteria for finding records.
/// Allows searching across multiple fields with specified operators.
/// </summary>
public class SearchFilter
{
    /// <summary>
    /// Fields to search in (e.g., ["EmployeeName", "Department"]).
    /// </summary>
    [GraphQLName("Fields")]
    public List<string>? Fields { get; set; }

    /// <summary>
    /// The search keyword entered by the user.
    /// </summary>
    [GraphQLName("Key")]
    public string? Key { get; set; }

    /// <summary>
    /// Comparison operator (contains, equals, startsWith, etc.).
    /// </summary>
    [GraphQLName("Operator")]
    public string? Operator { get; set; }

    /// <summary>
    /// Whether the search should ignore case (case-insensitive search).
    /// </summary>
    [GraphQLName("IgnoreCase")]
    public bool IgnoreCase { get; set; }

    /// <summary>
    /// Indicates whether to ignore accent marks and diacritic characters during search operations
    /// </summary>
    [GraphQLName("IgnoreAccent")]
    public bool IgnoreAccent { get; set; }
}

/// <summary>
/// Represents sorting instructions for ordering records.
/// Defines which field to sort by and in which direction.
/// </summary>
public class Sort
{
    /// <summary>
    /// Field name to sort by (e.g., "Amount", "EmployeeName").
    /// </summary>
    [GraphQLName("Name")]
    public string? Name { get; set; }

    /// <summary>
    /// Sort direction: "Ascending" or "Descending".
    /// </summary>
    [GraphQLName("Direction")]
    public string? Direction { get; set; }

    // Add other properties
}

/// <summary>
/// Represents a filter condition for narrowing down records.
/// Supports complex nested conditions (AND/OR logic) for advanced filtering.
/// </summary>
public class WhereFilter
{
    /// <summary>
    /// Field name to filter by (e.g., "Department", "Amount").
    /// </summary>
    [GraphQLName("Field")]
    public string? Field { get; set; }

    /// <summary>
    /// Ignore case sensitivity in comparisons.
    /// </summary>
    [GraphQLName("IgnoreCase")]
    public bool? IgnoreCase { get; set; }

    // Add other properties
}

// Add other classes
Understanding the DataManagerRequestInput Class
Example Scenario: A sequence of operations is performed on the DataGrid as follows:
- Searches for “Finance” in the Department column.
- Filters for amounts greater than 1000.
- Sorts by Amount in descending order.
- Navigates to page 2 (showing records 11-20).
- Resulting DataManagerRequestInput Parameters:
{
    "dataManager": {
        "Skip": 10,
        "Take": 10,
        "RequiresCounts": true,
        "Search": [
            {
                "Fields": ["Department"],
                "Key": "Finance",
                "Operator": "contains",
                "IgnoreCase": true,
                "IgnoreAccent": true
            }
        ],
        "Where": [
            {
                "Condition": "and",
                "Predicates": [
                    {
                        "Field": "Amount",
                        "Operator": "greaterThan",
                        "Value": 1000,
                        "Predicates": []
                    }
                ]
            }
        ],
        "Sorted": [
            {
                "Name": "Amount",
                "Direction": "Descending"
            }
        ]
    }
}
DataManagerRequestInput Properties:
| Property | Purpose | Type | Example |
|---|---|---|---|
Skip |
Number of records to skip (used for pagination) | int |
10 (skip first 10 records) |
Take |
Number of records to retrieve per page | int |
20 (fetch next 20 records) |
Search |
Search filter configuration | List<SearchFilter> |
Search term and target fields |
Where |
Filter conditions for column filtering | List<WhereFilter> |
Field name, operator, and value |
Sorted |
Sort specifications for ordering records | List<SortDescriptor> |
Field name and direction (asc/desc) |
Group |
Grouping configuration | List<string> |
Field names to group by |
Key Attributes Explained
[GraphQLName]: Maps C# property names to GraphQL schema field names. Hot Chocolate automatically converts PascalCase to camelCase.
Example: RequiresCounts → requiresCounts
[GraphQLType(typeof(AnyType))]: Allows flexible typing for complex nested structures that can contain various data types.
Step 7: GraphQL Mutation Resolvers
A GraphQL mutation resolver is a method in the backend that handles write requests (data modifications) from the client. While queries only read data, mutations create, update, or delete records. When the Blazor DataGrid performs add, edit, or delete operations, it sends a GraphQL mutation to the server. The mutation resolver receives this request, processes it, and persists the changes to the data source.
In simple terms, a GraphQL mutation asks for a change, and a resolver is the one who makes it.
Instructions:
- Inside the Models folder, create a new file named GraphQLMutation.cs.
- Define the GraphQLMutation class with the following code:
using Grid_GraphQLAdaptor.Models;
using HotChocolate.Types;

namespace Grid_GraphQLAdaptor.Models
{
    /// <summary>
    /// GraphQL Mutation class that handles all write operations (Create, Update, Delete).
    /// Each method is a resolver that processes data modification requests from the DataGrid.
    /// </summary>
    public class GraphQLMutation
    {
        /// <summary>
        /// Mutation resolver for creating a new expense record.
        /// Called when a user clicks the "Add" button in the DataGrid and submits a new record.
        /// </summary>
        public ExpenseRecord CreateExpense(
            ExpenseRecord record,
            int index,
            string action,
            [GraphQLType(typeof(AnyType))] IDictionary<string, object> additionalParameters)
        {
            // Add logic to create new expense record
            return record;
        }

        /// <summary>
        /// Mutation resolver for updating an existing expense record.
        /// Called when a user clicks the "Edit" button, modifies values, and submits the changes.
        /// </summary>
        public ExpenseRecord UpdateExpense(
            ExpenseRecord record,
            string action,
            string primaryColumnName,
            string primaryColumnValue,
            [GraphQLType(typeof(AnyType))] IDictionary<string, object> additionalParameters)
        {
            // Add logic to update existing expense record

            return record;
        }

        /// <summary>
        /// Mutation resolver for deleting an expense record.
        /// Called when a user clicks the "Delete" button and confirms the deletion.
        /// </summary>
        public bool DeleteExpense(
            string primaryColumnValue,
            [GraphQLType(typeof(AnyType))] IDictionary<string, object> additionalParameters)
        {
            // Add logic to delete existing expense record

            return true;
        }
    }
}
A mutation resolver is a C# method decorated with GraphQL attributes that:
- Receives input parameters from the DataGrid (record data, primary keys, etc.).
- Processes the operation (validation, calculation, data modification).
- Persists changes to the data source (database, file, memory).
- Returns results to the client (modified record or success/failure status).
The GraphQL Mutation class has been successfully created and is ready to handle all data modification operations from the Blazor DataGrid.
Integrating Blazor DataGrid
Step 1: Install and Configure Blazor DataGrid Components with GraphQL
Syncfusion is a library that provides pre-built UI components like DataGrid, which is used to display data in a table format.
Instructions:
- The Syncfusion.Blazor.Grid package was installed in Step 1 of the previous heading.
- Import the required namespaces in the
Components/_Imports.razorfile:
@using Syncfusion.Blazor
@using Syncfusion.Blazor.Grids
@using Syncfusion.Blazor.Data
@using Syncfusion.Blazor.DropDowns
@using Syncfusion.Blazor.Inputs
@using Syncfusion.Blazor.Calendars
@using Syncfusion.Blazor.Buttons
@using Grid_GraphQLAdaptor.Models- Add the stylesheet and scripts in the
Components/App.razorfile. Find the<head>section and add:
<!-- Blazor Stylesheet -->
<link href="_content/Syncfusion.Blazor.Themes/tailwind3.css" rel="stylesheet" />

<!-- Blazor Scripts -->
<script src="_content/Syncfusion.Blazor.Core/scripts/syncfusion-blazor.min.js" type="text/javascript"></script>
For this project, the tailwind3 theme is used. A different theme can be selected or the existing theme can be customized based on project requirements. Refer to the Blazor Components Appearance documentation to learn more about theming and customization options.
Blazor components are now configured and ready to use. For additional guidance, refer to the Grid component’s getting‑started documentation.
Step 2: Update the Blazor DataGrid
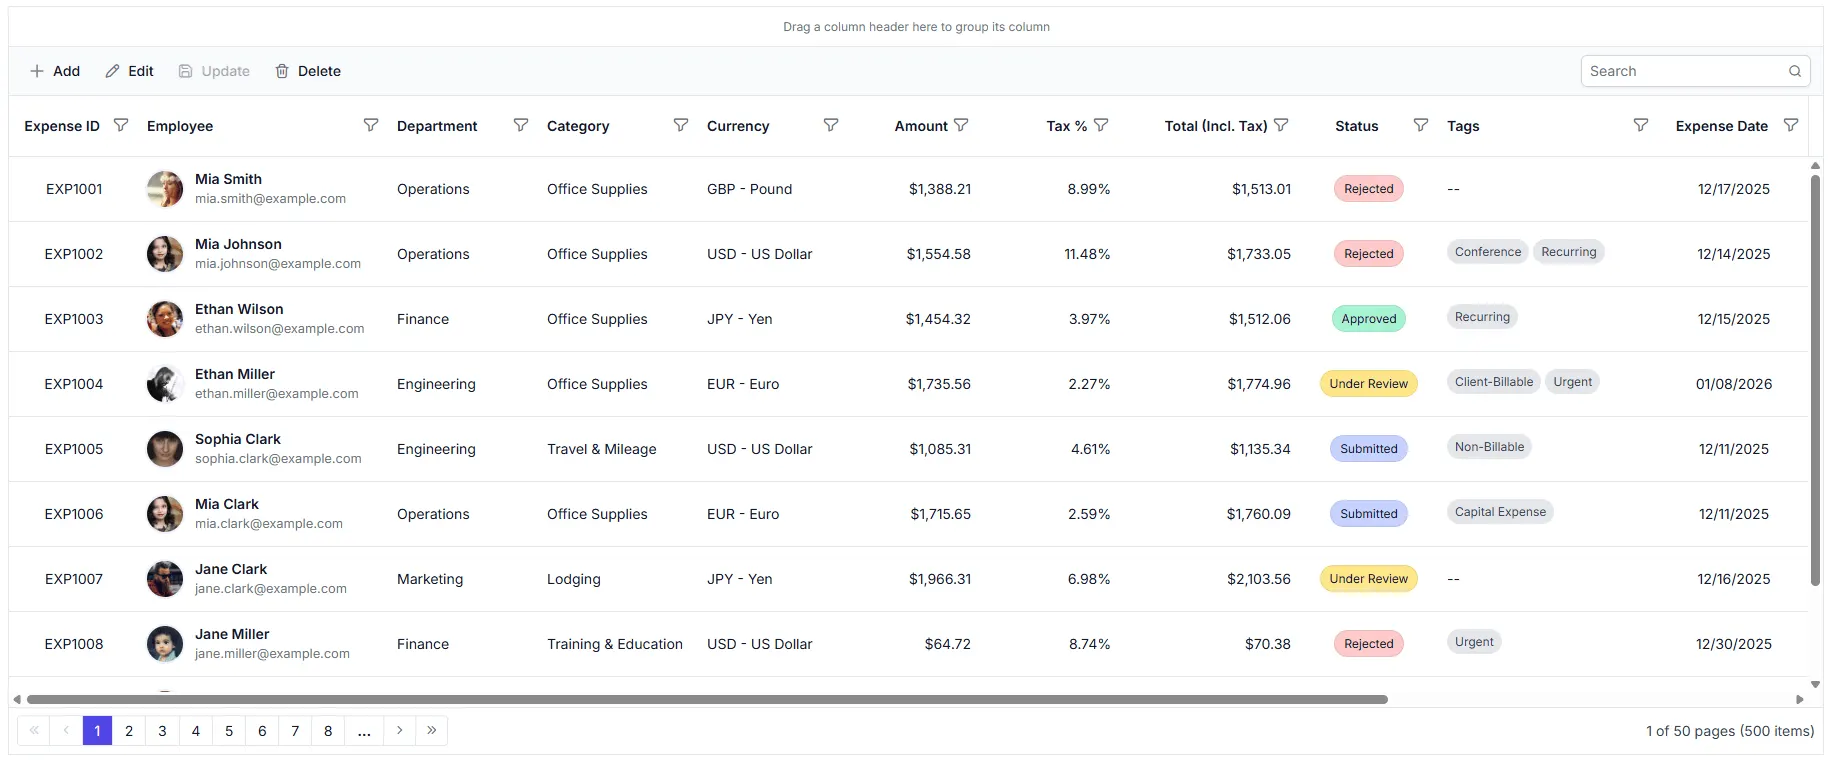
The Home.razor component will display the expense data in a Blazor DataGrid with search, filter, sort, editing and pagination capabilities.
Instructions:
- Open the file named
Home.razorin theComponents/Pagesfolder. - Add the following code to create a basic DataGrid:
@page "/"
@rendermode InteractiveServer

<PageTitle>Expense Tracker System</PageTitle>

<section class="bg-gray-50 dark:bg-gray-950">
    <div class="mx-auto w-full py-12 sm:px-6 px-4">
        <h1 class="mb-4 text-3xl font-bold">Expense Tracker System</h1>
        <p class="mb-3 text-gray-600">Manage and view all expenses from the database.</p>

        <!-- Blazor DataGrid Component -->
        <SfGrid TValue="ExpenseRecord" AllowPaging="true" AllowSorting="true" AllowFiltering="true">
            <SfDataManager Url="http://localhost:5272/graphql" GraphQLAdaptorOptions="@adaptorOptions" Adaptor="Adaptors.GraphQLAdaptor"></SfDataManager>
            <GridPageSettings PageSize="10"></GridPageSettings>
            <GridEditSettings AllowAdding="true" AllowEditing="true" AllowDeleting="true" Mode="EditMode.Dialog">
                <Template>
                  <!-- Customized Dialog -->
                </Template>
            <GridColumns>
                <!-- Columns configuration -->
            </GridColumns>

        </SfGrid>
    </div>
</section>

@code {
    // GraphQLAdaptorOptions will be added in the next step
}
Component Explanation:
-
@rendermode InteractiveServer: Enables interactive server-side rendering for the component. -
<SfGrid>: The DataGrid component that displays data in rows and columns. -
<GridColumns>: Defines individual columns in the DataGrid. -
<GridPageSettings>: Configures pagination with 10 records per page. -
<GridEditSettings>: Enable editing functionality directly within the Grid by setting the AllowEditing, AllowAdding, and AllowDeleting properties within the GridEditSettings to true. -
<Template>: Allows customization of the default dialog editing behavior by defining custom editors for grid rows within a dialog..
The SfDataManager component connects the DataGrid to the GraphQL backend using the adaptor options configured below:
<SfDataManager Url="http://localhost:5272/graphql"
               GraphQLAdaptorOptions="@adaptorOptions"
               Adaptor="Adaptors.GraphQLAdaptor">
</SfDataManager>
Component Attributes Explained:
| Attribute | Purpose | Value |
|---|---|---|
Url |
GraphQL endpoint location |
http://localhost:5272/graphql (must match backend port) |
GraphQLAdaptorOptions |
References the adaptor configuration object |
@adaptorOptions (defined in next heading) |
Adaptor |
Specifies adaptor type to use |
Adaptors.GraphQLAdaptor (tells Syncfusion to use GraphQL adaptor) |
Important Notes:
- The
Urlmust match the port configured inlaunchSettings.json. - If backend runs on port 5272, then URL must be
https://localhost:5272/graphql. - The
/graphqlpath is set byapp.MapGraphQL()in Program.cs.
Step 3: Configure GraphQL Adaptor and Data Binding
The GraphQL adaptor is a bridge that connects the Blazor DataGrid with the GraphQL backend. The adaptor translates DataGrid operations (filtering, sorting, paging, searching) into GraphQL queries and mutations. When the user interacts with the grid, the adaptor automatically sends the appropriate GraphQL request to the backend, receives the response, and updates the grid display.
What is a GraphQL Adaptor?
An adaptor is a translator between two different systems. The GraphQL adaptor specifically:
- Receives interaction events generated by the DataGrid, including Add, Edit, Delete actions, as well as sorting and filtering operations.
- Converts these actions into GraphQL query or mutation syntax.
- Sends the GraphQL request to the backend GraphQL endpoint.
- Receives the response data from the backend.
- Formats the response back into a structure the DataGrid understands.
- Updates the grid display with the new data.
The adaptor enables bidirectional communication between the frontend (DataGrid) and backend (GraphQL server).
GraphQL Adaptor Configuration
The @code block in Home.razor contains C# code that configures how the adaptor behaves. This configuration is critical because it defines:
- Which GraphQL query to use for reading data.
- Which GraphQL mutations to use for creating, updating, and deleting data.
- How to connect to the GraphQL backend endpoint.
Instructions:
- Open the
Home.razorfile located atComponents/Pages/Home.razor. - Scroll to the
@codeblock at the bottom of the file. - Add the following complete configuration:
@code {
    /// <summary>
    /// GraphQLAdaptorOptions configures how the DataGrid communicates with the GraphQL backend.
    /// This object contains the query, mutation operations, and endpoint URL.
    /// </summary>
    private GraphQLAdaptorOptions adaptorOptions = new GraphQLAdaptorOptions
    {
        Query = @"query expenseRecordData($dataManager: DataManagerRequestInput!) {
                    expenseRecordData(dataManager: $dataManager) {
                        count
                        result {
                            expenseId
                            employeeName
                            employeeEmail
                            employeeAvatarUrl
                            department
                            category
                            description
                            amount
                            taxPct
                            totalAmount
                            expenseDate
                            paymentMethod
                            currency
                            reimbursementStatus
                            isPolicyCompliant
                            tags
                        }
                    }
                }",

        ResolverName = "expenseRecordData",

        Mutation = new Syncfusion.Blazor.Data.GraphQLMutation
        {
            Insert = @"mutation create($record: ExpenseRecordInput!, $index: Int!, $action: String!, $additionalParameters: Any) {
                createExpense(record: $record, index: $index, action: $action, additionalParameters: $additionalParameters) {
                    expenseId
                    employeeName
                    // Add Other fields
                }
            }",

            Update = @"mutation update($record: ExpenseRecordInput!, $action: String!, $primaryColumnName: String!, $primaryColumnValue: String!, $additionalParameters: Any) {
                updateExpense(record: $record, action: $action, primaryColumnName: $primaryColumnName, primaryColumnValue: $primaryColumnValue, additionalParameters: $additionalParameters) {
                    expenseId
                    employeeName
                    // Add Other fields
                }
            }",

            Delete = @"mutation delete($primaryColumnValue: String!, $additionalParameters: Any) {
                deleteExpense(primaryColumnValue: $primaryColumnValue, additionalParameters: $additionalParameters)
            }",

            Batch = @"mutation batch($changed: [ExpenseRecordInput!], $added: [ExpenseRecordInput!], $deleted: [ExpenseRecordInput!], $action: String!, $primaryColumnName: String!, $additionalParameters: Any, $dropIndex: Int) {
                batchUpdate(changed: $changed, added: $added, deleted: $deleted, action: $action, primaryColumnName: $primaryColumnName, additionalParameters: $additionalParameters, dropIndex: $dropIndex) {
                    expenseId
                    employeeName
                    // Add Other fields
                }
            }"
        },
    };
}
GraphQL Query Structure Explained in Detail
The Query property is critical for understanding how data flows. Let’s break down each component:
query expenseRecordData($dataManager: DataManagerRequestInput!) {}
Line Breakdown:
-
query- GraphQL keyword indicating a read operation -
expenseRecordData- Name of the query (must match resolver name with camelCase) -
($dataManager: DataManagerRequestInput!)- Parameter declaration-
$dataManager- Variable name (referenced as $dataManager throughout the query) -
: DataManagerRequestInput!- Type specification -
!- Exclamation mark means this parameter is required (not optional)
-
expenseRecordData(dataManager: $dataManager) {}
Line Breakdown:
-
expenseRecordData(...)- Calls the resolver method in backend -
dataManager: $dataManager- Passes the $dataManager variable to the resolver - The resolver receives this object and uses it to apply filters, sorts, searches, and pagination
count
result {
    expenseId
    employeeName
    ...
}
-
count- Returns total number of records (used for pagination)- Example: If 500 total expense records exist, count = 500
- DataGrid uses this to calculate how many pages exist
-
result- Contains the array of expense records-
{ ... }- List of fields to return for each record - Each field must exist in the ExpenseRecord class
- Only requested fields are returned (no over-fetching)
-
Response Structure Example
When the backend executes the query, it returns a JSON response in this exact structure:
{
  "data": {
    "expenseRecordData": {
      "count": 2,
      "result": [
        {
          "expenseId": "EXP001",
          "employeeName": "John Smith",
          "employeeEmail": "[email protected]",
          "employeeAvatarUrl": "https://example.com/avatars/john.png",
          "department": "Sales",
          "category": "Travel & Mileage",
          "description": "Flight to client meeting in New York",
          "amount": 450.00,
          "taxPct": 0.10,
          "totalAmount": 495.00,
          "expenseDate": "2024-01-15",
          "paymentMethod": "Corporate Card",
          "currency": "USD - US Dollar",
          "reimbursementStatus": "Approved",
          "isPolicyCompliant": true,
          "tags": ["Client-Billable", "Travel"]
        },
        {
          "expenseId": "EXP002",
          "employeeName": "Sarah Johnson",
          "employeeEmail": "[email protected]",
          "employeeAvatarUrl": "https://example.com/avatars/sarah.png",
          "department": "Engineering",
          "category": "Office Supplies",
          "description": "Laptop peripherals and desk accessories",
          "amount": 125.50,
          "taxPct": 0.05,
          "totalAmount": 131.78,
          "expenseDate": "2024-01-14",
          "paymentMethod": "Personal Card",
          "currency": "USD - US Dollar",
          "reimbursementStatus": "Under Review",
          "isPolicyCompliant": true,
          "tags": ["Office", "Equipment"]
        }
      ]
    }
  }
}
Response Structure Explanation:
| Part | Purpose | Example |
|---|---|---|
data |
Root object containing the query result | Always present in successful response |
expenseRecordData |
Matches the query name (camelCase) | Contains count and result |
count |
Total number of records available | 2 (in this example) |
result |
Array of ExpenseRecord objects | [ {…}, {…} ] |
| Each field in result | Matches GraphQL query field names | Field values from database |
Step 4: Add Toolbar with CRUD and search options
The toolbar provides buttons for adding, editing, deleting records, and searching the data.
Instructions:
- Open the
Components/Pages/Home.razorfile. - Update the
<SfGrid>component to include the Toolbar property with CRUD and search options:
<SfGrid TValue="ExpenseRecord"
        AllowPaging="true"
        AllowSorting="true"
        AllowFiltering="true"
        Toolbar="@ToolbarItems">
    <SfDataManager Url="http://localhost:5272/graphql" GraphQLAdaptorOptions="@adaptorOptions" Adaptor="Adaptors.GraphQLAdaptor"></SfDataManager>

    <!-- Grid columns configuration -->
</SfGrid>- Add the toolbar items list in the
@codeblock:
@code {
    private List<string> ToolbarItems = new List<string> { "Add", "Edit", "Delete", "Update", "Cancel", "Search"};
}
Step 5: Running the Application
Build the Application
- Open the terminal or Package Manager Console.
- Navigate to the project directory.
- Run the following command:
dotnet buildRun the Application
Execute the following command:
dotnet runAccess the Application
- Open a web browser.
- Navigate to
https://localhost:5272(or the port shown in the terminal). - The Expense Tracker System is now running and ready to use.
Step 6: Implement Paging Feature
Paging divides large datasets into smaller pages to improve performance and usability.
Instructions:
- The paging feature is already partially enabled in the
<SfGrid>component with AllowPaging=”true”. - The page size is configured with GridPageSettings.
- No additional code changes are required from the previous steps.
<SfGrid TValue="ExpenseRecord"
        AllowPaging="true">
    <SfDataManager Url="http://localhost:5272/graphql" GraphQLAdaptorOptions="@adaptorOptions" Adaptor="Adaptors.GraphQLAdaptor"></SfDataManager>
    <GridPageSettings PageSize="10"></GridPageSettings>
    <!-- Grid columns configuration -->
</SfGrid>- Update the
GetExpenseRecordDatamethod in theGraphQLQueryclass to handle paging:
namespace Grid_GraphQLAdaptor.Models;

public class GraphQLQuery
{
    public ExpenseRecordDataResponse GetExpenseRecordData(DataManagerRequestInput dataManager)
    {
        List<ExpenseRecord> dataSource = ExpenseRecord.GetAllRecords();

        int totalRecords = dataSource.Count;

        if (dataManager.Skip != 0)
        {
            dataSource = dataSource.Skip(dataManager.Skip).ToList();
        }
        if (dataManager.Take != 0)
        {
            dataSource = dataSource.Take(dataManager.Take).ToList();
        }

        return new ExpenseRecordDataResponse
        {
            Count = totalRecords,
            Result = dataSource
        };
    }
}
Fetches expenses data by calling the GetAllRecords method, which is implemented in the ExpenseRecord.cs file.
private static List<ExpenseRecord> _expenseStore = null;
public static List<ExpenseRecord> GetAllRecords()
{
    // Add code to return a list of "ExpenseRecord" to process it further.
    return _expenseStore;
}| Part | Purpose |
|---|---|
dataManager.Skip |
Number of records to skip from the start (used to jump to the correct page) |
dataManager.Take |
Number of records to return for the current page (page size) |
dataManager.RequiresCounts |
Indicates whether the server should also return the total record count |
How Paging Variables are Passed:
When the grid requests a specific page, it automatically sends:
{
  "dataManager": {
    "Skip": 10,
    "Take": 10,
    "RequiresCounts": true
  }
}
The backend resolver applies Skip and Take, then returns count and the paged result. Paging feature is now active with 10 records per page.
Step 7: Implement Searching feature
Searching provides the capability to find specific records by entering keywords into the search box.
Instructions:
- Ensure the toolbar includes the “Search” item.
<SfGrid TValue="ExpenseRecord"
        AllowPaging="true"
        Toolbar="@ToolbarItems">
    <SfDataManager Url="http://localhost:5272/graphql" GraphQLAdaptorOptions="@adaptorOptions" Adaptor="Adaptors.GraphQLAdaptor"></SfDataManager>
    <GridPageSettings PageSize="10"></GridPageSettings>
    <!-- Grid columns configuration -->
</SfGrid>- Update the
GetExpenseRecordDatamethod in theGraphQLQueryclass to handle searching:
namespace Grid_GraphQLAdaptor.Models;

public class GraphQLQuery
{
    public ExpenseRecordDataResponse GetExpenseRecordData(DataManagerRequestInput dataManager)
    {
        List<ExpenseRecord> dataSource = ExpenseRecord.GetAllRecords();

        if (dataManager.Search != null && dataManager.Search.Count > 0)
        {
            foreach (var searchFilter in dataManager.Search)
            {
                dataSource = dataSource.Where(expense =>
                    searchFilter.Fields.Any(field =>
                        expense.GetType().GetProperty(field)?.GetValue(expense)?.ToString().IndexOf(searchFilter.Key, StringComparison.OrdinalIgnoreCase) >= 0
                    )
                ).ToList();
            }
        }

        int totalRecords = dataSource.Count;

        if (dataManager.Skip != 0)
        {
            dataSource = dataSource.Skip(dataManager.Skip).ToList();
        }
        if (dataManager.Take != 0)
        {
            dataSource = dataSource.Take(dataManager.Take).ToList();
        }

        return new ExpenseRecordDataResponse
        {
            Count = totalRecords,
            Result = dataSource
        };
    }
}
How Search Variables are Passed:
When search text is entered, the DataGrid automatically sends:
{
  "dataManager": {
      "Search": [
        {
          "Fields": ["EmployeeName", "Department", "Category", "Description"],
          "Key": "finance",
          "Operator": "contains",
          "IgnoreCase": true,
          "IgnoreAccent": true
        }
      ],
      "Skip": 0,
      "Take": 10,
      "RequiresCounts": true
    }
  }
The backend resolver receives this and processes the search filter in the GetExpenseRecordData method. Searching feature is now active.
Step 8: Implement Sorting feature
Sorting enables organizing records by selecting column headers, arranging the data in ascending or descending order.
Instructions:
- Ensure the
<SfGrid>component has AllowSorting=”true”.
<SfGrid TValue="ExpenseRecord"
        AllowPaging="true"
        AllowSorting="true"
        Toolbar="@ToolbarItems">
    <SfDataManager Url="http://localhost:5272/graphql" GraphQLAdaptorOptions="@adaptorOptions" Adaptor="Adaptors.GraphQLAdaptor"></SfDataManager>
    <GridPageSettings PageSize="10"></GridPageSettings>
    <!-- Grid columns configuration -->
</SfGrid>- Update the
GetExpenseRecordDatamethod in theGraphQLQueryclass to handle sorting:
namespace Grid_GraphQLAdaptor.Models;

public class GraphQLQuery
{
    public ExpenseRecordDataResponse GetExpenseRecordData(DataManagerRequestInput dataManager)
    {
        List<ExpenseRecord> dataSource = ExpenseRecord.GetAllRecords();

        if (dataManager.Sorted != null && dataManager.Sorted.Count > 0)
        {
            foreach (var sort in dataManager.Sorted)
            {
                var property = typeof(ExpenseRecord).GetProperty(sort.Name);
                if (property != null)
                {
                    dataSource = sort.Direction?.ToLower() == "descending"
                        ? dataSource.OrderByDescending(x => property.GetValue(x)).ToList()
                        : dataSource.OrderBy(x => property.GetValue(x)).ToList();
                }
            }
        }

        int totalRecords = dataSource.Count;

        if (dataManager.Skip != 0)
        {
            dataSource = dataSource.Skip(dataManager.Skip).ToList();
        }
        if (dataManager.Take != 0)
        {
            dataSource = dataSource.Take(dataManager.Take).ToList();
        }

        return new ExpenseRecordDataResponse
        {
            Count = totalRecords,
            Result = dataSource
        };
    }
}
How Sort Variables are Passed:
When a column header is selected for sorting, the DataGrid automatically sends:
{
  "dataManager": {
      "Sorted": [
        {
          "Name": "Amount",
          "Direction": "Descending"
        }
      ],
      "Skip": 0,
      "Take": 10,
      "RequiresCounts": true
    }
}
The backend resolver receives this and processes the sort specification in the GetExpenseRecordData method. Multiple sorting conditions can be applied sequentially by holding the Ctrl key and selecting additional column headers. Sorting feature is now active.
Step 9: Implement Filtering feature
Filtering enables narrowing down records by applying conditions to column values. Filtering can be performed by selecting checkbox-based filters or by using comparison operators such as equals, greater than, less than, and other supported operators.
Instructions:
- Ensure the
<SfGrid>component has AllowFiltering=”true”.
 <SfGrid TValue="ExpenseRecord"
         AllowPaging="true"
         AllowFiltering="true"
         Toolbar="@ToolbarItems">
     <SfDataManager Url="http://localhost:5272/graphql" GraphQLAdaptorOptions="@adaptorOptions" Adaptor="Adaptors.GraphQLAdaptor"></SfDataManager>
     <GridFilterSettings Type="FilterType.Excel"></GridFilterSettings>
     <GridPageSettings PageSize="10"></GridPageSettings>
     <!-- Grid columns configuration -->
</SfGrid>- Update the
GetExpenseRecordDatamethod in theGraphQLQueryclass to handle filtering:
 namespace Grid_GraphQLAdaptor.Models;

 public class GraphQLQuery
 {
     public ExpenseRecordDataResponse GetExpenseRecordData(DataManagerRequestInput dataManager)
     {
         List<ExpenseRecord> dataSource = ExpenseRecord.GetAllRecords();

         if (dataManager.Where != null && dataManager.Where.Count > 0)
         {
             foreach (var filter in dataManager.Where)
             {
                 dataSource = dataSource.Where(expense => EvaluateFilterGroup(expense, filter.Predicates)).ToList();
             }
         }

         int totalRecords = dataSource.Count;

         if (dataManager.Skip != 0)
         {
             dataSource = dataSource.Skip(dataManager.Skip).ToList();
         }
         if (dataManager.Take != 0)
         {
             dataSource = dataSource.Take(dataManager.Take).ToList();
         }

         return new ExpenseRecordDataResponse
         {
             Count = totalRecords,
             Result = dataSource
         };
     }

     private bool EvaluateFilterGroup(ExpenseRecord expense, List<WhereFilter> predicates)
     {
         bool match = true;

         foreach (var predicate in predicates)
         {
             if (predicate.Predicates != null && predicate.Predicates.Count > 0)
             {
                 bool nestedMatch = false;
                 foreach (var nestedPredicate in predicate.Predicates)
                 {
                     nestedMatch |= EvaluatePredicate(expense, nestedPredicate);
                 }
                 match &= nestedMatch;
             }
             else
             {
                 match &= EvaluateSinglePredicate(expense, predicate);
             }
         }

         return match;
     }

     private bool EvaluatePredicate(ExpenseRecord expense, WhereFilter predicate)
     {
         if (predicate.Predicates != null && predicate.Predicates.Count > 0)
         {
             bool nestedMatch = false;
             foreach (var nestedPredicate in predicate.Predicates)
             {
                 nestedMatch |= EvaluatePredicate(expense, nestedPredicate);
             }
             return nestedMatch;
         }
         else
         {
             return EvaluateSinglePredicate(expense, predicate);
         }
     }

     private bool EvaluateSinglePredicate(ExpenseRecord expense, WhereFilter predicate)
     {
         if (string.IsNullOrEmpty(predicate.Field) || string.IsNullOrEmpty(predicate.Operator))
             return false;

         string fieldName = predicate.Field;
         object fieldValue = predicate.Value;
         string operation = predicate.Operator.ToLower();

         var property = expense.GetType().GetProperty(fieldName);
         if (property == null) return false;

         var propertyValue = property.GetValue(expense);
         if (propertyValue == null) return false;

         switch (operation)
         {
             case "equal":
                 return propertyValue.ToString().Equals(fieldValue.ToString(), StringComparison.OrdinalIgnoreCase);
             case "notequal":
                 return !propertyValue.ToString().Equals(fieldValue.ToString(), StringComparison.OrdinalIgnoreCase);
             case "contains":
                 return propertyValue.ToString().IndexOf(fieldValue.ToString(), StringComparison.OrdinalIgnoreCase) >= 0;
             case "startswith":
                 return propertyValue.ToString().StartsWith(fieldValue.ToString(), StringComparison.OrdinalIgnoreCase);
             case "endswith":
                 return propertyValue.ToString().EndsWith(fieldValue.ToString(), StringComparison.OrdinalIgnoreCase);
             case "greaterthan":
                 return Convert.ToDouble(propertyValue) > Convert.ToDouble(fieldValue);
             case "lessthan":
                 return Convert.ToDouble(propertyValue) < Convert.ToDouble(fieldValue);
             case "greaterthanorequal":
                 return Convert.ToDouble(propertyValue) >= Convert.ToDouble(fieldValue);
             case "lessthanorequal":
                 return Convert.ToDouble(propertyValue) <= Convert.ToDouble(fieldValue);
             default:
                 return false;
         }
     }
 }
Supported Filter Operators:
| Operator | Purpose | Example |
|---|---|---|
equal |
Exact match | Amount equals 500 |
notequal |
Not equal to value | Status not equal to “Rejected” |
contains |
Contains substring (case-insensitive) | Description contains “travel” |
startswith |
Starts with value | EmployeeName starts with “John” |
endswith |
Ends with value | Category ends with “Supplies” |
greaterthan |
Greater than numeric value | Amount > 1000 |
lessthan |
Less than numeric value | TaxPct < 0.15 |
greaterthanorequal |
Greater than or equal | Amount >= 500 |
lessthanorequal |
Less than or equal | TaxPct <= 0.10 |
How Filter Variables are Passed:
When filter conditions are applied, the DataGrid automatically sends:
  {
   "dataManager": {
       "Where": [
         {
           "Condition": "and",
           "Predicates":[
            {
              "Operator":"or",
              "Predicates": [
                {
                  "Field": "Department",
                  "Value": "Finance",
                  "Operator": "equal"
                },
                {
                  "Field": "Department",
                  "Value": "HR & People",
                  "Operator": "equal"
                }
              ]
            }
           ]
         }
       ],
       "Skip": 0,
       "Take": 10,
       "RequiresCounts": true
    }
}
Filter Logic with Multiple Checkbox Selections:
When multiple checkboxes are selected for the same column (for example, Department = “Finance” OR “HR & People”), the nested predicates structure processes these selections using OR logic:
- Top-level predicates are combined with AND logic.
- Nested predicates within a field are combined with OR logic.
- This allows expressions like: (Department = “Finance” OR “HR & People”).
The backend resolver receives this and processes the filter conditions in the GetExpenseRecordData method using recursive evaluation to handle any depth of nesting. Filtering feature is now active.
Step 10: Implement Grouping feature
Grouping enables organizing and displaying records based on column values. This feature arranges data into expandable and collapsible group hierarchies, improving the ability to analyze and interpret data patterns.
Instructions:
- Ensure the
<SfGrid>component has AllowGrouping=”true”.
<SfGrid TValue="ExpenseRecord"
        AllowPaging="true"
        AllowGrouping="true"
        Toolbar="@ToolbarItems">
    <SfDataManager Url="http://localhost:5272/graphql" GraphQLAdaptorOptions="@adaptorOptions" Adaptor="Adaptors.GraphQLAdaptor"></SfDataManager>
    <GridGroupSettings>
        <CaptionTemplate>
            @{
                var groupData = context as CaptionTemplateContext;
                <span class="groupItems">
                    @groupData.HeaderText - @groupData.Key : @groupData.Count item@(groupData.Count == 1 ? "" : "s")
                </span>
            }
        </CaptionTemplate>
    </GridGroupSettings>
    <GridPageSettings PageSize="10"></GridPageSettings>
    <!-- Grid columns configuration -->
</SfGrid>
Group Caption Customization:
The <CaptionTemplate> in the grid allows customization of group header text. Access group metadata using CaptionTemplateContext:
| Property | Purpose | Example |
|---|---|---|
groupData.HeaderText |
Display text for the group field | “Department” |
groupData.Key |
The group value/key | “Finance” |
groupData.Count |
Number of records in the group | 5 |
groupData.Field |
The field name being grouped | “Department” |
- Update the
GetExpenseRecordDatamethod in theGraphQLQueryclass to handle grouping:
namespace Grid_GraphQLAdaptor.Models;

public class GraphQLQuery
{
    public ExpenseRecordDataResponse GetExpenseRecordData(DataManagerRequestInput dataManager)
    {
        List<ExpenseRecord> dataSource = ExpenseRecord.GetAllRecords();

        if (dataManager.Group != null && dataManager.Group.Count > 0)
        {
            dataSource = ApplyGrouping(dataSource, dataManager.Group);
        }

        int totalRecords = dataSource.Count;

        if (dataManager.Skip != 0)
        {
            dataSource = dataSource.Skip(dataManager.Skip).ToList();
        }
        if (dataManager.Take != 0)
        {
            dataSource = dataSource.Take(dataManager.Take).ToList();
        }

        return new ExpenseRecordDataResponse
        {
            Count = totalRecords,
            Result = dataSource
        };
    }

    private List<ExpenseRecord> ApplyGrouping(List<ExpenseRecord> dataSource, List<string> groupFields)
    {
        if (groupFields == null || groupFields.Count == 0)
            return dataSource;

        var sortedData = dataSource;
        foreach (var groupField in groupFields)
        {
            var property = typeof(ExpenseRecord).GetProperty(groupField);
            if (property != null)
            {
                sortedData = sortedData.OrderBy(x => property.GetValue(x) ?? string.Empty).ToList();
            }
        }

        return sortedData;
    }
}
How Group Variables are Passed:
When a column header is dragged into the grouping area, the DataGrid automatically sends:
{
  "dataManager": {
      "Group": [
        "Department",
        "ReimbursementStatus"
      ],
      "Skip": 0,
      "Take": 10,
      "RequiresCounts": true
    }
}
Backend Processing Order:
When multiple data operations are combined with grouping:
- Search - Filter records by search keywords
- Filter - Apply column filters
- Sort - Apply additional sorting within groups
- Group - Sort records by group fields
- Paging - Slice results for current page
This sequence ensures optimal performance and predictable results.
The backend resolver receives the group specifications in the GetExpenseRecordData method and sorts the data accordingly, enabling the DataGrid to display properly grouped records. Grouping feature is now active.
Perform CRUD Operations
CRUD operations (Create, Read, Update, Delete) provide complete data‑management capabilities within the DataGrid. The DataGrid offers built‑in dialogs and action buttons to perform these operations, while backend resolvers execute the corresponding data modifications.
Add the Grid GridEditSettings and Toolbar configuration to enable create, read, update, and delete (CRUD) operations.
 <SfGrid TValue="ExpenseRecord"
         AllowPaging="true"
         AllowFiltering="true"
         Toolbar="@ToolbarItems">
     <SfDataManager Url="http://localhost:5272/graphql" GraphQLAdaptorOptions="@adaptorOptions" Adaptor="Adaptors.GraphQLAdaptor"></SfDataManager>
     <GridPageSettings PageSize="10"></GridPageSettings>
     <GridEditSettings AllowAdding="true" Mode="EditMode.Dialog"></GridEditSettings>
     <!-- Grid columns configuration -->
 </SfGrid>
Add the toolbar items list in the @code block:
@code {
    private List<string> ToolbarItems = new List<string> { "Add", "Edit", "Delete", "Update", "Cancel", "Search"};

    // GraphQLAdaptorOptions code...
}
Insert
The Insert operation enables adding new expense records to the system. When the Add button in the toolbar is selected, the DataGrid displays a dialog containing the required input fields. After the data is entered and submitted, a GraphQL mutation transmits the new record to the backend for creation.
Instructions:
- Update the
GraphQLAdaptorOptionsin the@codeblock to include the Insert mutation:
 @code {
     private GraphQLAdaptorOptions adaptorOptions = new GraphQLAdaptorOptions
     {
         Query = @"query expenseRecordData($dataManager: DataManagerRequestInput!) { ... }",
         ResolverName = "expenseRecordData",
         Mutation = new Syncfusion.Blazor.Data.GraphQLMutation
         {
             Insert = @"mutation create($record: ExpenseRecordInput!, $index: Int!, $action: String!, $additionalParameters: Any) {
                 createExpense(record: $record, index: $index, action: $action, additionalParameters: $additionalParameters) {
                     expenseId
                     employeeName
                     // Add other fields
                 }
             }"
         }
     };
}- Implement the
CreateExpensemethod in theGraphQLMutationclass:
 namespace Grid_GraphQLAdaptor.Models;

 public class GraphQLMutation
 {
     public ExpenseRecord CreateExpense(ExpenseRecord record, int index, string action, [GraphQLType(typeof(AnyType))] IDictionary<string, object> additionalParameters)
     {
         var expenses = ExpenseRecord.GetAllRecords();
         if (string.IsNullOrWhiteSpace(record.ExpenseId))
         {
             record.ExpenseId = GenerateExpenseId(expenses);
         }

         record.TotalAmount = record.Amount + (record.Amount * record.TaxPct);

         if (index >= 0 && index <= expenses.Count)
         {
             expenses.Insert(index, record);
         }
         else
         {
             expenses.Add(record);
         }

         return record;
     }

     /// <summary>
     /// Generates a unique ExpenseId by extracting prefix from existing IDs and incrementing the sequence number.
     /// </summary>
     /// <param name="expenses">The list of existing expense records.</param>
     /// <returns>A newly generated unique ExpenseId.</returns>
     private string GenerateExpenseId(List<ExpenseRecord> expenses)
     {
         string detectedPrefix = "EXP";
         var firstWithLetters = expenses
             .Select(e => e.ExpenseId)
             .FirstOrDefault(id => !string.IsNullOrWhiteSpace(id) && char.IsLetter(id[0]));
         if (!string.IsNullOrWhiteSpace(firstWithLetters))
         {
             int i = 0;
             while (i < firstWithLetters.Length && char.IsLetter(firstWithLetters[i])) i++;
             if (i > 0) detectedPrefix = firstWithLetters.Substring(0, i);
         }

         int maxSeq = expenses
             .Select(e => e.ExpenseId)
             .Where(id => !string.IsNullOrWhiteSpace(id))
             .Select(id =>
             {
                 int j = id.Length - 1;
                 while (j >= 0 && char.IsDigit(id[j])) j--;
                 var numPart = id.Substring(j + 1);
                 return int.TryParse(numPart, out var n) ? n : 0;
             })
             .DefaultIfEmpty(1000) // start sequence at 1001 if nothing found
             .Max();

         return $"{detectedPrefix}{maxSeq + 1}";
     }
 }
Helper Method Explanation:
- The
GenerateExpenseId()helper method extracts the alphabetic prefix (e.g., “EXP”) from existing expense IDs and increments the numeric sequence number to create a unique identifier. - This method is reused in both
CreateExpense()andBatchUpdate()operations to ensure consistent ID generation across all add operations.
Insert Operation Logic Breakdown:
| Step | Purpose | Implementation |
|---|---|---|
| 1. Receive Input | Backend receives new record data from client |
CreateExpense method parameter record contains all field values |
| 2. Generate ID | Auto-generate unique ExpenseId if not provided | Extract prefix from existing IDs, find max sequence number, increment by 1 |
| 3. Calculate Totals | Compute derived fields based on input values | TotalAmount = Amount + (Amount * TaxPct) |
| 4. Insert Record | Add new record to data source at specified position or at end | Use Insert(index, record) for specific position or Add(record) for end |
| 5. Return Created | Send back the created record with generated values | Return record object with populated ExpenseId and TotalAmount |
How Insert Mutation Parameters are Passed:
Unlike data operations such as searching, filtering, and sorting—which rely on the DataManagerRequestInput structure—CRUD operations pass values directly to the corresponding GraphQL mutation. When the Add action is triggered, the dialog is completed, and the form is submitted, the GraphQL adaptor constructs the mutation using the provided field values and sends the following parameters:
GraphQL Mutation Request:
 mutation create($record: ExpenseRecordInput!, $index: Int!, $action: String!, $additionalParameters: Any) {
   createExpense(record: $record, index: $index, action: $action, additionalParameters: $additionalParameters) {
     expenseId
     employeeName
     employeeEmail
     employeeAvatarUrl
     department
     category
     description
     amount
     taxPct
     totalAmount
     expenseDate
     paymentMethod
     currency
     reimbursementStatus
     isPolicyCompliant
     tags
   }
 }
Variables Sent with the Request:
 {
   "record": {
     "expenseId": null,
       "employeeName": "Alice Johnson",
       "employeeEmail": "[email protected]",
       "employeeAvatarUrl": "https://example.com/avatars/alice.png",
       "department": "Finance",
       "category": "Travel & Mileage",
       "description": "Business trip to client office",
       "amount": 750.00,
       "taxPct": 0.10,
       "totalAmount": 0,
       "expenseDate": "2026-01-20T00:00:00Z",
       "paymentMethod": "Corporate Card",
       "currency": "USD - US Dollar",
       "reimbursementStatus": "Submitted",
       "isPolicyCompliant": true,
       "tags": ["Travel", "Client-Billable"]
    },
   "index": 0,
   "action": "add",
   "additionalParameters": {}
 }
Parameter Explanation:
| Parameter | Type | Purpose | Example |
|---|---|---|---|
record |
ExpenseRecord |
The new expense record object with all field values | Expense data filled in the dialog |
index |
int |
The position where the new record should be inserted (0 = top) |
0 for insert at beginning, -1 or higher than count for append |
action |
string |
Type of action being performed (usually “add” for insert) | "add" |
additionalParameters |
Any |
Extra context or custom parameters from the DataGrid | Empty object {} or additional metadata |
Backend Response:
The mutation returns the created record directly:
 {
  "data": {
    "createExpense": {
      "expenseId": "EXP1501",
      "employeeName": "Alice Johnson",
      "employeeEmail": "[email protected]",
      "employeeAvatarUrl": "https://example.com/avatars/alice.png",
      "department": "Finance",
      "category": "Travel & Mileage",
      "description": "Business trip to client office",
      "amount": 750,
      "taxPct": 0.1,
      "totalAmount": 825,
      "expenseDate": "2026-01-20T00:00:00.000Z",
      "paymentMethod": "Corporate Card",
      "currency": "USD - US Dollar",
      "reimbursementStatus": "Submitted",
      "isPolicyCompliant": true,
      "tags": [
        "Travel",
        "Client-Billable"
      ]
    }
  }
}
Update
The Update operation enables modifying existing expense records. When the Edit action is selected from the toolbar and a row is chosen, the DataGrid displays a dialog populated with the current record values. After the data is updated and the form is submitted, a GraphQL mutation transmits the modified record to the backend for processing.
Instructions:
- Update the
GraphQLAdaptorOptionsin the@codeblock to include the Update mutation:
@code {
    private GraphQLAdaptorOptions adaptorOptions = new GraphQLAdaptorOptions
    {
        Query = @"query expenseRecordData($dataManager: DataManagerRequestInput!) { ... }",
        ResolverName = "expenseRecordData",
        Mutation = new Syncfusion.Blazor.Data.GraphQLMutation
        {
            Update = @"mutation update($record: ExpenseRecordInput!, $action: String!, $primaryColumnName: String!, $primaryColumnValue: String!, $additionalParameters: Any) {
                updateExpense(record: $record, action: $action, primaryColumnName: $primaryColumnName, primaryColumnValue: $primaryColumnValue, additionalParameters: $additionalParameters) {
                    expenseId
                    employeeName
                    // Add other fields
                }
            }"
        }
    };
}- Implement the
UpdateExpensemethod in theGraphQLMutationclass:
namespace Grid_GraphQLAdaptor.Models;

public class GraphQLMutation
{
    public ExpenseRecord UpdateExpense(ExpenseRecord record, string action, string primaryColumnName, string primaryColumnValue, [GraphQLType(typeof(AnyType))] IDictionary<string, object> additionalParameters)
    {
        var expenses = ExpenseRecord.GetAllRecords();
        var existingExpense = expenses.FirstOrDefault(x => x.ExpenseId == primaryColumnValue);

        if (existingExpense != null)
        {
            UpdateExpenseProperties(existingExpense, record);
        }

        return existingExpense;
    }

    /// <summary>
    /// Updates all properties of an existing expense record with values from a source record.
    /// </summary>
    /// <param name="target">The existing expense record to update.</param>
    /// <param name="source">The source record containing new values.</param>
    private void UpdateExpenseProperties(ExpenseRecord target, ExpenseRecord source)
    {
        target.EmployeeName = source.EmployeeName;
        target.EmployeeEmail = source.EmployeeEmail;
        target.EmployeeAvatarUrl = source.EmployeeAvatarUrl;
        target.Department = source.Department;
        target.Category = source.Category;
        target.Description = source.Description;
        target.Amount = source.Amount;
        target.TaxPct = source.TaxPct;
        target.Currency = source.Currency;
        target.PaymentMethod = source.PaymentMethod;
        target.ReimbursementStatus = source.ReimbursementStatus;
        target.IsPolicyCompliant = source.IsPolicyCompliant;
        target.Tags = source.Tags;
        target.ExpenseDate = source.ExpenseDate;

        target.TotalAmount = target.Amount + (target.Amount * target.TaxPct);
    }
}
Helper Method Explanation:
- The
UpdateExpenseProperties()helper method encapsulates all property assignment logic, making the update operation cleaner and more maintainable. - This method is reused in both
UpdateExpense()andBatchUpdate()operations to ensure consistent property updates and total amount recalculation across all edit operations.
Update Operation Logic Breakdown:
| Step | Purpose | Implementation |
|---|---|---|
| 1. Find Record | Locate the existing record using primary key value | FirstOrDefault(x => x.ExpenseId == primaryColumnValue) |
| 2. Validate Existence | Ensure the record exists before updating |
if (existingExpense != null) check |
| 3. Update Properties | Replace all property values with modified data | Assign each property from record parameter to existingExpense
|
| 4. Recalculate Totals | Compute derived fields based on updated values | TotalAmount = Amount + (Amount * TaxPct) |
| 5. Preserve ID | Keep original ExpenseId unchanged | ExpenseId is not updated, only retrieved for lookup |
| 6. Return Updated | Send back the modified record with new values | Return existingExpense object with all updates applied |
How Update Mutation Parameters are Passed:
When the Edit action is invoked, the dialog is modified, and the changes are submitted, the GraphQL adaptor constructs the mutation using the following parameters:
GraphQL Mutation Request:
mutation update($record: ExpenseRecordInput!, $action: String!, $primaryColumnName: String!, $primaryColumnValue: String!, $additionalParameters: Any) {
  updateExpense(record: $record, action: $action, primaryColumnName: $primaryColumnName, primaryColumnValue: $primaryColumnValue, additionalParameters: $additionalParameters) {
    expenseId
    employeeName
    employeeEmail
    employeeAvatarUrl
    department
    category
    description
    amount
    taxPct
    totalAmount
    expenseDate
    paymentMethod
    currency
    reimbursementStatus
    isPolicyCompliant
    tags
  }
}
Variables Sent with the Request:
{
  "record": {
    "expenseId": "EXP1001",
    "employeeName": "Alice Johnson",
    "employeeEmail": "[email protected]",
    "employeeAvatarUrl": "https://example.com/avatars/alice.png",
    "department": "Finance",
    "category": "Travel & Mileage",
    "description": "Updated: Flight to New York for client meeting",
    "amount": 850.00,
    "taxPct": 0.12,
    "totalAmount": 0,
    "expenseDate": "2026-01-20T00:00:00Z",
    "paymentMethod": "Corporate Card",
    "currency": "USD - US Dollar",
    "reimbursementStatus": "Under Review",
    "isPolicyCompliant": true,
    "tags": ["Travel", "Client-Billable", "Updated"]
  },
  "action": "save",
  "primaryColumnName": "ExpenseId",
  "primaryColumnValue": "EXP1001",
  "additionalParameters": {}
}
Parameter Explanation:
| Parameter | Type | Purpose | Example |
|---|---|---|---|
record |
ExpenseRecord |
The modified expense record object with updated field values | Expense data with changes made in the dialog |
action |
string |
Type of action being performed (usually “save” for update) | "save" |
primaryColumnName |
string |
Name of the primary key column used to identify the record | "ExpenseId" |
primaryColumnValue |
string |
Value of the primary key to locate which record to update | "EXP1001" |
additionalParameters |
Any |
Extra context or custom parameters from the DataGrid | Empty object {} or additional metadata |
Backend Response:
The mutation returns the updated record with all changes applied:
{
  "data": {
    "updateExpense": {
      "expenseId": "EXP1001",
      "employeeName": "Alice Johnson",
      "employeeEmail": "[email protected]",
      "employeeAvatarUrl": "https://example.com/avatars/alice.png",
      "department": "Finance",
      "category": "Travel & Mileage",
      "description": "Updated: Flight to New York for client meeting",
      "amount": 850,
      "taxPct": 0.12,
      "totalAmount": 952,
      "expenseDate": "2026-01-20T00:00:00.000Z",
      "paymentMethod": "Corporate Card",
      "currency": "USD - US Dollar",
      "reimbursementStatus": "Under Review",
      "isPolicyCompliant": true,
      "tags": [
        "Travel",
        "Client-Billable",
        "Updated"
      ]
    }
  }
}
Delete
The Delete operation enables removing expense records from the system. When the Delete action is selected from the toolbar, a GraphQL mutation issues a delete request to the backend using only the primary key value.
Instructions:
- Update the
GraphQLAdaptorOptionsin the@codeblock to include the Delete mutation:
@code {
    private GraphQLAdaptorOptions adaptorOptions = new GraphQLAdaptorOptions
    {
        Query = @"query expenseRecordData($dataManager: DataManagerRequestInput!) { ... }",
        ResolverName = "expenseRecordData",
        Mutation = new Syncfusion.Blazor.Data.GraphQLMutation
        {
            Delete = @"mutation delete($primaryColumnValue: String!, $additionalParameters: Any) {
                deleteExpense(primaryColumnValue: $primaryColumnValue, additionalParameters: $additionalParameters)
            }"
        }
    };
}- Implement the
DeleteExpensemethod in theGraphQLMutationclass:
namespace Grid_GraphQLAdaptor.Models;

public class GraphQLMutation
{
    public bool DeleteExpense(string primaryColumnValue, [GraphQLType(typeof(AnyType))] IDictionary<string, object> additionalParameters)
    {
        var expenses = ExpenseRecord.GetAllRecords();
        var expenseToDelete = expenses.FirstOrDefault(x => x.ExpenseId == primaryColumnValue);

        if (expenseToDelete != null)
        {
            expenses.Remove(expenseToDelete);
            return true;
        }

        return false;
    }
}
Delete Operation Logic Breakdown:
| Step | Purpose | Implementation |
|---|---|---|
| 1. Receive Key | Backend receives only the primary key value from client |
DeleteExpense method parameter primaryColumnValue contains the record ID |
| 2. Find Record | Locate the record to delete using the primary key | FirstOrDefault(x => x.ExpenseId == primaryColumnValue) |
| 3. Validate Existence | Ensure the record exists before attempting deletion |
if (expenseToDelete != null) check |
| 4. Remove Record | Delete the record from the data source | expenses.Remove(expenseToDelete) |
| 5. Return Status | Send success/failure confirmation to client | Return true if deleted, false if not found |
GraphQL Mutation Request:
mutation delete($primaryColumnValue: String!, $additionalParameters: Any) {
  deleteExpense(primaryColumnValue: $primaryColumnValue, additionalParameters: $additionalParameters)
}
Variables Sent with the Request:
{
  "primaryColumnValue": "EXP1001",
  "additionalParameters": {}
}
Parameter Explanation:
| Parameter | Type | Purpose | Example |
|---|---|---|---|
primaryColumnValue |
string |
Value of the primary key identifying which record to delete | "EXP1001" |
additionalParameters |
Any |
Extra context or custom parameters from the DataGrid | Empty object {} or additional metadata |
Backend Response:
The mutation returns a boolean success/failure indicator:
{
  "data": {
    "deleteExpense": true
  }
}
If the record doesn’t exist:
{
  "data": {
    "deleteExpense": false
  }
}
Batch Update
The Batch Update operation allows adding, updating, and deleting multiple records in a single request.
Instructions:
- Update the
GraphQLAdaptorOptionsin the@codeblock to include the Batch mutation:
@code {
    private GraphQLAdaptorOptions adaptorOptions = new GraphQLAdaptorOptions
    {
        Query = @"query expenseRecordData($dataManager: DataManagerRequestInput!) { ... }",
        ResolverName = "expenseRecordData",
        Mutation = new Syncfusion.Blazor.Data.GraphQLMutation
        {
            Batch = @"mutation batch($changed: [ExpenseRecordInput!], $added: [ExpenseRecordInput!], $deleted: [ExpenseRecordInput!], $action: String!, $primaryColumnName: String!, $additionalParameters: Any, $dropIndex: Int) {
                batchUpdate(changed: $changed, added: $added, deleted: $deleted, action: $action, primaryColumnName: $primaryColumnName, additionalParameters: $additionalParameters, dropIndex: $dropIndex) {
                    expenseId
                    employeeName
                    // Add other fields
                }
            }"
        }
    };
}- Implement the
BatchUpdatemethod in theGraphQLMutationclass:
namespace Grid_GraphQLAdaptor.Models;

using HotChocolate.Types;

public class GraphQLMutation
{
    public List<ExpenseRecord> BatchUpdate(List<ExpenseRecord>? changed, List<ExpenseRecord>? added,
        List<ExpenseRecord>? deleted, string action, string primaryColumnName,
        [GraphQLType(typeof(AnyType))] IDictionary<string, object> additionalParameters, int? dropIndex)
    {
        var expenses = ExpenseRecord.GetAllRecords();

        // Update existing expenses
        if (changed != null)
        {
            foreach (var changedItem in changed)
            {
                var existing = expenses.FirstOrDefault(e => e.ExpenseId == changedItem.ExpenseId);
                if (existing != null)
                {
                    UpdateExpenseProperties(existing, changedItem);
                }
            }
        }

        // Add new expenses
        if (added != null)
        {
            foreach (var newItem in added)
            {
                if (string.IsNullOrWhiteSpace(newItem.ExpenseId))
                {
                    newItem.ExpenseId = GenerateExpenseId(expenses);
                }

                newItem.TotalAmount = newItem.Amount + (newItem.Amount * newItem.TaxPct);

                if (dropIndex.HasValue && dropIndex >= 0 && dropIndex <= expenses.Count)
                    expenses.Insert(dropIndex.Value, newItem);
                else
                    expenses.Add(newItem);
            }
        }

        // Delete expenses
        if (deleted != null)
        {
            foreach (var del in deleted)
            {
                var toRemove = expenses.FirstOrDefault(e => e.ExpenseId == del.ExpenseId);
                if (toRemove != null) expenses.Remove(toRemove);
            }
        }

        return expenses;
    }
}
How Batch Mutation Parameters are Passed:
GraphQL Mutation Request:
mutation batch($changed: [ExpenseRecordInput!], $added: [ExpenseRecordInput!], $deleted: [ExpenseRecordInput!], $action: String!, $primaryColumnName: String!, $additionalParameters: Any, $dropIndex: Int) {
  batchUpdate(changed: $changed, added: $added, deleted: $deleted, action: $action, primaryColumnName: $primaryColumnName, additionalParameters: $additionalParameters, dropIndex: $dropIndex) {
    expenseId
    employeeName
    employeeEmail
    employeeAvatarUrl
    department
    category
    description
    amount
    taxPct
    totalAmount
    expenseDate
    paymentMethod
    currency
    reimbursementStatus
    isPolicyCompliant
    tags
  }
}
Variables Sent with the Request:
{
  "changed": [
    {
      "expenseId": "EXP1002",
      "employeeName": "Alice Johnson",
      "employeeEmail": "[email protected]",
      "employeeAvatarUrl": "https://example.com/avatars/alice.png",
      "department": "Finance",
      "category": "Travel & Mileage",
      "description": "Updated hotel charges",
      "amount": 620.00,
      "taxPct": 0.1,
      "totalAmount": 0,
      "expenseDate": "2026-01-22T00:00:00Z",
      "paymentMethod": "Corporate Card",
      "currency": "USD - US Dollar",
      "reimbursementStatus": "Approved",
      "isPolicyCompliant": true,
      "tags": ["Travel"]
    }
  ],
  "added": [
    {
      "expenseId": null,
      "employeeName": "Bob Smith",
      "employeeEmail": "[email protected]",
      "employeeAvatarUrl": "https://example.com/avatars/bob.png",
      "department": "Engineering",
      "category": "Software & SaaS",
      "description": "API monitoring subscription",
      "amount": 199.99,
      "taxPct": 0.07,
      "totalAmount": 0,
      "expenseDate": "2026-01-25T00:00:00Z",
      "paymentMethod": "Personal Card",
      "currency": "USD - US Dollar",
      "reimbursementStatus": "Submitted",
      "isPolicyCompliant": true,
      "tags": ["SaaS"]
    }
  ],
  "deleted": [
    {
      "expenseId": "EXP1001",
      "amount": 0.00,
      "taxPct": 0.00,
      "totalAmount": 0.00,
      "isPolicyCompliant":false,
      "tags": []
    }
  ],
  "action": "batch",
  "primaryColumnName": "ExpenseId",
  "additionalParameters": {},
  "dropIndex": 0
}
Parameter Explanation:
| Parameter | Type | Purpose | Example |
|---|---|---|---|
| changed | [ExpenseRecord] | Records to update | Modified rows with existing ExpenseId |
| added | [ExpenseRecord] | Records to insert | New rows, ExpenseId optional |
| deleted | [ExpenseRecord] | Records to delete | Objects with ExpenseId only |
| action | string | Batch action indicator | “batch” |
| primaryColumnName | string | Name of primary key column | “ExpenseId” |
| additionalParameters | Any | Extra context from grid | {} |
| dropIndex | Int | Target index for insertion/reorder | 0 |
Backend Response:
{
  "data": {
    "batchUpdate": [
      {
        "expenseId": "EXP1001",
        "employeeName": "Carol Davis",
        "employeeEmail": "[email protected]",
        "employeeAvatarUrl": "https://example.com/avatars/carol.png",
        "department": "Finance",
        "category": "Office Supplies",
        "description": "Printer ink cartridges",
        "amount": 85.5,
        "taxPct": 0.05,
        "totalAmount": 89.78,
        "expenseDate": "2026-01-15T00:00:00.000Z",
        "paymentMethod": "Corporate Card",
        "currency": "USD - US Dollar",
        "reimbursementStatus": "Approved",
        "isPolicyCompliant": true,
        "tags": ["Office"]
      }
    ]
  }
}
Complete Sample Repository
A complete, working sample implementation is available in the GitHub repository.
Summary
This guide demonstrates how to:
- Install required NuGet packages for Hot Chocolate and Syncfusion Blazor. 🔗
- Register Hot Chocolate services and expose the GraphQL endpoint. 🔗
- Configure launch settings and ports for the GraphQL endpoint. 🔗
- Create the ExpenseRecord data model used across the GraphQL schema. 🔗
- Implement GraphQL query resolvers to read data. 🔗
- Create the DataManagerRequestInput input type to carry grid operations. 🔗
- Define GraphQL mutation resolvers for Create, Update, and Delete. 🔗
- Integrate Blazor DataGrid and configure the GraphQL adaptor. 🔗
- Perform CRUD operations from the grid using GraphQL mutations. 🔗
The application now provides a complete solution for managing expenses with a modern Blazor DataGrid integrated with a Hot Chocolate GraphQL backend.