Connecting SQL Server to Blazor Data Grid Using Entity Framework
9 Jun 202624 minutes to read
The Blazor DataGrid supports binding data from a SQL Server database using Entity Framework Core (EF Core). This modern approach provides a more maintainable and type-safe alternative to raw SQL queries.
What is Entity Framework Core?
Entity Framework Core (EF Core) is a software tool that simplifies database operations in .NET applications. It serves as a bridge between C# code and databases like SQL Server.
Key Benefits of Entity Framework Core
- Automatic SQL Generation: Entity Framework Core generates optimized SQL queries automatically, eliminating the need to write raw SQL code.
- Type Safety: Work with strongly-typed objects instead of raw SQL strings, reducing errors.
- Built-in Security: Automatic parameterization prevents SQL injection attacks.
- Version Control for Databases: Manage database schema changes version-by-version through migrations.
- Familiar Syntax: Use LINQ (Language Integrated Query) syntax, which is more intuitive than raw SQL strings.
What is Entity Framework Core SQL Server Provider?
The Microsoft.EntityFrameworkCore.SqlServer package is the official Entity Framework Core provider for SQL Server. It acts as a bridge between Entity Framework Core and SQL Server, allowing applications to read, write, update, and delete data in a SQL Server database.
Prerequisites
Ensure the following software and packages are installed before proceeding:
| Software/Package | Version | Purpose |
|---|---|---|
| Visual Studio 2026 | 18.0 or later | Development IDE with Blazor workload |
| .NET SDK | net8.0 or compatible | Runtime and build tools |
| SQL Server | 2019 or later | Database server |
| Syncfusion.Blazor.Grid | 34.1.29 | DataGrid and UI components |
| Syncfusion.Blazor.Themes | 34.1.29 | Styling for DataGrid components |
| Microsoft.EntityFrameworkCore | 9.0.0 or later | Core framework for database operations |
| Microsoft.EntityFrameworkCore.Tools | 9.0.0 or later | Tools for managing database migrations |
| Microsoft.EntityFrameworkCore.SqlServer | 9.0.0 or later | SQL Server provider for Entity Framework Core |
Setting Up the SQL Server Environment for Entity Framework Core
Step 1: Create the database and Table in SQL Server
First, the SQL Server database structure must be created to store ticket records.
Instructions:
- Open SQL Server Management Studio (SSMS) or any SQL Server client.
- Create a new database named
NetworkSupportDB. - Define a
Ticketstable with the specified schema. - Insert sample data for testing.
Run the following SQL script:
-- Create Database
IF NOT EXISTS (SELECT * FROM sys.databases WHERE name = 'NetworkSupportDB')
BEGIN
    CREATE DATABASE NetworkSupportDB;
END
GO

USE NetworkSupportDB;
GO

-- Create Tickets Table
IF NOT EXISTS (SELECT * FROM sys.tables WHERE name = 'Tickets')
BEGIN
    CREATE TABLE dbo.Tickets (
        TicketId INT PRIMARY KEY IDENTITY(1,1),
        PublicTicketId VARCHAR(50) NOT NULL UNIQUE,
        Title VARCHAR(200) NULL,
        Description TEXT NULL,
        Category VARCHAR(100) NULL,
        Department VARCHAR(100) NULL,
        Assignee VARCHAR(100) NULL,
        CreatedBy VARCHAR(100) NULL,
        Status VARCHAR(50) NOT NULL DEFAULT 'Open',
        Priority VARCHAR(50) NOT NULL DEFAULT 'Medium',
        ResponseDue DATETIME2 NULL,
        DueDate DATETIME2 NULL,
        CreatedOn DATETIME2 NOT NULL DEFAULT GETDATE(),
        UpdatedOn DATETIME2 NOT NULL DEFAULT GETDATE()
    );
END
GO

-- Insert Sample Data (Optional)
INSERT INTO dbo.Tickets (PublicTicketId, Title, Description, Category, Department, Assignee, CreatedBy, Status, Priority, ResponseDue, DueDate, CreatedOn, UpdatedOn)
VALUES
('NET-1001', 'Network Connectivity Issue', 'Users unable to connect to the VPN', 'Network Issue', 'Network Ops', 'John Doe', 'Alice Smith', 'Open', 'High', '2026-01-14 10:00:00', '2026-01-15 17:00:00', '2026-01-13 10:15:30', '2026-01-13 10:15:30'),
('NET-1002', 'Server Performance Degradation', 'Email server responding slowly', 'Performance', 'Infrastructure', 'Emily White', 'Bob Johnson', 'InProgress', 'Critical', '2026-01-13 15:00:00', '2026-01-14 17:00:00', '2026-01-13 11:20:10', '2026-01-13 11:20:10');
GO
After executing this script, the ticket records are stored in the Tickets table within the NetworkSupportDB database. The database is now ready for integration with the Blazor application.
Step 2: Install Required NuGet Packages
Before installing the necessary NuGet packages, a new Blazor Web Application must be created using the default template.
This template automatically generates essential starter files—such as Program.cs, appsettings.json, the wwwroot folder, and the Components folder.
For this guide, a Blazor application named Grid_MSSQL has been created. Once the project is set up, the next step involves installing the required NuGet packages. NuGet packages are software libraries that add functionality to the application. These packages enable Entity Framework Core and SQL Server integration.
Method 1: Using Package Manager Console
- Open Visual Studio 2026.
- Navigate to Tools → NuGet Package Manager → Package Manager Console.
- Run the following commands:
Install-Package Microsoft.EntityFrameworkCore -Version 9.0.0;
Install-Package Microsoft.EntityFrameworkCore.Tools -Version 9.0.0;
Install-Package Microsoft.EntityFrameworkCore.SqlServer -Version 9.0.0;
Install-Package Syncfusion.Blazor.Grid -Version 34.1.29;
Install-Package Syncfusion.Blazor.Themes -Version 34.1.29
Method 2: Using NuGet Package Manager UI
- Open Visual Studio 2026 → Tools → NuGet Package Manager → Manage NuGet Packages for Solution.
- Search for and install each package individually:
- Microsoft.EntityFrameworkCore (version 9.0.0 or later)
- Microsoft.EntityFrameworkCore.Tools (version 9.0.0 or later)
- Microsoft.EntityFrameworkCore.SqlServer (version 9.0.0 or later)
- Syncfusion.Blazor.Grid (version 34.1.29)
- Syncfusion.Blazor.Themes (version 34.1.29)
All required packages are now installed.
Step 3: Create the Data Model
A data model is a C# class that represents the structure of a database table. This model defines the properties that correspond to the columns in the Tickets table.
Instructions:
- Create a new folder named
Datain the Blazor application project. - Inside the
Datafolder, create a new file named Tickets.cs. - Define the Tickets class with the following code:
using System.ComponentModel.DataAnnotations;

namespace Grid_MSSQL.Data
{
    /// <summary>
    /// Represents a ticket record mapped to the 'Tickets' table in the database.
    /// This model defines the structure of ticket-related data used throughout the application.
    /// </summary>
    public class Tickets
    {
        /// <summary>
        /// Gets or sets the unique identifier for the ticket record.
        /// </summary>
        [Key]
        public int TicketId { get; set; }

        /// <summary>
        /// Gets or sets the public-facing ticket identifier (e.g., NET-1001).
        /// </summary>
        public string? PublicTicketId { get; set; }

        /// <summary>
        /// Gets or sets the ticket title or subject.
        /// </summary>
        public string? Title { get; set; }

        /// <summary>
        /// Gets or sets a detailed description of the ticket.
        /// </summary>
        public string? Description { get; set; }

        /// <summary>
        /// Gets or sets the category of the issue (e.g., Network, Hardware, Software).
        /// </summary>
        public string? Category { get; set; }

        /// <summary>
        /// Gets or sets the department responsible for handling the ticket.
        /// </summary>
        public string? Department { get; set; }

        /// <summary>
        /// Gets or sets the name of the agent assigned to the ticket.
        /// </summary>
        public string? Assignee { get; set; }

        /// <summary>
        /// Gets or sets the name of the person who created the ticket.
        /// </summary>
        public string? CreatedBy { get; set; }

        /// <summary>
        /// Gets or sets the current status of the ticket (e.g., Open, In Progress, Resolved, Closed).
        /// </summary>
        public string? Status { get; set; }

        /// <summary>
        /// Gets or sets the priority level of the ticket (e.g., Critical, High, Medium, Low).
        /// </summary>
        public string? Priority { get; set; }

        /// <summary>
        /// Gets or sets the deadline for responding to the ticket.
        /// </summary>
        public DateTime? ResponseDue { get; set; }

        /// <summary>
        /// Gets or sets the deadline for resolving the ticket.
        /// </summary>
        public DateTime? DueDate { get; set; }

        /// <summary>
        /// Gets or sets the timestamp indicating when the ticket was created.
        /// </summary>
        public DateTime? CreatedOn { get; set; }

        /// <summary>
        /// Gets or sets the timestamp indicating when the ticket was last updated.
        /// </summary>
        public DateTime? UpdatedOn { get; set; }
    }
}
Explanation:
- The
[Key]attribute marks theTicketIdproperty as the primary key (a unique identifier for each record). - Each property represents a column in the database table.
- The
?symbol indicates that a property is nullable (can be empty). - The model includes comprehensive XML documentation for each property.
The data model has been successfully created.
Step 4: Configure the DbContext
A DbContext is a special class that manages the connection between the application and the SQL Server database. It handles all database operations such as saving, updating, deleting, and retrieving data.
Instructions:
- Inside the
Datafolder, create a new file named TicketsDbContext.cs. - Define the
TicketsDbContextclass with the following code:
using Microsoft.EntityFrameworkCore;

namespace Grid_MSSQL.Data
{
    /// <summary>
    /// DbContext for Tickets entity
    /// Manages database connections and entity configurations for the Network Support Ticket System
    /// </summary>
    public class TicketsDbContext : DbContext
    {
        public TicketsDbContext(DbContextOptions<TicketsDbContext> options)
            : base(options)
        {
        }

        /// <summary>
        /// DbSet for Ticket entities
        /// </summary>
        public DbSet<Tickets> Tickets => Set<Tickets>();

        /// <summary>
        /// Configures the entity mappings and constraints
        /// </summary>
        protected override void OnModelCreating(ModelBuilder modelBuilder)
        {
            base.OnModelCreating(modelBuilder);

            // Configure Tickets entity
            modelBuilder.Entity<Tickets>(entity =>
            {
                // Primary Key
                entity.HasKey(e => e.TicketId);

                // Auto-increment for Primary Key
                entity.Property(e => e.TicketId)
                    .ValueGeneratedOnAdd();

                // Column configurations
                entity.Property(e => e.PublicTicketId)
                    .HasMaxLength(50)
                    .IsRequired(true);

                entity.Property(e => e.Title)
                    .HasMaxLength(200)
                    .IsRequired(false);

                entity.Property(e => e.Description)
                    .HasMaxLength(int.MaxValue)  // For MAX type
                    .IsRequired(false);

                entity.Property(e => e.Category)
                    .HasMaxLength(100)
                    .IsRequired(false);

                entity.Property(e => e.Department)
                    .HasMaxLength(100)
                    .IsRequired(false);

                entity.Property(e => e.Assignee)
                    .HasMaxLength(100)
                    .IsRequired(false);

                entity.Property(e => e.CreatedBy)
                    .HasMaxLength(100)
                    .IsRequired(false);

                entity.Property(e => e.Status)
                    .HasMaxLength(50)
                    .IsRequired(false)
                    .HasDefaultValue("Open");

                entity.Property(e => e.Priority)
                    .HasMaxLength(50)
                    .IsRequired(false)
                    .HasDefaultValue("Medium");

                // DateTime columns
                entity.Property(e => e.ResponseDue)
                    .HasColumnType("datetime2")
                    .IsRequired(false);

                entity.Property(e => e.DueDate)
                    .HasColumnType("datetime2")
                    .IsRequired(false);

                entity.Property(e => e.CreatedOn)
                    .HasColumnType("datetime2")
                    .IsRequired(false)
                    .HasDefaultValueSql("GETDATE()");

                entity.Property(e => e.UpdatedOn)
                    .HasColumnType("datetime2")
                    .IsRequired(false)
                    .HasDefaultValueSql("GETDATE()");

                // Add indexes for frequently queried columns
                entity.HasIndex(e => e.PublicTicketId)
                    .HasDatabaseName("IX_PublicTicketId");

                entity.HasIndex(e => e.Status)
                    .HasDatabaseName("IX_Status");

                entity.HasIndex(e => e.CreatedOn)
                    .HasDatabaseName("IX_CreatedOn");

                // Table name and schema
                entity.ToTable("Tickets", schema: "dbo");
            });
        }
    }
}
Explanation:
- The
DbContextclass inherits from Entity Framework’sDbContextbase class. - The
Ticketsproperty represents theTicketstable in the database. - The
OnModelCreatingmethod configures how the database columns should behave (maximum length, required/optional, default values, data types, indexes, etc.). - SQL Server-specific configurations include
datetime2for timestamp columns andGETDATE()for default values. - Database indexes are configured for improved query performance on frequently accessed columns.
The TicketsDbContext class is required because:
- It connects the application to the database.
- It manages all database operations.
- It maps C# models to actual database tables.
- It configures how data should look inside the database.
- It enables SQL Server-specific features like indexes and default value functions.
Without this class, Entity Framework Core will not know where to save data or how to create the Tickets table. The DbContext has been successfully configured.
Step 5: Configure the Connection String
A connection string contains the information needed to connect the application to the SQL Server database, including the server address, database name, and authentication credentials.
Instructions:
- Open the
appsettings.jsonfile in the project root. - Add or update the
ConnectionStringssection with the SQL Server connection details:
{
  "ConnectionStrings": {
    "DefaultConnection": "Data Source=CustomSQLServer;Initial Catalog=NetworkSupportDB;Integrated Security=True;Connect Timeout=30;Encrypt=False;Trust Server Certificate=False;Application Intent=ReadWrite;Multi Subnet Failover=False"
  },
  "Logging": {
    "LogLevel": {
      "Default": "Information",
      "Microsoft.AspNetCore": "Warning"
    }
  },
  "AllowedHosts": "*"
}
Connection String Components:
| Component | Description |
|---|---|
| Data Source | The address of the SQL Server instance (server name, IP address, or localhost) |
| Initial Catalog | The database name (in this case, NetworkSupportDB) |
| Integrated Security | Set to True for Windows Authentication; use False with Username/Password for SQL Authentication |
| Connect Timeout | Connection timeout in seconds (default is 15) |
| Encrypt | Enables encryption for the connection (set to True for production environments) |
| Trust Server Certificate | Whether to trust the server certificate (set to False for security) |
| Application Intent | Set to ReadWrite for normal operations or ReadOnly for read-only scenarios |
| Multi Subnet Failover | Used in failover clustering scenarios (typically False) |
The database connection string has been configured successfully.
Step 6: Create the Repository Class
A repository class is an intermediary layer that handles all database operations. This class uses Entity Framework Core to communicate with the database.
Instructions:
- Inside the
Datafolder, create a new file named TicketRepository.cs. - Define the TicketRepository class with the following code:
using Microsoft.EntityFrameworkCore;

namespace Grid_MSSQL.Data
{
    /// <summary>
    /// Repository pattern implementation for Tickets entity using Entity Framework Core
    /// Handles all CRUD operations and business logic for network support tickets
    /// </summary>
    public class TicketRepository
    {
        private readonly TicketsDbContext _context;

        public TicketRepository(TicketsDbContext context)
        {
            _context = context;
        }

        /// <summary>
        /// Retrieves all tickets from the database ordered by ID descending
        /// </summary>
        /// <returns>List of all tickets</returns>
        public async Task<List<Tickets>> GetTicketsDataAsync()
        {
            try
            {
                return await _context.Tickets
                    .OrderByDescending(t => t.TicketId)
                    .ToListAsync();
            }
            catch (Exception ex)
            {
                Console.WriteLine($"Error retrieving tickets: {ex.Message}");
                throw;
            }
        }

        /// <summary>
        /// Adds a new ticket to the database
        /// </summary>
        /// <param name="value">The ticket model to add</param>
        public async Task AddTicketAsync(Tickets? value)
        {
            // Handle logic to add a new ticket to the database
        }

        /// <summary>
        /// Updates an existing ticket
        /// </summary>
        /// <param name="value">The ticket model with updated values</param>
        public async Task UpdateTicketAsync(Tickets? value)
        {
            // Handle logic to update an existing ticket to the database
        }

        /// <summary>
        /// Deletes a ticket from the database
        /// </summary>
        /// <param name="key">The ticket ID to delete</param>
        public async Task RemoveTicketAsync(int? key)
        {
            // Handle logic to delete an existing ticket to the database
        }
    }
}
The repository class has been created.
Step 7: Register Services in Program.cs
The Program.cs file is where application services are registered and configured. This file must be updated to enable Entity Framework Core and the repository pattern.
Instructions:
- Open the
Program.csfile at the project root. - Add the following code after the line
var builder = WebApplication.CreateBuilder(args);:
using Grid_MSSQL.Components;
using Grid_MSSQL.Data;
using Syncfusion.Blazor;
using Microsoft.EntityFrameworkCore;

var builder = WebApplication.CreateBuilder(args);

// Add services to the container.
builder.Services.AddRazorComponents()
    .AddInteractiveServerComponents();
builder.Services.AddSyncfusionBlazor();

// ========== ENTITY FRAMEWORK CORE CONFIGURATION ==========
// Get connection string from appsettings.json
var connectionString = builder.Configuration.GetConnectionString("DefaultConnection");

if (string.IsNullOrEmpty(connectionString))
{
    throw new InvalidOperationException("Connection string 'DefaultConnection' not found in configuration.");
}

// Register DbContext with SQL Server provider
builder.Services.AddDbContext<TicketsDbContext>(options =>
{
    options.UseSqlServer(connectionString);

    // Enable detailed error messages in development
    if (builder.Environment.IsDevelopment())
    {
        options.EnableSensitiveDataLogging();
    }
});

// Register Repository for dependency injection
builder.Services.AddScoped<TicketRepository>();
// ========================================================

var app = builder.Build();

// Configure the HTTP request pipeline.
if (!app.Environment.IsDevelopment())
{
    app.UseExceptionHandler("/Error", createScopeForErrors: true);
    // The default HSTS value is 30 days. You may want to change this for production scenarios, see https://aka.ms/aspnetcore-hsts.
    app.UseHsts();
}

app.UseHttpsRedirection();

app.UseAntiforgery();

app.MapStaticAssets();
app.MapRazorComponents<App>()
    .AddInteractiveServerRenderMode();
app.Run();
Explanation:
-
AddDbContext<TicketsDbContext>: Registers the DbContext with SQL Server as the database provider usingUseSqlServer(). -
EnableSensitiveDataLogging(): Enabled in development to log detailed information about database operations (useful for debugging). -
AddScoped<TicketRepository>: Registers the repository as a scoped service, creating a new instance for each HTTP request. -
AddSyncfusionBlazor(): Registers Blazor components. -
AddRazorComponents()andAddInteractiveServerComponents(): Enables Blazor server-side rendering with interactive components.
The service registration has been completed successfully.
Integrating Blazor DataGrid
Step 1: Install and Configure Blazor DataGrid Components
Syncfusion is a library that provides pre-built UI components like DataGrid, which is used to display data in a table format.
Instructions:
- The Syncfusion.Blazor.Grid package was installed in Step 2 of the previous heading.
- Import the required namespaces in the
Components/_Imports.razorfile:
@using Syncfusion.Blazor
@using Syncfusion.Blazor.Grids
@using Syncfusion.Blazor.Data
@using Syncfusion.Blazor.DropDowns
@using Grid_MSSQL.Data- Add the stylesheet and scripts in the
Components/App.razorfile. Find the<head>section and add:
<!-- Blazor Stylesheet -->
<link href="_content/Syncfusion.Blazor.Themes/tailwind3.css" rel="stylesheet" />

<!-- Blazor Scripts -->
<script src="_content/Syncfusion.Blazor.Core/scripts/syncfusion-blazor.min.js" type="text/javascript"></script>
For this project, the tailwind3 theme is used. A different theme can be selected or the existing theme can be customized based on project requirements. Refer to the Blazor Components Appearance documentation to learn more about theming and customization options.
Blazor components are now configured and ready to use. For additional guidance, refer to the Grid component’s getting‑started documentation.
Step 2: Update the Blazor DataGrid
The Home.razor component will display the ticket data in a Blazor DataGrid with search, filter, sort, and pagination capabilities.
Instructions:
- Open the file named
Home.razorin theComponents/Pagesfolder. - Add the following code to create a basic DataGrid:
@page "/"
@rendermode InteractiveServer
@inject TicketRepository TicketService

<PageTitle>Network Support Ticket System</PageTitle>

<section class="bg-gray-50 dark:bg-gray-950">
    <div class="mx-auto w-full py-12 sm:px-6 px-4">
        <h1 class="mb-4 text-3xl font-bold">Network Support Ticket System</h1>
        <p class="mb-3 text-gray-600">Manage and view all support tickets from the database.</p>

        <!-- Blazor DataGrid Component -->
        <SfGrid TValue="Tickets" AllowPaging="true" AllowSorting="true" AllowFiltering="true">
            <SfDataManager AdaptorInstance="@typeof(CustomAdaptor)" Adaptor="Adaptors.CustomAdaptor"></SfDataManager>

            <GridColumns>
                <!-- Columns configuration -->
            </GridColumns>

            <GridPageSettings PageSize="10"></GridPageSettings>
        </SfGrid>
    </div>
</section>

@code {
    // CustomAdaptor class will be added in the next step
}
Component Explanation:
-
@rendermode InteractiveServer: Enables interactive server-side rendering for the component. -
@inject TicketRepository: Injects the repository to access database methods. -
<SfGrid>: The DataGrid component that displays data in rows and columns. -
<GridColumns>: Defines individual columns in the DataGrid. -
<GridPageSettings>: Configures pagination with 10 records per page.
The Home component has been updated successfully with DataGrid.
Step 3: Implement the CustomAdaptor
The Blazor DataGrid can bind data from a SQL Server database using DataManager and set the Adaptor property to CustomAdaptor for scenarios that require full control over data operations.
The CustomAdaptor is a bridge between the DataGrid and the database. It handles all data operations including reading, searching, filtering, sorting, paging, and CRUD operations. Each operation in the CustomAdaptor’s ReadAsync method handles specific grid functionality. The Blazor DataGrid sends operation details to the API through a DataManagerRequest object. These details can be applied to the data source using methods from the DataOperations class.
Instructions:
- Open the
Components/Pages/Home.razorfile. - Add the following
CustomAdaptorclass code inside the@codeblock:
@code {

    private CustomAdaptor? _customAdaptor;

    protected override void OnInitialized()
    {
        // Initialize the CustomAdaptor with the injected TicketRepository
        _customAdaptor = new CustomAdaptor { TicketService = TicketService };
    }

    /// <summary>
    /// CustomAdaptor class bridges DataGrid interactions with database operations.
    /// This adaptor handles all data retrieval and manipulation for the DataGrid.
    /// </summary>
    public class CustomAdaptor : DataAdaptor
    {
        public static TicketRepository? _ticketService { get; set; }

        public TicketRepository? TicketService
        {
            get => _ticketService;
            set => _ticketService = value;
        }

        /// <summary>
        /// ReadAsync retrieves records from the database and applies data operations.
        /// This method executes when the grid initializes and when filtering, searching, sorting, or paging occurs.
        /// </summary>
        public override async Task<object> ReadAsync(DataManagerRequest dataManagerRequest, string? key = null)
        {
            try
            {
                // Fetch all tickets from the database
                IEnumerable dataSource = await _ticketService!.GetTicketsDataAsync();

                // Apply search operation if search criteria exists
                if (dataManagerRequest.Search != null && dataManagerRequest.Search.Count > 0)
                {
                    dataSource = DataOperations.PerformSearching(dataSource, dataManagerRequest.Search);
                }

                // Apply filter operation if filter criteria exists
                if (dataManagerRequest.Where != null && dataManagerRequest.Where.Count > 0)
                {
                    dataSource = DataOperations.PerformFiltering(dataSource, dataManagerRequest.Where, dataManagerRequest.Where[0].Operator);
                }

                // Apply sort operation if sort criteria exists
                if (dataManagerRequest.Sorted != null && dataManagerRequest.Sorted.Count > 0)
                {
                    dataSource = DataOperations.PerformSorting(dataSource, dataManagerRequest.Sorted);
                }

                // Calculate total record count before paging for accurate pagination
                int totalRecordsCount = dataSource.Cast<Tickets>().Count();

                // Apply paging skip operation
                if (dataManagerRequest.Skip != 0)
                {
                    dataSource = DataOperations.PerformSkip(dataSource, dataManagerRequest.Skip);
                }

                // Apply paging take operation to retrieve only the requested page size
                if (dataManagerRequest.Take != 0)
                {
                    dataSource = DataOperations.PerformTake(dataSource, dataManagerRequest.Take);
                }

                // Handling Grouping
                if (dataManagerRequest.Group != null)
                {
                    foreach (var group in dataManagerRequest.Group)
                    {
                        dataSource = DataUtil.Group<Tickets>(dataSource, group, dataManagerRequest.Aggregates, 0, dataManagerRequest.GroupByFormatter);
                    }
                }

                // Return the result with total count for pagination metadata
                return dataManagerRequest.RequiresCounts
                    ? new DataResult() { Result = dataSource, Count = totalRecordsCount }
                    : (object)dataSource;
            }
            catch (Exception ex)
            {
                throw new Exception($"An error occurred while retrieving data: {ex.Message}");
            }
        }
    }
}
The CustomAdaptor class has been successfully implemented with all data operations.
Common methods in data operations
-
ReadAsync(DataManagerRequest) - Retrieve and process records (search, filter, sort, page, group)
- PerformSearching - Applies search criteria to the collection.
- PerformFiltering - Filters data based on conditions.
- PerformSorting - Sorts data by one or more fields.
- PerformSkip - Skips a defined number of records for paging.
- PerformTake - Retrieves a specified number of records for paging.
- PerformAggregation – Calculates aggregate values such as Sum, Average, Min, and Max.
Step 4: Add Toolbar with CRUD and search options
The toolbar provides buttons for adding, editing, deleting records, and searching the data.
Instructions:
- Open the
Components/Pages/Home.razorfile. - Update the
<SfGrid>component to include the Toolbar property with CRUD and search options:
<SfGrid TValue="Tickets"
        AllowPaging="true"
        AllowSorting="true"
        AllowFiltering="true"
        Toolbar="@ToolbarItems">
    <SfDataManager AdaptorInstance="@typeof(CustomAdaptor)" Adaptor="Adaptors.CustomAdaptor"></SfDataManager>

    <!-- Grid columns configuration -->
</SfGrid>- Add the toolbar items list in the
@codeblock:
@code {
    private List<string> ToolbarItems = new List<string> { "Add", "Edit", "Delete", "Update", "Cancel", "Search"};

    // CustomAdaptor class code...
}
Toolbar Items Explanation:
| Item | Function |
|---|---|
Add |
Opens a form to add a new ticket record. |
Edit |
Enables editing of the selected record. |
Delete |
Deletes the selected record from the database. |
Update |
Saves changes made to the selected record. |
Cancel |
Cancels the current edit or add operation. |
Search |
Displays a search box to find records. |
The toolbar has been successfully added.
Step 5: Running the Application
Build the Application
- Open the terminal or Package Manager Console.
- Navigate to the project directory.
- Run the following command:
dotnet buildRun the Application
Execute the following command:
dotnet runAccess the Application
- Open a web browser.
- Navigate to
https://localhost:5001(or the port shown in the terminal). - The Network Support Ticket System is now running and ready to use.
Step 6: Implement Paging Feature
Paging divides large datasets into smaller pages to improve performance and usability.
Instructions:
- The paging feature is already partially enabled in the
<SfGrid>component with AllowPaging=”true”. - The page size is configured with GridPageSettings.
- No additional code changes are required from the previous steps.
<SfGrid TValue="Tickets"
        AllowPaging="true">
    <SfDataManager AdaptorInstance="@typeof(CustomAdaptor)" Adaptor="Adaptors.CustomAdaptor"></SfDataManager>
    <GridPageSettings PageSize="10"></GridPageSettings>

    <!-- Grid columns configuration -->
</SfGrid>- Update the
ReadAsyncmethod in theCustomAdaptorclass to handle paging:
@code {
    /// <summary>
    /// CustomAdaptor class to handle grid data operations with SQL Server using Entity Framework
    /// </summary>
    public class CustomAdaptor : DataAdaptor
    {
        public static TicketRepository? _ticketService { get; set; }
        public TicketRepository? TicketService
        {
            get => _ticketService;
            set => _ticketService = value;
        }

        public override async Task<object> ReadAsync(DataManagerRequest dataManagerRequest, string? key = null)
        {
            IEnumerable dataSource = await _ticketService!.GetTicketsDataAsync();

            int totalRecordsCount = dataSource.Cast<Tickets>().Count();

            // Handling Paging
            if (dataManagerRequest.Skip != 0)
            {
                dataSource = DataOperations.PerformSkip(dataSource, dataManagerRequest.Skip);
            }

            if (dataManagerRequest.Take != 0)
            {
                dataSource = DataOperations.PerformTake(dataSource, dataManagerRequest.Take);
            }

            return dataManagerRequest.RequiresCounts
                ? new DataResult() { Result = dataSource, Count = totalRecordsCount }
                : (object)dataSource;
        }
    }
}
Fetches ticket data by calling the GetTicketsDataAsync method, which is implemented in the TicketRepository.cs file.
/// <summary>
/// Retrieves all tickets from the database ordered by ID descending
/// </summary>
/// <returns>List of all tickets</returns>
public async Task<List<Tickets>> GetTicketsDataAsync()
{
    try
    {
        return await _context.Tickets
            .OrderByDescending(t => t.TicketId)
            .ToListAsync();
    }
    catch (Exception ex)
    {
        Console.WriteLine($"Error retrieving tickets: {ex.Message}");
        throw;
    }
}
How Paging Works:
- The DataGrid displays 10 records per page (as set in
GridPageSettings). - Navigation buttons allow the user to move between pages.
- When a page is requested, the
ReadAsyncmethod receives skip and take values. - The
DataOperations.PerformSkip()andDataOperations.PerformTake()methods handle pagination. - Only the requested page of records is transmitted from the server.
Paging feature is now active with 10 records per page.
Step 7: Implement Searching feature
Searching allows the user to find records by entering keywords in the search box.
Instructions:
- Ensure the toolbar includes the “Search” item.
<SfGrid TValue="Tickets"
        AllowPaging="true"
        Toolbar="@ToolbarItems">
    <SfDataManager AdaptorInstance="@typeof(CustomAdaptor)" Adaptor="Adaptors.CustomAdaptor"></SfDataManager>
    <GridPageSettings PageSize="10"></GridPageSettings>
    <!-- Grid columns configuration -->
</SfGrid>- Update the
ReadAsyncmethod in theCustomAdaptorclass to handle searching:
@code {
    private List<string> ToolbarItems = new List<string> { "Search"};

    /// <summary>
    /// CustomAdaptor class to handle grid data operations with SQL using Entity Framework
    /// </summary>
    public class CustomAdaptor : DataAdaptor
    {
        public static TicketRepository? _ticketService { get; set; }
        public TicketRepository? TicketService { get => _ticketService; set => _ticketService = value; }

        public override async Task<object> ReadAsync(DataManagerRequest dataManagerRequest, string? key = null)
        {
            IEnumerable dataSource = await _ticketService!.GetTicketsDataAsync();

            // Handling Search
            if (dataManagerRequest.Search != null && dataManagerRequest.Search.Count > 0)
            {
                dataSource = DataOperations.PerformSearching(dataSource, dataManagerRequest.Search);
            }

            int totalRecordsCount = dataSource.Cast<Tickets>().Count();

            // Handling Paging
            if (dataManagerRequest.Skip != 0)
            {
                dataSource = DataOperations.PerformSkip(dataSource, dataManagerRequest.Skip);
            }
            if (dataManagerRequest.Take != 0)
            {
                dataSource = DataOperations.PerformTake(dataSource, dataManagerRequest.Take);
            }

            return dataManagerRequest.RequiresCounts
                ? new DataResult() { Result = dataSource, Count = totalRecordsCount }
                : (object)dataSource;
        }
    }
}
How Searching Works:
- When the user enters text in the search box and presses Enter, the DataGrid sends a search request to the CustomAdaptor.
- The
ReadAsyncmethod receives the search criteria indataManagerRequest.Search. - The
DataOperations.PerformSearching()method filters the data based on the search term across all columns. - Results are returned and displayed in the DataGrid.
Searching feature is now active.
Step 8: Implement Filtering feature
Filtering allows the user to restrict data based on column values using a menu interface.
Instructions:
- Open the
Components/Pages/Home.razorfile. - Add the AllowFiltering property and GridFilterSettings to the
<SfGrid>component:
<SfGrid TValue="Tickets"
        AllowPaging="true"
        AllowFiltering="true"
        Toolbar="@ToolbarItems">
    <SfDataManager AdaptorInstance="@typeof(CustomAdaptor)" Adaptor="Adaptors.CustomAdaptor"></SfDataManager>

    <GridFilterSettings Type="Syncfusion.Blazor.Grids.FilterType.Menu"></GridFilterSettings>

    <!-- Grid columns configuration -->
</SfGrid>- Update the
ReadAsyncmethod in theCustomAdaptorclass to handle filtering:
@code {
    private List<string> ToolbarItems = new List<string> { "Search"};

    /// <summary>
    /// CustomAdaptor class to handle grid data operations with SQL using Entity Framework
    /// </summary>
    public class CustomAdaptor : DataAdaptor
    {
        public static TicketRepository? _ticketService { get; set; }
        public TicketRepository? TicketService { get => _ticketService; set => _ticketService = value; }

        public override async Task<object> ReadAsync(DataManagerRequest dataManagerRequest, string? key = null)
        {
            IEnumerable dataSource = await _ticketService!.GetTicketsDataAsync();

            // Handling Search
            if (dataManagerRequest.Search != null && dataManagerRequest.Search.Count > 0)
            {
                dataSource = DataOperations.PerformSearching(dataSource, dataManagerRequest.Search);
            }

            // Handling Filtering
            if (dataManagerRequest.Where != null && dataManagerRequest.Where.Count > 0)
            {
                dataSource = DataOperations.PerformFiltering(dataSource, dataManagerRequest.Where, dataManagerRequest.Where[0].Operator);
            }

            int totalRecordsCount = dataSource.Cast<Tickets>().Count();

            // Handling Paging
            if (dataManagerRequest.Skip != 0)
            {
                dataSource = DataOperations.PerformSkip(dataSource, dataManagerRequest.Skip);
            }
            if (dataManagerRequest.Take != 0)
            {
                dataSource = DataOperations.PerformTake(dataSource, dataManagerRequest.Take);
            }

            return dataManagerRequest.RequiresCounts
                ? new DataResult() { Result = dataSource, Count = totalRecordsCount }
                : (object)dataSource;
        }
    }
}
How Filtering Works:
- Click on the dropdown arrow in any column header to open the filter menu.
- Select filtering criteria (equals, contains, greater than, less than, etc.).
- Click the “Filter” button to apply the filter.
- The
ReadAsyncmethod receives the filter criteria indataManagerRequest.Where. - The
DataOperations.PerformFiltering()method applies the filter conditions to the data. - Results are filtered accordingly and displayed in the DataGrid.
Filtering feature is now active.
Step 9: Implement Sorting feature
Sorting enables the user to arrange records in ascending or descending order based on column values.
Instructions:
- Open the
Components/Pages/Home.razorfile. - Add the AllowSorting property to the
<SfGrid>component:
<SfGrid TValue="Tickets"
        AllowPaging="true"
        AllowSorting="true"
        AllowFiltering="true"
        Toolbar="@ToolbarItems">
    <SfDataManager AdaptorInstance="@typeof(CustomAdaptor)" Adaptor="Adaptors.CustomAdaptor"></SfDataManager>

     <GridPageSettings PageSize="10"></GridPageSettings>
     <GridFilterSettings Type="Syncfusion.Blazor.Grids.FilterType.Menu"></GridFilterSettings>

    <!-- Grid columns configuration -->
</SfGrid>- Update the
ReadAsyncmethod in theCustomAdaptorclass to handle sorting:
@code {
    public class CustomAdaptor : DataAdaptor
    {
        public static TicketRepository? _ticketService { get; set; }
        public TicketRepository? TicketService { get => _ticketService; set => _ticketService = value; }

        public override async Task<object> ReadAsync(DataManagerRequest dataManagerRequest, string? key = null)
        {
            IEnumerable dataSource = await _ticketService!.GetTicketsDataAsync();

            // Handling Search
            if (dataManagerRequest.Search != null && dataManagerRequest.Search.Count > 0)
            {
                dataSource = DataOperations.PerformSearching(dataSource, dataManagerRequest.Search);
            }

            // Handling Filtering
            if (dataManagerRequest.Where != null && dataManagerRequest.Where.Count > 0)
            {
                dataSource = DataOperations.PerformFiltering(dataSource, dataManagerRequest.Where, dataManagerRequest.Where[0].Operator);
            }

            // Handling Sorting
            if (dataManagerRequest.Sorted != null && dataManagerRequest.Sorted.Count > 0)
            {
                dataSource = DataOperations.PerformSorting(dataSource, dataManagerRequest.Sorted);
            }

            int totalRecordsCount = dataSource.Cast<Tickets>().Count();

            // Handling Paging
            if (dataManagerRequest.Skip != 0)
            {
                dataSource = DataOperations.PerformSkip(dataSource, dataManagerRequest.Skip);
            }
            if (dataManagerRequest.Take != 0)
            {
                dataSource = DataOperations.PerformTake(dataSource, dataManagerRequest.Take);
            }

            return dataManagerRequest.RequiresCounts
                ? new DataResult() { Result = dataSource, Count = totalRecordsCount }
                : (object)dataSource;
        }
    }
}
How Sorting Works:
- Click on the column header to sort in ascending order.
- Click again to sort in descending order.
- The
ReadAsyncmethod receives the sort criteria indataManagerRequest.Sorted. - The
DataOperations.PerformSorting()method sorts the data based on the specified column and direction. - Records are sorted accordingly and displayed in the DataGrid.
Sorting feature is now active.
Step 10: Implement Grouping feature
Grouping organizes records into hierarchical groups based on column values.
Instructions:
- Open the
Components/Pages/Home.razorfile. - Add the AllowGrouping property to the
<SfGrid>component:
<SfGrid TValue="Tickets"
        AllowPaging="true"
        AllowSorting="true"
        AllowFiltering="true"
        AllowGrouping="true"
        Toolbar="@ToolbarItems">
    <SfDataManager AdaptorInstance="@typeof(CustomAdaptor)" Adaptor="Adaptors.CustomAdaptor"></SfDataManager>
     <GridPageSettings PageSize="10"></GridPageSettings>
     <GridFilterSettings Type="Syncfusion.Blazor.Grids.FilterType.Menu"></GridFilterSettings>
    <!-- Grid columns  -->
</SfGrid>- Update the
ReadAsyncmethod in theCustomAdaptorclass to handle grouping:
@code {
    public class CustomAdaptor : DataAdaptor
    {
        public static TicketRepository? _ticketService { get; set; }
        public TicketRepository? TicketService { get => _ticketService; set => _ticketService = value; }

        public override async Task<object> ReadAsync(DataManagerRequest dataManagerRequest, string? key = null)
        {
            IEnumerable dataSource = await _ticketService!.GetTicketsDataAsync();

            // Handling Search
            if (dataManagerRequest.Search != null && dataManagerRequest.Search.Count > 0)
            {
                dataSource = DataOperations.PerformSearching(dataSource, dataManagerRequest.Search);
            }

            // Handling Filtering
            if (dataManagerRequest.Where != null && dataManagerRequest.Where.Count > 0)
            {
                dataSource = DataOperations.PerformFiltering(dataSource, dataManagerRequest.Where, dataManagerRequest.Where[0].Operator);
            }

            // Handling Sorting
            if (dataManagerRequest.Sorted != null && dataManagerRequest.Sorted.Count > 0)
            {
                dataSource = DataOperations.PerformSorting(dataSource, dataManagerRequest.Sorted);
            }

            int totalRecordsCount = dataSource.Cast<Tickets>().Count();

            // Handling Paging
            if (dataManagerRequest.Skip != 0)
            {
                dataSource = DataOperations.PerformSkip(dataSource, dataManagerRequest.Skip);
            }
            if (dataManagerRequest.Take != 0)
            {
                dataSource = DataOperations.PerformTake(dataSource, dataManagerRequest.Take);
            }

            // Handling Grouping
            if (dataManagerRequest.Group != null)
            {
                foreach (var group in dataManagerRequest.Group)
                {
                    dataSource = DataUtil.Group<Tickets>(dataSource, group, dataManagerRequest.Aggregates, 0, dataManagerRequest.GroupByFormatter);
                }
            }

            return dataManagerRequest.RequiresCounts
                ? new DataResult() { Result = dataSource, Count = totalRecordsCount }
                : (object)dataSource;
        }
    }
}
How Grouping Works:
- Columns can be grouped by dragging the column header into the group drop area.
- Each group can be expanded or collapsed by clicking on the group header.
- The
ReadAsyncmethod receives the grouping instructions throughdataManagerRequest.Group. - The grouping operation is processed using DataUtil.Group, which organizes the records into hierarchical groups based on the selected column.
- Grouping is performed after search, filter, and sort operations, ensuring the grouped data reflects all applied conditions.
- The processed grouped result is then returned to the Grid and displayed in a structured, hierarchical format.
Grouping feature is now active.
Step 11: Perform CRUD operations
CustomAdaptor methods enable users to create, read, update, and delete records directly from the DataGrid. Each operation calls corresponding data layer methods in TicketRepository.cs to execute SQL Server commands.
Add the Grid EditSettings and Toolbar configuration to enable create, read, update, and delete (CRUD) operations.
<SfGrid TValue="Tickets"
        AllowPaging="true"
        AllowSorting="true"
        AllowFiltering="true"
        AllowGrouping="true"
        Toolbar="@ToolbarItems">
    <SfDataManager AdaptorInstance="@typeof(CustomAdaptor)" Adaptor="Adaptors.CustomAdaptor"></SfDataManager>
     <GridPageSettings PageSize="10"></GridPageSettings>
     <GridFilterSettings Type="Syncfusion.Blazor.Grids.FilterType.Menu"></GridFilterSettings>
     <GridEditSettings AllowEditing="true" AllowAdding="true" AllowDeleting="true" Mode="EditMode.Batch"></GridEditSettings>
    <!-- Grid columns  -->
</SfGrid>
Add the toolbar items list in the @code block:
@code {
    private List<string> ToolbarItems = new List<string> { "Add", "Edit", "Delete", "Update", "Cancel", "Search"};

    // CustomAdaptor class code...
}
Insert
Record insertion allows new tickets to be added directly through the DataGrid component. The adaptor processes the insertion request, performs any required business‑logic validation, and saves the newly created record to the SQL Server database.
In Home.razor, implement the InsertAsync method within the CustomAdaptor class:
public class CustomAdaptor : DataAdaptor
{
    public override async Task<object> InsertAsync(DataManager dataManager, object value, string? key)
    {
        if (value is Tickets ticket)
        {
            await _ticketService!.AddTicketAsync(ticket);
        }
        return value;
    }
}
In Data/TicketRepository.cs, the insert method is implemented as:
public async Task AddTicketAsync(Tickets? value)
{
    try
    {
        if (value == null)
            throw new ArgumentNullException(nameof(value), "Ticket cannot be null");

        string generatedPublicTicketId = await GeneratePublicTicketIdAsync();
        value.PublicTicketId = generatedPublicTicketId;

        if (value.CreatedOn == null)
            value.CreatedOn = DateTime.Now;

        if (value.UpdatedOn == null)
            value.UpdatedOn = DateTime.Now;

        _context.Tickets.Add(value);

        await _context.SaveChangesAsync();
    }
    catch (DbUpdateException ex)
    {
        Console.WriteLine($"Database error while adding ticket: {ex.Message}");
        throw;
    }
    catch (Exception ex)
    {
        Console.WriteLine($"Error adding ticket: {ex.Message}");
        throw;
    }
}

private async Task<string> GeneratePublicTicketIdAsync()
{
    try
    {
        var existingTickets = await GetTicketsDataAsync();

        int maxNumber = existingTickets
            .Where(ticket => !string.IsNullOrEmpty(ticket.PublicTicketId) && ticket.PublicTicketId.StartsWith(PublicTicketIdPrefix))
            .Select(ticket =>
            {
                string numberPart = ticket.PublicTicketId!.Substring((PublicTicketIdPrefix + PublicTicketIdSeparator).Length);
                if (int.TryParse(numberPart, out int number))
                    return number;
                return 0;
            })
            .DefaultIfEmpty(PublicTicketIdStartNumber - 1)
            .Max();
        int nextNumber = maxNumber + 1;
        string newPublicTicketId = $"{PublicTicketIdPrefix}{PublicTicketIdSeparator}{nextNumber}";

        return newPublicTicketId;
    }
    catch (Exception ex)
    {
        Console.WriteLine($"Error generating ticket ID: {ex.Message}");
        return $"{PublicTicketIdPrefix}{PublicTicketIdSeparator}{PublicTicketIdStartNumber}";
    }
}
Helper methods explanation:
-
GeneratePublicTicketIdAsync(): A new PublicTicketId is auto-generated using previously generated PublicTicketId.
What happens behind the scenes:
- The form data is collected and validated in the CustomAdaptor’s
InsertAsync()method. - The
TicketRepository.AddTicketAsync()method is called. - The new record is added to the
_context.Ticketscollection. -
SaveChangesAsync()persists the record to the SQL Server database. - The DataGrid automatically refreshes to display the new record.
Now the new ticket is persisted to the database and reflected in the grid.
Update
Record modification allows ticket details to be updated directly within the DataGrid. The adaptor processes the edited row, validates the updated values, and applies the changes to the SQL Server database while ensuring data integrity is preserved.
In Home.razor, implement the UpdateAsync method within the CustomAdaptor class:
public class CustomAdaptor : DataAdaptor
{
    public override async Task<object> UpdateAsync(DataManager dataManager, object value, string? keyField, string key)
    {
        if (value is Tickets ticket)
        {
            await _ticketService!.UpdateTicketAsync(ticket);
        }
        return value;
    }
}
In Data/TicketRepository.cs, the update method is implemented as:
public async Task UpdateTicketAsync(Tickets? value)
{
    try
    {
        if (value == null)
            throw new ArgumentNullException(nameof(value), "Ticket cannot be null");

        if (value.TicketId <= 0)
            throw new ArgumentException("Ticket ID must be valid", nameof(value.TicketId));

        var existingTicket = await _context.Tickets.FindAsync(value.TicketId);
        if (existingTicket == null)
            throw new KeyNotFoundException($"Ticket with ID {value.TicketId} not found");

        existingTicket.PublicTicketId = value.PublicTicketId;
        existingTicket.Title = value.Title;
        existingTicket.Description = value.Description;
        existingTicket.Category = value.Category;
        existingTicket.Department = value.Department;
        existingTicket.Assignee = value.Assignee;
        existingTicket.CreatedBy = value.CreatedBy;
        existingTicket.Status = value.Status;
        existingTicket.Priority = value.Priority;
        existingTicket.ResponseDue = value.ResponseDue;
        existingTicket.DueDate = value.DueDate;
        existingTicket.CreatedOn = value.CreatedOn;
        existingTicket.UpdatedOn = DateTime.Now;

        await _context.SaveChangesAsync();
    }
    catch (DbUpdateConcurrencyException ex)
    {
        Console.WriteLine($"Concurrency error while updating ticket: {ex.Message}");
        throw;
    }
    catch (DbUpdateException ex)
    {
        Console.WriteLine($"Database error while updating ticket: {ex.Message}");
        throw;
    }
    catch (Exception ex)
    {
        Console.WriteLine($"Error updating ticket: {ex.Message}");
        throw;
    }
}
What happens behind the scenes:
- The modified data is collected from the form.
- The CustomAdaptor’s
UpdateAsync()method is called. - The
TicketRepository.UpdateTicketAsync()method is called. - The existing record is retrieved from the database by ID.
- All properties are updated with the new values.
-
SaveChangesAsync()persists the changes to the SQL Server database. - The DataGrid refreshes to display the updated record.
Now modifications are synchronized to the database and reflected in the grid UI.
Delete
Record deletion allows tickets to be removed directly from the DataGrid. The adaptor captures the delete request, executes the corresponding SQL Server DELETE operation, and updates both the database and the grid to reflect the removal.
In Home.razor, implement the RemoveAsync method within the CustomAdaptor class:
public class CustomAdaptor : DataAdaptor
{
    public override async Task<object> RemoveAsync(DataManager dataManager, object value, string? keyField, string key)
    {
        // This method will be invoked when deleting existing records from the Blazor DataGrid component.
        int? recordId = null;
        if (value is int intValue)
        {
            recordId = intValue;
        }
        else if (value is Tickets ticket)
        {
            recordId = ticket.TicketId;
        }
        else if (int.TryParse(value?.ToString(), out int parsedValue))
        {
            recordId = parsedValue;
        }

        if (recordId.HasValue && recordId.Value > 0)
        {
            await _ticketService!.RemoveTicketAsync(recordId);
        }
        return value;
    }
}
In Data/TicketRepository.cs, the delete method is implemented as:
public async Task RemoveTicketAsync(int? key)
{
    try
    {
        if (key == null || key <= 0)
            throw new ArgumentException("Ticket ID cannot be null or invalid", nameof(key));

        var ticket = await _context.Tickets.FindAsync(key);
        if (ticket == null)
            throw new KeyNotFoundException($"Ticket with ID {key} not found");

        _context.Tickets.Remove(ticket);
        await _context.SaveChangesAsync();
    }
    catch (DbUpdateException ex)
    {
        Console.WriteLine($"Database error while deleting ticket: {ex.Message}");
        throw;
    }
    catch (Exception ex)
    {
        Console.WriteLine($"Error deleting ticket: {ex.Message}");
        throw;
    }
}
What happens behind the scenes:
- The user selects a record and clicks “Delete”.
- A confirmation dialog appears (built into the DataGrid).
- If confirmed, the CustomAdaptor’s
RemoveAsync()method is called. - The
TicketRepository.RemoveTicketAsync()method is called. - The record is located in the database by its ID.
- The record is removed from the
_context.Ticketscollection. -
SaveChangesAsync()executes the DELETE statement in SQL Server. - The DataGrid refreshes to remove the deleted record from the UI.
Now tickets are removed from the database and the grid UI reflects the changes immediately.
Batch update
Batch operations combine multiple insert, update, and delete actions into a single request, minimizing network overhead and ensuring transactional consistency by applying all changes atomically to the SQL Server database.
In Home.razor, implement the BatchUpdateAsync method within the CustomAdaptor class:
public class CustomAdaptor : DataAdaptor
{
    public override async Task<object> BatchUpdateAsync(DataManager dataManager, object changed, object added, object deleted, string? keyField, string key, int? dropIndex)
    {
        // Process updated records
        if (changed != null)
        {
            foreach (var record in (IEnumerable<Tickets>)changed)
            {
                await _ticketService!.UpdateTicketAsync(record);
            }
        }

        // Process newly added records
        if (added != null)
        {
            foreach (var record in (IEnumerable<Tickets>)added)
            {
                await _ticketService!.AddTicketAsync(record);
            }
        }

        // Process deleted records
        if (deleted != null)
        {
            foreach (var record in (IEnumerable<Tickets>)deleted)
            {
                await _ticketService!.RemoveTicketAsync(record.TicketId);
            }
        }
        return key;
    }
}
This method is triggered when the DataGrid is operating in Batch Edit mode.
What happens behind the scenes:
- The DataGrid collects all added, edited, and deleted records in Batch Edit mode.
- The combined batch request is passed to the CustomAdaptor’s
BatchUpdateAsync()method. - Each modified record is processed using
TicketRepository.UpdateTicketAsync(). - Each newly added record is saved using
TicketRepository.AddTicketAsync(). - Each deleted record is removed using
TicketRepository.RemoveTicketAsync(). - All repository operations persist changes to the SQL Server database.
- The DataGrid refreshes to display the updated, added, and removed records in a single response.
Now the adaptor supports bulk modifications with atomic database synchronization. All CRUD operations are now fully implemented, enabling comprehensive data management capabilities within the Blazor DataGrid.
Reference links
- InsertAsync(DataManager, object) - Create new records in SQL Server
- UpdateAsync(DataManager, object, string, string) - Edit existing records in SQL Server
- RemoveAsync(DataManager, object, string, string) - Delete records from SQL Server
- BatchUpdateAsync(DataManager, object, object, object, string, string, int?) - Handle bulk operations
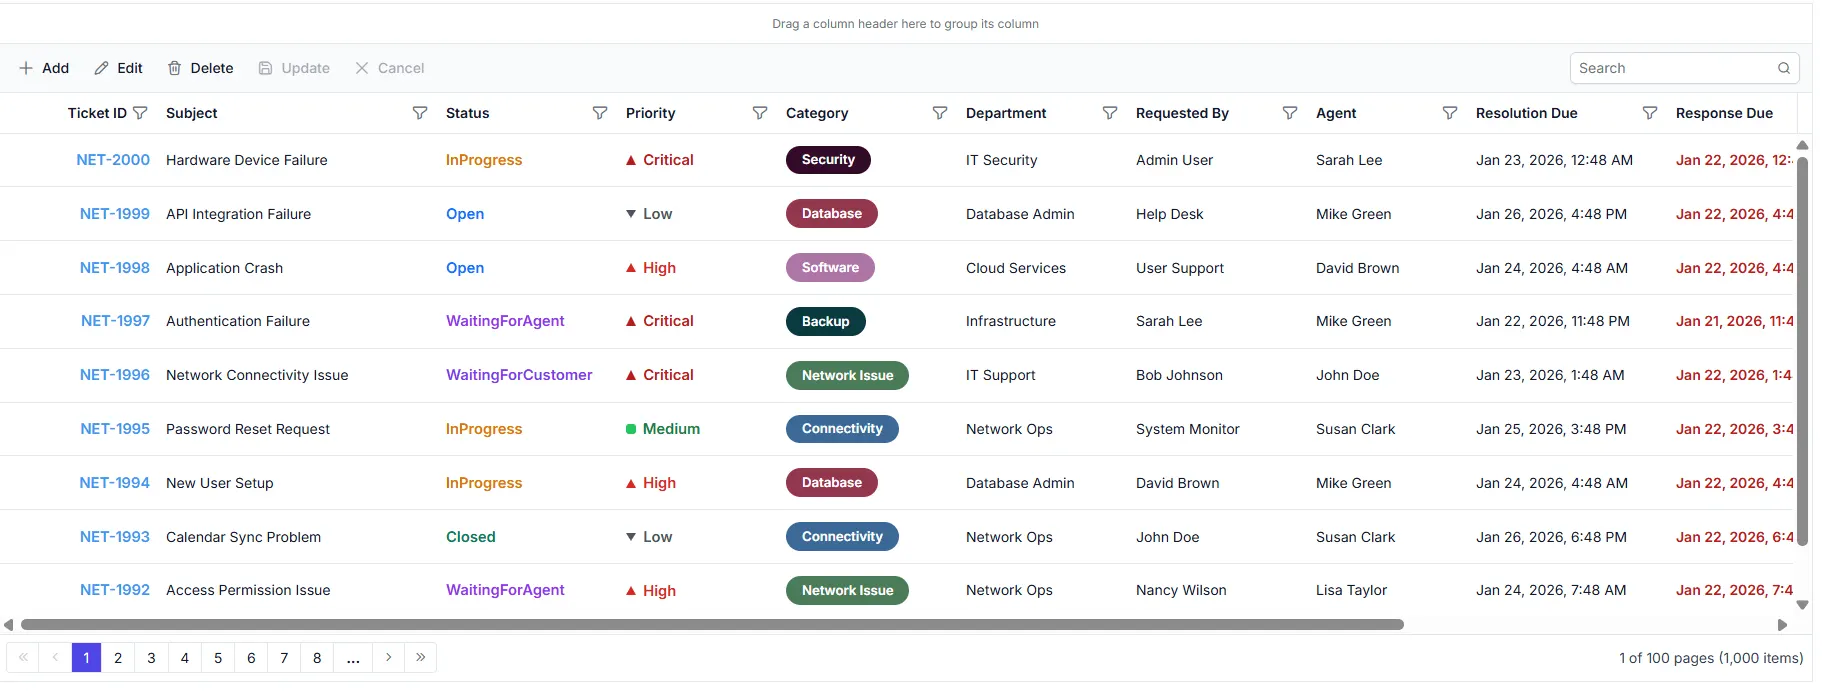
Step 12: Complete Code
Here is the complete and final Home.razor component with all features integrated. This component uses the exact implementation from the Grid_MSSQL project:
@page "/"
@using System.Collections
@inject TicketRepository TicketService
<PageTitle>Network Support Ticket System</PageTitle>

<section class="bg-gray-50 dark:bg-gray-950">
    <div class="mx-auto w-full py-12 sm:px-6 px-4">
        <h1 class="mb-4 text-3xl font-bold">Network Support Ticket System</h1>
        <p class="mb-3 text-gray-600">Manage and view all support tickets from the database.</p>
        <SfGrid TValue="Tickets" Width="100%" Height="500px" AllowSorting="true" AllowFiltering="true" AllowPaging="true" AllowGrouping="true"
            Toolbar="@(new List<string>() { "Add", "Edit", "Delete", "Update", "Cancel", "Search" })">
            <GridFilterSettings Type="Syncfusion.Blazor.Grids.FilterType.Menu"></GridFilterSettings>
            <GridEditSettings AllowEditing="true" AllowDeleting="true" AllowAdding="true" Mode="EditMode.Batch"></GridEditSettings>
            <GridPageSettings PageSize="10"></GridPageSettings>
            <SfDataManager AdaptorInstance="@typeof(CustomAdaptor)" Adaptor="Adaptors.CustomAdaptor"></SfDataManager>
            <GridColumns>
                <GridColumn Field=@nameof(Tickets.TicketId) IsPrimaryKey="true" IsIdentity="true" ShowInColumnChooser="false" ShowColumnMenu="false"></GridColumn>

                <GridColumn Field=@nameof(Tickets.PublicTicketId) IsIdentity="true" HeaderText="Ticket ID" Width="160" TextAlign="TextAlign.Right">
                    <Template>
                        @{
                            var data = (Tickets)context;
                        }
                        <a class="status-text status-ticket-id">
                            @data.PublicTicketId
                        </a>
                    </Template>
                </GridColumn>

                <GridColumn Field=@nameof(Tickets.Title) HeaderText="Subject" Width="280" ClipMode="ClipMode.EllipsisWithTooltip" EditType="EditType.DefaultEdit"></GridColumn>

                <GridColumn Field=@nameof(Tickets.Status) HeaderText="Status" Width="180" EditType="EditType.DropDownEdit" EditorSettings="@StatusDropDownParams">
                    <Template>
                        @{
                            var data = (Tickets)context;
                        }
                        <span class="status-text @GetStatusClass(data)" title="@GetStatusDescription(data)">
                            @data.Status
                        </span>
                    </Template>
                </GridColumn>

                <GridColumn Field=@nameof(Tickets.Priority) HeaderText="Priority" Width="160" EditType="EditType.DropDownEdit" EditorSettings="@PriorityDropDownParams">
                    <Template>
                        @{
                            var data = (Tickets)context;
                        }
                        <span class="priority-pill @GetPriorityClass(data)" title="@GetPriorityDescription(data)">
                            <span class="priority-icon" aria-hidden="true"></span>
                            @data.Priority
                        </span>
                    </Template>
                </GridColumn>

                <GridColumn Field=@nameof(Tickets.Category) HeaderText="Category" Width="180" EditType="EditType.DropDownEdit" EditorSettings="@CategoryDropDownParams">
                    <Template>
                        @{
                            var data = (Tickets)context;
                        }
                        <span class="chip @GetCategoryClass(data)">
                            @data.Category
                        </span>
                    </Template>
                </GridColumn>

                <GridColumn Field=@nameof(Tickets.Department) HeaderText="Department" Width="170" EditType="EditType.DropDownEdit" EditorSettings="@DepartmentDropDownParams"></GridColumn>

                <GridColumn Field=@nameof(Tickets.CreatedBy) HeaderText="Requested By" Width="180" EditType="EditType.DropDownEdit" EditorSettings="@CreatedByDropDownParams"></GridColumn>

                <GridColumn Field=@nameof(Tickets.Assignee) HeaderText="Agent" Width="160" EditType="EditType.DropDownEdit" EditorSettings="@AssigneeDropDownParams"></GridColumn>

                <GridColumn Field=@nameof(Tickets.DueDate) HeaderText="Resolution Due" Width="200" Type="ColumnType.DateTime" Format="MMM d, yyyy, h:mm tt" EditType="EditType.DateTimePickerEdit"></GridColumn>

                <GridColumn Field=@nameof(Tickets.ResponseDue) HeaderText="Response Due" Width="200" EditType="EditType.DateTimePickerEdit">
                    <Template>
                        @{
                            var data = (Tickets)context;
                        }
                        <span class="@GetResponseDueClass(data)" title="@GetResponseDueTooltip(data)">
                            @(data.ResponseDue?.ToString("MMM d, yyyy, h:mm tt") ?? "")
                        </span>
                    </Template>
                </GridColumn>

                <GridColumn Field=@nameof(Tickets.UpdatedOn) HeaderText="Last Modified" Width="200" Type="ColumnType.DateTime" Format="MMM d, yyyy, h:mm tt" EditType="EditType.DateTimePickerEdit"></GridColumn>

                <GridColumn Field=@nameof(Tickets.CreatedOn) HeaderText="Created On" Width="200" Type="ColumnType.DateTime" Format="MMM d, yyyy, h:mm tt" EditType="EditType.DateTimePickerEdit"></GridColumn>
            </GridColumns>
        </SfGrid>
    </div>
</section>
- Set IsPrimaryKey to true for a column that contains unique values.
- Set IsIdentity to true for auto-generated columns to disable editing during add or update operations.
- The EditType property can be used to specify the desired editor for each column. 🔗
- The behavior of default editors can be customized using the EditorSettings property of the
GridColumncomponent. 🔗- Type property of the
GridColumncomponent specifies the data type of a grid column.- The Template property that allows rendering custom elements in a column instead of the default field value. 🔗
@code{
    private CustomAdaptor? _customAdaptor;

    protected override void OnInitialized()
    {
        // Initialize the CustomAdaptor with the injected TicketRepository
        _customAdaptor = new CustomAdaptor { TicketService = TicketService };
    }

    public class CustomAdaptor : DataAdaptor
    {
        public static TicketRepository? _ticketService { get; set; }

        public TicketRepository? TicketService
        {
            get => _ticketService;
            set => _ticketService = value;
        }

        /// <summary>
        /// Returns the data collection after performing data operations based on request from <see cref="DataManagerRequest"/>
        /// </summary>
        /// <param name="DataManagerRequest">DataManagerRequest contains the information regarding paging, grouping, filtering, searching, sorting which is handled on the Blazor DataGrid component side</param>
        /// <param name="Key">An optional parameter that can be used to perform additional data operations.</param>
        /// <returns>The data collection's type is determined by how this method has been implemented.</returns>
        public override async Task<object> ReadAsync(DataManagerRequest dataManagerRequest, string Key = null)
        {
            IEnumerable dataSource = await _ticketService!.GetTicketsDataAsync();

            // Handling Searching in CustomAdaptor.
            if (dataManagerRequest.Search != null && dataManagerRequest.Search.Count > 0)
            {
                dataSource = DataOperations.PerformSearching(dataSource, dataManagerRequest.Search);
            }

            // Handling Filtering in CustomAdaptor.
            if (dataManagerRequest.Where != null && dataManagerRequest.Where.Count > 0)
            {
                dataSource = DataOperations.PerformFiltering(dataSource, dataManagerRequest.Where, dataManagerRequest.Where[0].Operator);
            }

            // Handling Sorting in CustomAdaptor.
            if (dataManagerRequest.Sorted != null && dataManagerRequest.Sorted.Count > 0)
            {
                dataSource = DataOperations.PerformSorting(dataSource, dataManagerRequest.Sorted);
            }

            int totalRecordsCount = dataSource.Cast<Tickets>().Count();

            // Handling paging in CustomAdaptor.
            if (dataManagerRequest.Skip != 0)
            {
                dataSource = DataOperations.PerformSkip(dataSource, dataManagerRequest.Skip);
            }
            if (dataManagerRequest.Take != 0)
            {
                dataSource = DataOperations.PerformTake(dataSource, dataManagerRequest.Take);
            }

            // Handling Grouping
            if (dataManagerRequest.Group != null)
            {
                foreach (var group in dataManagerRequest.Group)
                {
                    dataSource = DataUtil.Group<Tickets>(dataSource, group, dataManagerRequest.Aggregates, 0, dataManagerRequest.GroupByFormatter);
                }
            }

            return dataManagerRequest.RequiresCounts ? new DataResult() { Result = dataSource, Count = totalRecordsCount } : (object)dataSource;
        }

        /// <summary>
        /// Inserts a new data item into the data collection.
        /// </summary>
        /// <param name="DataManager">The DataManager is a data management component used for performing data operations in application.</param>
        /// <param name="value">The new record which is need to be inserted.</param>
        /// <param name="key">An optional parameter that can be used to perform additional data operations.</param>
        /// <returns>Returns the newly inserted record details.</returns>
        public override async Task<object> InsertAsync(DataManager DataManager, object value, string key)
        {
            // Add your insert logic here
            await _ticketService!.AddTicketAsync(value as Tickets);
            return value;
        }

        /// <summary>
        /// Updates an existing data item in the data collection.
        /// </summary>
        /// <param name="DataManager">The DataManager is a data management component used for performing data operations in application.</param>
        /// <param name="value">The modified record which is need to be updated.</param>
        /// <param name="keyField">The primary column name specifies the field name of the primary column.</param>
        /// <param name="key">An optional parameter that can be used to perform additional data operations.</param>
        /// <returns>Returns the updated data item.</returns>
        public override async Task<object> UpdateAsync(DataManager DataManager, object value, string keyField, string key)
        {
            // Add your update logic here
            await _ticketService!.UpdateTicketAsync(value as Tickets);
            return value;
        }

        /// <summary>
        /// Removes a data item from the data collection.
        /// </summary>
        /// <param name="dataManager">The DataManager is a data management component used for performing data operations in application.</param>
        /// <param name="value">The Value specifies the primary column value which is needs to be removed from the grid record.</param>
        /// <param name="keyField">The KeyField specifies the field name of the primary column.</param>
        /// <param name="key">An optional parameter that can be used to perform additional data operations.</param>
        /// <returns>Returns the removed data item.</returns>
        public override async Task<object> RemoveAsync(DataManager dataManager, object value, string keyField, string key)
        {

            await _ticketService!.RemoveTicketAsync(value as int?);
            return value;
        }

        /// <summary>
        /// Batchupdate (Insert, Update, Delete) a collection of data items from the data collection.
        /// </summary>
        /// <param name="dataManager">The DataManager is a data management component used for performing data operations in application.</param>
        /// <param name="changed">The Changed specifies the collection of record updated in batch mode which needs to be updated from the grid record.</param>
        /// <param name="added">The Added specifies the collection of record inserted in batch mode which needs to be inserted from the grid record.</param>
        /// <param name="deleted">The Deleted specifies the collection of record deleted in batch mode which needs to be removed from the grid record.</param>
        /// <param name="keyField">The KeyField specifies the field name of the primary column.</param>
        /// <param name="key">An optional parameter that can be used to perform additional data operations.</param>
        /// <param name="dropIndex">An optional parameter that can be used to perform row drag and drop operation.</param>
        /// <returns>Returns the removed data item.</returns>
        public override async Task<object> BatchUpdateAsync(DataManager dataManager, object changed, object added, object deleted, string keyField, string key, int? dropIndex)
        {
            if (changed != null)
            {
                foreach (var record in (IEnumerable<Tickets>)changed)
                {
                    await _ticketService!.UpdateTicketAsync(record as Tickets);
                }
            }
            if (added != null)
            {
                foreach (var record in (IEnumerable<Tickets>)added)
                {
                    await _ticketService!.AddTicketAsync(record as Tickets);
                }
            }
            if (deleted != null)
            {
                foreach (var record in (IEnumerable<Tickets>)deleted)
                {
                    await _ticketService!.RemoveTicketAsync((record as Tickets).TicketId);
                }
            }
            return key;
        }
    }

    /// <summary>
    /// Provides a list of status options used as the data source for the Status dropdown editor in the grid.
    /// </summary>
    private static List<Tickets> StatusCustomData = new List<Tickets> {
            new Tickets() { Status= "Open" },
            new Tickets() { Status= "InProgress" },
            new Tickets() { Status= "WaitingForCustomer" },
            new Tickets() { Status= "WaitingForAgent" },
            new Tickets() { Status= "Resolved" },
            new Tickets() { Status= "Closed" },
        };

    /// <summary>
    /// Configures the dropdown editor used by the Status column via EditorSettings="@StatusDropDownParams".
    /// </summary>
    private IEditorSettings StatusDropDownParams = new DropDownEditCellParams
    {
        Params = new DropDownListModel<object, object>() { DataSource = StatusCustomData, Query = new Syncfusion.Blazor.Data.Query(), ShowClearButton = true, AllowFiltering = true, }
    };

    /// <summary>
    /// Provides a list of priority options used as the data source for the Priority dropdown editor in the grid.
    /// </summary>
    private static List<Tickets> PriorityCustomData = new List<Tickets> {
            new Tickets() { Priority= "Critical" },
            new Tickets() { Priority= "High" },
            new Tickets() { Priority= "Medium" },
            new Tickets() { Priority= "Low" },
        };

    /// <summary>
    /// Configures the dropdown editor used by the Priority column via EditorSettings="@PriorityDropDownParams".
    /// </summary>
    private IEditorSettings PriorityDropDownParams = new DropDownEditCellParams
    {
        Params = new DropDownListModel<object, object>() { DataSource = PriorityCustomData, Query = new Syncfusion.Blazor.Data.Query(), ShowClearButton = true, AllowFiltering = true, }
    };

    /// <summary>
    /// Provides a list of category options used as the data source for the Category dropdown editor in the grid.
    /// </summary>
    private static List<Tickets> CategoryCustomData = new List<Tickets> {
            new Tickets() { Category= "Network Issue" },
            new Tickets() { Category= "Network" },
            new Tickets() { Category= "Performance" },
            new Tickets() { Category= "VPN" },
            new Tickets() { Category= "Hardware" },
            new Tickets() { Category= "Server issue" },
            new Tickets() { Category= "Server" },
            new Tickets() { Category= "Security" },
            new Tickets() { Category= "Connectivity" },
            new Tickets() { Category= "Software" },
            new Tickets() { Category= "Email" },
            new Tickets() { Category= "Access" },
            new Tickets() { Category= "Backup" },
            new Tickets() { Category= "Database" },
        };

    /// <summary>
    /// Configures the dropdown editor used by the Category column via EditorSettings="@CategoryDropDownParams".
    /// </summary>
    private IEditorSettings CategoryDropDownParams = new DropDownEditCellParams
    {
        Params = new DropDownListModel<object, object>() { DataSource = CategoryCustomData, Query = new Syncfusion.Blazor.Data.Query(), ShowClearButton = true, AllowFiltering = true, }
    };

    /// <summary>
    /// Provides a list of department options used as the data source for the Department dropdown editor in the grid.
    /// </summary>
    private static List<Tickets> DepartmentCustomData = new List<Tickets> {
            new Tickets() { Department= "IT Support" },
            new Tickets() { Department= "Network Ops" },
            new Tickets() { Department= "IT Security" },
            new Tickets() { Department= "Infrastructure" },
            new Tickets() { Department= "Database Admin" },
            new Tickets() { Department= "Help Desk" },
            new Tickets() { Department= "Cloud Services" },
            new Tickets() { Department= "DevOps" },
        };

    /// <summary>
    /// Configures the dropdown editor used by the Department column via EditorSettings="@DepartmentDropDownParams".
    /// </summary>
    private IEditorSettings DepartmentDropDownParams = new DropDownEditCellParams
    {
        Params = new DropDownListModel<object, object>() { DataSource = DepartmentCustomData, Query = new Syncfusion.Blazor.Data.Query(), ShowClearButton = true, AllowFiltering = true, }
    };

    /// <summary>
    /// Provides a list of requester names used as the data source for the Requested By dropdown editor in the grid.
    /// </summary>
    private static List<Tickets> CreatedByCustomData = new List<Tickets> {
            new Tickets() { CreatedBy= "Alice Smith" },
            new Tickets() { CreatedBy= "Bob Johnson" },
            new Tickets() { CreatedBy= "David Brown" },
            new Tickets() { CreatedBy= "Emily White" },
            new Tickets() { CreatedBy= "Nancy Wilson" },
            new Tickets() { CreatedBy= "Robert Harris" },
            new Tickets() { CreatedBy= "System Monitor" },
            new Tickets() { CreatedBy= "Reception Desk" },
            new Tickets() { CreatedBy= "User Support" },
            new Tickets() { CreatedBy= "Admin User" },
            new Tickets() { CreatedBy= "John Doe" },
            new Tickets() { CreatedBy= "Sarah Lee" },
            new Tickets() { CreatedBy= "Help Desk" },
            new Tickets() { CreatedBy= "IT Operations" },
        };

    /// <summary>
    /// Configures the dropdown editor used by the Requested By column via EditorSettings="@CreatedByDropDownParams".
    /// </summary>
    private IEditorSettings CreatedByDropDownParams = new DropDownEditCellParams
    {
        Params = new DropDownListModel<object, object>() { DataSource = CreatedByCustomData, Query = new Syncfusion.Blazor.Data.Query(), ShowClearButton = true, AllowFiltering = true, }
    };

    /// <summary>
    /// Provides a list of agent names used as the data source for the Agent dropdown editor in the grid.
    /// </summary>
    private static List<Tickets> AssigneeCustomData = new List<Tickets> {
            new Tickets() { Assignee= "John Doe" },
            new Tickets() { Assignee= "Emily White" },
            new Tickets() { Assignee= "James Miller" },
            new Tickets() { Assignee= "Lisa Taylor" },
            new Tickets() { Assignee= "Susan Clark" },
            new Tickets() { Assignee= "Sarah Lee" },
            new Tickets() { Assignee= "Robert Harris" },
            new Tickets() { Assignee= "Mike Green" },
            new Tickets() { Assignee= "Nancy Wilson" },
            new Tickets() { Assignee= "David Brown" },
        };

    /// <summary>
    /// Configures the dropdown editor used by the Agent column via EditorSettings="@AssigneeDropDownParams".
    /// </summary>
    private IEditorSettings AssigneeDropDownParams = new DropDownEditCellParams
    {
        Params = new DropDownListModel<object, object>() { DataSource = AssigneeCustomData, Query = new Syncfusion.Blazor.Data.Query(), ShowClearButton = true, AllowFiltering = true, }
    };

    /// <summary>
    /// Returns a CSS class name based on ticket status to style the Status column template.
    /// </summary>
    private string GetStatusClass(Tickets data)
    {
        return data.Status?.ToLower() switch
        {
            "open" => "status-open",
            "inprogress" => "status-inprogress",
            "waitingforcustomer" => "status-waiting-customer",
            "waitingforagent" => "status-waiting-agent",
            "resolved" => "status-resolved",
            "closed" => "status-closed",
            _ => ""
        };
    }

    /// <summary>
    /// Returns the tooltip text shown for status in the Status column template.
    /// </summary>
    private string GetStatusDescription(Tickets data)
    {
        return data.Status ?? "";
    }

    /// <summary>
    /// Returns a CSS class name based on ticket priority to style the Priority column template.
    /// </summary>
    private string GetPriorityClass(Tickets data)
    {
        return data.Priority?.ToLower() switch
        {
            "critical" => "priority-critical",
            "high" => "priority-high",
            "medium" => "priority-medium",
            "low" => "priority-low",
            _ => ""
        };
    }

    /// <summary>
    /// Returns the tooltip text shown for priority in the Priority column template.
    /// </summary>
    private string GetPriorityDescription(Tickets data)
    {
        return data.Priority ?? "";
    }

    /// <summary>
    /// Returns a CSS class name based on ticket category to style the Category column template.
    /// </summary>
    private string GetCategoryClass(Tickets data)
    {
        return data.Category?.ToLower() switch
        {
            "network issue" => "category-network",
            "network" => "category-network",
            "performance" => "category-performance",
            "vpn" => "category-vpn",
            "hardware" => "category-hardware",
            "server issue" => "category-server",
            "server" => "category-server",
            "security" => "category-security",
            "connectivity" => "category-connectivity",
            "software" => "category-software",
            "email" => "category-email",
            "access" => "category-access",
            "backup" => "category-backup",
            "database" => "category-database",
            _ => ""
        };
    }

    /// <summary>
    /// Returns a CSS class name indicating if the response due date is exceeded for the Response Due column.
    /// </summary>
    private string GetResponseDueClass(Tickets data)
    {
        if (!data.ResponseDue.HasValue)
            return "response-due";

        var isExceeded = data.ResponseDue < DateTime.Now;
        return isExceeded ? "response-due response-due-exceeded" : "response-due";
    }

    /// <summary>
    /// Returns the tooltip text for the response due date in the Response Due column template.
    /// </summary>
    private string GetResponseDueTooltip(Tickets data)
    {
        if (!data.ResponseDue.HasValue)
            return "";

        var isExceeded = data.ResponseDue < DateTime.Now;
        return isExceeded ? "Response due date has been exceeded" : data.ResponseDue.Value.ToString("MMM d, yyyy, h:mm tt");
    }
}
- Set IsPrimaryKey to true for a column that contains unique values.
- Set IsIdentity to true for auto-generated columns to disable editing during add or update operations.
Complete Sample Repository
A complete, working sample implementation is available in the GitHub repository.
Summary
This guide demonstrates how to:
- Create a SQL Server database with ticket records. 🔗
- Install necessary NuGet packages for Entity Framework Core and Syncfusion. 🔗
- Create data models and DbContext for database communication. 🔗
- Configure connection strings and register services. 🔗
- Implement the repository pattern for data access. 🔗
- Create a Blazor component with a DataGrid that supports searching, filtering, sorting, paging, and CRUD operations. 🔗
- Handle bulk operations and batch updates. 🔗
The application now provides a complete solution for managing network support tickets with a modern, user-friendly interface integrated with SQL Server.