Connecting SQL Server to Blazor DataGrid via Entity Framework
22 Jun 202624 minutes to read
The Blazor DataGrid supports binding data from SQL Server using Entity Framework Core (EF Core) with REST API endpoints via UrlAdaptor. This approach enables clean separation of UI and data layers while supporting full data operations.
What is Entity Framework Core?
Entity Framework Core (EF Core) is a data access technology for .NET that simplifies working with databases like SQL Server by mapping C# classes to database tables and generating SQL at runtime.
Key Benefits of Entity Framework Core
- Automatic SQL generation with optimized queries
- Strongly typed models for compile-time safety
- Parameterization to mitigate SQL injection
- Migrations to version database schema changes
- LINQ queries for expressive data access
What is Entity Framework Core SQL Server Provider?
The Microsoft.EntityFrameworkCore.SqlServer package is the provider that connects Entity Framework core to SQL Server, enabling CRUD, transactions, and SQL Server-specific features.
What is UrlAdaptor?
UrlAdaptor is a DataManager adaptor that communicates with REST API endpoints for all grid operations. The DataGrid sends read, insert, update, delete, and batch requests to controller actions, which use Entity Framework core to access SQL Server.
Prerequisites
Ensure the following software and packages are installed before proceeding:
| Software/Package | Version | Purpose |
|---|---|---|
| Visual Studio 2026 | 18.0 or later | Development IDE with Blazor workload |
| .NET SDK | net10.0 or compatible | Runtime and build tools |
| SQL Server | 2019 or later | Database server |
| Syncfusion.Blazor.Grid | 34.1.29 | DataGrid and UI components |
| Syncfusion.Blazor.Themes | 34.1.29 | Styling for DataGrid components |
| Microsoft.EntityFrameworkCore | 10.0.2 | Core framework for database operations |
| Microsoft.EntityFrameworkCore.SqlServer | 10.0.2 | SQL Server provider for Entity Framework Core |
Setting Up the SQL Server Environment for Entity Framework Core
Step 1: Create the Database and Table in SQL Server
First, the SQL Server database structure must be created to store order records.
Instructions:
- Open SQL Server Management Studio (SSMS) or any SQL Server client.
- Create a new database named
OrderDB. - Define an
Ordertable with the specified schema. - Insert sample data for testing.
Run the following SQL script:
-- Create Database
IF NOT EXISTS (SELECT * FROM sys.databases WHERE name = 'OrderDB')
BEGIN
    CREATE DATABASE OrderDB;
END
GO

USE OrderDB;
GO

-- Create [Order] Table
IF NOT EXISTS (SELECT * FROM sys.tables WHERE name = 'Order' AND schema_id = SCHEMA_ID('dbo'))
BEGIN
    CREATE TABLE dbo.[Order] (
        OrderID INT IDENTITY(1,1) NOT NULL PRIMARY KEY,
        CustomerID NVARCHAR(50) NOT NULL,
        EmployeeID INT NOT NULL,
        Freight DECIMAL(18,2) NOT NULL,
        ShipCity NVARCHAR(100) NOT NULL
    );
END
GO

-- Insert Sample Data (Optional)
INSERT INTO dbo.[Order] (CustomerID, EmployeeID, Freight, ShipCity)
VALUES
(N'ALFKI', 5, 32.50, N'Berlin'),
(N'BONAP', 7, 120.00, N'Marseille');
GO
After executing this script, the order records are stored in the Order table within the OrderDB database. The database is now ready for integration with the Blazor application.
Step 2: Install Required NuGet Packages
Before installing the necessary NuGet packages, a new Blazor Web Application must be created using the default template. This template automatically generates essential starter files—such as Program.cs, appsettings.json, wwwroot, and Components.
For this guide, a Blazor application named Grid_EF_UrlAdaptor has been created. Once the project is set up, the next step involves installing the required NuGet packages. These packages enable Entity Framework Core with SQL Server provider and add UI components.
Method 1: Using Package Manager Console
- Open Visual Studio 2026.
- Navigate to Tools → NuGet Package Manager → Package Manager Console.
- Run the following commands:
Install-Package Microsoft.EntityFrameworkCore -Version 10.0.2;
Install-Package Microsoft.EntityFrameworkCore.SqlServer -Version 10.0.2;
Install-Package Syncfusion.Blazor.Grid -Version 34.1.29;
Install-Package Syncfusion.Blazor.Themes -Version 34.1.29
Method 2: Using NuGet Package Manager UI
- Open Visual Studio 2026 → Tools → NuGet Package Manager → Manage NuGet Packages for Solution.
- Search for and install each package individually:
- Microsoft.EntityFrameworkCore (version 10.0.2)
- Microsoft.EntityFrameworkCore.SqlServer (version 10.0.2)
- Syncfusion.Blazor.Grid (version 34.1.29)
- Syncfusion.Blazor.Themes (version 34.1.29)
All required packages are now installed.
Step 3: Create the Data Model
A data model is a C# class that represents the structure of a database table. This model defines the properties that correspond to the columns in the Order table.
Instructions:
- Create a new folder named
Datain the Blazor application project. - Inside the
Datafolder, create a new file named Order.cs. - Define the Order class with the following code:
using System.ComponentModel.DataAnnotations.Schema;

namespace Grid_EF_UrlAdaptor.Data
{
    [Table("Order")]
    public class Order
    {
        public int OrderID { get; set; }
        public string CustomerID { get; set; }
        public int EmployeeID { get; set; }
        public decimal Freight { get; set; }
        public string ShipCity { get; set; }
    }
}
Explanation:
-
[Table("Order")]maps the entity explicitly to the SQL table namedOrder. - Each property represents a column in the table.
-
OrderIDis the identifier used as the primary key in the table script created earlier.
The data model has been successfully created.
Step 4: Configure the DbContext
A DbContext is a special class that manages the connection between the application and the SQL Server database. It handles all database operations such as saving, updating, deleting, and retrieving data.
Instructions:
- Inside the
Datafolder, create a new file named OrderDbContext.cs. - Define the
OrderDbContextclass with the following code:
using Microsoft.EntityFrameworkCore;

namespace Grid_EF_UrlAdaptor.Data
{
    public class OrderDbContext : DbContext
    {
        public OrderDbContext(DbContextOptions<OrderDbContext> options) : base(options) { }
        public DbSet<Order> Orders { get; set; }

        protected override void OnModelCreating(ModelBuilder modelBuilder)
        {
            base.OnModelCreating(modelBuilder);
            // Explicitly map DbSet<Order> to the [Order] table
            modelBuilder.Entity<Order>().ToTable("Order");
        }
    }
}
Explanation:
-
OrderDbContextinherits fromDbContextand exposesDbSet<Order>to query and saveOrderentities. -
modelBuilder.Entity<Order>().ToTable("Order")ensures Entity Framework core maps the entity to theOrdertable.
The DbContext has been successfully configured.
Step 5: Configure the Connection String
A connection string contains the information needed to connect the application to the SQL Server database, including the server address, database name, and authentication credentials.
Instructions:
- Open the appsettings.json file in the project root.
- Add or verify the
ConnectionStringssection with the SQL Server connection details:
{
  "ConnectionStrings": {
    "ConnectionString": "Data Source=CustomSQLServer;Initial Catalog=OrderDB;Integrated Security=True;Connect Timeout=30;Encrypt=False;Trust Server Certificate=False;Application Intent=ReadWrite;Multi Subnet Failover=False;Command Timeout=30"
  },
  "Logging": {
    "LogLevel": {
      "Default": "Information",
      "Microsoft.AspNetCore": "Warning"
    }
  },
  "AllowedHosts": "*"
}
Connection String Components:
| Component | Description |
|---|---|
| Data Source | The SQL Server instance (e.g., CustomSQLServer) |
| Initial Catalog | The database name (OrderDB) |
| Integrated Security |
True for Windows Authentication |
| Connect Timeout | Connection timeout in seconds |
| Encrypt | Enables encryption for the connection |
| Trust Server Certificate | Whether to trust the server certificate |
| Application Intent |
ReadWrite for normal operations |
| Multi Subnet Failover | Typically False unless using multi-subnet clustering |
| Command Timeout | Command execution timeout in seconds |
The database connection string has been configured successfully.
Step 6: Create the Grid API Controller
A controller exposes REST API endpoints for the grid to read data. This step adds minimal POST endpoint that return empty results. Additional CRUD and batch endpoints will be added later when configuring UrlAdaptor.
Instructions:
- Create a new folder named
Controllersin the project. - Inside the
Controllersfolder, create a new file named GridController.cs. - Add the following code:
using Microsoft.AspNetCore.Mvc;
using Grid_EF_UrlAdaptor.Data;
using System.Collections.Generic;

namespace Grid_EF_UrlAdaptor.Controllers
{
    [ApiController]
    [Route("api/[controller]")]
    public class GridController : ControllerBase
    {
        private readonly OrderDbContext _context;

        public GridController(OrderDbContext context)
        {
            _context = context;
        }

        // POST: api/Grid (DataManager read)
        [HttpPost]
        public ActionResult<object> Post([FromBody] DataManagerRequest dataManagerRequest)
        {
            return Ok(new { result = new List<Order>(), count = 0 });
        }
    }
}
The controller has been created with basic endpoint.
Step 7: Register Services in Program.cs
The Program.cs file is where application services are registered and configured. This step enables Entity Framework Core, controllers, Blazor, and maps controller routes.
Instructions:
- Open the Program.cs file at the project root.
- Add the following code after the line
var builder = WebApplication.CreateBuilder(args);:
using Grid_EF_UrlAdaptor.Components;
using Grid_EF_UrlAdaptor.Data;
using Microsoft.EntityFrameworkCore;
using Syncfusion.Blazor;

var builder = WebApplication.CreateBuilder(args);

// Add services to the container.
builder.Services.AddRazorComponents()
    .AddInteractiveServerComponents();
builder.Services.AddSyncfusionBlazor();
builder.Services.AddControllers();

// ========== ENTITY FRAMEWORK CORE CONFIGURATION ==========
// Get connection string from appsettings.json
var connectionString = builder.Configuration.GetConnectionString("ConnectionString");
// Register DbContext with SQL Server provider
builder.Services.AddDbContext<OrderDbContext>(options =>
{
    options.UseSqlServer(connectionString);
});
// ========================================================

var app = builder.Build();

// Configure the HTTP request pipeline.
if (!app.Environment.IsDevelopment())
{
    app.UseExceptionHandler("/Error", createScopeForErrors: true);
    app.UseHsts();
}

app.UseStatusCodePagesWithReExecute("/not-found", createScopeForStatusCodePages: true);
app.UseHttpsRedirection();

app.UseAntiforgery();
app.MapControllers();
app.MapStaticAssets();
app.MapRazorComponents<App>()
    .AddInteractiveServerRenderMode();

app.Run();
Explanation:
-
AddControllers()registers MVC controllers for REST endpoints. -
AddDbContext<OrderDbContext>()configures Entity Framework core to use SQL Server with theConnectionStringfrom appsettings.json. -
MapControllers()exposes routes like/api/Grid. - Blazor and Razor components are registered for the UI.
Integrating Blazor DataGrid with UrlAdaptor
Step 1: Install and Configure Blazor DataGrid Components
Syncfusion is a library that provides pre-built UI components like DataGrid, which is used to display data in a table format.
Instructions:
- The Syncfusion.Blazor.Grid and Syncfusion.Blazor.Themes packages were installed in Step 2 of the previous section.
- Import the required namespaces in the
Components/_Imports.razorfile:
@using Syncfusion.Blazor
@using Syncfusion.Blazor.Grids
@using Syncfusion.Blazor.Data
@using Grid_EF_UrlAdaptor.Data- Add the stylesheet and scripts in the
Components/App.razorfile. Find the<head>section and add:
<!-- Blazor Stylesheet -->
<link href="_content/Syncfusion.Blazor.Themes/fluent.css" rel="stylesheet" />

<!-- Blazor Scripts -->
<script src="_content/Syncfusion.Blazor.Core/scripts/syncfusion-blazor.min.js" type="text/javascript"></script>
For this project, the fluent theme is used. A different theme can be selected or customized based on project requirements. Refer to the Blazor Components Appearance documentation to learn more about theming and customization options.
Blazor components are now configured and ready to use. For additional guidance, refer to the Grid component’s getting‑started documentation.
Step 2: Update the Blazor DataGrid
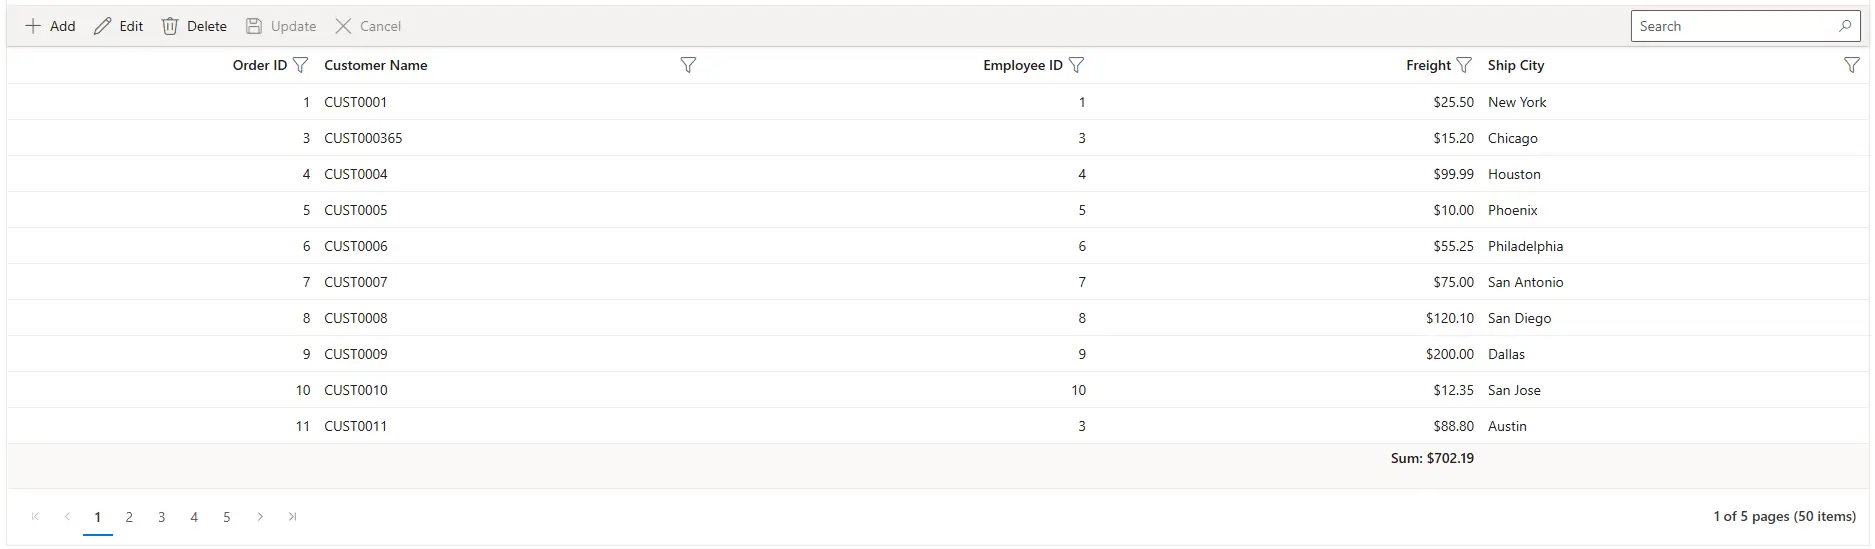
The Home.razor component will display the order data in a Blazor DataGrid with search, filter, sort, paging, and CRUD capabilities using UrlAdaptor to communicate with REST API endpoints.
Instructions:
- Open the file named
Home.razorin theComponents/Pagesfolder. - Replace the entire content with the following code:
@page "/"

<SfGrid TValue="Order" AllowPaging="true" AllowFiltering="true" AllowSorting="true" AllowGrouping="true"
        Toolbar="@(new List<string>() { "Add", "Edit", "Delete", "Update", "Cancel", "Search" })" Width="100%" Height="600px">
    <SfDataManager Url="http://localhost:5175/api/Grid"
                   InsertUrl="http://localhost:5175/api/Grid/Insert"
                   UpdateUrl="http://localhost:5175/api/Grid/Update"
                   RemoveUrl="http://localhost:5175/api/Grid/Delete"
                   BatchUrl="http://localhost:5175/api/Grid/BatchUpdate"
                   Adaptor="Adaptors.UrlAdaptor">
    </SfDataManager>
    <GridFilterSettings Type="Syncfusion.Blazor.Grids.FilterType.Menu"></GridFilterSettings>
    <GridEditSettings AllowEditing="true" AllowDeleting="true" AllowAdding="true" Mode="EditMode.Normal"></GridEditSettings>

    <GridColumns>
        <GridColumn Field=@nameof(Order.OrderID) HeaderText="Order ID" IsIdentity="true" IsPrimaryKey="true"
                    TextAlign="TextAlign.Right" Width="120"></GridColumn>
        <GridColumn Field=@nameof(Order.CustomerID) HeaderText="Customer Name" Width="150"></GridColumn>
        <GridColumn Field=@nameof(Order.EmployeeID) HeaderText="Employee ID" TextAlign="TextAlign.Right" Width="150"></GridColumn>
        <GridColumn Field=@nameof(Order.Freight) HeaderText="Freight" TextAlign="TextAlign.Right" Format="C2" Width="150"></GridColumn>
        <GridColumn Field=@nameof(Order.ShipCity) HeaderText="Ship City" Width="150"></GridColumn>
    </GridColumns>
    <GridAggregates>
        <GridAggregate>
            <GridAggregateColumns>
                <GridAggregateColumn Field=@nameof(Order.Freight) Type="AggregateType.Sum" Format="C2">
                    <GroupFooterTemplate>
                        @{
                            var aggregate = (context as AggregateTemplateContext);
                            <div>
                                <p>Sum: @aggregate?.Sum</p>
                            </div>
                        }
                    </GroupFooterTemplate>
                    <FooterTemplate>
                        @{
                            var aggregate = (context as AggregateTemplateContext);
                            <div>
                                <p>Sum: @aggregate?.Sum</p>
                            </div>
                        }
                    </FooterTemplate>
                </GridAggregateColumn>
            </GridAggregateColumns>
        </GridAggregate>
    </GridAggregates>
    <GridPageSettings PageSize="10"></GridPageSettings>
</SfGrid>
Component Explanation:
-
<SfGrid>: The DataGrid component that displays order data in rows and columns. -
<SfDataManager>: Manages data communication with REST API endpoints using UrlAdaptor. TheUrlproperty points to the read endpoint, whileInsertUrl,UpdateUrl,RemoveUrl, andBatchUrlpoint to CRUD endpoints. -
AllowPaging="true": Enables pagination to display records in pages of 10 records each. -
AllowFiltering="true": Enables column filtering with menu-based filters. -
AllowSorting="true": Enables column sorting by clicking headers. -
AllowGrouping="true": Allows grouping by dragging columns to the group area. -
<GridColumns>: Defines the columns displayed in the grid, mapped toOrdermodel properties. -
<GridPageSettings>: Configures pagination with 10 records per page. -
<GridFilterSettings>: Configures filter type asMenufor dropdown-style filtering. -
<GridEditSettings>: Enables inline editing inNormalmode (edit one row at a time). -
Toolbar: “Add”, “Edit”, “Delete”, “Update”, “Cancel”, “Search” for CRUD and search operations. -
<GridAggregates>: Displays summary calculations (Sum, Count, Average, Min, Max) in footer rows. The<GroupFooterTemplate>shows aggregates for each group, while<FooterTemplate>displays aggregates for the entire grid at the bottom.
In URL Adaptor, the DataGrid component handles grouping and aggregation operations automatically.
Step 3: Implement the Endpoints for UrlAdaptor
The UrlAdaptor communicates with REST API endpoints for grid operations rather than executing logic in the component. The grid sends requests to endpoints defined in a controller. Below is the controller structure with the same decorators and signatures as in the project, with placeholder comments to add logic.
Open the file named Controllers/GridController.cs and use the following structure:
using Grid_EF_UrlAdaptor.Data;
using Microsoft.AspNetCore.Mvc;
using Syncfusion.Blazor;
using Syncfusion.Blazor.Data;
using System.Text.Json.Serialization;

namespace Grid_EF_UrlAdaptor.Controllers
{
    [ApiController]
    public class GridController : ControllerBase
    {
        private readonly OrderDbContext _context;

        public GridController(OrderDbContext context)
        {
            _context = context; // implement logic here
        }

        /// <summary>
        /// Returns data with search, filter, sort, and paging operations
        /// </summary>
        [HttpPost]
        [Route("api/[controller]")]
        public object Post([FromBody] DataManagerRequest dataManagerRequest)
        {
            // implement logic here
            return new { }; // placeholder
        }

        /// <summary>
        /// Retrieves all order data from the database
        /// </summary>
        [HttpGet]
        [Route("api/[controller]")]
        public List<Order> GetOrderData()
        {
            // implement logic here
            return new List<Order>();
        }

        /// <summary>
        /// Inserts a new order record
        /// </summary>
        [HttpPost("Insert")]
        [Route("api/[controller]/Insert")]
        public void Insert([FromBody] CRUDModel<Order> value)
        {
            // implement logic here
        }

        /// <summary>
        /// Updates an existing order record
        /// </summary>
        [HttpPost("Update")]
        [Route("api/[controller]/Update")]
        public void Update([FromBody] CRUDModel<Order> value)
        {
            // implement logic here
        }

        /// <summary>
        /// Deletes an order record
        /// </summary>
        [HttpPost("Delete")]
        [Route("api/[controller]/Delete")]
        public void Delete([FromBody] CRUDModel<Order> value)
        {
            // implement logic here
        }

        /// <summary>
        /// Batch operations for Insert, Update, and Delete
        /// </summary>
        [HttpPost("Batch")]
        [Route("api/[controller]/BatchUpdate")]
        public void Batch([FromBody] CRUDModel<Order> value)
        {
            // implement logic here
        }
    }

    /// <summary>
    /// CRUD Model for handling data operations
    /// </summary>
    public class CRUDModel<T> where T : class
    {
        [JsonPropertyName("action")]
        public string? Action { get; set; }
        [JsonPropertyName("keyColumn")]
        public string? KeyColumn { get; set; }
        [JsonPropertyName("key")]
        public object? Key { get; set; }
        [JsonPropertyName("value")]
        public T? Value { get; set; }
        [JsonPropertyName("added")]
        public List<T>? Added { get; set; }
        [JsonPropertyName("changed")]
        public List<T>? Changed { get; set; }
        [JsonPropertyName("deleted")]
        public List<T>? Deleted { get; set; }
        [JsonPropertyName("params")]
        public IDictionary<string, object>? Params { get; set; }
    }
}
The CRUDModel<T> is the payload contract used by UrlAdaptor for insert, update, delete, and batch requests.
It carries the primary key, single entity (Value), and collections (Added, Changed, Deleted) for batch operations.
This controller exposes the endpoints used by <SfDataManager> in Home.razor. Logic will be added in later steps when wiring CRUD and batch operations.
Step 4: Running the Application
Build the Application
- Open PowerShell or your terminal.
- Navigate to the project directory.
- Build the application:
dotnet buildRun the Application
Execute the following command:
dotnet runThe application will start, and the console will display the local URL (typically http://localhost:5175 or https://localhost:5001).
Access the Application
- Open a web browser.
- Navigate to the URL displayed in the console.
- The DataGrid application is now running and ready to use.
Step 5: Implement Paging Feature
Paging divides large datasets into smaller pages to improve performance and usability.
Instructions:
- Ensure the grid has paging enabled with
AllowPaging="true". - Configure the page size using GridPageSettings.
<SfGrid TValue="Order" AllowPaging="true">
    <SfDataManager Url="http://localhost:5175/api/Grid" Adaptor="Adaptors.UrlAdaptor"></SfDataManager>
    <GridColumns>
        <!-- Columns configuration -->
    </GridColumns>

    <GridPageSettings PageSize="10"></GridPageSettings>
</SfGrid>- Update the
Postaction in Controllers/GridController.cs to apply only paging usingSkipandTakefromDataManagerRequest:
[HttpPost]
[Route("api/[controller]")]
public object Post([FromBody] DataManagerRequest dataManagerRequest)
{
    IEnumerable<Order> dataSource = GetOrderData();

    int totalRecordsCount = dataSource.Count();

    // Handling Paging
    if (dataManagerRequest.Skip != 0)
    {
        dataSource = DataOperations.PerformSkip(dataSource, dataManagerRequest.Skip);
    }

    if (dataManagerRequest.Take != 0)
    {
        dataSource = DataOperations.PerformTake(dataSource, dataManagerRequest.Take);
    }

    return dataManagerRequest.RequiresCounts ? new DataResult() { Result = dataSource, Count = totalRecordsCount} : (object)dataSource
}
How Paging Works:
- The grid posts
SkipandTaketohttp://localhost:5175/api/Grid. - The controller returns the paged
resultand totalcountfor correct pager UI. - Only paging logic is shown here; other operations will be covered in later steps.
Step 6: Implement Searching Feature
Searching allows the user to find records by entering keywords in the search box, which filters data across all columns.
Instructions:
- Ensure the toolbar includes the “Search” item.
<SfGrid TValue="Order"
        AllowPaging="true"
        Toolbar="@(new List<string>() { "Add", "Edit", "Delete", "Update", "Cancel", "Search" })">
    <SfDataManager Url="http://localhost:5175/api/Grid" Adaptor="Adaptors.UrlAdaptor"></SfDataManager>
    <GridPageSettings PageSize="10"></GridPageSettings>
</SfGrid>- Update the
Postaction in Controllers/GridController.cs to handle searching:
[HttpPost]
[Route("api/[controller]")]
public object Post([FromBody] DataManagerRequest dataManagerRequest)
{
    try
    {
        IEnumerable<Order> dataSource = GetOrderData();

        // Handling Searching
        if (dataManagerRequest.Search != null && dataManagerRequest.Search.Count > 0)
        {
            dataSource = DataOperations.PerformSearching(dataSource, dataManagerRequest.Search);
        }

        int totalRecordsCount = dataSource.Count();

        // Handling Paging
        if (dataManagerRequest.Skip != 0)
        {
            dataSource = DataOperations.PerformSkip(dataSource, dataManagerRequest.Skip);
        }

        if (dataManagerRequest.Take != 0)
        {
            dataSource = DataOperations.PerformTake(dataSource, dataManagerRequest.Take);
        }

        return dataManagerRequest.RequiresCounts ? new DataResult() { Result = dataSource, Count = totalRecordsCount} : (object)dataSource
    }
    catch (Exception ex)
    {
        return new { error = ex.Message, innerError = ex.InnerException?.Message };
    }
}
How Searching Works:
- When the user enters text in the search box and presses Enter, the DataGrid sends a search request to the REST API.
- The
Postmethod receives the search criteria indataManagerRequest.Search. - The
DataOperations.PerformSearching()method filters the data based on the search term across all columns. - Results are returned and displayed in the DataGrid with pagination applied.
Searching feature is now active.
Step 7: Implement Filtering Feature
Filtering allows the user to restrict data based on column values using a menu interface.
Instructions:
- Open the
Components/Pages/Home.razorfile. - Add the AllowFiltering property and GridFilterSettings to the
<SfGrid>component:
<SfGrid TValue="Order"
        AllowPaging="true"
        AllowFiltering="true"
        Toolbar="@(new List<string>() { "Add", "Edit", "Delete", "Update", "Cancel", "Search" })">
    <SfDataManager Url="http://localhost:5175/api/Grid" Adaptor="Adaptors.UrlAdaptor"></SfDataManager>
    <GridFilterSettings Type="Syncfusion.Blazor.Grids.FilterType.Menu"></GridFilterSettings>
    <GridPageSettings PageSize="10"></GridPageSettings>
</SfGrid>- Update the
Postaction in Controllers/GridController.cs to handle filtering:
[HttpPost]
[Route("api/[controller]")]
public object Post([FromBody] DataManagerRequest dataManagerRequest)
{
    try
    {
        IEnumerable<Order> dataSource = GetOrderData();

        // Handling Searching
        if (dataManagerRequest.Search != null && dataManagerRequest.Search.Count > 0)
        {
            dataSource = DataOperations.PerformSearching(dataSource, dataManagerRequest.Search);
        }

        // Handling Filtering
        if (dataManagerRequest.Where != null && dataManagerRequest.Where.Count > 0)
        {
            dataSource = DataOperations.PerformFiltering(dataSource, dataManagerRequest.Where, dataManagerRequest.Where[0].Operator);
        }

        int totalRecordsCount = dataSource.Count();

        // Handling Paging
        if (dataManagerRequest.Skip != 0)
        {
            dataSource = DataOperations.PerformSkip(dataSource, dataManagerRequest.Skip);
        }

        if (dataManagerRequest.Take != 0)
        {
            dataSource = DataOperations.PerformTake(dataSource, dataManagerRequest.Take);
        }

        return dataManagerRequest.RequiresCounts ? new DataResult() { Result = dataSource, Count = totalRecordsCount} : (object)dataSource
    }
    catch (Exception ex)
    {
        return new { error = ex.Message, innerError = ex.InnerException?.Message };
    }
}
How Filtering Works:
- Click on the dropdown arrow in any column header to open the filter menu.
- Select filtering criteria (equals, contains, greater than, less than, etc.).
- Click the “Filter” button to apply the filter.
- The
Postmethod receives the filter criteria indataManagerRequest.Where. - The
DataOperations.PerformFiltering()method applies the filter conditions to the data. - Results are filtered accordingly and displayed in the DataGrid.
Filtering feature is now active.
Step 8: Implement Sorting Feature
Sorting enables the user to arrange records in ascending or descending order based on column values.
Instructions:
- Open the
Components/Pages/Home.razorfile. - Add the AllowSorting property to the
<SfGrid>component:
<SfGrid TValue="Order"
        AllowPaging="true"
        AllowSorting="true"
        AllowFiltering="true"
        Toolbar="@(new List<string>() { "Add", "Edit", "Delete", "Update", "Cancel", "Search" })">
    <SfDataManager Url="http://localhost:5175/api/Grid"Adaptor="Adaptors.UrlAdaptor"></SfDataManager>
    <GridFilterSettings Type="Syncfusion.Blazor.Grids.FilterType.Menu"></GridFilterSettings>
    <GridPageSettings PageSize="10"></GridPageSettings>
</SfGrid>- Update the
Postaction in Controllers/GridController.cs to handle sorting:
[HttpPost]
[Route("api/[controller]")]
public object Post([FromBody] DataManagerRequest dataManagerRequest)
{
    try
    {
        IEnumerable<Order> dataSource = GetOrderData();

        // Handling Searching
        if (dataManagerRequest.Search != null && dataManagerRequest.Search.Count > 0)
        {
            dataSource = DataOperations.PerformSearching(dataSource, dataManagerRequest.Search);
        }

        // Handling Filtering
        if (dataManagerRequest.Where != null && dataManagerRequest.Where.Count > 0)
        {
            dataSource = DataOperations.PerformFiltering(dataSource, dataManagerRequest.Where, dataManagerRequest.Where[0].Operator);
        }

        // Handling Sorting
        if (dataManagerRequest.Sorted != null && dataManagerRequest.Sorted.Count > 0)
        {
            dataSource = DataOperations.PerformSorting(dataSource, dataManagerRequest.Sorted);
        }

        int totalRecordsCount = dataSource.Count();

        // Handling Paging
        if (dataManagerRequest.Skip != 0)
        {
            dataSource = DataOperations.PerformSkip(dataSource, dataManagerRequest.Skip);
        }

        if (dataManagerRequest.Take != 0)
        {
            dataSource = DataOperations.PerformTake(dataSource, dataManagerRequest.Take);
        }

        return dataManagerRequest.RequiresCounts ? new DataResult() { Result = dataSource, Count = totalRecordsCount} : (object)dataSource
    }
    catch (Exception ex)
    {
        return new { error = ex.Message, innerError = ex.InnerException?.Message };
    }
}
How Sorting Works:
- Click on the column header to sort in ascending order.
- Click again to sort in descending order.
- The
Postmethod receives the sort criteria indataManagerRequest.Sorted. - The
DataOperations.PerformSorting()method sorts the data based on the specified column and direction. - Records are sorted accordingly and displayed in the DataGrid.
Sorting feature is now active.
Step 9: Perform CRUD Operations
CRUD operations (Create, Read, Update, Delete) enable users to manage data directly from the DataGrid. The REST API endpoints in the controller handle all database operations using Entity Framework Core.
Instructions:
- Update the
<SfGrid>component inHome.razorto include GridEditSettings:
<SfGrid TValue="Order"
        AllowPaging="true"
        AllowSorting="true"
        AllowFiltering="true"
        AllowGrouping="true"
        Toolbar="@(new List<string>() { "Add", "Edit", "Delete", "Update", "Cancel", "Search" })"
        Width="100%" Height="600px">
    <SfDataManager Url="http://localhost:5175/api/Grid"
                   InsertUrl="http://localhost:5175/api/Grid/Insert"
                   UpdateUrl="http://localhost:5175/api/Grid/Update"
                   RemoveUrl="http://localhost:5175/api/Grid/Delete"
                   BatchUrl="http://localhost:5175/api/Grid/BatchUpdate"
                   Adaptor="Adaptors.UrlAdaptor">
    </SfDataManager>
    <GridFilterSettings Type="Syncfusion.Blazor.Grids.FilterType.Menu"></GridFilterSettings>
    <GridEditSettings AllowEditing="true" AllowDeleting="true" AllowAdding="true" Mode="EditMode.Normal"></GridEditSettings>
    <GridPageSettings PageSize="10"></GridPageSettings>
    <GridColumns>
        // Add Columns
    </GridColumns>
</SfGrid>
Insert (Create)
Record insertion allows new orders to be added directly through the DataGrid component. The Insert endpoint processes the insertion request and saves the newly created record to the SQL Server database.
In Controllers/GridController.cs, the insert method is implemented as:
/// <summary>
/// Inserts a new order record
/// </summary>
[HttpPost("Insert")]
[Route("api/[controller]/Insert")]
public void Insert([FromBody] CRUDModel<Order> value)
{
    try
    {
        _context.Orders.Add(value.Value!);
        _context.SaveChanges();
    }
    catch (Exception ex)
    {
        throw new Exception($"Error inserting order: {ex.Message}");
    }
}
What happens behind the scenes:
- The user clicks the “Add” button and fills in the form.
- The DataGrid sends a POST request to
http://localhost:5175/api/Grid/Insert. - The
Insertmethod receives the new order data invalue.Value. - Entity Framework Core adds the record to the
_context.Orderscollection. -
SaveChanges()persists the record to the SQL Server database. - The DataGrid automatically refreshes to display the new order.
Update (Edit)
Record modification allows order details to be updated directly within the DataGrid. The Update endpoint processes the edited row and applies the changes to the SQL Server database.
In Controllers/GridController.cs, the update method is implemented as:
/// <summary>
/// Updates an existing order record
/// </summary>
[HttpPost("Update")]
[Route("api/[controller]/Update")]
public void Update([FromBody] CRUDModel<Order> value)
{
    try
    {
        var existingOrder = _context.Orders.Find(value.Value?.OrderID);
        if (existingOrder != null)
        {
            _context.Entry(existingOrder).CurrentValues.SetValues(value.Value!);
            _context.SaveChanges();
        }
    }
    catch (Exception ex)
    {
        throw new Exception($"Error updating order: {ex.Message}");
    }
}
What happens behind the scenes:
- The user clicks the “Edit” button and modifies the record.
- The DataGrid sends a POST request to
http://localhost:5175/api/Grid/Update. - The
Updatemethod receives the modified order data invalue.Value. - The existing order is retrieved from the database by its ID.
- The properties are updated with the new values using
SetValues(). -
SaveChanges()persists the changes to the SQL Server database. - The DataGrid refreshes to display the updated order.
Delete (Remove)
Record deletion allows orders to be removed directly from the DataGrid. The Delete endpoint executes the corresponding SQL Server DELETE operation and updates both the database and the grid.
In Controllers/GridController.cs, the delete method is implemented as:
/// <summary>
/// Deletes an order record
/// </summary>
[HttpPost("Delete")]
[Route("api/[controller]/Delete")]
public void Delete([FromBody] CRUDModel<Order> value)
{
    try
    {
        int orderId = Convert.ToInt32(value.Key?.ToString());
        var order = _context.Orders.Find(orderId);
        if (order != null)
        {
            _context.Orders.Remove(order);
            _context.SaveChanges();
        }
    }
    catch (Exception ex)
    {
        throw new Exception($"Error deleting order: {ex.Message}");
    }
}
What happens behind the scenes:
- The user selects an order and clicks “Delete”.
- A confirmation dialog appears (built into the DataGrid).
- If confirmed, the DataGrid sends a POST request to
http://localhost:5175/api/Grid/Delete. - The
Deletemethod extracts the order ID fromvalue.Key. - The order is located in the database by its ID.
- The order is removed from the
_context.Orderscollection. -
SaveChanges()executes the DELETE statement in SQL Server. - The DataGrid refreshes to remove the deleted order from the UI.
Batch Operations (Multiple CRUD in one request)
Batch operations combine multiple insert, update, and delete actions into a single request, minimizing network overhead and ensuring transactional consistency.
In Controllers/GridController.cs, the batch method is implemented as:
/// <summary>
/// Batch operations for Insert, Update, and Delete
/// </summary>
[HttpPost("Batch")]
[Route("api/[controller]/BatchUpdate")]
public void Batch([FromBody] CRUDModel<Order> value)
{
    try
    {
        if (value.Changed != null)
        {
            foreach (var record in value.Changed)
            {
                _context.UpdateRange(record);
            }
        }

        if (value.Added != null)
        {
            _context.Orders.AddRange(value.Added);
        }

        if (value.Deleted != null)
        {
            foreach (var record in value.Deleted)
            {
                var existingOrder = _context.Orders.Find(record.OrderID);
                if (existingOrder != null)
                {
                    _context.Orders.Remove(existingOrder);
                }
            }
        }

        _context.SaveChanges();
    }
    catch (Exception ex)
    {
        throw new Exception($"Error in batch operations: {ex.Message}");
    }
}
What happens behind the scenes:
- The DataGrid collects all added, edited, and deleted records.
- All changes are sent in a single POST request to
http://localhost:5175/api/Grid/BatchUpdate. - The
Batchmethod processes changed records usingUpdateRange(). - The
Batchmethod processes added records usingAddRange(). - The
Batchmethod processes deleted records usingRemove(). - All operations are saved to the database in a single
SaveChanges()call for transactional consistency. - The DataGrid refreshes to display all changes.
All CRUD operations are now fully implemented, enabling comprehensive data management capabilities within the Blazor DataGrid.
Complete Sample Repository
A complete, working sample implementation is available in the GitHub repository.
Summary
This guide demonstrates how to:
- Create a SQL Server database with order records. 🔗
- Install necessary NuGet packages for Entity Framework Core and Syncfusion. 🔗
- Create data models and DbContext for database communication. 🔗
- Configure connection strings and register services in Program.cs. 🔗
- Create REST API endpoints in a controller for CRUD operations. 🔗
- Implement searching, filtering, and sorting in the REST API. 🔗
- Perform complete CRUD operations (Create, Read, Update, Delete) via REST API. 🔗
- Handle batch operations for bulk data modifications. 🔗
The application now provides a complete solution for managing orders with a modern, user-friendly interface using Entity Framework Core with SQL Server and REST API endpoints via UrlAdaptor.
Alternative Approach: Custom Adaptor
For a client-side data operations approach without REST API endpoints, refer to the Blazor DataGrid with SQL Server using Entity Framework and Custom Adaptor documentation. This approach executes search, filter, sort, and grouping operations directly in the Blazor component, providing a tightly integrated alternative to the REST API pattern.