Blazor File Upload Component in WebAssembly App using Visual Studio
4 Nov 20258 minutes to read
This article provides step-by-step instructions for building a Blazor WebAssembly app with the Blazor File Upload component using Visual Studio.
Prerequisites
Create a Blazor WebAssembly App in Visual Studio
Create a Blazor WebAssembly App using Visual Studio via Microsoft templates or the Syncfusion® Blazor Extension.
Install Syncfusion® Blazor Inputs and Themes NuGet in the App
To add the Blazor File Upload component to the app, open the NuGet Package Manager in Visual Studio (Tools → NuGet Package Manager → Manage NuGet Packages for Solution), then search for and install Syncfusion.Blazor.Inputs and Syncfusion.Blazor.Themes. Alternatively, you can use the following Package Manager commands:
Install-Package Syncfusion.Blazor.Inputs -Version 32.1.19

Install-Package Syncfusion.Blazor.Themes -Version 32.1.19
NOTE
Syncfusion® Blazor components are available on NuGet. Refer to the NuGet packages topic for the available packages and component details.
Register Syncfusion® Blazor Service
Open ~/_Imports.razor and import the Syncfusion.Blazor and Syncfusion.Blazor.Inputs namespaces.
@using Syncfusion.Blazor
@using Syncfusion.Blazor.Inputs
Now, register the Syncfusion® Blazor service in the ~/Program.cs file of your Blazor WebAssembly app.
using Microsoft.AspNetCore.Components.Web;
using Microsoft.AspNetCore.Components.WebAssembly.Hosting;
using Syncfusion.Blazor;

var builder = WebAssemblyHostBuilder.CreateDefault(args);
builder.RootComponents.Add<App>("#app");
builder.RootComponents.Add<HeadOutlet>("head::after");

builder.Services.AddScoped(sp => new HttpClient { BaseAddress = new Uri(builder.HostEnvironment.BaseAddress) });

builder.Services.AddSyncfusionBlazor();
await builder.Build().RunAsync();
....
Add stylesheet and script resources
The theme stylesheet and script can be accessed from NuGet through Static Web Assets. Reference the stylesheet and script in the <head> of the main page as follows:
- For Blazor WebAssembly app, include them in the ~/index.html file.
<head>
    ....
    <link href="_content/Syncfusion.Blazor.Themes/bootstrap5.css" rel="stylesheet" />
    <script src="_content/Syncfusion.Blazor.Core/scripts/syncfusion-blazor.min.js" type="text/javascript"></script>
</head>
NOTE
See Blazor Themes for multiple ways to reference themes (Static Web Assets, CDN, and CRG). For script references, see Adding script references. references in your Blazor application.
Add Blazor File Upload component
Add the Syncfusion® Blazor File Upload component in the ~/Pages/Index.razor file.
<SfUploader></SfUploader>- Press Ctrl+F5 (Windows) or ⌘+F5 (macOS) to launch the application. This renders the Syncfusion® Blazor File Upload component in your default web browser.

Without server-side API endpoint
Upload files (and folder contents) in a Blazor application without specifying a server-side API endpoint by configuring AsyncSettings.
Save and Remove actions
Uploaded files as streams in the ValueChange event arguments. Implement the save logic within the ValueChange handler to process files as needed. The concept is illustrated below.
<SfUploader AutoUpload="false">
    <UploaderEvents ValueChange="OnChange"></UploaderEvents>
</SfUploader>

@code {

    private void OnChange(UploadChangeEventArgs args)
    {
        try
        {
            foreach (var file in args.Files)
            {
                var path = @"" + file.FileInfo.Name;
                FileStream filestream = new FileStream(path, FileMode.Create, FileAccess.Write);
                await file.File.OpenReadStream(long.MaxValue).CopyToAsync(filestream);
                filestream.Close();
            }
        }
        catch (Exception ex)
        {
            Console.WriteLine(ex.Message);
        }
    }
}
When clicking the remove icon in the file list, the OnRemove event provides the file name(s) being removed. Implement the remove logic in the OnRemove handler to remove files from the target location as needed in your application.
Private void onRemove(RemovingEventArgs args)
{
    foreach(var removeFile in args.FilesData)
    {
        if (File.Exists(Path.Combine(@"rootPath", removeFile.Name)))
        {
            File.Delete(Path.Combine(@"rootPath", removeFile.Name))
        }
    }
}
With server-side API endpoint
The upload process can use server endpoints for save and remove actions.
NOTE
- The save action is required to handle the upload operation.
* The remove action is optional for deleting files on the server.
Specify the save action URL with the SaveUrl property.
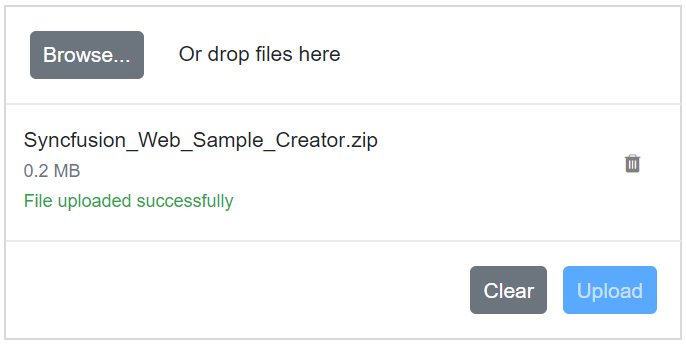
The save handler receives the submitted files and manages the save process on the server. After uploading files to the server location, the color of the selected file name changes to green and the remove icon switches to a bin icon.
Specify the remove action URL with the RemoveUrl property to handle server-side deletes.
[Route("api/[controller]")]

private IHostingEnvironment hostingEnv;

public SampleDataController(IHostingEnvironment env)
{
    this.hostingEnv = env;
}

[HttpPost("[action]")]
public void Save(IList<IFormFile> UploadFiles)
{
    long size = 0;
    try
    {
        foreach (var file in UploadFiles)
        {
            var filename = ContentDispositionHeaderValue
                    .Parse(file.ContentDisposition)
                    .FileName
                    .Trim('"');
                filename = hostingEnv.ContentRootPath + $@"\{filename}";
                size += (int)file.Length;
            if (!System.IO.File.Exists(filename))
            {
                using (FileStream fs = System.IO.File.Create(filename))
                {
                    file.CopyTo(fs);
                    fs.Flush();
                }
            }
        }
    }
    catch (Exception e)
    {
        Response.Clear();
        Response.StatusCode = 204;
        Response.HttpContext.Features.Get<IHttpResponseFeature>().ReasonPhrase = "File failed to upload";
        Response.HttpContext.Features.Get<IHttpResponseFeature>().ReasonPhrase = e.Message;
    }
}
[HttpPost("[action]")]
public void Remove(IList<IFormFile> UploadFiles)
{
    try
    {
        var filename = hostingEnv.ContentRootPath + $@"\{UploadFiles[0].FileName}";
        if (System.IO.File.Exists(filename))
        {
            System.IO.File.Delete(filename);
        }
    }
    catch (Exception e)
    {
        Response.Clear();
        Response.StatusCode = 200;
        Response.HttpContext.Features.Get<IHttpResponseFeature>().ReasonPhrase = "File removed successfully";
        Response.HttpContext.Features.Get<IHttpResponseFeature>().ReasonPhrase = e.Message;
    }
}<SfUploader ID="UploadFiles">
<UploaderAsyncSettings SaveUrl="api/SampleData/Save" RemoveUrl="api/SampleData/Remove"></UploaderAsyncSettings>
</SfUploader>Configure allowed file types
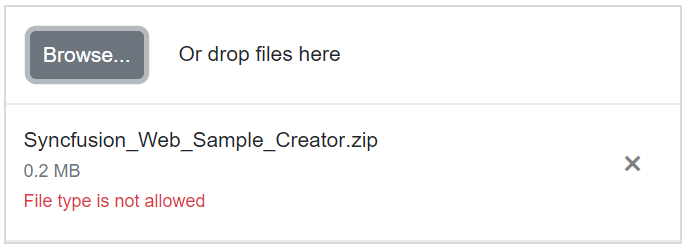
Allow only specific file types to be uploaded using the AllowedExtensions property. Provide extensions as a comma-separated list. The uploader filters selected or dropped files against the specified file types and proceeds with the upload operation. Validation also applies when specifying the native input’s accept attribute.
<SfUploader AllowedExtensions=".doc, .docx, .xls, .xlsx"></SfUploader>