Getting Started with Smart Paste Button Component
29 Jun 202611 minutes to read
This section briefly explains about how to include Blazor Smart Paste Button component in your Blazor Server App using Visual Studio.
Prerequisites
- System requirements for Blazor components
- OpenAI or Azure OpenAI Account
NOTE
Blazor Smart Components are compatible with both
OpenAIandAzure OpenAI, and fully support Server Interactivity mode apps.
Create a new Blazor App in Visual Studio
Create a Blazor Server App using Visual Studio via Microsoft Templates or the Syncfusion® Blazor Extension.
Install required Blazor SmartComponents and Themes NuGet in the App
To add Blazor Smart Paste Button component in the app, open the NuGet package manager in Visual Studio (Tools → NuGet Package Manager → Manage NuGet Packages for Solution), search and install Syncfusion.Blazor.SmartComponents and Syncfusion.Blazor.Themes. Alternatively, you can utilize the following package manager command to achieve the same.
Install-Package Syncfusion.Blazor.SmartComponents -Version 34.1.29
Install-Package Syncfusion.Blazor.Themes -Version 34.1.29
NOTE
Blazor components are available in nuget.org. Refer to NuGet packages topic for available NuGet packages list with component details.
Prerequisites
- System requirements for Blazor components
- OpenAI or Azure OpenAI Account
NOTE
Blazor Smart Components are compatible with both
OpenAIandAzure OpenAI, and fully support Server Interactivity mode apps.
Create a new Blazor App in Visual Studio Code
Create a Blazor Server App using Visual Studio Code via Microsoft Templates or the Syncfusion® Blazor Extension.
Alternatively, you can create a Server application using the following command in the terminal(Ctrl+`).
dotnet new blazorserver -o BlazorApp
cd BlazorApp
Install required Blazor SmartComponents and Themes NuGet in the App
- Press Ctrl+` to open the integrated terminal in Visual Studio Code.
- Ensure you’re in the project root directory where your
.csprojfile is located. - Run the following command to install a Syncfusion.Blazor.SmartComponents and Syncfusion.Blazor.Themes NuGet package and ensure all dependencies are installed.
dotnet add package Syncfusion.Blazor.SmartComponents -v 34.1.29
dotnet add package Syncfusion.Blazor.Themes -v 34.1.29
dotnet restore
NOTE
Blazor components are available in nuget.org. Refer to NuGet packages topic for available NuGet packages list with component details.
Register Blazor Service
Open ~/_Imports.razor file and import the Syncfusion.Blazor and Syncfusion.Blazor.SmartComponents namespace.
@using Syncfusion.Blazor
@using Syncfusion.Blazor.SmartComponents
Now, register the Blazor Service in the ~/Program.cs file of your Blazor Server App.
using Microsoft.AspNetCore.Components;
using Microsoft.AspNetCore.Components.Web;
using Syncfusion.Blazor;

var builder = WebApplication.CreateBuilder(args);

// Add services to the container.
builder.Services.AddRazorPages();
builder.Services.AddServerSideBlazor();
builder.Services.AddSyncfusionBlazor();

var app = builder.Build();
....
Configure AI Service
Follow the instructions below to register an AI model in your application.
OpenAI
For OpenAI, create an API key and place it at openAIApiKey. The value for openAIModel is the model you wish to use (e.g., gpt-3.5-turbo, gpt-4, etc.).
- Install the following NuGet packages to your project:
Install-Package Microsoft.Extensions.AI
Install-Package Microsoft.Extensions.AI.OpenAI- To configure the AI service, add the following settings to the ~/Program.cs file in your Blazor Server app.
using Syncfusion.Blazor.SmartComponents;
using Syncfusion.Blazor.AI;
using Microsoft.Extensions.AI;
using OpenAI;
var builder = WebApplication.CreateBuilder(args);

....

builder.Services.AddSyncfusionBlazor();

string openAIApiKey = "API-KEY";
string openAIModel = "OPENAI_MODEL";
OpenAIClient openAIClient = new OpenAIClient(openAIApiKey);
IChatClient openAIChatClient = openAIClient.GetChatClient(openAIModel).AsIChatClient();
builder.Services.AddChatClient(openAIChatClient);

builder.Services.AddSyncfusionSmartComponents()
.InjectOpenAIInference();

var app = builder.Build();
....
Azure OpenAI
For Azure OpenAI, first deploy an Azure OpenAI Service resource and model, then values for azureOpenAIKey, azureOpenAIEndpoint and azureOpenAIModel will all be provided to you.
- Install the following NuGet packages to your project:
Install-Package Microsoft.Extensions.AI
Install-Package Microsoft.Extensions.AI.OpenAI
Install-Package Azure.AI.OpenAI- To configure the AI service, add the following settings to the ~/Program.cs file in your Blazor Server app.
using Syncfusion.Blazor.SmartComponents;
using Syncfusion.Blazor.AI;
using Azure.AI.OpenAI;
using Microsoft.Extensions.AI;
using System.ClientModel;

var builder = WebApplication.CreateBuilder(args);

....

builder.Services.AddSyncfusionBlazor();

string azureOpenAIKey = "AZURE_OPENAI_KEY";
string azureOpenAIEndpoint = "AZURE_OPENAI_ENDPOINT";
string azureOpenAIModel = "AZURE_OPENAI_MODEL";
AzureOpenAIClient azureOpenAIClient = new AzureOpenAIClient(
     new Uri(azureOpenAIEndpoint),
     new ApiKeyCredential(azureOpenAIKey)
);
IChatClient azureOpenAIChatClient = azureOpenAIClient.GetChatClient(azureOpenAIModel).AsIChatClient();
builder.Services.AddChatClient(azureOpenAIChatClient);

builder.Services.AddSyncfusionSmartComponents()
.InjectOpenAIInference();

var app = builder.Build();
....
NOTE
From version 28.2.33 to 30.2.6, the Azure.AI.OpenAI package has been removed from the SmartComponents dependency. To use Azure OpenAI, please install the Azure.AI.OpenAI package separately in your Blazor application.
Ollama
To use Ollama for running self-hosted models:
-
Download and install Ollama
Visit Ollama’s official website and install the application appropriate for your operating system. -
Install the desired model from the Ollama library
You can browse and install models from the Ollama Library (e.g.,llama2:13b,mistral:7b, etc.). -
Configure your application
- Provide the
EndpointURL where the model is hosted (e.g.,http://localhost:11434). - Set
ModelNameto the specific model you installed (e.g.,llama2:13b).
- Provide the
- Install the following NuGet packages to your project:
Install-Package Microsoft.Extensions.AI
Install-Package OllamaSharp- Add the following settings to the ~/Program.cs file in your Blazor Server app.
using Syncfusion.Blazor.SmartComponents;
using Syncfusion.Blazor.AI;
using Microsoft.Extensions.AI;
using OllamaSharp;

var builder = WebApplication.CreateBuilder(args);

....

builder.Services.AddSyncfusionBlazor();

string ModelName = "MODEL_NAME";
IChatClient chatClient = new OllamaApiClient("http://localhost:11434", ModelName);
builder.Services.AddChatClient(chatClient);

builder.Services.AddSyncfusionSmartComponents()
.InjectOpenAIInference();

var app = builder.Build();
....
Add stylesheet and script resources
The theme stylesheet and script can be accessed from NuGet through Static Web Assets. Reference the stylesheet and script in the <head> of the main page as follows:
-
For .NET 6 Blazor Server app, include it in ~/Pages/_Layout.cshtml file.
-
For .NET 10, .NET 9 and .NET 8 Blazor Server app, include it in the ~/Components/App.razor file.
<head>
    ....
    <link href="_content/Syncfusion.Blazor.Themes/tailwind.css" rel="stylesheet" />
</head>

<body>
    ....
    <script src="_content/Syncfusion.Blazor.Core/scripts/syncfusion-blazor.min.js" type="text/javascript"></script>
</body>
NOTE
Check out the Blazor Themes topic to discover various methods (Static Web Assets, CDN, and CRG) for referencing themes in your Blazor application. Also, check out the Adding Script Reference topic to learn different approaches for adding script references in your Blazor application.
Add Blazor Smart Paste Button component
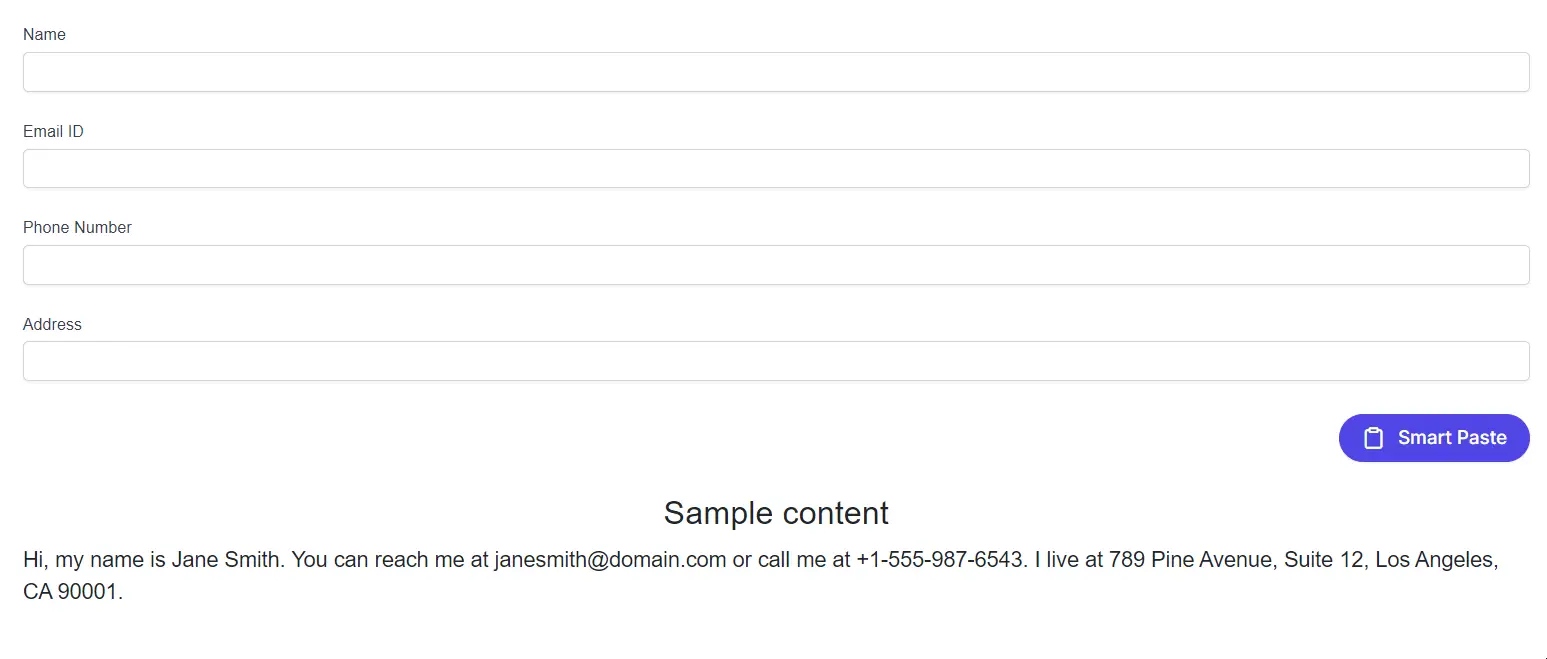
Add the Blazor Smart Paste Button component with form components in the ~/Pages/Index.razor file.
NOTE
In this example, Blazor DataForm component is used to manage form input fields. To get started, install the Syncfusion.Blazor.DataForm package.
@using Syncfusion.Blazor.DataForm
@using System.ComponentModel.DataAnnotations
@using Syncfusion.Blazor.SmartComponents

<SfDataForm ID="MyForm"
            Model="@EventRegistrationModel">
    <FormValidator>
        <DataAnnotationsValidator></DataAnnotationsValidator>
    </FormValidator>
    <FormItems>
        <FormItem Field="@nameof(EventRegistration.Name)" ID="firstname"></FormItem>
        <FormItem Field="@nameof(EventRegistration.Email)" ID="email"></FormItem>
        <FormItem Field="@nameof(EventRegistration.Phone)" ID="phonenumber"></FormItem>
        <FormItem Field="@nameof(EventRegistration.Address)" ID="address"></FormItem>
    </FormItems>
    <FormButtons>
        <SfSmartPasteButton IsPrimary="true" Content="Smart Paste" IconCss="e-icons e-paste">
        </SfSmartPasteButton>
    </FormButtons>
</SfDataForm>

<br>
<h4 style="text-align:center;">Sample content</h4>
<div>
    Hi, my name is Jane Smith. You can reach me at [email protected] or call me at +1-555-987-6543. I live at 789 Pine Avenue, Suite 12, Los Angeles, CA 90001.
</div>

@code {
    private EventRegistration EventRegistrationModel = new EventRegistration();

    public class EventRegistration
    {
        [Required(ErrorMessage = "Please enter your name.")]
        [Display(Name = "Name")]
        public string Name { get; set; }

        [Required(ErrorMessage = "Please enter your email address.")]
        [Display(Name = "Email ID")]
        public string Email { get; set; }

        [Required(ErrorMessage = "Please enter your mobile number.")]
        [Display(Name = "Phone Number")]
        public string Phone { get; set; }

        [Required(ErrorMessage = "Please enter your address.")]
        [Display(Name = "Address")]
        public string Address { get; set; }
    }
}-
Press Ctrl+F5 (Windows) or ⌘+F5 (macOS) to launch the application. This will render the Blazor Smart Paste Button component in your default web browser.
-
Copy the
Sample Contentand click onSmart Pasteto see how the form is instantly filled.
NOTE