Getting Started with Blazor File Upload Component
30 Apr 202516 minutes to read
This section briefly explains about how to include Blazor File Upload component in your Blazor WebAssembly App using Visual Studio and Visual Studio Code.
To get started quickly with Blazor File Upload component, check on the following video:
Prerequisites
Create a new Blazor App in Visual Studio
You can create a Blazor WebAssembly App using Visual Studio via Microsoft Templates or the Syncfusion® Blazor Extension.
Install Syncfusion® Blazor Inputs and Themes NuGet in the App
To add Blazor File Upload component in the app, open the NuGet package manager in Visual Studio (Tools → NuGet Package Manager → Manage NuGet Packages for Solution), search and install Syncfusion.Blazor.Inputs and Syncfusion.Blazor.Themes. Alternatively, you can utilize the following package manager command to achieve the same.
Install-Package Syncfusion.Blazor.Inputs -Version 30.1.37
Install-Package Syncfusion.Blazor.Themes -Version 30.1.37
NOTE
Syncfusion® Blazor components are available in nuget.org. Refer to NuGet packages topic for available NuGet packages list with component details.
Prerequisites
Create a new Blazor App in Visual Studio Code
You can create a Blazor WebAssembly App using Visual Studio Code via Microsoft Templates or the Syncfusion® Blazor Extension.
Alternatively, you can create a WebAssembly application using the following command in the terminal(Ctrl+`).
dotnet new blazorwasm -o BlazorApp
cd BlazorApp
Install Syncfusion® Blazor Inputs and Themes NuGet in the App
- Press Ctrl+` to open the integrated terminal in Visual Studio Code.
- Ensure you’re in the project root directory where your
.csprojfile is located. - Run the following command to install a Syncfusion.Blazor.Inputs and Syncfusion.Blazor.Themes NuGet package and ensure all dependencies are installed.
dotnet add package Syncfusion.Blazor.Inputs -v 30.1.37
dotnet add package Syncfusion.Blazor.Themes -v 30.1.37
dotnet restore
NOTE
Syncfusion® Blazor components are available in nuget.org. Refer to NuGet packages topic for available NuGet packages list with component details.
Register Syncfusion® Blazor Service
Open ~/_Imports.razor file and import the Syncfusion.Blazor and Syncfusion.Blazor.Inputs namespace.
@using Syncfusion.Blazor
@using Syncfusion.Blazor.Inputs
Now, register the Syncfusion® Blazor Service in the ~/Program.cs file of your Blazor WebAssembly App.
using Microsoft.AspNetCore.Components.Web;
using Microsoft.AspNetCore.Components.WebAssembly.Hosting;
using Syncfusion.Blazor;

var builder = WebAssemblyHostBuilder.CreateDefault(args);
builder.RootComponents.Add<App>("#app");
builder.RootComponents.Add<HeadOutlet>("head::after");

builder.Services.AddScoped(sp => new HttpClient { BaseAddress = new Uri(builder.HostEnvironment.BaseAddress) });

builder.Services.AddSyncfusionBlazor();
await builder.Build().RunAsync();
....
Add stylesheet and script resources
The theme stylesheet and script can be accessed from NuGet through Static Web Assets. Include the stylesheet and script references in the <head> section of the ~/index.html file.
<head>
    ....
    <link href="_content/Syncfusion.Blazor.Themes/bootstrap5.css" rel="stylesheet" />
    <script src="_content/Syncfusion.Blazor.Core/scripts/syncfusion-blazor.min.js" type="text/javascript"></script>
</head>
NOTE
Check out the Blazor Themes topic to discover various methods (Static Web Assets, CDN, and CRG) for referencing themes in your Blazor application. Also, check out the Adding Script Reference topic to learn different approaches for adding script references in your Blazor application.
Add Blazor File Upload component
Add the Syncfusion® Blazor File Upload component in the ~/Pages/Index.razor file.
<SfUploader></SfUploader>- Press Ctrl+F5 (Windows) or ⌘+F5 (macOS) to launch the application. This will render the Syncfusion® Blazor File Upload component in your default web browser.

Without server-side API endpoint
You can upload the files and files of folders in the Blazor application without specifying the server-side API end point using AsyncSettings.
Save and Remove actions
You can get the uploaded files as file stream in the ValueChange event argument. Now, you can write the save handler inside ValueChange event to save the files to desired location. Find the save action code below.
@using Syncfusion.Blazor.Inputs
<SfUploader AutoUpload="true">
      <UploaderEvents ValueChange="@OnChange"></UploaderEvents>
</SfUploader>
@code {
    private async Task OnChange(UploadChangeEventArgs args)
    {
        try
        {
            foreach (var file in args.Files)
            {
                var path = @"" + file.FileInfo.Name;
                FileStream filestream = new FileStream(path, FileMode.Create, FileAccess.Write);
                await file.File.OpenReadStream(long.MaxValue).CopyToAsync(filestream);
                filestream.Close();
            }
        }
        catch (Exception ex)
        {
            Console.WriteLine(ex.Message);
        }
    }
}
While clicking on the remove icon in the file list, you will get the OnRemove event with removing file name as argument. So, you can write the remove handler inside OnRemove event to remove the particular file from desired location. Find the remove action code below.
Private void onRemove(RemovingEventArgs args)
{
    foreach(var removeFile in args.FilesData)
    {
        if (File.Exists(Path.Combine(@"rootPath", removeFile.Name)))
        {
            File.Delete(Path.Combine(@"rootPath", removeFile.Name))
        }
    }
}
With server-side API endpoint
The upload process requires save and remove action URL to manage the upload process in the server.
NOTE
- The save action is necessary to handle the upload operation.
* The remove action is optional, one can handle the removed files from server.
The save action handler upload the files that needs to be specified in the SaveUrl property.
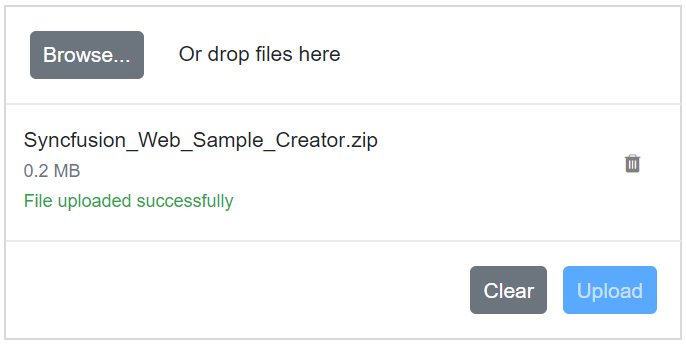
The save handler receives the submitted files and manages the save process in server. After uploading the files to server location, the color of the selected file name changes to green and the remove icon is changed as bin icon.
The remove action is optional. The remove action handler removes the files that needs to be specified in the RemoveUrl property. OnActionComplete event triggers after all the selected files have been processed to upload successfully or failed to server.
[Route("api/[controller]")]
public class SampleDataController : Controller
{
    public string uploads = ".\\Uploaded Files"; // replace with your directory path

    [HttpPost("[action]")]
    public async Task<IActionResult> Save(IFormFile UploadFiles) // Save the uploaded file here
    {
        if (UploadFiles.Length > 0)
        {
            //Create directory if not exists
            if (!Directory.Exists(uploads))
            {
                Directory.CreateDirectory(uploads);
            }

            var filePath = Path.Combine(uploads, UploadFiles.FileName);
            if (System.IO.File.Exists(filePath))
            {
                //Return conflict status code
                return new StatusCodeResult(StatusCodes.Status409Conflict);
            }
            using (var fileStream = new FileStream(filePath, FileMode.Create))
            {
                //Save the uploaded file to server
                await UploadFiles.CopyToAsync(fileStream);
            }
        }
        return Ok();
    }


    [HttpPost("[action]")]
    public void Remove(string UploadFiles) // Delete the uploaded file here
    {
        if(UploadFiles != null)
        {
            var filePath = Path.Combine(uploads, UploadFiles);
            if (System.IO.File.Exists(filePath))
            {
                //Delete the file from server
                System.IO.File.Delete(filePath);
            }
        }
    }
}
The OnFailure event is triggered when there is a failure in the AJAX request during the uploading or removing of files. It provides a way to handle and respond to any errors or issues that occur during the file upload or removal process.
<SfUploader ID="UploadFiles">
    <UploaderAsyncSettings SaveUrl="api/SampleData/Save" RemoveUrl="api/SampleData/Remove"></UploaderAsyncSettings>
    <UploaderEvents OnFailure="@OnFailureHandler" OnActionComplete="@OnActionCompleteHandler"></UploaderEvents>
</SfUploader>
@code {
    private void OnFailureHandler(FailureEventArgs args)
    {
        // Here, you can customize your code.
    }
    private void OnActionCompleteHandler(ActionCompleteEventArgs args)
    {
        // Here, you can customize your code.
    }
}
Server-side configuration for saving and returning responses
The following example demonstrates the server-side action for saving files on the server and returning responses in JSON, String, and File formats.
[Route("api/[controller]")]

private IHostingEnvironment hostingEnv;

public SampleDataController(IHostingEnvironment env)
{
    this.hostingEnv = env;
}

[HttpPost("[action]")]
public IActionResult Save()
{
    // for JSON Data
    try
    {
        // Process uploaded files
        var responseData = new
        {
            Success = true,
            Message = "Files uploaded successfully",
            // Additional data can be added here
        };

        return Ok(responseData);
    }
    catch (Exception e)
    {
        var errorResponse = new
        {
            Success = false,
            Message = "File upload failed: " + e.Message
        };

        return BadRequest(errorResponse);
    }

    // for String Data
    try
    {
        // Process string data
        var data = "success";
        // Return the string data
        return Content(data);
    }
    catch (Exception)
    {
        var data = "failed";
        return Content(data);
    }

    // for File Data
    try
    {
        // Example: Retrieve file path for stream.txt
        var filePath = "stream.txt"; // Example file path

        var fullPath = Path.GetFullPath(filePath);

        // Return the file
        return PhysicalFile(fullPath, "text/plain");
    }
    catch (Exception e)
    {
        return Content("Failed to retrieve file response: " + e.Message, "text/plain");
    }

}
Client-side configuration for saving and returning responses
The following example demonstrates the client-side action for saving files on the server and returning responses in JSON, String, and File formats.
@using Syncfusion.Blazor.Inputs
@using System.Text.Json


<SfUploader>
    <UploaderAsyncSettings SaveUrl="/api/Uploader/Save"></UploaderAsyncSettings>
    <UploaderEvents Success="@OnSuccessHandler"></UploaderEvents>
</SfUploader>

@code {

    private void OnSuccessHandler(SuccessEventArgs args)
    {
        if (args.Response is not null) // Check if the event argument is not null
        {
           var responseText = args.Response.ResponseText;
           if (!string.IsNullOrWhiteSpace(responseText))
           {
                // for JSON and File Datas
                using var jsonDoc = JsonDocument.Parse(responseText);
                var jsonResponse = jsonDoc.RootElement;

                if (jsonResponse.TryGetProperty("success", out var successProp))
                {
                    var isSuccess = successProp.GetBoolean();

                    if (isSuccess)
                    {
                        // File upload success
                        var message = jsonResponse.TryGetProperty("message", out var messageProp) ? messageProp.GetString() : "File uploaded successfully";

                        // Additional processing as needed
                    }
                }


                // for string Data
                var message = responseText;
                // Additional processing as needed
           }
        }
    }

}
Configure allowed file types
You can allow the specific files alone to upload using the AllowedExtensions property. The extension can be represented as collection by comma separators. The uploader component filters the selected or dropped files to match against the specified file types and processes the upload operation. The validation happens when you specify value to inline attribute to accept the original input element.
<SfUploader AllowedExtensions=".doc, docx, .xls, xlsx"></SfUploader>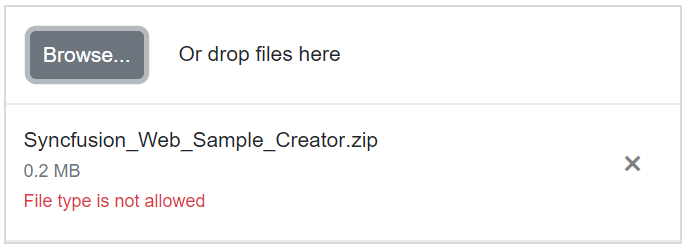
NOTE
See also
- Getting Started with Syncfusion® Blazor for Client-Side in .NET Core CLI
- Getting Started with Syncfusion® Blazor for Server-side in Visual Studio
- Getting Started with Syncfusion® Blazor for Server-Side in .NET Core CLI
- Getting Started with Syncfusion® File Upload in Blazor WebAssembly using Visual Studio