How can I help you?
Getting Started with Blazor RichTextEditor Component
27 Oct 202518 minutes to read
This section explains how to add the Blazor Rich TextEditor component to a Blazor Server app using Visual Studio and Visual Studio Code.
Ready to streamline your Syncfusion® Blazor development?
Discover the full potential of Syncfusion® Blazor components with Syncfusion® AI Coding Assistants. Effortlessly integrate, configure, and enhance your projects with intelligent, context-aware code suggestions, streamlined setups, and real-time insights—all seamlessly integrated into your preferred AI-powered IDEs like VS Code, Cursor, Syncfusion® CodeStudio and more. Explore Syncfusion® AI Coding Assistants
To get started quickly with Blazor Rich Text Editor, see the Getting Started sample on GitHub.
Prerequisites
Create a new Blazor App in Visual Studio
Create a Blazor Server App using Blazor Web App template in Visual Studio via Microsoft Templates or the Syncfusion® Blazor Extension. For detailed instructions, refer to Blazor Server App Getting Started documentation.
Install Syncfusion® Blazor Rich Text Editor and Themes NuGet in the App
To add the Blazor Rich Text Editor component, open the NuGet package manager in Visual Studio (Tools → NuGet Package Manager → Manage NuGet Packages for Solution), then search and install Syncfusion.Blazor.RichTextEditor and Syncfusion.Blazor.Themes. Alternatively, use the following Package Manager commands:
Install-Package Syncfusion.Blazor.RichTextEditor -Version 33.1.44
Install-Package Syncfusion.Blazor.Themes -Version 33.1.44
NOTE
Syncfusion® Blazor components are available in nuget.org. Refer to the NuGet packages topic for the list of available packages and component
Prerequisites
Create a new Blazor App in Visual Studio Code
Create a Blazor Server App using Visual Studio Code via Microsoft Templates or the Syncfusion® Blazor Extension. For detailed instructions, see the Blazor Server App Getting Started documentation.
Alternatively, create a server application using the following command in the terminal(Ctrl+`).
dotnet new blazor -o BlazorApp -int Server
cd BlazorApp
Install Syncfusion® Blazor Rich Text Editor and Themes NuGet in the App
- Press Ctrl+` to open the integrated terminal in Visual Studio Code.
- Ensure the current directory contains your
.csprojfile. - Run the following commands to install Syncfusion.Blazor.RichTextEditor and Syncfusion.Blazor.Themes NuGet package and ensure all dependencies are installed.
dotnet add package Syncfusion.Blazor.RichTextEditor -v 33.1.44
dotnet add package Syncfusion.Blazor.Themes -v 33.1.44
dotnet restore
NOTE
Syncfusion® Blazor components are available in nuget.org. Refer to the NuGet packages topic for the list of available packages and component details.
Prerequisites
Install the latest version of the .NET SDK. If the SDK is already installed, verify the version by running the following command in a command prompt (Windows), terminal (macOS), or shell (Linux).
dotnet --versionCreate a Blazor Server App using .NET CLI
Run the dotnet new blazorserver command to create a new Blazor Server app in a command prompt (Windows) or terminal (macOS) or shell (Linux).
dotnet new blazor -o BlazorApp -int Server
cd BlazorApp
This command creates a new Blazor Server app in a directory named BlazorApp at the current location. See Create a Blazor app and the dotnet new CLI command for more details.
Install Syncfusion® Blazor Rich Text Editor and Themes NuGet in the App
Use the following commands to add the Blazor Rich Text Editor component to the application by installing Syncfusion.Blazor.RichTextEditor and Syncfusion.Blazor.Themes. For details, see Install and manage packages using the dotnet CLI.
dotnet add package Syncfusion.Blazor.RichTextEditor -Version 33.1.44
dotnet add package Syncfusion.Blazor.Themes -Version 33.1.44
dotnet restore
NOTE
Syncfusion® Blazor components are available in nuget.org. Refer to the NuGet packages topic for the list of available packages and component details.
Add Import Namespaces
Open the ~/_Imports.razor file and import the Syncfusion.Blazor and Syncfusion.Blazor.RichTextEditor namespaces.
@using Syncfusion.Blazor
@using Syncfusion.Blazor.RichTextEditor
Register Syncfusion® Blazor Service
Now, register the Syncfusion® Blazor Service in the ~/Program.cs file of your Blazor Server App.
....
....
using Syncfusion.Blazor;

var builder = WebApplication.CreateBuilder(args);

// Add services to the container.
....
....
builder.Services.AddSyncfusionBlazor();

....
Add stylesheet and script resources
The theme stylesheet and script can be accessed from NuGet through Static Web Assets. Include the stylesheet and script in the <head> and the script reference at the end of the <body> in the App.razor file as shown below:
<head>
    ....
    <link href="_content/Syncfusion.Blazor.Themes/bootstrap5.css" rel="stylesheet" />
</head>

<body>
    ....
    <script src="_content/Syncfusion.Blazor.Core/scripts/syncfusion-blazor.min.js" type="text/javascript"></script>

    //Blazor RichTextEditor Component script reference.
    <!-- <script src="_content/Syncfusion.Blazor.RichTextEditor/scripts/sf-richtexteditor.min.js" type="text/javascript"></script> -->
</body>
NOTE
Check out the Blazor Themes topic to discover various methods (Static Web Assets, CDN, and CRG) for referencing themes in your Blazor application. Also, check out the Adding Script Reference topic to learn different approaches for adding script references in your Blazor application.
Add Blazor Rich Text Editor component
Add the Syncfusion® Blazor Rich Text Editor component in the ~/Components/Pages/Home.razor file. If an interactivity location as per page/component, define a render mode at the top of the Home.razor page.
NOTE
If an Interactivity Location is set to
Globaland the Render Mode is set toServer, the render mode is configured in theApp.razorfile by default.
@* desired render mode define here *@
@rendermode InteractiveServer
<SfRichTextEditor>
    <p>Rich Text Editor allows to insert images from online source as well as local computer where you want to insert the image in your content.</p>
    <p><b>Get started Quick Toolbar to click on the image</b></p>
    <p>It is possible to add custom style on the selected image inside the Rich Text Editor through quick toolbar.</p>
</SfRichTextEditor>- Press Ctrl+F5 (Windows) or ⌘+F5 (macOS) to launch the application. This will render the Syncfusion® Blazor Rich Text Editor component in your default web browser.

Configure the Toolbar
Configure the toolbar with the tools using RichTextEditorToolbarSettings.Items property as your application requires.
<SfRichTextEditor>
<RichTextEditorToolbarSettings Items="@Tools" />
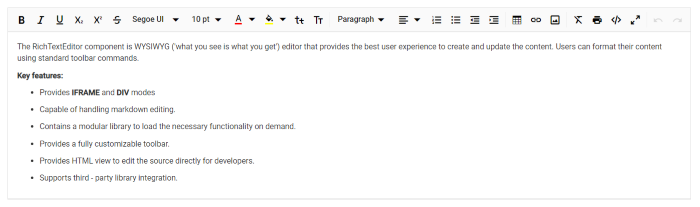
<p>The Rich Text Editor component is WYSIWYG ('what you see is what you get') editor that provides the best user experience to create and update the content. Users can format their content using standard toolbar commands.</p>
<p><b> Key features:</b></p>
<ul>
<li><p> Provides <b>IFRAME</b> and <b>DIV</b> modes </p></li>
<li><p> Capable of handling markdown editing.</p></li>
<li><p> Contains a modular library to load the necessary functionality on demand.</p></li>
<li><p> Provides a fully customizable toolbar.</p></li>
<li><p> Provides HTML view to edit the source directly for developers.</p></li>
<li><p> Supports third - party library integration.</p></li>
<li><p> Allows preview of modified content before saving it.</p></li>
</ul>
</SfRichTextEditor>
@code {
private List<ToolbarItemModel> Tools = new List<ToolbarItemModel>()
{
new ToolbarItemModel() { Command = ToolbarCommand.Bold },
new ToolbarItemModel() { Command = ToolbarCommand.Italic },
new ToolbarItemModel() { Command = ToolbarCommand.Underline },
new ToolbarItemModel() { Command = ToolbarCommand.StrikeThrough },
new ToolbarItemModel() { Command = ToolbarCommand.FontName },
new ToolbarItemModel() { Command = ToolbarCommand.FontSize },
new ToolbarItemModel() { Command = ToolbarCommand.Separator },
new ToolbarItemModel() { Command = ToolbarCommand.FontColor },
new ToolbarItemModel() { Command = ToolbarCommand.BackgroundColor },
new ToolbarItemModel() { Command = ToolbarCommand.Separator },
new ToolbarItemModel() { Command = ToolbarCommand.Formats },
new ToolbarItemModel() { Command = ToolbarCommand.Alignments },
new ToolbarItemModel() { Command = ToolbarCommand.Separator },
new ToolbarItemModel() { Command = ToolbarCommand.LowerCase },
new ToolbarItemModel() { Command = ToolbarCommand.UpperCase },
new ToolbarItemModel() { Command = ToolbarCommand.SuperScript },
new ToolbarItemModel() { Command = ToolbarCommand.SubScript },
new ToolbarItemModel() { Command = ToolbarCommand.Separator },
new ToolbarItemModel() { Command = ToolbarCommand.OrderedList },
new ToolbarItemModel() { Command = ToolbarCommand.UnorderedList },
new ToolbarItemModel() { Command = ToolbarCommand.Outdent },
new ToolbarItemModel() { Command = ToolbarCommand.Indent },
new ToolbarItemModel() { Command = ToolbarCommand.Separator },
new ToolbarItemModel() { Command = ToolbarCommand.CreateLink },
new ToolbarItemModel() { Command = ToolbarCommand.Image },
new ToolbarItemModel() { Command = ToolbarCommand.CreateTable },
new ToolbarItemModel() { Command = ToolbarCommand.Separator },
new ToolbarItemModel() { Command = ToolbarCommand.ClearFormat },
new ToolbarItemModel() { Command = ToolbarCommand.Print },
new ToolbarItemModel() { Command = ToolbarCommand.SourceCode },
new ToolbarItemModel() { Command = ToolbarCommand.FullScreen },
new ToolbarItemModel() { Command = ToolbarCommand.Separator },
new ToolbarItemModel() { Command = ToolbarCommand.Undo },
new ToolbarItemModel() { Command = ToolbarCommand.Redo }
};
}
Insert images and links
The Image inserts an image into Rich Text Editor’s content area, and the Link links an external resources such as website URLs to the selected text in the Rich Text Editor’s content respectively.
Specifies the items to be rendered in quick toolbar based on the target elements such as image, link and table element. The quick toolbar opens to customize the element by clicking the target element.
<SfRichTextEditor>
    <RichTextEditorToolbarSettings Items="@Tools" />
    <RichTextEditorQuickToolbarSettings Image="@Image" Link="@Link" />
    <p>Rich Text Editor allows to insert images from online source as well as local computer where you want to insert the image in your content.</p>
    <p><b>Get started Quick Toolbar to click on the image</b></p>
    <p>It is possible to add custom style on the selected image inside the Rich Text Editor through quick toolbar.</p>
    <img alt='Logo' style='width: 300px; height: 300px; transform: rotate(0deg);' src='https://cdn.syncfusion.com/ej2/richtexteditor-resources/RTE-Portrait.png' />
</SfRichTextEditor>

@code {
    private List<ToolbarItemModel> Tools = new List<ToolbarItemModel>()
    {
        new ToolbarItemModel() { Command = ToolbarCommand.Bold },
        new ToolbarItemModel() { Command = ToolbarCommand.Italic },
        new ToolbarItemModel() { Command = ToolbarCommand.Underline },
        new ToolbarItemModel() { Command = ToolbarCommand.Separator },
        new ToolbarItemModel() { Command = ToolbarCommand.Formats },
        new ToolbarItemModel() { Command = ToolbarCommand.Alignments },
        new ToolbarItemModel() { Command = ToolbarCommand.Separator },
        new ToolbarItemModel() { Command = ToolbarCommand.CreateLink },
        new ToolbarItemModel() { Command = ToolbarCommand.Image },
        new ToolbarItemModel() { Command = ToolbarCommand.Separator },
        new ToolbarItemModel() { Command = ToolbarCommand.SourceCode },
        new ToolbarItemModel() { Command = ToolbarCommand.Separator },
        new ToolbarItemModel() { Command = ToolbarCommand.Undo },
        new ToolbarItemModel() { Command = ToolbarCommand.Redo }
    };
    private List<ImageToolbarItemModel> Image = new List<ImageToolbarItemModel>()
    {
        new ImageToolbarItemModel() { Command = ImageToolbarCommand.Replace },
        new ImageToolbarItemModel() { Command = ImageToolbarCommand.Align },
        new ImageToolbarItemModel() { Command = ImageToolbarCommand.Caption },
        new ImageToolbarItemModel() { Command = ImageToolbarCommand.Remove },
        new ImageToolbarItemModel() { Command = ImageToolbarCommand.OpenImageLink },
        new ImageToolbarItemModel() { Command = ImageToolbarCommand.HorizontalSeparator },
        new ImageToolbarItemModel() { Command = ImageToolbarCommand.EditImageLink },
        new ImageToolbarItemModel() { Command = ImageToolbarCommand.RemoveImageLink },
        new ImageToolbarItemModel() { Command = ImageToolbarCommand.Display },
        new ImageToolbarItemModel() { Command = ImageToolbarCommand.AltText },
        new ImageToolbarItemModel() { Command = ImageToolbarCommand.Dimension }
    };
    private List<LinkToolbarItemModel> Link = new List<LinkToolbarItemModel>()
    {
        new LinkToolbarItemModel() { Command = LinkToolbarCommand.Open },
        new LinkToolbarItemModel() { Command = LinkToolbarCommand.Edit },
        new LinkToolbarItemModel() { Command = LinkToolbarCommand.UnLink }
    };
}
Retrieve the formatted content
To retrieve the editor content in HTML format, use the Value property of the Rich Text Editor. To fetch the editor content as plain text, use the GetText method of the Rich Text Editor.
@using Syncfusion.Blazor.Buttons
@using Syncfusion.Blazor.RichTextEditor
@using Syncfusion.Blazor.Popups

<SfButton @onclick="@GetValue">Get Value</SfButton>
<SfButton @onclick="@GetText">Get Text</SfButton>

<br />
<SfDialog @ref="DialogObj" @bind-Visible="@Visibility" Content="@Content" Header="@Header" Target="#target" Height="200px"
          Width="400px" ShowCloseIcon="true">
    <DialogButtons>
        <DialogButton Content="Ok" IsPrimary="true" OnClick="@DlgButtonClick" />
    </DialogButtons>

</SfDialog>
<SfRichTextEditor @ref="RteObj" Value="@RteValue" />

@code {
    SfRichTextEditor RteObj;
    SfDialog DialogObj;
    private string Content;
    private bool Visibility = false;
    private string Header = "Rich Text Editor's Value";
    private string RteValue = @"<p>Rich Text Editor allows to insert images from online source as well as local computer where you want to insert the image in your content.</p><p><b>Get started Quick Toolbar to click on the image</b></p><p>It is possible to add custom style on the selected image inside the Rich Text Editor through quick toolbar.</p><img alt='Logo' style='width: 300px; height: 300px; transform: rotate(0deg);' src='https://cdn.syncfusion.com/ej2/richtexteditor-resources/RTE-Portrait.png' />";
    private async Task GetValue()
    {
        this.Content = this.RteValue;
        await this.DialogObj.ShowAsync();
    }
    private async Task GetText()
    {
        this.Content = await this.RteObj.GetTextAsync();
        this.DialogObj.ShowAsync();
    }
    private async Task DlgButtonClick(object arg)
    {
        await this.DialogObj.HideAsync();
    }
}
Retrieve the number of characters
To retrieve the number of characters in the Rich Text Editor content, use the GetCharCount method of the Rich Text Editor.
@using Syncfusion.Blazor.Buttons
@using Syncfusion.Blazor.RichTextEditor
@using Syncfusion.Blazor.Popups

<SfButton @onclick="@GetCharCount">Get Char Count</SfButton>

<br />
<SfDialog @ref="DialogObj" @bind-Visible="@Visibility" Content="@Content" Header="@Header" Target="#target" Height="200px"
          Width="400px" ShowCloseIcon="true">
    <DialogButtons>
        <DialogButton Content="Ok" IsPrimary="true" OnClick="@DlgButtonClick" />
    </DialogButtons>

</SfDialog>
<SfRichTextEditor @ref="RteObj" />

@code {
    SfRichTextEditor RteObj;
    SfDialog DialogObj;
    private string Content;
    private bool Visibility = false;
    private string Header = "Rich Text Editor's Value";
    private string RteValue = @"<p>Rich Text Editor allows to insert images from online source as well as local computer where you want to insert the image in your content.</p><p><b>Get started Quick Toolbar to click on the image</b></p><p>It is possible to add custom style on the selected image inside the Rich Text Editor through quick toolbar.</p><img alt='Logo' style='width: 300px; height: 300px; transform: rotate(0deg);' src='https://cdn.syncfusion.com/ej2/richtexteditor-resources/RTE-Portrait.png' />";
    private async Task GetCharCount()
    {
        double charCount = await this.RteObj.GetCharCountAsync();
        this.Content = charCount.ToString(); // Convert double to string
        await this.DialogObj.ShowAsync();
    }
    private async Task DlgButtonClick(object arg)
    {
        await this.DialogObj.HideAsync();
    }
}